E420VO User Manual
Page 12
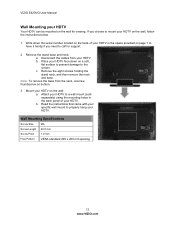
Remove the eight screws holding the stand neck, and then remove the neck and base. Note: To remove the base from your HDTV. b. c. Attach your HDTV to a wall mount (sold separately) using the mounting holes in the space provided on page 1 to have it handy ... unscrew thumbscrew on bottom. 3. b. Wall Mounting Specifications Screw Size M6 Screw Length 20.0 mm Screw Pitch 1.0 mm Hole Pattern VESA standard 200 x 200 mm spacing 12 www.VIZIO.com If you need to the screen. VIZIO E420VO User Manual Wall Mounting your HDTV Your HDTV can be mounted on the wall for support...
Remove the eight screws holding the stand neck, and then remove the neck and base. Note: To remove the base from your HDTV. b. c. Attach your HDTV to a wall mount (sold separately) using the mounting holes in the space provided on page 1 to have it handy ... unscrew thumbscrew on bottom. 3. b. Wall Mounting Specifications Screw Size M6 Screw Length 20.0 mm Screw Pitch 1.0 mm Hole Pattern VESA standard 200 x 200 mm spacing 12 www.VIZIO.com If you need to the screen. VIZIO E420VO User Manual Wall Mounting your HDTV Your HDTV can be mounted on the wall for support...
E420VO QSG
Page 1
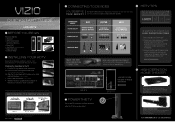
... and tighten thumb screw (see fig. 2 - XMA1200 / XMA500 3 CONNECTING TO DEVICES YOU DESERVE THE BEST! You may be able to get HD signals using these inputs wherever possible. for Wall Mounting - Preparing the TV for E320VL, E370VL, E420VL, E420VO) 2b. The inputs listed in the center of the action. Visit www.VIZIO.com or...
... and tighten thumb screw (see fig. 2 - XMA1200 / XMA500 3 CONNECTING TO DEVICES YOU DESERVE THE BEST! You may be able to get HD signals using these inputs wherever possible. for Wall Mounting - Preparing the TV for E320VL, E370VL, E420VL, E420VO) 2b. The inputs listed in the center of the action. Visit www.VIZIO.com or...


