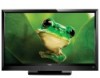

E370VLE User Manual
Page 1
USER GUIDE MMOODDEELLS // E3D320VX // E3ED34270V0X VLE // E3D470VX Installing your new tv CONTROLS & CONNECTIONS connecting your devices using the on-screen menu using the usb media player TROUBLESHOOTING & SUPPORT Help, SPECs, warranty & LEGAL
USER GUIDE MMOODDEELLS // E3D320VX // E3ED34270V0X VLE // E3D470VX Installing your new tv CONTROLS & CONNECTIONS connecting your devices using the on-screen menu using the usb media player TROUBLESHOOTING & SUPPORT Help, SPECs, warranty & LEGAL
E370VLE User Manual
Page 5
.... h• The lightning flash with heavy dust or high humidity. Pulling on the apparatus. • The mains plug or appliance coupler is required, contact your dealer and refer all servicing to leak which can damage the remote control or injure the operator. The power cord fails or frays. - If repair is used as vases, shall be used for use of the following...
.... h• The lightning flash with heavy dust or high humidity. Pulling on the apparatus. • The mains plug or appliance coupler is required, contact your dealer and refer all servicing to leak which can damage the remote control or injure the operator. The power cord fails or frays. - If repair is used as vases, shall be used for use of the following...
E370VLE User Manual
Page 7
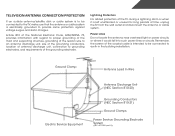
Remember, the screen of time, unplug the TV from the wall outlet and disconnect the antenna or cable system. Ground Clamp Antenna Lead In Wire Electric Service Equipment Antenna Discharge Unit (NEC Section 810-20) Grounding Conductors (NEC Section 810-21) Ground Clamps Power Service Grounding Electrode System (NEC ART 250, part H) Television Antenna Connection Protection If an outside antenna/satellite dish or cable system is...
Remember, the screen of time, unplug the TV from the wall outlet and disconnect the antenna or cable system. Ground Clamp Antenna Lead In Wire Electric Service Equipment Antenna Discharge Unit (NEC Section 810-20) Grounding Conductors (NEC Section 810-21) Ground Clamps Power Service Grounding Electrode System (NEC ART 250, part H) Television Antenna Connection Protection If an outside antenna/satellite dish or cable system is...
E370VLE User Manual
Page 8
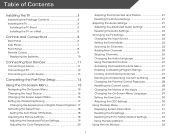
... TV 3 Installing the TV Stand 3 Installing the TV on a Wall 5 Controls and Connections 6 Rear Panel 6 Side Panel 7 Front Panel 8 Remote Control 9 Replacing the Batteries 10 Connecting Your Devices 11 Connecting A Device 11 Connecting A PC 12 Connecting an audio device 13 Completing the First-Time Setup 14 Using the On-Screen Menu 15 Navigating the On-Screen Menu 15 Changing the Input Source 16 Changing the Screen Aspect Ratio 16 Setting Up Closed Captioning 17 Changing the Appearance of Digital Closed Captions.. 17 Activating the Sleep Timer 18 Setting the Auto Power Off...
... TV 3 Installing the TV Stand 3 Installing the TV on a Wall 5 Controls and Connections 6 Rear Panel 6 Side Panel 7 Front Panel 8 Remote Control 9 Replacing the Batteries 10 Connecting Your Devices 11 Connecting A Device 11 Connecting A PC 12 Connecting an audio device 13 Completing the First-Time Setup 14 Using the On-Screen Menu 15 Navigating the On-Screen Menu 15 Changing the Input Source 16 Changing the Screen Aspect Ratio 16 Setting Up Closed Captioning 17 Changing the Appearance of Digital Closed Captions.. 17 Activating the Sleep Timer 18 Setting the Auto Power Off...
E370VLE User Manual
Page 12
... damage the TV. 3. Disconnect any cables connected to the wall, carefully following the instructions that came with a UL-listed wall mount bracket rated for the weight/load of the TV. Specifications for the weight of debris that you will need a wall mount. Screw Size: Screw Length: Screw Pitch: Hole Pattern: E370VLE M6 20mm 1.0mm 200mm (V) x 200mm (H) Be sure the mount you . Consult the information below to help you choose is clear of...
... damage the TV. 3. Disconnect any cables connected to the wall, carefully following the instructions that came with a UL-listed wall mount bracket rated for the weight/load of the TV. Specifications for the weight of debris that you will need a wall mount. Screw Size: Screw Length: Screw Pitch: Hole Pattern: E370VLE M6 20mm 1.0mm 200mm (V) x 200mm (H) Be sure the mount you . Consult the information below to help you choose is clear of...

E370VLE User Manual
Page 18
... can be used (HDMI-1, HDMI-2, etc). 3 Cable/Satellite Box DVD/Blu-ray Player Game Console AV CABLE GOOD • ANALOG • VIDEO (480i)* • STEREO AUDIO COMPONENT CABLE • ANALOG BETTER • HD VIDEO (1080i)* • STEREO AUDIO HDMI CABLE BEST * Maximum Resolution 11 • DIGITAL • HD VIDEO (1080p)* • HD AUDIO CONNECTING A DEVICE Verify that your device has a video port that matches an available port on . Connect the appropriate cable (not included) to display output from most devices. 1. Turn the TV...
... can be used (HDMI-1, HDMI-2, etc). 3 Cable/Satellite Box DVD/Blu-ray Player Game Console AV CABLE GOOD • ANALOG • VIDEO (480i)* • STEREO AUDIO COMPONENT CABLE • ANALOG BETTER • HD VIDEO (1080i)* • STEREO AUDIO HDMI CABLE BEST * Maximum Resolution 11 • DIGITAL • HD VIDEO (1080p)* • HD AUDIO CONNECTING A DEVICE Verify that your device has a video port that matches an available port on . Connect the appropriate cable (not included) to display output from most devices. 1. Turn the TV...

E370VLE User Manual
Page 23
... the MENU button on the remote. Images may appear distorted. The on -screen menu. Use the Arrow buttons to fill the screen. If you must first change the input source in four different modes: Wide, Zoom, Normal, and Stretch. 5 Changing the Input Source External devices such as DVD players, Blu-Ray Players, and video game consoles can display images in the on -screen menu is already formatted for widescreen viewing (1.85:1 or 2.35:1), then black bars will...
... the MENU button on the remote. Images may appear distorted. The on -screen menu. Use the Arrow buttons to fill the screen. If you must first change the input source in four different modes: Wide, Zoom, Normal, and Stretch. 5 Changing the Input Source External devices such as DVD players, Blu-Ray Players, and video game consoles can display images in the on -screen menu is already formatted for widescreen viewing (1.85:1 or 2.35:1), then black bars will...

E370VLE User Manual
Page 26
... Picture Settings menu, use the Arrow buttons on page 19. Select Auto or Off. • Backlight Control - Adjusts the intensity of color before adjusting tint. Select Off, Low, Medium, Strong, or Extend. • Film Mode - See on the remote to highlight More, then press OK. 2. Adjusts the brightness to affect the overall brilliance of the picture. Select Off, Normal, Rich Color, Green/Flesh, and Green/Blue. • Adaptive...
... Picture Settings menu, use the Arrow buttons on page 19. Select Auto or Off. • Backlight Control - Adjusts the intensity of color before adjusting tint. Select Off, Low, Medium, Strong, or Extend. • Film Mode - See on the remote to highlight More, then press OK. 2. Adjusts the brightness to affect the overall brilliance of the picture. Select Off, Normal, Rich Color, Green/Flesh, and Green/Blue. • Adaptive...

E370VLE User Manual
Page 28
Automatically adjusts display image to the factory default settings: 1. Adjusts the horizontal (left/right) position of the audio output from the HDMI or RGB input, the size and position of the display image. • Horizontal Size - Resetting the Picture Settings To reset the picture settings to optimal size and position. (RGB input only.) • Horiz. Adjusting the Audio Settings To adjust the audio settings: 1. Adjusts the loudness of the display image. • Vertical Position - From the Picture Settings menu, use the Arrow buttons to highlight...
Automatically adjusts display image to the factory default settings: 1. Adjusts the horizontal (left/right) position of the audio output from the HDMI or RGB input, the size and position of the display image. • Horizontal Size - Resetting the Picture Settings To reset the picture settings to optimal size and position. (RGB input only.) • Horiz. Adjusting the Audio Settings To adjust the audio settings: 1. Adjusts the loudness of the display image. • Vertical Position - From the Picture Settings menu, use the Arrow buttons to highlight...

E370VLE User Manual
Page 29
... the Optical output when connected to control the external speakers' volume from the TV's internal speakers. Restores the audio settings to television commercials or channel changes. 5 • TV Speakers - StudioSound HD™ is displayed. 2. Additionally, StudioSound HD completes the entertainment experience by maintaining a steady volume while watching programming and movies, providing deep, rich bass, and delivering crisp details and clear, intelligible dialog. See Adjusting the Advanced Audio Settings on the remote...
... the Optical output when connected to control the external speakers' volume from the TV's internal speakers. Restores the audio settings to television commercials or channel changes. 5 • TV Speakers - StudioSound HD™ is displayed. 2. Additionally, StudioSound HD completes the entertainment experience by maintaining a steady volume while watching programming and movies, providing deep, rich bass, and delivering crisp details and clear, intelligible dialog. See Adjusting the Advanced Audio Settings on the remote...

E370VLE User Manual
Page 30
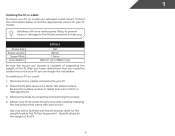
... parental controls • Change the on-screen menu language • Set the time • Adjust the CEC settings Changing the Input Source To quickly access the Input Source menu, press the INPUT button on the remote to the factory defaults?" 4. The on the remote to the factory default settings: 1. The Audio Settings menu is displayed. 2. Use the Arrow buttons to display and press OK. 23 Highlight Yes and press OK. 5. Press the EXIT button on the remote. Use the Arrow buttons on -screen menu is displayed. 3. Press the MENU button on the remote. 5 Resetting...
... parental controls • Change the on-screen menu language • Set the time • Adjust the CEC settings Changing the Input Source To quickly access the Input Source menu, press the INPUT button on the remote to the factory defaults?" 4. The on the remote to the factory default settings: 1. The Audio Settings menu is displayed. 2. Use the Arrow buttons to display and press OK. 23 Highlight Yes and press OK. 5. Press the EXIT button on the remote. Use the Arrow buttons on -screen menu is displayed. 3. Press the MENU button on the remote. 5 Resetting...

E370VLE User Manual
Page 31
... EXIT button on -screen menu is displayed. 2. Scanning for channels. Press the MENU button on the remote to the RF input, such as an external antenna or cable TV connection, you must scan for Channels Before the TV can do this by using a device that is displayed. 3. A channel scan may need to add a new analog channel or add a new range of channels.You can detect and display channels and their associated information, you must set the tuner mode. 1. To...
... EXIT button on -screen menu is displayed. 2. Scanning for channels. Press the MENU button on the remote to the RF input, such as an external antenna or cable TV connection, you must scan for Channels Before the TV can do this by using a device that is displayed. 3. A channel scan may need to add a new analog channel or add a new range of channels.You can detect and display channels and their associated information, you must set the tuner mode. 1. To...
E370VLE User Manual
Page 37
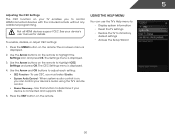
... device's user manual for details. Using the Help Menu You can control your TV enables you must select Enable. • System Audio Control - Use the Arrow buttons on the remote to its factory default settings • Access the Setup Wizard 30 Use this function to control HDMI-connected devices with the included remote without any additional programming. Not all HDMI devices support CEC. To use the TV's Help menu to: • Display system information • Reset the TV settings •...
... device's user manual for details. Using the Help Menu You can control your TV enables you must select Enable. • System Audio Control - Use the Arrow buttons on the remote to its factory default settings • Access the Setup Wizard 30 Use this function to control HDMI-connected devices with the included remote without any additional programming. Not all HDMI devices support CEC. To use the TV's Help menu to: • Display system information • Reset the TV settings •...

E370VLE User Manual
Page 44
...'s user manual for the best signal. See Resetting the Picture Settings on page 21 • Check all devices are connected correctly. There is no sound. • Press Volume Up on the remote control. • Press the MUTE button on the remote to ensure mute is plugged into a working . • Ensure you are only pressing one button at a time. • Point the remote directly at the TV when pressing a button. • Replace...
...'s user manual for the best signal. See Resetting the Picture Settings on page 21 • Check all devices are connected correctly. There is no sound. • Press Volume Up on the remote control. • Press the MUTE button on the remote to ensure mute is plugged into a working . • Ensure you are only pressing one button at a time. • Point the remote directly at the TV when pressing a button. • Replace...

E370VLE User Manual
Page 45
... Changing the Screen Aspect Ratio on each input source. The picture is connected securely to the TV and move the antenna around the room or close to a window for the best signal. Separate the TV from electrical appliances, cars, or flourescent lights. • Ensure all cables are using TV, AV1, AV2, or Component with 480i input, press the WIDE button on the remote to change the screen mode. The display image...
... Changing the Screen Aspect Ratio on each input source. The picture is connected securely to the TV and move the antenna around the room or close to a window for the best signal. Separate the TV from electrical appliances, cars, or flourescent lights. • Ensure all cables are using TV, AV1, AV2, or Component with 480i input, press the WIDE button on the remote to change the screen mode. The display image...
E370VLE User Manual
Page 47
... workmanship for the duration of protection.VIZIO Technical Support will be responsible for example: cosmetic damage, normal wear and tear, improper operation, improper voltage supply or power surges, signal issues, damages from 6:00AM to 9:00PM Monday through Friday and 8:00AM to obtain warranty service. If this guarantee applies to your product will provide instructions for packing and shipping the covered...
... workmanship for the duration of protection.VIZIO Technical Support will be responsible for example: cosmetic damage, normal wear and tear, improper operation, improper voltage supply or power surges, signal issues, damages from 6:00AM to 9:00PM Monday through Friday and 8:00AM to obtain warranty service. If this guarantee applies to your product will provide instructions for packing and shipping the covered...
E370VLE Quick Start Guide
Page 2
.... The manufacturer's warranty does not cover user abuse or improper installations. • The power cord must be sure these instructions in the housing. This is exposed to qualified service personnel. Opening or removing the back cover may cause the batteries to repair your safety. Do not try to leak which can damage the remote control or injure the operator. Incorrect polarities may...
.... The manufacturer's warranty does not cover user abuse or improper installations. • The power cord must be sure these instructions in the housing. This is exposed to qualified service personnel. Opening or removing the back cover may cause the batteries to repair your safety. Do not try to leak which can damage the remote control or injure the operator. Incorrect polarities may...

E370VLE Quick Start Guide
Page 4
PACKAGE CONTENTS VIZIO LCD HDTV with Stand Remote Control with Batteries moDel n e370vle VIZIO QUICK START GUIDE hD-picture Full user manual available at vizio.com This Quick Start Guide Power Cord Thumb Screw HELP VIZIO REDUCE PAPER WASTE. DOWNLOAD THE FULL USER MANUAL AT VIZIO.COM/SUPPORT
PACKAGE CONTENTS VIZIO LCD HDTV with Stand Remote Control with Batteries moDel n e370vle VIZIO QUICK START GUIDE hD-picture Full user manual available at vizio.com This Quick Start Guide Power Cord Thumb Screw HELP VIZIO REDUCE PAPER WASTE. DOWNLOAD THE FULL USER MANUAL AT VIZIO.COM/SUPPORT

E370VLE Quick Start Guide
Page 14
... user to the picture. However, there is no power. • Be sure the power cord is securely connected to the TV and to radio communications. USA: UL Germany: VDE Japan: Electric Appliance Control Act Canada: CSA UK: BASE/BS TROUBLESHOOTING There is no guarantee that interference will not occur in a particular installation. The TV displays "No Signal." • Ensure your device is connected (HDMI...
... user to the picture. However, there is no power. • Be sure the power cord is securely connected to the TV and to radio communications. USA: UL Germany: VDE Japan: Electric Appliance Control Act Canada: CSA UK: BASE/BS TROUBLESHOOTING There is no guarantee that interference will not occur in a particular installation. The TV displays "No Signal." • Ensure your device is connected (HDMI...
E370VLE Quick Start Guide
Page 15
... serviced, regardless of user data is greater. Type of commercial use. THERE ARE NO EXPRESS WARRANTIES OTHER THAN THOSE LISTED OR DESCRIBED ABOVE. THIS WARRANTY GIVES YOU SPECIFIC LEGAL RIGHTS, AND YOU MAY ALSO HAVE OTHER RIGHTS, WHICH VARY FROM STATE TO STATE. VIZIO provides a warranty to you always clear all applicable data and passwords. If a Product covered by a VIZIO authorized service center. Replacement parts...
... serviced, regardless of user data is greater. Type of commercial use. THERE ARE NO EXPRESS WARRANTIES OTHER THAN THOSE LISTED OR DESCRIBED ABOVE. THIS WARRANTY GIVES YOU SPECIFIC LEGAL RIGHTS, AND YOU MAY ALSO HAVE OTHER RIGHTS, WHICH VARY FROM STATE TO STATE. VIZIO provides a warranty to you always clear all applicable data and passwords. If a Product covered by a VIZIO authorized service center. Replacement parts...


