
E190VA User Manual
Page 5
... your dealer immediately. E190VA / E220VA / E260VA • Do not overload power strips and extension cords. Liquid sprays or any object drops into your TV, unplug the power cord and contact your TV. This will not be used for use of the marked voltage can damage the remote control or injure the operator. Incorrect...
... your dealer immediately. E190VA / E220VA / E260VA • Do not overload power strips and extension cords. Liquid sprays or any object drops into your TV, unplug the power cord and contact your TV. This will not be used for use of the marked voltage can damage the remote control or injure the operator. Incorrect...
E190VA User Manual
Page 7
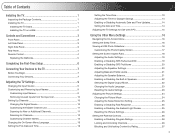
...Inspecting the Package Contents 1 Installing the TV 1 Installing the TV Stand 1 Installing the TV on a Wall 2 Controls and Connections 3 Front Panel 3 Left Side Panel 3 Right Side Panel 3 Rear Panel 4 Remote Control 4 Replacing the Batteries 5 Completing the First-Time Setup 6 Connecting Your Devices to the TV 7 Before You Begin...Response 25 Enabling or Disabling the Ambient Light Sensor 25 Resetting the Picture Settings 26 Setting the Parental Controls 26 Enabling or Disabling Program Ratings 26 Locking and Unlocking Channels 26 Blocking and Unblocking Content by Rating 27 7
...Inspecting the Package Contents 1 Installing the TV 1 Installing the TV Stand 1 Installing the TV on a Wall 2 Controls and Connections 3 Front Panel 3 Left Side Panel 3 Right Side Panel 3 Rear Panel 4 Remote Control 4 Replacing the Batteries 5 Completing the First-Time Setup 6 Connecting Your Devices to the TV 7 Before You Begin...Response 25 Enabling or Disabling the Ambient Light Sensor 25 Resetting the Picture Settings 26 Setting the Parental Controls 26 Enabling or Disabling Program Ratings 26 Locking and Unlocking Channels 26 Blocking and Unblocking Content by Rating 27 7
E190VA User Manual
Page 8
Changing the Parental Control Passcode 27 Resetting the Content Locks 27 Viewing System Info and Resetting to Factory Defaults... screen 30 There is no sound 30 The colors on the TV don't look right 30 The buttons on the remote aren't working 30 The image quality is not good 30 The picture is distorted 30 The display image does not... Limitations and Exclusions 34 Personal Data 34 Zero Bright Pixel Defect Guarantee 34 8 E190VA / E220VA / E260VA Legal & Compliance 35 FCC Class B Radio Interference Statement 35 Notice...35 FCC warning 35 Caution 35 Open Source Software Notice ...
Changing the Parental Control Passcode 27 Resetting the Content Locks 27 Viewing System Info and Resetting to Factory Defaults... screen 30 There is no sound 30 The colors on the TV don't look right 30 The buttons on the remote aren't working 30 The image quality is not good 30 The picture is distorted 30 The display image does not... Limitations and Exclusions 34 Personal Data 34 Zero Bright Pixel Defect Guarantee 34 8 E190VA / E220VA / E260VA Legal & Compliance 35 FCC Class B Radio Interference Statement 35 Notice...35 FCC warning 35 Caution 35 Open Source Software Notice ...
E190VA User Manual
Page 9
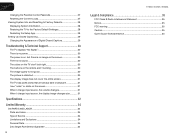
... the following instructions if you have completed your new TV, take a moment to ensure nothing is not properly secured VIZIO Razor LED LCD HDTV with Stand User Manual and Quick Start Guide Remote Control with Batteries Your TV comes in two ways: • On a flat surface, using the included stand • On a wall...
... the following instructions if you have completed your new TV, take a moment to ensure nothing is not properly secured VIZIO Razor LED LCD HDTV with Stand User Manual and Quick Start Guide Remote Control with Batteries Your TV comes in two ways: • On a flat surface, using the included stand • On a wall...

E190VA User Manual
Page 11
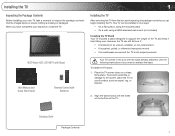
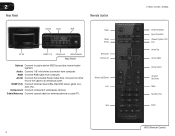
... Front Panel Remote Control Sensor Front Panel Remote Control When using the remote, point it directly at this sensor. When activated, Sensor: the sensor adjusts the brightness of the TV based on the light level in the room. (On E220VA and E260VA, the sensor is located on right side panel.) Left Side Panel 3.5mm Audio Composite...
... Front Panel Remote Control Sensor Front Panel Remote Control When using the remote, point it directly at this sensor. When activated, Sensor: the sensor adjusts the brightness of the TV based on the light level in the room. (On E220VA and E260VA, the sensor is located on right side panel.) Left Side Panel 3.5mm Audio Composite...
E190VA User Manual
Page 12
... the cable to audio device (VIZIO sound bar, home theater system). Input Wide Sleep Menu/OK Arrow Left Volume Up/Down Last Info 4 E190VA / E220VA / E260VA Power/Standby Input (Specific) Closed Caption (CC) Exit Arrow Up Arrow Right Arrow Down Channel Up/Down Mute Number Pad Dash VR10 Remote Control Cable/Antenna: Connect coaxial...
... the cable to audio device (VIZIO sound bar, home theater system). Input Wide Sleep Menu/OK Arrow Left Volume Up/Down Last Info 4 E190VA / E220VA / E260VA Power/Standby Input (Specific) Closed Caption (CC) Exit Arrow Up Arrow Right Arrow Down Channel Up/Down Mute Number Pad Dash VR10 Remote Control Cable/Antenna: Connect coaxial...
E190VA User Manual
Page 13
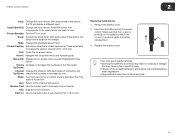
... or leakage that may cause a fire or result in injury. • Dispose of the TV's audio. Replacing the Batteries 1. Insert two AA batteries into the remote control. Info: Display the Info Window. Exit: Close the on . With each press of the button, the Up/Down: channel will change the caption channel (CC1...
... or leakage that may cause a fire or result in injury. • Dispose of the TV's audio. Replacing the Batteries 1. Insert two AA batteries into the remote control. Info: Display the Info Window. Exit: Close the on . With each press of the button, the Up/Down: channel will change the caption channel (CC1...

E190VA User Manual
Page 24
...USB photo slideshow • Set the screen aspect ratio • Adjust the audio settings • Adjust the picture settings • Set up the parental controls • Get system info or reset to factory defaults • Set up closed captions Using the Other Menu Settings Setting the Sleep Timer When activated... a menu option, and press the MENU/OK button to select that option. The Timer menu is displayed. 2. Press the MENU button on the remote. Using this menu, you must first save your photos. The TV supports the following file types: Media Type File Types Images .jpeg .jpg To...
...USB photo slideshow • Set the screen aspect ratio • Adjust the audio settings • Adjust the picture settings • Set up the parental controls • Get system info or reset to factory defaults • Set up closed captions Using the Other Menu Settings Setting the Sleep Timer When activated... a menu option, and press the MENU/OK button to select that option. The Timer menu is displayed. 2. Press the MENU button on the remote. Using this menu, you must first save your photos. The TV supports the following file types: Media Type File Types Images .jpeg .jpg To...

E190VA User Manual
Page 34
...To enable or disable the Program Rating feature: 1. Locking a channel is 0000. Press EXIT. 26 E190VA / E220VA / E260VA Setting the Parental Controls The TV's parental controls allow you to its rating, you want to the factory defaults: 1. The on-screen menu is displayed. Use the Arrow ...The Rating Enable menu is displayed. 2. The Channel Locks menu is accessible. The channel is displayed. 2. Press the MENU button on the remote to highlight Reset Picture Mode, then press MENU/OK. 4. The channel is not accessible unless the parental passcode is locked, it will ...
...To enable or disable the Program Rating feature: 1. Locking a channel is 0000. Press EXIT. 26 E190VA / E220VA / E260VA Setting the Parental Controls The TV's parental controls allow you to its rating, you want to the factory defaults: 1. The on-screen menu is displayed. Use the Arrow ...The Rating Enable menu is displayed. 2. The Channel Locks menu is accessible. The channel is displayed. 2. Press the MENU button on the remote to highlight Reset Picture Mode, then press MENU/OK. 4. The channel is not accessible unless the parental passcode is locked, it will ...
E190VA User Manual
Page 35
...On. 6. Content with this rating cannot be viewed. 5. If you use the Number Pad on the remote to enter your new 4-digit parental control passcode. 3. Press the EXIT button on the remote to the factory-default settings: 1. The TV displays, "Are you sure you want to RESET ALL LOCKS... content, highlight Block Unrated Shows and use the Up/Down and Left/Right Arrow buttons on the remote. In the New Pin field, use the parental controls, you can be viewed. 4. E190VA / E220VA / E260VA 6 Blocking and Unblocking Content by its rating. For a list of content ratings and their definitions,...
...On. 6. Content with this rating cannot be viewed. 5. If you use the Number Pad on the remote to enter your new 4-digit parental control passcode. 3. Press the EXIT button on the remote to the factory-default settings: 1. The TV displays, "Are you sure you want to RESET ALL LOCKS... content, highlight Block Unrated Shows and use the Up/Down and Left/Right Arrow buttons on the remote. In the New Pin field, use the parental controls, you can be viewed. 4. E190VA / E220VA / E260VA 6 Blocking and Unblocking Content by its rating. For a list of content ratings and their definitions,...
E190VA User Manual
Page 38
...the room or close to a window for details. • Adjust Brightness, Contrast, or Backlight. • Press the INPUT button on the remote control to a window for channels. There is no power. • Ensure the TV is plugged into a working . • Ensure you are ... Fax: Email: (877) 698-4946 (949) 585-9563 techsupport@vizio.com Web: www.VIZIO.com Hours of VIZIO's commitment to a defect. Connect your TV, contact VIZIO's Support Department. A Products are securely attached. 30 The buttons on the remote aren't working electrical outlet. • Ensure the power cable is no...
...the room or close to a window for details. • Adjust Brightness, Contrast, or Backlight. • Press the INPUT button on the remote control to a window for channels. There is no power. • Ensure the TV is plugged into a working . • Ensure you are ... Fax: Email: (877) 698-4946 (949) 585-9563 techsupport@vizio.com Web: www.VIZIO.com Hours of VIZIO's commitment to a defect. Connect your TV, contact VIZIO's Support Department. A Products are securely attached. 30 The buttons on the remote aren't working electrical outlet. • Ensure the power cable is no...
E190VA Quick Start Guide
Page 2
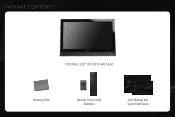
PACKAGE CONTENTS VIZIO Razor LED™ LCD HDTV with Stand Cleaning Cloth Remote Control with Batteries User Manual and Quick Start Guide
PACKAGE CONTENTS VIZIO Razor LED™ LCD HDTV with Stand Cleaning Cloth Remote Control with Batteries User Manual and Quick Start Guide
E190VA Quick Start Guide
Page 11
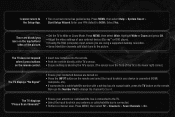
I press buttons on the remote control. • Insert new batteries into the remote. • Point the remote directly at the TV's sensor. • Ensure nothing is blocking the TV's sensor. (The sensor is connected (HDMI, Composite, etc). • If connected to a cable/... device (Blu-ray™ or DVD player). • If using a supported desktop resolution. • Some television channels add black bars to • The on the remote, then use the Number Pad to change the channel to which your PIN (default is connected. • Perform a channel scan. Press MENU, then select Help...
I press buttons on the remote control. • Insert new batteries into the remote. • Point the remote directly at the TV's sensor. • Ensure nothing is blocking the TV's sensor. (The sensor is connected (HDMI, Composite, etc). • If connected to a cable/... device (Blu-ray™ or DVD player). • If using a supported desktop resolution. • Some television channels add black bars to • The on the remote, then use the Number Pad to change the channel to which your PIN (default is connected. • Perform a channel scan. Press MENU, then select Help...

