
E190VA User Manual
Page 8
... or static on the screen 31 When I change input source, the volume changes 31 When I change input source, the display image changes size 31 Specifications 32 Limited Warranty 34 ON PARTS AND LABOR 34 Parts and Labor 34 Type of Service 34 Limitations and Exclusions 34 Personal Data 34 Zero... Bright Pixel Defect Guarantee 34 8 E190VA / E220VA / E260VA Legal & Compliance 35 FCC Class B Radio Interference Statement 35 Notice...35 FCC warning 35 Caution 35 Open Source Software Notice ...
... or static on the screen 31 When I change input source, the volume changes 31 When I change input source, the display image changes size 31 Specifications 32 Limited Warranty 34 ON PARTS AND LABOR 34 Parts and Labor 34 Type of Service 34 Limitations and Exclusions 34 Personal Data 34 Zero... Bright Pixel Defect Guarantee 34 8 E190VA / E220VA / E260VA Legal & Compliance 35 FCC Class B Radio Interference Statement 35 Notice...35 FCC warning 35 Caution 35 Open Source Software Notice ...
E190VA User Manual
Page 10
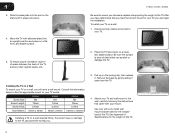
...carefully following the instructions that came with a UL-listed wall mount bracket rated for your TV model: Screw Size: Screw Length: Screw Pitch: Hole Pattern: E190VA M4 10mm 0.7mm 75mm x 75mm E220VA M4 10mm 0.7mm 75mm x 75mm E260VA M4 10mm 0.7mm 100mm x 100mm Installing a TV on a wall: ...4. Remove the base by gently sliding it . Installing the TV on a Wall To mount your TV on a wall requires lifting. See Appendix A Specifications for your mount. 1 3. Disconnect any other objects (walls, etc). 2. Be sure the surface is capable of supporting the weight of debris that...
...carefully following the instructions that came with a UL-listed wall mount bracket rated for your TV model: Screw Size: Screw Length: Screw Pitch: Hole Pattern: E190VA M4 10mm 0.7mm 75mm x 75mm E220VA M4 10mm 0.7mm 75mm x 75mm E260VA M4 10mm 0.7mm 100mm x 100mm Installing a TV on a wall: ...4. Remove the base by gently sliding it . Installing the TV on a Wall To mount your TV on a wall requires lifting. See Appendix A Specifications for your mount. 1 3. Disconnect any other objects (walls, etc). 2. Be sure the surface is capable of supporting the weight of debris that...
E190VA User Manual
Page 12
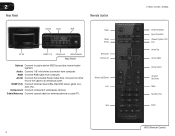
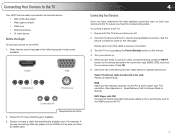
...: Connect to an electrical outlet. AC IN: Connect the included Power Cable here. Connect the other end of the cable to audio device (VIZIO sound bar, home theater system). Cable/Antenna: Connect coaxial cable for external antenna or cable TV. RGB: Connect RGB cable from computer. HDMI... device (Blu-Ray/DVD player, game console, etc). Input Wide Sleep Menu/OK Arrow Left Volume Up/Down Last Info 4 E190VA / E220VA / E260VA Power/Standby Input (Specific) Closed Caption (CC) Exit Arrow Up Arrow Right Arrow Down Channel Up/Down Mute Number Pad Dash VR10 Remote Control Component: ...
...: Connect to an electrical outlet. AC IN: Connect the included Power Cable here. Connect the other end of the cable to audio device (VIZIO sound bar, home theater system). Cable/Antenna: Connect coaxial cable for external antenna or cable TV. RGB: Connect RGB cable from computer. HDMI... device (Blu-Ray/DVD player, game console, etc). Input Wide Sleep Menu/OK Arrow Left Volume Up/Down Last Info 4 E190VA / E220VA / E260VA Power/Standby Input (Specific) Closed Caption (CC) Exit Arrow Up Arrow Right Arrow Down Channel Up/Down Mute Number Pad Dash VR10 Remote Control Component: ...
E190VA User Manual
Page 13
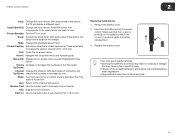
...highlighted menu option. Dash (-): Use to manually enter a channel. Replacing the Batteries 1. Insert two AA batteries into the remote control. Input (Specific): Change the input device. Volume Increase or decrease the loudness of the button, the Up/Down: channel will increase or decrease by one.... Wide: Change the displayed aspect ratio. Last: Return to view. E190VA / E220VA / E260VA 2 Input: Change the input device. With each press of the button, the TV will change the caption channel (CC1...
...highlighted menu option. Dash (-): Use to manually enter a channel. Replacing the Batteries 1. Insert two AA batteries into the remote control. Input (Specific): Change the input device. Volume Increase or decrease the loudness of the button, the Up/Down: channel will increase or decrease by one.... Wide: Change the displayed aspect ratio. Last: Return to view. E190VA / E220VA / E260VA 2 Input: Change the input device. With each press of the button, the TV will change the caption channel (CC1...
E190VA User Manual
Page 15
... the Power/Standby button on the next page. Verify that matches the available port. Use the best available connection. Turn your TV's resolution. (See Appendix A - Specifications.) Set the Screen Mode to the TV: 1. Ensure you have the corresponding cable. See the Device Connection Chart on the remote. 4. Press OK. 6. DVD Player...
... the Power/Standby button on the next page. Verify that matches the available port. Use the best available connection. Turn your TV's resolution. (See Appendix A - Specifications.) Set the Screen Mode to the TV: 1. Ensure you have the corresponding cable. See the Device Connection Chart on the remote. 4. Press OK. 6. DVD Player...
E190VA User Manual
Page 40
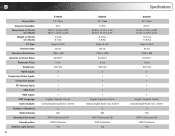
... Inputs: RF Antenna Input: USB Ports: RGB Inputs: OSD Language: Audio Outputs: Number of Speakers Watts/Channel Simulated Surround: Sound Leveler: Ambient Light Sensor: 32 E190VA 19" Class 18.5" 18.01 x 12.54 x 4.28" 18.01 x 12.54 x 2.29" 7.5 lbs 6.7 lbs Edge Lit LED 60 Hz 1366 x 768 20,000:1 5 ms... LED 60 Hz 1920 x 1080 20,000:1 5 ms 250 nits 2 1 1 1 1 1 English, Spanish, French Optical Digital Audio Out, 3.5mm 2 3W SRS TruSurround HD SRS TruVolume Yes Specifications E260VA 26" Class 26.01" 25.35 x 17.00 x 5.86" 25.35 x 17.00 x 2.30" 13.1 lbs 11.8 lbs Edge Lit LED 60 Hz 1366...
... Inputs: RF Antenna Input: USB Ports: RGB Inputs: OSD Language: Audio Outputs: Number of Speakers Watts/Channel Simulated Surround: Sound Leveler: Ambient Light Sensor: 32 E190VA 19" Class 18.5" 18.01 x 12.54 x 4.28" 18.01 x 12.54 x 2.29" 7.5 lbs 6.7 lbs Edge Lit LED 60 Hz 1366 x 768 20,000:1 5 ms... LED 60 Hz 1920 x 1080 20,000:1 5 ms 250 nits 2 1 1 1 1 1 English, Spanish, French Optical Digital Audio Out, 3.5mm 2 3W SRS TruSurround HD SRS TruVolume Yes Specifications E260VA 26" Class 26.01" 25.35 x 17.00 x 5.86" 25.35 x 17.00 x 2.30" 13.1 lbs 11.8 lbs Edge Lit LED 60 Hz 1366...

E190VA User Manual
Page 42
... ALL CONTENTS AND INFORMATION WILL BE DELETED IN THE COURSE OF SOME IN-HOME AND ALL SHIP-IN WARANTY SERVICE. THIS WARRANTY GIVES YOU SPECIFIC LEGAL RIGHTS, AND YOU MAY ALSO HAVE OTHER RIGHTS, WHICH VARY FROM STATE TO STATE. Proof of purchase in United States and Puerto ... Products must utilize either repair or replace the Product at its sole option and discretion. PRE-AUTHORIZATION IS REQUIRED BEFORE SENDING ANY PRODUCT TO A VIZIO SERVICE CENTER FOR WARRANTY SERVICE. This warranty does not cover, for the "zero bright pixel" guarantee on select new product purchases. THERE ARE...
... ALL CONTENTS AND INFORMATION WILL BE DELETED IN THE COURSE OF SOME IN-HOME AND ALL SHIP-IN WARANTY SERVICE. THIS WARRANTY GIVES YOU SPECIFIC LEGAL RIGHTS, AND YOU MAY ALSO HAVE OTHER RIGHTS, WHICH VARY FROM STATE TO STATE. Proof of purchase in United States and Puerto ... Products must utilize either repair or replace the Product at its sole option and discretion. PRE-AUTHORIZATION IS REQUIRED BEFORE SENDING ANY PRODUCT TO A VIZIO SERVICE CENTER FOR WARRANTY SERVICE. This warranty does not cover, for the "zero bright pixel" guarantee on select new product purchases. THERE ARE...

E190VA User Manual
Page 48
PRODUCT FEATURES AND SPECIFICATIONS ARE SUBJECT TO CHANGE WITHOUT NOTICE. © 2011 VIZIO INC. ALL RIGHTS RESERVED. 110127ST-A TRADEMARKS SHOWN ARE THE PROPERTY OF THEIR RESPECTIVE OWNERS. IMAGES USED ARE FOR ILLUSTRATION PURPOSES ONLY. VIZIO, THE V LOGO, WHERE VISION MEETS VALUE, AND OTHER VIZIO TRADEMARKS ARE THE INTELLECTUAL PROPERTY OF VIZIO INC.
PRODUCT FEATURES AND SPECIFICATIONS ARE SUBJECT TO CHANGE WITHOUT NOTICE. © 2011 VIZIO INC. ALL RIGHTS RESERVED. 110127ST-A TRADEMARKS SHOWN ARE THE PROPERTY OF THEIR RESPECTIVE OWNERS. IMAGES USED ARE FOR ILLUSTRATION PURPOSES ONLY. VIZIO, THE V LOGO, WHERE VISION MEETS VALUE, AND OTHER VIZIO TRADEMARKS ARE THE INTELLECTUAL PROPERTY OF VIZIO INC.

E190VA Quick Start Guide
Page 3
Input (Specific): Change the input device. Press the button that corresponds to the input device you wish to manually enter a sub-channel (18-1, 18-2, etc). Closed Caption: .... With each press of the TV's audio. USING THE REMOTE Input Wide Sleep Menu/OK Arrow Left Volume Up/Down Last Info Power/Standby Input (Specific) Closed Caption (CC) Exit Arrow Up Arrow Right Arrow Down Channel Up/Down Mute Number Pad Input: Change the input device.
Input (Specific): Change the input device. Press the button that corresponds to the input device you wish to manually enter a sub-channel (18-1, 18-2, etc). Closed Caption: .... With each press of the TV's audio. USING THE REMOTE Input Wide Sleep Menu/OK Arrow Left Volume Up/Down Last Info Power/Standby Input (Specific) Closed Caption (CC) Exit Arrow Up Arrow Right Arrow Down Channel Up/Down Mute Number Pad Input: Change the input device.

E190VA Quick Start Guide
Page 12
VIZIO, THE V LOGO, WHERE VISION MEETS VALUE, AND OTHER VIZIO TRADEMARKS ARE THE INTELLECTUAL PROPERTY OF VIZIO INC. ALL RIGHTS RESERVED. 110103ST-NC PRODUCT FEATURES AND SPECIFICATIONS ARE SUBJECT TO CHANGE WITHOUT NOTICE. © 2011 VIZIO INC. TRADEMARKS SHOWN ARE THE PROPERTY OF THEIR RESPECTIVE OWNERS. IMAGES USED ARE FOR ILLUSTRATION PURPOSES ONLY.
VIZIO, THE V LOGO, WHERE VISION MEETS VALUE, AND OTHER VIZIO TRADEMARKS ARE THE INTELLECTUAL PROPERTY OF VIZIO INC. ALL RIGHTS RESERVED. 110103ST-NC PRODUCT FEATURES AND SPECIFICATIONS ARE SUBJECT TO CHANGE WITHOUT NOTICE. © 2011 VIZIO INC. TRADEMARKS SHOWN ARE THE PROPERTY OF THEIR RESPECTIVE OWNERS. IMAGES USED ARE FOR ILLUSTRATION PURPOSES ONLY.
