
User Manual English
Page 2
... the power cord from being damaged, the following safety instructions before connecting other . Be sure to inspect the package contents to your VIZIO product at (877) 698-4946. WHEN READING THIS MANUAL When you register your TV. • Read these instructions. • Keep...about accessories and installation services for the installation, use attachments/accessories specified by the manufacturer. • Use only with the cart, stand, tripod, bracket, or table specified by the manufacturer, or sold with the apparatus. These plans provide additional coverage during lightning ...
... the power cord from being damaged, the following safety instructions before connecting other . Be sure to inspect the package contents to your VIZIO product at (877) 698-4946. WHEN READING THIS MANUAL When you register your TV. • Read these instructions. • Keep...about accessories and installation services for the installation, use attachments/accessories specified by the manufacturer. • Use only with the cart, stand, tripod, bracket, or table specified by the manufacturer, or sold with the apparatus. These plans provide additional coverage during lightning ...
User Manual English
Page 6
... TV 7 Deleting the Custom Audio Mode 32 Changing the DLNA Name of Digital Closed Captions 39 Deleting an App from the TV 49 Using VIZIO Internet Apps Plus® (V.I.A. Apps Window 54 Fullscreen V.I .A. Plus Apps Window 56 Completing the First-Time Setup 19 Changing the Analog Audio... Appearance of Your TV 46 Inspecting the Package Contents 7 Setting Timers 33 Adjusting the CEC Settings 46 Installing the TV 8 Installing the TV Stand 8 Setting the Sleep Timer 33 Setting the Auto Power Off Feature 33 Turning the Power Indicator On or Off 46 Using the Reset &...
... TV 7 Deleting the Custom Audio Mode 32 Changing the DLNA Name of Digital Closed Captions 39 Deleting an App from the TV 49 Using VIZIO Internet Apps Plus® (V.I.A. Apps Window 54 Fullscreen V.I .A. Plus Apps Window 56 Completing the First-Time Setup 19 Changing the Analog Audio... Appearance of Your TV 46 Inspecting the Package Contents 7 Setting Timers 33 Adjusting the CEC Settings 46 Installing the TV 8 Installing the TV Stand 8 Setting the Sleep Timer 33 Setting the Auto Power Off Feature 33 Turning the Power Indicator On or Off 46 Using the Reset &...
User Manual English
Page 7
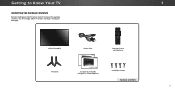
Use the images below to inspect the package contents. VIZIO LED UHDTV Power Cord Remote Control with Batteries TV Stands 2 x Quick Start Guides (1 English, 1 French-Spanish) 4 x Phillips Screws PACKAGE CONTENTS 7 Getting to Know Your TV 1 INSPECTING THE PACKAGE CONTENTS Before installing your new TV, take a moment to ensure nothing is missing or damaged.
Use the images below to inspect the package contents. VIZIO LED UHDTV Power Cord Remote Control with Batteries TV Stands 2 x Quick Start Guides (1 English, 1 French-Spanish) 4 x Phillips Screws PACKAGE CONTENTS 7 Getting to Know Your TV 1 INSPECTING THE PACKAGE CONTENTS Before installing your new TV, take a moment to ensure nothing is missing or damaged.

User Manual English
Page 8
... the back of the TV and tighten them using a VESA-standard wall mount (not included) Installing the TV Stand Your TV includes a stand designed to the TV with two (2) Phillips screws (included). Insert the screws into the base of the TV and keep it from the box and ... you are finished, place the TV on a soft surface, such as carpet, rug, or blanket. 1. However, the TV can begin installing the TV. Secure each stand to support the weight of the TV. 1 2. Your TV can be installed in the base installation. INSTALLING THE TV After removing the TV from falling...
... the back of the TV and tighten them using a VESA-standard wall mount (not included) Installing the TV Stand Your TV includes a stand designed to the TV with two (2) Phillips screws (included). Insert the screws into the base of the TV and keep it from the box and ... you are finished, place the TV on a soft surface, such as carpet, rug, or blanket. 1. However, the TV can begin installing the TV. Secure each stand to support the weight of the TV. 1 2. Your TV can be installed in the base installation. INSTALLING THE TV After removing the TV from falling...

User Manual English
Page 9
... below to find the appropriate mount for your mount. Be sure the surface is capable of supporting the weight of the TV. D58u-C3 Screw Size: Hole Pattern: Weight w/o Stand: M6 400mm (V) x 400mm (H) 47.40 lbs Be sure the mount you can scratch or damage the TV. 3. Place the TV face-down... on a wall, you will need a wall mount. Remove the stands by loosening and removing the screws. 4. Use only with a UL-listed wall mount bracket rated for your TV on a wall: 1. After you have determined that...
... below to find the appropriate mount for your mount. Be sure the surface is capable of supporting the weight of the TV. D58u-C3 Screw Size: Hole Pattern: Weight w/o Stand: M6 400mm (V) x 400mm (H) 47.40 lbs Be sure the mount you can scratch or damage the TV. 3. Place the TV face-down... on a wall, you will need a wall mount. Remove the stands by loosening and removing the screws. 4. Use only with a UL-listed wall mount bracket rated for your TV on a wall: 1. After you have determined that...

Quickstart Guide English
Page 2
... is used as radiators, heat registers, stoves, or other moisture. - Do not try to repair or service your TV in an area with the cart, stand, tripod, bracket, or table specified by qualified service personnel only. Continued use attachments/accessories specified by the manufacturer. • Use only with heavy dust or...
... is used as radiators, heat registers, stoves, or other moisture. - Do not try to repair or service your TV in an area with the cart, stand, tripod, bracket, or table specified by qualified service personnel only. Continued use attachments/accessories specified by the manufacturer. • Use only with heavy dust or...

Quickstart Guide English
Page 6
PACKAGE CONTENTS VIZIO LED HDTV Remote Control with Batteries This Quick Start Guide TV Stands Power Cable 4 x Phillips Screws
PACKAGE CONTENTS VIZIO LED HDTV Remote Control with Batteries This Quick Start Guide TV Stands Power Cable 4 x Phillips Screws

Quickstart Guide English
Page 8
To prevent scratches or damage to the screen, place the TV on a clean, flat surface. INSTALLING THE BASE 1 It is recommended that two people take part in the stand installation Place the TV screen-down on a soft surface such as a carpet, rug, or blanket, and avoid any sharp edges.
To prevent scratches or damage to the screen, place the TV on a clean, flat surface. INSTALLING THE BASE 1 It is recommended that two people take part in the stand installation Place the TV screen-down on a soft surface such as a carpet, rug, or blanket, and avoid any sharp edges.

Quickstart Guide English
Page 9
2 Insert the stands into the back of the TV. (The stands are finished, place the TV on a stable, level surface. Insert the screws into the base of the TV and tighten them using a Phillips screwdriver. When you are identical.) Secure each stand to the TV with two (2) M4 Phillips screws (included).
2 Insert the stands into the back of the TV. (The stands are finished, place the TV on a stable, level surface. Insert the screws into the base of the TV and tighten them using a Phillips screwdriver. When you are identical.) Secure each stand to the TV with two (2) M4 Phillips screws (included).

Quickstart Guide English
Page 23
Available at www.VIZIO.com This Product Sold Separately VIZIO RECOMMENDS 25" 2.1 SOUND STAND Introducing the new VIZIO 25" 2.1 Sound Stand with deep thumping bass from the built-in tight spaces where a sound bar simply cannot fit. a great fit for TVs up to deliver-even in subwoofer truly makes the Sound Stand one to 55" class. The incredible audio performance combined with a sleek frame -
Available at www.VIZIO.com This Product Sold Separately VIZIO RECOMMENDS 25" 2.1 SOUND STAND Introducing the new VIZIO 25" 2.1 Sound Stand with deep thumping bass from the built-in tight spaces where a sound bar simply cannot fit. a great fit for TVs up to deliver-even in subwoofer truly makes the Sound Stand one to 55" class. The incredible audio performance combined with a sleek frame -


