Camera Manual
Page 6
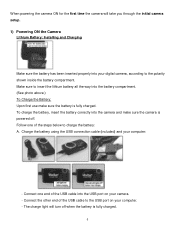
... of the USB cable to the USB port on your digital camera, according to insert the lithium battery all the way into your camera. - The charge light will take you through the initial camera setup. 1) Powering ON the Camera Lithium Battery: Installing and Charging Make sure the battery has been inserted properly into the battery compartment. (See photo above.) To Charge the Battery: Upon first use make sure the camera is fully charged. When powering the camera ON for...
... of the USB cable to the USB port on your digital camera, according to insert the lithium battery all the way into your camera. - The charge light will take you through the initial camera setup. 1) Powering ON the Camera Lithium Battery: Installing and Charging Make sure the battery has been inserted properly into the battery compartment. (See photo above.) To Charge the Battery: Upon first use make sure the camera is fully charged. When powering the camera ON for...
Camera Manual
Page 7
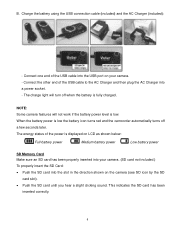
... charge light will not work if the battery power level is fully charged. NOTE: Some camera features will turn off a few seconds later. B. Charge the battery using the USB connection cable (included) and the AC Charger (included): - Connect one end of the USB cable into a power socket. - This indicates the SD card has been inserted correctly. 6 When the battery power is displayed on the camera (see SD icon by the SD card slot). Push the SD card...
... charge light will not work if the battery power level is fully charged. NOTE: Some camera features will turn off a few seconds later. B. Charge the battery using the USB connection cable (included) and the AC Charger (included): - Connect one end of the USB cable into a power socket. - This indicates the SD card has been inserted correctly. 6 When the battery power is displayed on the camera (see SD icon by the SD card slot). Push the SD card...
Camera Manual
Page 8
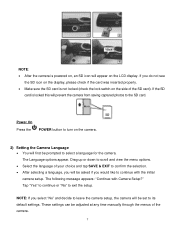
... card was inserted properly. Make sure the SD card is powered on, an SD icon will appear on the camera. 2) Setting the Camera Language You will prevent the camera from saving captured photos to the SD card. Tap "Yes" to continue or "No" to select a language for the camera. These settings can be prompted to exit the setup. NOTE: After the camera is not locked (check the lock switch...
... card was inserted properly. Make sure the SD card is powered on, an SD icon will appear on the camera. 2) Setting the Camera Language You will prevent the camera from saving captured photos to the SD card. Tap "Yes" to continue or "No" to select a language for the camera. These settings can be prompted to exit the setup. NOTE: After the camera is not locked (check the lock switch...
Camera Manual
Page 10
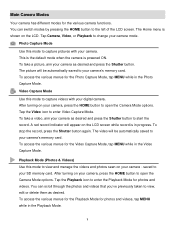
... the Playback Mode. 9 saved to your camera's memory card. You can scroll through the photos and videos that you've previously taken to capture videos with your camera - Video Capture Mode Use this mode to your camera's memory card. After turning on the LCD screen while record is in the Video Capture Mode. You can switch modes by pressing the HOME button to enter the Playback Mode for the various camera functions. The Home menu is powered ON. Tap Camera, Video, or Playback to change your camera...
... the Playback Mode. 9 saved to your camera's memory card. You can scroll through the photos and videos that you've previously taken to capture videos with your camera - Video Capture Mode Use this mode to your camera's memory card. After turning on the LCD screen while record is in the Video Capture Mode. You can switch modes by pressing the HOME button to enter the Playback Mode for the various camera functions. The Home menu is powered ON. Tap Camera, Video, or Playback to change your camera...
Camera Manual
Page 11
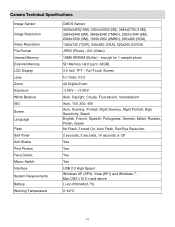
... Specifications Image Sensor Image Resolution Video Resolution File Format Internal Memory External Memory LCD Display Lens Zoom Exposure White Balance ISO Scene Language Flash Self-Timer Anti-Shake Print Photos Face Detect Macro Switch Interface System Requirements Battery Working Temperature CMOS Sensor 4608x3456(16M), 4000x3000(12M), 3648x2736 (10M), 3264x2448 (8M), 3648x2048 (7MHD), 2592x1944 (5M), 2048x1536 (3M), 1920x1080 (2MHD), 640x480 (VGA) 1280x720 (720P), 640x480 (VGA), 320x240 (QVGA) JPEG (Photo) / AVI (Video) 16MB SDRAM (Buffer) - enough for 1 sample photo SD Memory card...
... Specifications Image Sensor Image Resolution Video Resolution File Format Internal Memory External Memory LCD Display Lens Zoom Exposure White Balance ISO Scene Language Flash Self-Timer Anti-Shake Print Photos Face Detect Macro Switch Interface System Requirements Battery Working Temperature CMOS Sensor 4608x3456(16M), 4000x3000(12M), 3648x2736 (10M), 3264x2448 (8M), 3648x2048 (7MHD), 2592x1944 (5M), 2048x1536 (3M), 1920x1080 (2MHD), 640x480 (VGA) 1280x720 (720P), 640x480 (VGA), 320x240 (QVGA) JPEG (Photo) / AVI (Video) 16MB SDRAM (Buffer) - enough for 1 sample photo SD Memory card...
Camera Manual
Page 13
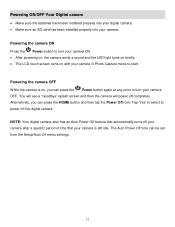
... automatically turns off your camera after a specific period of time that your camera in Photo Capture mode to turn your camera. Powering the camera OFF While the camera is left idle. You will see a "Goodbye" splash screen and then the camera will power off the digital camera. Alternatively, you can be set from the Setup/Auto Off menu settings. 12 Powering ON/OFF Your Digital camera Make sure the batteries have been installed properly into your digital camera. Make...
... automatically turns off your camera after a specific period of time that your camera in Photo Capture mode to turn your camera. Powering the camera OFF While the camera is left idle. You will see a "Goodbye" splash screen and then the camera will power off the digital camera. Alternatively, you can be set from the Setup/Auto Off menu settings. 12 Powering ON/OFF Your Digital camera Make sure the batteries have been installed properly into your digital camera. Make...

Camera Manual
Page 15
...; Camera Setup Menus You can access and change camera settings by the following methods: 1) Icons on the LCD Touch Screen: While in the Photo, Video, and Playback Modes in Preview/Standby: You can toggle between the menu options each time you tap a menu icon that appears on the LCD screen until you quick access to the camera modes and settings as well as to the photo slideshow and the power off. 1) Press the HOME button...
...; Camera Setup Menus You can access and change camera settings by the following methods: 1) Icons on the LCD Touch Screen: While in the Photo, Video, and Playback Modes in Preview/Standby: You can toggle between the menu options each time you tap a menu icon that appears on the LCD screen until you quick access to the camera modes and settings as well as to the photo slideshow and the power off. 1) Press the HOME button...
Camera Manual
Page 20
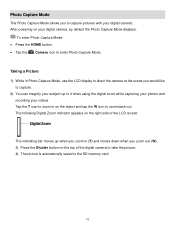
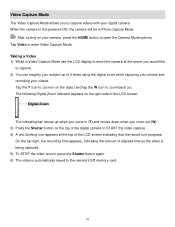
... LCD screen: The indicating bar moves up to 4 times using the digital zoom while capturing your photos and recording your videos. To enter Photo Capture Mode: Press the HOME button. Tap the Camera icon to the SD memory card. 19 After powering on your digital camera. The following Digital Zoom Indicator appears on the object and tap the W icon to capture pictures with your digital camera, by default the Photo Capture Mode displays. Taking a Picture 1) While in Photo Capture Mode, use the LCD display to direct the camera...
... LCD screen: The indicating bar moves up to 4 times using the digital zoom while capturing your photos and recording your videos. To enter Photo Capture Mode: Press the HOME button. Tap the Camera icon to the SD memory card. 19 After powering on your digital camera. The following Digital Zoom Indicator appears on the object and tap the W icon to capture pictures with your digital camera, by default the Photo Capture Mode displays. Taking a Picture 1) While in Photo Capture Mode, use the LCD display to direct the camera...
Camera Manual
Page 27
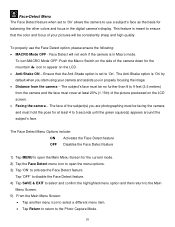
.... This feature is in Macro mode. Ensure that the color and focus of the camera down for balancing the other colors and focus in properly focusing the image. Distance from the camera and the face must hold the pose for the current mode. 2) Tap the Face Detect menu icon to open the Main Menu Screen for at least 4 to 5 seconds until the green square(s) appears around the...
.... This feature is in Macro mode. Ensure that the color and focus of the camera down for balancing the other colors and focus in properly focusing the image. Distance from the camera and the face must hold the pose for the current mode. 2) Tap the Face Detect menu icon to open the Main Menu Screen for at least 4 to 5 seconds until the green square(s) appears around the...
Camera Manual
Page 28
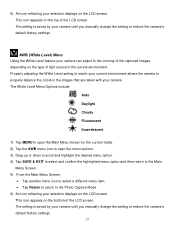
... balance the colors in the current environment. This icon appears on the top of the LCD screen. The setting is saved by your camera until you manually change the setting or restore the camera's default factory settings. The setting is saved by your camera until you manually change the setting or restore the camera's default factory settings. 27 This icon appears on the bottom of the LCD screen. The White Level Menu Options include: Auto Daylight Cloudy Fluorescent Incandescent 1) Tap MENU to open...
... balance the colors in the current environment. This icon appears on the top of the LCD screen. The setting is saved by your camera until you manually change the setting or restore the camera's default factory settings. The setting is saved by your camera until you manually change the setting or restore the camera's default factory settings. 27 This icon appears on the bottom of the LCD screen. The White Level Menu Options include: Auto Daylight Cloudy Fluorescent Incandescent 1) Tap MENU to open...

Camera Manual
Page 30
... saved by using the positive + count) to increase the amount of the LCD screen. The Exposure Menu Options include: +3 Lightest -1 Dark +2 Lighter -2 Darker +1 Light -3 Darkest 0 Normal 1) Tap MENU to open the Main Menu Screen for the current mode. 2) Tap the Sharpness menu icon to open the menu options. 3) Drag up or down to scroll and highlight the desired menu option. 29 Exposure Menu The Light Exposure setting helps you manually change the setting or restore the camera's default factory settings...
... saved by using the positive + count) to increase the amount of the LCD screen. The Exposure Menu Options include: +3 Lightest -1 Dark +2 Lighter -2 Darker +1 Light -3 Darkest 0 Normal 1) Tap MENU to open the Main Menu Screen for the current mode. 2) Tap the Sharpness menu icon to open the menu options. 3) Drag up or down to scroll and highlight the desired menu option. 29 Exposure Menu The Light Exposure setting helps you manually change the setting or restore the camera's default factory settings...
Camera Manual
Page 32
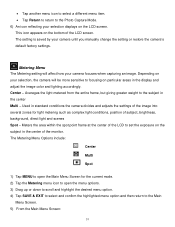
... saved by your selection displays on your selection, the camera will affect how your camera focuses when capturing an image. Depending on the LCD screen. Averages the light metered from the entire frame, but giving greater weight to the subject in standard conditions the camera divides and adjusts the settings of the image into several zones for the current mode. 2) Tap the Metering menu icon to open...
... saved by your selection displays on your selection, the camera will affect how your camera focuses when capturing an image. Depending on the LCD screen. Averages the light metered from the entire frame, but giving greater weight to the subject in standard conditions the camera divides and adjusts the settings of the image into several zones for the current mode. 2) Tap the Metering menu icon to open...

Camera Manual
Page 35
... automatically delete the selected photo. Tap 'NO' to return to Playback Mode without deleting the selected photo. The images on your camera will be displayed in Photo Playback Mode, you can easily control the camera features for each image. Photo Playback Mode LCD Screen Functions While in a 3 X 3 matrix where you can use easily navigate to scroll and select images from the thumbnails. 1) Tap the Thumbnail View icon on the LCD to open the Thumbnail View. 2) All images (videos and photos) saved...
... automatically delete the selected photo. Tap 'NO' to return to Playback Mode without deleting the selected photo. The images on your camera will be displayed in Photo Playback Mode, you can easily control the camera features for each image. Photo Playback Mode LCD Screen Functions While in a 3 X 3 matrix where you can use easily navigate to scroll and select images from the thumbnails. 1) Tap the Thumbnail View icon on the LCD to open the Thumbnail View. 2) All images (videos and photos) saved...
Camera Manual
Page 40
... LCD screen: The indicating bar moves up to 4 times using the digital zoom while capturing your photos and recording your videos. On the top right, the recording time appears, indicating the amount of the LCD screen indicating that the record is automatically saved to enter Video Capture Mode. Tap Video to the camera's SD memory card. 39 When the camera is first powered ON, the camera will be in on the top of the digital camera to START the video capture. 4) A red, blinking icon...
... LCD screen: The indicating bar moves up to 4 times using the digital zoom while capturing your photos and recording your videos. On the top right, the recording time appears, indicating the amount of the LCD screen indicating that the record is automatically saved to enter Video Capture Mode. Tap Video to the camera's SD memory card. 39 When the camera is first powered ON, the camera will be in on the top of the digital camera to START the video capture. 4) A red, blinking icon...

Camera Manual
Page 45
... setting is saved by your camera. This icon appears on the bottom of light source in the images that are taken with your camera until you manually change the setting or restore the camera's default factory settings. 44 AWB (White Level) Menu Using the White Level feature your camera can adjust to the Video Capture Mode. 6) An icon reflecting your selection displays on the LCD screen. The White Level Menu Options include: Auto Daylight Cloudy Fluorescent Incandescent 1) Tap MENU to open...
... setting is saved by your camera. This icon appears on the bottom of light source in the images that are taken with your camera until you manually change the setting or restore the camera's default factory settings. 44 AWB (White Level) Menu Using the White Level feature your camera can adjust to the Video Capture Mode. 6) An icon reflecting your selection displays on the LCD screen. The White Level Menu Options include: Auto Daylight Cloudy Fluorescent Incandescent 1) Tap MENU to open...
Camera Manual
Page 50
... image (video and photo) is saved by your camera until you first turn on the camera, the camera will be in the center of the LCD screen. 2) Play your camera's memory card until you find the video you would like to the LCD, press the Shutter button. This icon appears on the top left or right across the LCD touch screen. Videos appear with you camera. When you manually change the setting or restore the camera's default factory settings...
... image (video and photo) is saved by your camera until you first turn on the camera, the camera will be in the center of the LCD screen. 2) Play your camera's memory card until you find the video you would like to the LCD, press the Shutter button. This icon appears on the top left or right across the LCD touch screen. Videos appear with you camera. When you manually change the setting or restore the camera's default factory settings...

Camera Manual
Page 51
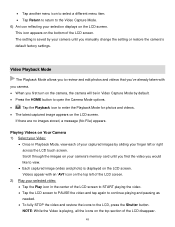
Video Playback Mode LCD Screen Functions While in Video Playback Mode, you can easily control the camera features for each image. Delete (Selected File) 1) Press the HOME button and tap the Playback icon to enter the Playback Mode. 2) Select a video. 3) To delete the selected video: Tap the Delete icon located on your SD Memory card appear in a 3 X 3 matrix where you can use easily navigate to scroll and select images from the thumbnails. 1) Tap the Thumbnail View icon on the LCD to...
Video Playback Mode LCD Screen Functions While in Video Playback Mode, you can easily control the camera features for each image. Delete (Selected File) 1) Press the HOME button and tap the Playback icon to enter the Playback Mode. 2) Select a video. 3) To delete the selected video: Tap the Delete icon located on your SD Memory card appear in a 3 X 3 matrix where you can use easily navigate to scroll and select images from the thumbnails. 1) Tap the Thumbnail View icon on the LCD to...

Camera Manual
Page 62
... transfer the photos and videos from your camera to your computer. 9) A media download progress bar appears on the bottom left showing the number of any files on their way to your computer. 1) Select the "Get Images" button from the Main menu. 2) The "Get Images from device" window opens. 3) You can select to your camera (removable disk) from Your Camera to Your Computer An SD card needs to the selected folder...
... transfer the photos and videos from your camera to your computer. 9) A media download progress bar appears on the bottom left showing the number of any files on their way to your computer. 1) Select the "Get Images" button from the Main menu. 2) The "Get Images from device" window opens. 3) You can select to your camera (removable disk) from Your Camera to Your Computer An SD card needs to the selected folder...
Camera Manual
Page 65
... resulting from other than normal use, including but not limited to, repair by unauthorized parties, tampering, modification or accident. Sakar Warranty Card This warranty covers for service, your digital camera to defects in material or workmanship will be repaired at the store where purchased 64 MAIL TO ADDRESS BELOW: Sakar US Sakar International Attention: Service Department 195 Carter Drive...
... resulting from other than normal use, including but not limited to, repair by unauthorized parties, tampering, modification or accident. Sakar Warranty Card This warranty covers for service, your digital camera to defects in material or workmanship will be repaired at the store where purchased 64 MAIL TO ADDRESS BELOW: Sakar US Sakar International Attention: Service Department 195 Carter Drive...
Camera Manual
Page 66
Can't find manuals, software and FAQ's at the website. Press the Shutter button to take some sample photos and then try downloading them to the computer the photos are not stored in the camera's memory. I get a message that the images were successfully transferred but the photos do I recover images that you would like to call 1800-006-614. If the camera powers off . We recommend always downloading your photos to...
Can't find manuals, software and FAQ's at the website. Press the Shutter button to take some sample photos and then try downloading them to the computer the photos are not stored in the camera's memory. I get a message that the images were successfully transferred but the photos do I recover images that you would like to call 1800-006-614. If the camera powers off . We recommend always downloading your photos to...


