
ViviCam 8690 Camera Manual
Page 2
... use...6 Starting Your Digital Camera ...9 Main Icons on the LCD ...11 Camera mode ...13 Video Mode ...29 Playback Mode ...31 Install the Vivitar Experience Image Manager Software 40 Connect your camera to the computer 42 Get photos and videos from your camera to your computer 42 Get started! ...44 Transfer media from my...
... use...6 Starting Your Digital Camera ...9 Main Icons on the LCD ...11 Camera mode ...13 Video Mode ...29 Playback Mode ...31 Install the Vivitar Experience Image Manager Software 40 Connect your camera to the computer 42 Get photos and videos from your camera to your computer 42 Get started! ...44 Transfer media from my...
ViviCam 8690 Camera Manual
Page 3
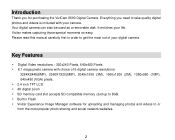
... capturing those special moments so easy. Please read this manual carefully first in Flash Vivitar Experience Image Manager software for purchasing the ViviCam 8690 Digital Camera. Introduction Thank you need to take quality digital photos and videos is included with choice of 6 digital camera resolutions- 3264X2448(8MP), 2560X1920(5MP), 2048x1536 (3M), 1600x1200...
... capturing those special moments so easy. Please read this manual carefully first in Flash Vivitar Experience Image Manager software for purchasing the ViviCam 8690 Digital Camera. Introduction Thank you need to take quality digital photos and videos is included with choice of 6 digital camera resolutions- 3264X2448(8MP), 2560X1920(5MP), 2048x1536 (3M), 1600x1200...

ViviCam 8690 Camera Manual
Page 4
What Your Camera Includes Digital Camera Vivitar Experience Image Manager software Installation CD USB cable Quick Start Guide Strap Computer System Requirements for Windows XP To be able to download photos and videos to your PC, you will need the following minimum configuration: Pentium 4 processor or above...
What Your Camera Includes Digital Camera Vivitar Experience Image Manager software Installation CD USB cable Quick Start Guide Strap Computer System Requirements for Windows XP To be able to download photos and videos to your PC, you will need the following minimum configuration: Pentium 4 processor or above...
ViviCam 8690 Camera Manual
Page 9
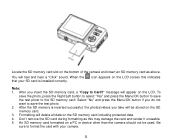
... select "Yes" and press the Menu/OK button to Card?" Be sure to format the card with your SD card is inserted successful, the photos/videos you insert the SD memory card, a "Copy to save the test photo. 2. An SD memory card formatted on the LCD. When the that your camera...
... select "Yes" and press the Menu/OK button to Card?" Be sure to format the card with your SD card is inserted successful, the photos/videos you insert the SD memory card, a "Copy to save the test photo. 2. An SD memory card formatted on the LCD. When the that your camera...

ViviCam 8690 Camera Manual
Page 10
... your camera is turned on and ready for use . Camera Mode (Left): Take still photos Video Mode (Middle): Capture video files Playback Mode (Right): View, print and edit photos and view videos 9 When there is insufficient battery power, a "Low Battery" message will appear on the LCD screen and the camera...
... your camera is turned on and ready for use . Camera Mode (Left): Take still photos Video Mode (Middle): Capture video files Playback Mode (Right): View, print and edit photos and view videos 9 When there is insufficient battery power, a "Low Battery" message will appear on the LCD screen and the camera...

ViviCam 8690 Camera Manual
Page 11
Main buttons on the camera 10 In Playback mode you can shoot video files while in Video mode. The Camera mode is for you captured, rotate, protect, delete, crop and print your photos. You can preview the photos/videos you to take still photos.
Main buttons on the camera 10 In Playback mode you can shoot video files while in Video mode. The Camera mode is for you captured, rotate, protect, delete, crop and print your photos. You can preview the photos/videos you to take still photos.

ViviCam 8690 Camera Manual
Page 14
Short-cut buttons on the camera Digital Zoom function In the Photo, Video and Playback modes, you attempt to your object as possible using the 4X digital zoom. 1. Hold the camera steady and compose your computer as soon ... memory is full, the LCD screen will display "Disk Full" If you can magnify your subject using the Vivitar Experience Image Manager software as described below in the section "Transfer photos and videos to shoot at this resolution is displayed on the top right corner of the LCD screen. icon will appear...
Short-cut buttons on the camera Digital Zoom function In the Photo, Video and Playback modes, you attempt to your object as possible using the 4X digital zoom. 1. Hold the camera steady and compose your computer as soon ... memory is full, the LCD screen will display "Disk Full" If you can magnify your subject using the Vivitar Experience Image Manager software as described below in the section "Transfer photos and videos to shoot at this resolution is displayed on the top right corner of the LCD screen. icon will appear...

ViviCam 8690 Camera Manual
Page 16
... second count down button again to select the 10 seconds self timer. 5. Delete (Last Photo or Video) You can include yourself in Camera or Video mode. 1. Self-Timer You can delete the last photo or video taken while in a photo by using the camera with the flash, please install new batteries. The icon...
... second count down button again to select the 10 seconds self timer. 5. Delete (Last Photo or Video) You can include yourself in Camera or Video mode. 1. Self-Timer You can delete the last photo or video taken while in a photo by using the camera with the flash, please install new batteries. The icon...

ViviCam 8690 Camera Manual
Page 17
... icons will appear on the LCD. 5. Note: "No File" will be able to delete the last photo/video if you photo. Note: The Scene options can manually select the scene. 1. At step 2, if you will... appear on the LCD when you press the right button in the camera/video mode to recognize the different Scene icons and related scene detail. 16 Once the appropriate scene is selected...OK button. Press the Scene button to select "Yes". 3. From the "This Image" or "This Video" message that the images you capture are captured in the Photo menu. Press the Menu/OK button to ...
... icons will appear on the LCD. 5. Note: "No File" will be able to delete the last photo/video if you photo. Note: The Scene options can manually select the scene. 1. At step 2, if you will... appear on the LCD when you press the right button in the camera/video mode to recognize the different Scene icons and related scene detail. 16 Once the appropriate scene is selected...OK button. Press the Scene button to select "Yes". 3. From the "This Image" or "This Video" message that the images you capture are captured in the Photo menu. Press the Menu/OK button to ...

ViviCam 8690 Camera Manual
Page 30
...You can play this file in your camera is provided for test photos and videos only. Please read the section on "Minimum Computer Requirements for normal camera use... be properly utilize all the features of your camera is full. 29 Video Mode Move the mode switch to the center to begin shooting videos. Press the Shutter button again to stop recording and save this AVI ... the top right of the LCD screen. 1. You need to Transfer and Shoot More Test Videos" will appear on the LCD when the memory storage capacity of the application. Press the Shutter button to activate the...
...You can play this file in your camera is provided for test photos and videos only. Please read the section on "Minimum Computer Requirements for normal camera use... be properly utilize all the features of your camera is full. 29 Video Mode Move the mode switch to the center to begin shooting videos. Press the Shutter button again to stop recording and save this AVI ... the top right of the LCD screen. 1. You need to Transfer and Shoot More Test Videos" will appear on the LCD when the memory storage capacity of the application. Press the Shutter button to activate the...

ViviCam 8690 Camera Manual
Page 31
... Balance for shooting. 1. Press the Up/Down button to select the White Balance you desire. Press the Up/Down button to the video standby mode. 5. Video Resolution Your camera supports 2 video resolutions- 640x480 (VGA) pixels, 320x240 (QVGA) pixels. The default resolution is VGA. 1. Press the Menu/OK button. 2. Press the Left/Right button...
... Balance for shooting. 1. Press the Up/Down button to select the White Balance you desire. Press the Up/Down button to the video standby mode. 5. Video Resolution Your camera supports 2 video resolutions- 640x480 (VGA) pixels, 320x240 (QVGA) pixels. The default resolution is VGA. 1. Press the Menu/OK button. 2. Press the Left/Right button...

ViviCam 8690 Camera Manual
Page 32
... to the Playback mode. The corresponding resolution icon will open the thumbnail display view. 31 You can preview the photos and videos you can view the images on the LCD screen if there are no photos/videos in and out of the LCD screen. Thumbnail and Zoom You can protect and delete... video clips. Pressing the W button once will appear on the right hand side of your camera using PictBridge technology. Playback Mode Set the...
... to the Playback mode. The corresponding resolution icon will open the thumbnail display view. 31 You can preview the photos and videos you can view the images on the LCD screen if there are no photos/videos in and out of the LCD screen. Thumbnail and Zoom You can protect and delete... video clips. Pressing the W button once will appear on the right hand side of your camera using PictBridge technology. Playback Mode Set the...

ViviCam 8690 Camera Manual
Page 34
Press the Shutter button to pause and again to stop and exit the video playback mode for selecting files or wait until the file playback over. Playing the AVI video file Select an AVI file you want to rotate, protect, delete, crop or print. Press the Up button to continue. 3. Rotate 1. ...Edit photos and videos Select a still photo you want to play. 1. Press the Shutter button ...
Press the Shutter button to pause and again to stop and exit the video playback mode for selecting files or wait until the file playback over. Playing the AVI video file Select an AVI file you want to rotate, protect, delete, crop or print. Press the Up button to continue. 3. Rotate 1. ...Edit photos and videos Select a still photo you want to play. 1. Press the Shutter button ...

ViviCam 8690 Camera Manual
Page 35
Protect You can protect your choice. Press the Menu/OK button to exit. 4. Press the Menu/OK button. 2. Press the Up/Down button to select the degree you want to rotate your photo or cancel to confirm. 5. Press the Right/Left button to select the Rotate menu option. 3. A "Rotate and Saving" message will appear rotated as per your photos and videos from accidental deletion. 1. 2. After a few seconds the photo will appear on the LCD. Press the Right/Left button to select the Protect menu option. 34
Protect You can protect your choice. Press the Menu/OK button to exit. 4. Press the Menu/OK button. 2. Press the Up/Down button to select the degree you want to rotate your photo or cancel to confirm. 5. Press the Right/Left button to select the Rotate menu option. 3. A "Rotate and Saving" message will appear rotated as per your photos and videos from accidental deletion. 1. 2. After a few seconds the photo will appear on the LCD. Press the Right/Left button to select the Protect menu option. 34

ViviCam 8690 Camera Manual
Page 36
... icon will appear on that are currently recorded on the LCD. 6. Delete Delete unwanted photos and videos at once. You can delete one image or video clip at a time or delete all the unprotected photos and videos that image when it appear on the memory card at any time to confirm and exit...
... icon will appear on that are currently recorded on the LCD. 6. Delete Delete unwanted photos and videos at once. You can delete one image or video clip at a time or delete all the unprotected photos and videos that image when it appear on the memory card at any time to confirm and exit...

ViviCam 8690 Camera Manual
Page 37
... Up/Down button to highlight certain focal points. Press the Menu/OK button. 5. The Crop feature lets you delete one or all unprotect photos or videos "Cancel" to select the Crop menu option. 3. Crop Image Crop your photos to show only a specific portion of the image as a new photo. Press... the Menu/OK button. 2. Press the Up/Down button to select: "This image" (photos) or "This Video" (videos) depending on an image and then save that part of an image or to select Crop or cancel. 36 Press the Left/Right button to...
... Up/Down button to highlight certain focal points. Press the Menu/OK button. 5. The Crop feature lets you delete one or all unprotect photos or videos "Cancel" to select the Crop menu option. 3. Crop Image Crop your photos to show only a specific portion of the image as a new photo. Press... the Menu/OK button. 2. Press the Up/Down button to select: "This image" (photos) or "This Video" (videos) depending on an image and then save that part of an image or to select Crop or cancel. 36 Press the Left/Right button to...

ViviCam 8690 Camera Manual
Page 42
...this license agreement" and then click "Next" to where the program will be installed, and then click "Install". 41 On PC only: Let the "Vivitar Experience Image Manager" installer create the folder to continue. 10. Click "Next" to confirm your camera model selection and to open the next window. 6.... Click the "How to transfer photos and videos from the list and click "Next" to install the application. 8. Note: If you do not have internet access, you have internet access, the "...
...this license agreement" and then click "Next" to where the program will be installed, and then click "Install". 41 On PC only: Let the "Vivitar Experience Image Manager" installer create the folder to continue. 10. Click "Next" to confirm your camera model selection and to open the next window. 6.... Click the "How to transfer photos and videos from the list and click "Next" to install the application. 8. Note: If you do not have internet access, you have internet access, the "...

ViviCam 8690 Camera Manual
Page 43
... complete. The first time you connect the device to open the application or close the window and run the Vivitar Experience Image Manager from the Main menu. 42 11. Click the "Launch Vivitar Experience Image Manager" to the computer you are in the USB mode. 4. Do not disconnect the cable during transfer... came with your camera to connect your camera to the computer 1. MSDC will cancel the transfer of any files on your computer. 2. Get photos and videos from your camera to your camera to your computer. 12.
... complete. The first time you connect the device to open the application or close the window and run the Vivitar Experience Image Manager from the Main menu. 42 11. Click the "Launch Vivitar Experience Image Manager" to the computer you are in the USB mode. 4. Do not disconnect the cable during transfer... came with your camera to connect your camera to the computer 1. MSDC will cancel the transfer of any files on your computer. 2. Get photos and videos from your camera to your camera to your computer. 12.

ViviCam 8690 Camera Manual
Page 44
Select to your camera to remove the media files from your computer. Click the "Get media" button to transfer the photos and videos from the selected device (removable disk) after the import. 8. Select a location on the bottom left showing the number of media 43 You can select to... place the new photo and video files. 6. If your camera (removable disk) from device" window opens. 3. Select your camera is the only USB device connected then it will be selected ...
Select to your camera to remove the media files from your computer. Click the "Get media" button to transfer the photos and videos from the selected device (removable disk) after the import. 8. Select a location on the bottom left showing the number of media 43 You can select to... place the new photo and video files. 6. If your camera (removable disk) from device" window opens. 3. Select your camera is the only USB device connected then it will be selected ...

ViviCam 8690 Camera Manual
Page 45
...cancel the transfer of options, select Open folder to my computer manually (Using Windows) 1. Using the Vivitar Experience Image Manager, you copy the images into the Pictures/My Pictures folder and the videos into your computer. 44 Use automatic "Geotagging" with built in Mass Storage mode. 3. Use the...and albums ready for your computer with your camera to connect your camera to and from this folder into the Videos/My Videos folder. 7. A window appears on your use the Vivitar Experience Image Manager open the Help file or click the "Take the Tour" button on their way to another...
...cancel the transfer of options, select Open folder to my computer manually (Using Windows) 1. Using the Vivitar Experience Image Manager, you copy the images into the Pictures/My Pictures folder and the videos into your computer. 44 Use automatic "Geotagging" with built in Mass Storage mode. 3. Use the...and albums ready for your computer with your camera to connect your camera to and from this folder into the Videos/My Videos folder. 7. A window appears on your use the Vivitar Experience Image Manager open the Help file or click the "Take the Tour" button on their way to another...


