
VC5024 User Manual
Page 1
All other trademarks are registered trademarks of their respective companies. All rights reserved. Windows and the Windows logo are the property of Microsoft Corporation. ViviCam 5024 Digital Camera Owner Manual © 2009 Sakar International, Inc.
All other trademarks are registered trademarks of their respective companies. All rights reserved. Windows and the Windows logo are the property of Microsoft Corporation. ViviCam 5024 Digital Camera Owner Manual © 2009 Sakar International, Inc.

VC5024 User Manual
Page 2
... Windows XP 2 Computer System Requirements for Windows Vista 3 Computer System Requirements for Macintosh 3 A Quick Look at Your Camera ...4 Preparing Your Camera for Use ...5 Installing SD Memory Card ...6 Starting Your Camera ...8 Camera Mode ...8 Taking photos ...8 Video Mode ...13 Playback Mode...13 Installing PhoTags Express Software ...17 Everything you need to... and videos to your PC manually 29 Transferring photos and videos to your MAC manually 30 Maintenance of Your Digital Camera...30 Sakar Warranty Card...30 Appendix A: Specifications ...32 Appendix B: Troubleshooting ...33 1
... Windows XP 2 Computer System Requirements for Windows Vista 3 Computer System Requirements for Macintosh 3 A Quick Look at Your Camera ...4 Preparing Your Camera for Use ...5 Installing SD Memory Card ...6 Starting Your Camera ...8 Camera Mode ...8 Taking photos ...8 Video Mode ...13 Playback Mode...13 Installing PhoTags Express Software ...17 Everything you need to... and videos to your PC manually 29 Transferring photos and videos to your MAC manually 30 Maintenance of Your Digital Camera...30 Sakar Warranty Card...30 Appendix A: Specifications ...32 Appendix B: Troubleshooting ...33 1

VC5024 User Manual
Page 3
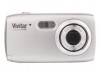
Please read this manual carefully first in order to your digital camera. What your camera includes y Digital Camera y PhoTags Express software Installation CD y USB cable y Quick Start Guide y Strap Computer System Requirements for Windows XP To be used as a removable disk. ...quality digital photos and videos is included with Windows XP 2 Everything you need the following minimum configuration: y Pentium III process or above with your camera. Your digital camera can also be able to download photos to get the most out of your PC, you will need to 8GB. • 2.4 inch TFT...
Please read this manual carefully first in order to your digital camera. What your camera includes y Digital Camera y PhoTags Express software Installation CD y USB cable y Quick Start Guide y Strap Computer System Requirements for Windows XP To be used as a removable disk. ...quality digital photos and videos is included with Windows XP 2 Everything you need the following minimum configuration: y Pentium III process or above with your camera. Your digital camera can also be able to download photos to get the most out of your PC, you will need to 8GB. • 2.4 inch TFT...

VC5024 User Manual
Page 6
... on the LCD, this indicates that the batteries are inserted with the correct polarity facing up. 3. To insert the batteries into the camera: 1. Preparing Your Camera for Use Battery Installation Your camera requires 3 AAA batteries. When the "Low Power" is no SD card inserted before it powers off the testing photo will be...
... on the LCD, this indicates that the batteries are inserted with the correct polarity facing up. 3. To insert the batteries into the camera: 1. Preparing Your Camera for Use Battery Installation Your camera requires 3 AAA batteries. When the "Low Power" is no SD card inserted before it powers off the testing photo will be...

VC5024 User Manual
Page 7
... the capacity of time, please remove the batteries to conserve battery power if the camera is shut down or powered off your camera for 60s it will be lost forever if they are not downloaded before the camera is on but not in the correct direction. (see the sketch below : 1.... Insert the Memory card into the slot in use Alkaline batteries. We recommend you to your camera before downloading the testing photo when you have not inserted an SD card. Installing SD Memory Card Your camera has a memory card slot that enables you use for an extended period of your PC. ...
... the capacity of time, please remove the batteries to conserve battery power if the camera is shut down or powered off your camera for 60s it will be lost forever if they are not downloaded before the camera is on but not in the correct direction. (see the sketch below : 1.... Insert the Memory card into the slot in use Alkaline batteries. We recommend you to your camera before downloading the testing photo when you have not inserted an SD card. Installing SD Memory Card Your camera has a memory card slot that enables you use for an extended period of your PC. ...

VC5024 User Manual
Page 8
... LCD screen when you insert the card indicating that photos and videos will now be flushed with the camera will be stored on the LCD screen after you feel it to your camera. 4. Your camera supports any compatible SD memory card (up to your card, please wait..." The testing photo will appear ...normal use . on the SD memory card. Push the card in until you turn on your memory card when you inserted it "click" into the camera all the images taken with the surface of the card should be stored on the screen. 7 Please download the images before power off . "Card inserted...
... LCD screen when you insert the card indicating that photos and videos will now be flushed with the camera will be stored on the LCD screen after you feel it to your camera. 4. Your camera supports any compatible SD memory card (up to your card, please wait..." The testing photo will appear ...normal use . on the SD memory card. Push the card in until you turn on your memory card when you inserted it "click" into the camera all the images taken with the surface of the card should be stored on the screen. 7 Please download the images before power off . "Card inserted...

VC5024 User Manual
Page 9
... on your object as possible or insert an SD memory card in order to your LCD screen.. 1. Note: When the internal memory is Camera mode. Starting Your Camera Press and hold the Power button again for about 3 seconds. Insert a SD Memory Card to be taken. The icon turned on and ...ready to take more images! Hold the camera steady and compose your camera, the default mode is full, the LCD screen will beep continuously. If you to use . The LCD screen will appear at the top...
... on your object as possible or insert an SD memory card in order to your LCD screen.. 1. Note: When the internal memory is Camera mode. Starting Your Camera Press and hold the Power button again for about 3 seconds. Insert a SD Memory Card to be taken. The icon turned on and ...ready to take more images! Hold the camera steady and compose your camera, the default mode is full, the LCD screen will beep continuously. If you to use . The LCD screen will appear at the top...

VC5024 User Manual
Page 10
... button again until you to the red-eye reduction flash mode. Note: A "Low Power" message will appear on your subject using the camera with the flash, please change from the auto flash to take good quality photos even without the use of trembling or shaking while the photo... can magnify your subject. 2. This function allows you see the icon appear on . 4. Press the Menu/OK button. 2. Anti-shake function Your Digital Camera has a function that the flash is being taken. This indicates that prevents photos coming out blurry as a result of a tripod. Press the W button ...
... button again until you to the red-eye reduction flash mode. Note: A "Low Power" message will appear on your subject using the camera with the flash, please change from the auto flash to take good quality photos even without the use of trembling or shaking while the photo... can magnify your subject. 2. This function allows you see the icon appear on . 4. Press the Menu/OK button. 2. Anti-shake function Your Digital Camera has a function that the flash is being taken. This indicates that prevents photos coming out blurry as a result of a tripod. Press the W button ...

VC5024 User Manual
Page 11
... screen. 5. Change Image Resolution The build-in memory allows you to take up more image size selections. 1. Press the Up/Down button to get more camera memory capacity than lower resolution photos. 10 Icon will affect the photo quality. Press the Menu/OK button. 2. to confirm. Press the Menu/OK button...
... screen. 5. Change Image Resolution The build-in memory allows you to take up more image size selections. 1. Press the Up/Down button to get more camera memory capacity than lower resolution photos. 10 Icon will affect the photo quality. Press the Menu/OK button. 2. to confirm. Press the Menu/OK button...

VC5024 User Manual
Page 12
...close settings push the Micro/Normal switch up. The default setting is found on the left hand side of the camera. 1. To set the photo frequency: 1. Hyperfocal distance setting This camera is equipped with the lens you are using. The mountain setting gives you maximum depth-of your photos. The ... lighting oscillation can have the overhead branch in focus as well as the mountains in between! 11 Set the camera for the correct frequency for the country that you are in. Your camera has 2 Frequency settings, 60HZ for Europe and Japan. and 50HZ for the U.S. Press the Up/Down button...
...close settings push the Micro/Normal switch up. The default setting is found on the left hand side of the camera. 1. To set the photo frequency: 1. Hyperfocal distance setting This camera is equipped with the lens you are using. The mountain setting gives you maximum depth-of your photos. The ... lighting oscillation can have the overhead branch in focus as well as the mountains in between! 11 Set the camera for the correct frequency for the country that you are in. Your camera has 2 Frequency settings, 60HZ for Europe and Japan. and 50HZ for the U.S. Press the Up/Down button...

VC5024 User Manual
Page 13
... to delay the time between your pressing the shutter and when the photo is actually taken. The timer icon will now appear instead of the camera icon on a flat and secure surface when you have taken a photo. 2. At the end of the LCD. 3. It is selected by a flashing red LED light... use the Self Timer again simply press the Shutter button once more. Press the Left button to the 'No' option if you have taken: 1. The camera will automatically take the picture. 6. Press the Down / Timer button in a photo by using the Self Timer feature to confirm. 12 Self Timer You can...
... to delay the time between your pressing the shutter and when the photo is actually taken. The timer icon will now appear instead of the camera icon on a flat and secure surface when you have taken a photo. 2. At the end of the LCD. 3. It is selected by a flashing red LED light... use the Self Timer again simply press the Shutter button once more. Press the Left button to the 'No' option if you have taken: 1. The camera will automatically take the picture. 6. Press the Down / Timer button in a photo by using the Self Timer feature to confirm. 12 Self Timer You can...

VC5024 User Manual
Page 14
... (Lower resolution) 13 Note: 1. To set the resolution size before capturing the video. Press the Menu/OK button. 2. Press the Up/Down button to your camera. 3. The video will appear on the LCD screen as soon as an AVI file on your computer. You can playback the AVI file by using...
... (Lower resolution) 13 Note: 1. To set the resolution size before capturing the video. Press the Menu/OK button. 2. Press the Up/Down button to your camera. 3. The video will appear on the LCD screen as soon as an AVI file on your computer. You can playback the AVI file by using...

VC5024 User Manual
Page 15
...Note: "NO FILE" will appear on the LCD when there are in. Press the Menu/OK button to select either: 50 HZ 60 HZ 5. Your camera has 2 Frequency settings, 60HZ for the country that you are no photos or videos in this mode. 1. Press the MODE button to select the FREQUENCY... option. 3. Power on your camera. 14 Press the Menu/OK button again. 4. Press the Up/Down button to enter the Playback Mode. 3. Setting Video frequency Fluorescent lighting oscillation can preview...
...Note: "NO FILE" will appear on the LCD when there are in. Press the Menu/OK button to select either: 50 HZ 60 HZ 5. Your camera has 2 Frequency settings, 60HZ for the country that you are no photos or videos in this mode. 1. Press the MODE button to select the FREQUENCY... option. 3. Power on your camera. 14 Press the Menu/OK button again. 4. Press the Up/Down button to enter the Playback Mode. 3. Setting Video frequency Fluorescent lighting oscillation can preview...
VC5024 User Manual
Page 16
.../Down button to select one of the LCD for each photo. Press the Menu/OK button 4. Press the Menu/OK button again to confirm your camera. This action is deleted forever. The resolution icon of the photo will appear on the bottom left corner of the following options: "Delete One"... in your camera. 3. Press the Shutter button to delete the current file selected. Depending on the LCD when you choose "Yes" the currect file is irreversible. 15...
.../Down button to select one of the LCD for each photo. Press the Menu/OK button 4. Press the Menu/OK button again to confirm your camera. This action is deleted forever. The resolution icon of the photo will appear on the bottom left corner of the following options: "Delete One"... in your camera. 3. Press the Shutter button to delete the current file selected. Depending on the LCD when you choose "Yes" the currect file is irreversible. 15...

VC5024 User Manual
Page 17
... "Yes" or "No". 5. Format This function will delete all of the files in any time. 1. Press the Shutter button again to confirm your camera's memory (internal memory or SD memory card, depending on the LCD once the format has completed. Now you can connect your photos Your...above. 16 Press Menu/OK button. 3. In the playback mode: 1. Use Up/Down button to print out by pressing Left or Right button. 2. Print your camera to print photos in your selection. 6. Press the Menu/OK button. 2. Select a photo you wish to select Print. 4. Please be certain that allows you ...
... "Yes" or "No". 5. Format This function will delete all of the files in any time. 1. Press the Shutter button again to confirm your camera's memory (internal memory or SD memory card, depending on the LCD once the format has completed. Now you can connect your photos Your...above. 16 Press Menu/OK button. 3. In the playback mode: 1. Use Up/Down button to print out by pressing Left or Right button. 2. Print your camera to print photos in your selection. 6. Press the Menu/OK button. 2. Select a photo you wish to select Print. 4. Please be certain that allows you ...

VC5024 User Manual
Page 18
... Before attempting to install the software, make sure that you need to install the CD installation disk. Warning: DO NOT PLUG YOUR CAMERA INTO THE USB PORT UNTIL THE SOFTWARE INSTALLATION HAS BEEN COMPLETELY INSTALLED. 1. This will affect the install process and can cause a failed... installation of the camera software and drivers. The installation screen should automatically open. For more installation information click the "Read Me First!" In order to install...
... Before attempting to install the software, make sure that you need to install the CD installation disk. Warning: DO NOT PLUG YOUR CAMERA INTO THE USB PORT UNTIL THE SOFTWARE INSTALLATION HAS BEEN COMPLETELY INSTALLED. 1. This will affect the install process and can cause a failed... installation of the camera software and drivers. The installation screen should automatically open. For more installation information click the "Read Me First!" In order to install...

VC5024 User Manual
Page 22
... as Free Customer Support. Plug the other end of the USB cable into the USB port of the USB cable into a USB port on your camera. 1. If you to use message pops up on your product entitles you choose to register at a later time click the "Continue" button to open . Wait... (This requires an internet connection). Note: In order to edit existing photos that you have on the task bar. 21 Plug one end of the camera. 2. This screen will appear each time you open the application until you are required to Photags Express Product Registration screen will open the Photags Express...
... as Free Customer Support. Plug the other end of the USB cable into the USB port of the USB cable into a USB port on your camera. 1. If you to use message pops up on your product entitles you choose to register at a later time click the "Continue" button to open . Wait... (This requires an internet connection). Note: In order to edit existing photos that you have on the task bar. 21 Plug one end of the camera. 2. This screen will appear each time you open the application until you are required to Photags Express Product Registration screen will open the Photags Express...

VC5024 User Manual
Page 23
4. From the Main Menu screen that appears on when the USB cable is properly connected. Burn 22 You can use these features to open the "PhoTags Express" Software. If you have not already opened your photos by creating countless unique photo collections without duplicating any photos. If the Camera is off it will automatically be turned on your desktop to edit your photos: Manage your application then click the "PhoTags Express" icon that appears, select the "Select Photos", "Enhance Photos" or "Add Captions" buttons.
4. From the Main Menu screen that appears on when the USB cable is properly connected. Burn 22 You can use these features to open the "PhoTags Express" Software. If you have not already opened your photos by creating countless unique photo collections without duplicating any photos. If the Camera is off it will automatically be turned on your desktop to edit your photos: Manage your application then click the "PhoTags Express" icon that appears, select the "Select Photos", "Enhance Photos" or "Add Captions" buttons.

VC5024 User Manual
Page 25
The Get Photos Wizard opens. 24 Download photos and videos to your PC Transfer Photos and video images from the top of the PhoTags Express Main Menu screen. Select the "Get Photos" button from your camera to your PC using PhoTags Express.
The Get Photos Wizard opens. 24 Download photos and videos to your PC Transfer Photos and video images from the top of the PhoTags Express Main Menu screen. Select the "Get Photos" button from your camera to your PC using PhoTags Express.

VC5024 User Manual
Page 28
Photos and Videos on the top right of the screen. 27 Open the "Select Photos" mode of your photos, create collections and Burn CD`s. Help Guide button found on your camera are now downloaded to your computer to the selected folder. You may now use PhoTags Express to view the thumbnails for all the media. All the media - To learn more of how to get the most out of Photags Express to edit your PhoTags application select the "Show Me How" or the "?"
Photos and Videos on the top right of the screen. 27 Open the "Select Photos" mode of your photos, create collections and Burn CD`s. Help Guide button found on your camera are now downloaded to your computer to the selected folder. You may now use PhoTags Express to view the thumbnails for all the media. All the media - To learn more of how to get the most out of Photags Express to edit your PhoTags application select the "Show Me How" or the "?"


