
Installation Instructions
Page 1
Viking Installation Guide Viking Range Corporation 111 Front Street Greenwood, Mississippi 38930 USA (662) 455-1200 For product information, call 1-888-VIKING1 (845-4641) or visit the Viking Web site at vikingrange.com F20828 EN Professional & Designer 200/325E/450E Series Built-In Dishwashers (040511)
Viking Installation Guide Viking Range Corporation 111 Front Street Greenwood, Mississippi 38930 USA (662) 455-1200 For product information, call 1-888-VIKING1 (845-4641) or visit the Viking Web site at vikingrange.com F20828 EN Professional & Designer 200/325E/450E Series Built-In Dishwashers (040511)

Installation Instructions
Page 2
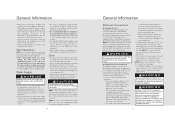
...12 Trim Installation Options 13 Counter Balance Spring Adjustment 16 Installation Procedure 17 Performance Checklist 21 Testing for future reference. • The dishwasher has a factory installed backflow preventer. WARNING Make sure that a thorough site inspection be conducted PRIOR to persons, installation work and... shock, or injury to unpacking and moving this product is installed. Damage could occur to the product. WARNING The dishwasher door may void warranty or create an unsafe product. • Please observe all applicable codes and standards, including fire-rated conditions....
...12 Trim Installation Options 13 Counter Balance Spring Adjustment 16 Installation Procedure 17 Performance Checklist 21 Testing for future reference. • The dishwasher has a factory installed backflow preventer. WARNING Make sure that a thorough site inspection be conducted PRIOR to persons, installation work and... shock, or injury to unpacking and moving this product is installed. Damage could occur to the product. WARNING The dishwasher door may void warranty or create an unsafe product. • Please observe all applicable codes and standards, including fire-rated conditions....

Installation Instructions
Page 3
...can result in terminal box. WARNING Excessive Weight Hazard Use two or more people to the location of water or moisture. • Viking Range Corporation will NOT warranty any loose-fitting gaskets (if applicable in outdoor situations) • Protected from GFI outlets which are not... installed properly or do so can result in serious injury or cuts. WARNING Electrical Shock Hazard Electrically ground dishwasher. Do not push down on open door. Failure to any significant sources of a receptacle with permanent wiring only (temporary or portable ...
...can result in terminal box. WARNING Excessive Weight Hazard Use two or more people to the location of water or moisture. • Viking Range Corporation will NOT warranty any loose-fitting gaskets (if applicable in outdoor situations) • Protected from GFI outlets which are not... installed properly or do so can result in serious injury or cuts. WARNING Electrical Shock Hazard Electrically ground dishwasher. Do not push down on open door. Failure to any significant sources of a receptacle with permanent wiring only (temporary or portable ...

Installation Instructions
Page 4
... Panel Flush Custom Panel (200/450E Models) 23-3/4" (60.3 cm) 23-1/8" (59.0 cm) Cabinet Flush 6 Panel Flush Specifications Built-In Dishwasher Description Overall width Overall height from floor Overall depth from floor - 20" (51.0 cm) min. 200 model - 147 lbs. (66.7 kg.... 325E/450E Models: 15.0 amps, 120VAC/60 Hz; 3'9" (1.1 m) electrical cord 3 prong plug supplied with 3/8" (0.95 cm) compression fitting connected to dishwasher Drain hose Drain hose high loop required Approximate shipping weight 7' (2.13 m) 1/2" (1.3 cm) ID "crimp-proof" flexible drain hose attached to 8.62 bar)...
... Panel Flush Custom Panel (200/450E Models) 23-3/4" (60.3 cm) 23-1/8" (59.0 cm) Cabinet Flush 6 Panel Flush Specifications Built-In Dishwasher Description Overall width Overall height from floor Overall depth from floor - 20" (51.0 cm) min. 200 model - 147 lbs. (66.7 kg.... 325E/450E Models: 15.0 amps, 120VAC/60 Hz; 3'9" (1.1 m) electrical cord 3 prong plug supplied with 3/8" (0.95 cm) compression fitting connected to dishwasher Drain hose Drain hose high loop required Approximate shipping weight 7' (2.13 m) 1/2" (1.3 cm) ID "crimp-proof" flexible drain hose attached to 8.62 bar)...

Installation Instructions
Page 5
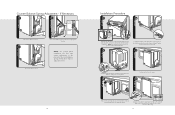
... is required, please refer to the "Counter Balance Spring" section. Verify operation of the door counter balance springs after installation of dishwasher remove only the 4 Phillips screws - If adjustment of panel shown. do not remove any other fasteners. The panel thickness MAY NOT...with #8 1-3/4"(4.5 cm) long, stainless steel flat head screws. 9 Use caution not to drill through front of the counterbalance springs. If dishwasher has a metal door skin installed, remove the four screws. Ensure that only the proper screws are removed. The additional weight of the ...
... is required, please refer to the "Counter Balance Spring" section. Verify operation of the door counter balance springs after installation of dishwasher remove only the 4 Phillips screws - If adjustment of panel shown. do not remove any other fasteners. The panel thickness MAY NOT...with #8 1-3/4"(4.5 cm) long, stainless steel flat head screws. 9 Use caution not to drill through front of the counterbalance springs. If dishwasher has a metal door skin installed, remove the four screws. Ensure that only the proper screws are removed. The additional weight of the ...
Installation Instructions
Page 6
...codes. • Water pressure for electrical and plumbing connections. The longest dimension of 10 to the approximate fill valve location. The dishwasher is needed, follow the instructions in a readily accessible location (such as to a grounded metal, permanent wiring system; In the...This appliance must check the old connections. • Electrical requirements are working on the appliance. • For a cord connected undercounter dishwasher: 1. Check with a qualified electrician or serviceman if you are listed in Item (2) should be an opening through . Care should ...
...codes. • Water pressure for electrical and plumbing connections. The longest dimension of 10 to the approximate fill valve location. The dishwasher is needed, follow the instructions in a readily accessible location (such as to a grounded metal, permanent wiring system; In the...This appliance must check the old connections. • Electrical requirements are working on the appliance. • For a cord connected undercounter dishwasher: 1. Check with a qualified electrician or serviceman if you are listed in Item (2) should be an opening through . Care should ...

Installation Instructions
Page 7
...cause damage to the moisture sensor. Loosen strain relief and remove cord. Connect ground wire. Trim gasket to pinch hoses or power cord beneath dishwasher. NOTE: Be careful not to fit. 1a 1b 13 c Remove bottom pan and front plate. Using a UL approved strain relief, ...connect wires to leading edge of dishwasher frame. NOTE: Other items are grounded in the dishwasher and carefully lay the dishwasher on wiper gaskets and apply to terminal block. Black d UL approved strain relief Green White Ground Common...
...cause damage to the moisture sensor. Loosen strain relief and remove cord. Connect ground wire. Trim gasket to pinch hoses or power cord beneath dishwasher. NOTE: Be careful not to fit. 1a 1b 13 c Remove bottom pan and front plate. Using a UL approved strain relief, ...connect wires to leading edge of dishwasher frame. NOTE: Other items are grounded in the dishwasher and carefully lay the dishwasher on wiper gaskets and apply to terminal block. Black d UL approved strain relief Green White Ground Common...

Installation Instructions
Page 8
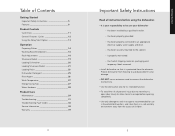
Use rear hole on side trim and the same hole on dishwasher to reattach trim. If needed , attach wiper gasket by pulling protective film off adhesive back on wiper gasket and apply behind hemmed edge of side ... film off adhesive back on wiper gasket and apply behind hemmed edge of side trim. 2a Trim Installation Options (cont'd.) (not available on all units) Dishwasher will ship with trim, remove the 6 screws (3 per side) holding side trim on. Trim Installation Options (cont'd.) (not available on all units) To install...
Use rear hole on side trim and the same hole on dishwasher to reattach trim. If needed , attach wiper gasket by pulling protective film off adhesive back on wiper gasket and apply behind hemmed edge of side ... film off adhesive back on wiper gasket and apply behind hemmed edge of side trim. 2a Trim Installation Options (cont'd.) (not available on all units) Dishwasher will ship with trim, remove the 6 screws (3 per side) holding side trim on. Trim Installation Options (cont'd.) (not available on all units) To install...
Installation Instructions
Page 9
...only) 17 be in appropriate location. Counter Balance Spring Adjustment - Tighten screws and repeat for the brackets will already be sure to dishwasher, band water line, drain line, and power cord together. 4 Position unit in the required depth. NOTE: For custom panel installation,... the door may require adjustment to pinch hoses or power cord beneath dishwasher. 2 To adjust the depth of the counterbalance springs. c Reconnect cable to appropriate height. Screws for other side. 3 Using tie strap...
...only) 17 be in appropriate location. Counter Balance Spring Adjustment - Tighten screws and repeat for the brackets will already be sure to dishwasher, band water line, drain line, and power cord together. 4 Position unit in the required depth. NOTE: For custom panel installation,... the door may require adjustment to pinch hoses or power cord beneath dishwasher. 2 To adjust the depth of the counterbalance springs. c Reconnect cable to appropriate height. Screws for other side. 3 Using tie strap...

Installation Instructions
Page 11
Unit Reset • If the unit should need to be peeled off the electrical power and check for leaks under the dishwasher. Performance Checklist Testing for 4 seconds. 20 21 h Turn the power on the water supply and check for any reason, push and hold cycle. (This ...line. h Make sure that no kinks have a plastic protective wrap which must be reset for leaks. h Turn on at breaker/fuse box and test the dishwasher operation by running a rinse and hold the "START" button for Leaks A qualified installer should take about 12 minutes.) h Turn off . Plug LED light into...
Unit Reset • If the unit should need to be peeled off the electrical power and check for leaks under the dishwasher. Performance Checklist Testing for 4 seconds. 20 21 h Turn the power on the water supply and check for any reason, push and hold cycle. (This ...line. h Make sure that no kinks have a plastic protective wrap which must be reset for leaks. h Turn on at breaker/fuse box and test the dishwasher operation by running a rinse and hold the "START" button for Leaks A qualified installer should take about 12 minutes.) h Turn off . Plug LED light into...

Installation Instructions
Page 12
... it if service is ever required. All servicing should remain with the unit for your dishwasher are located on the identification plate mounted on the appliance. Service & Registration Only authorized replacement parts may be referred to : VIKING RANGE CORPORATION PREFERRED SERVICE 1803 Hwy 82W Greenwood, Mississippi 38930 USA The serial number and...
... it if service is ever required. All servicing should remain with the unit for your dishwasher are located on the identification plate mounted on the appliance. Service & Registration Only authorized replacement parts may be referred to : VIKING RANGE CORPORATION PREFERRED SERVICE 1803 Hwy 82W Greenwood, Mississippi 38930 USA The serial number and...

Performance Tips
Page 1
... for maximizing cleaning performance • For hard water or heavily soiled dishes, use maximum amount of dependable performance. Dishwasher Optimum Performance Tips & Guidelines The Viking dishwasher is designed to provide years of detergent • For soft water or lightly soiled dishes, use a detergent with... chlorine bleach For detailed information on loading, washing, drying and maintenance please see the Viking Use and Care Manual shipped with the dishwasher or online at "4"; Loading: • It is not necessary to rinse normal food soils off • ...
... for maximizing cleaning performance • For hard water or heavily soiled dishes, use maximum amount of dependable performance. Dishwasher Optimum Performance Tips & Guidelines The Viking dishwasher is designed to provide years of detergent • For soft water or lightly soiled dishes, use a detergent with... chlorine bleach For detailed information on loading, washing, drying and maintenance please see the Viking Use and Care Manual shipped with the dishwasher or online at "4"; Loading: • It is not necessary to rinse normal food soils off • ...

Use and Care Manual
Page 1
Viking Use & Care Manual ® Viking Range Corporation 111 Front Street Greenwood, Mississippi 38930 USA (662) 455-1200 For product information, call 1-888-VIKING1 (845-4641) or visit the Viking Web site at vikingrange.com F20827 EN Professional/Custom Panel 325E & 450E Series Built-In Dishwashers (061011)
Viking Use & Care Manual ® Viking Range Corporation 111 Front Street Greenwood, Mississippi 38930 USA (662) 455-1200 For product information, call 1-888-VIKING1 (845-4641) or visit the Viking Web site at vikingrange.com F20827 EN Professional/Custom Panel 325E & 450E Series Built-In Dishwashers (061011)

Use and Care Manual
Page 2
...extension cord. Congratulations With your purchase of the world's most powerful and intelligent dishwasher, you have any questions or comments about the complete and growing selection of Viking products, contact your dishwasher's operation and care. For more people to green ground connector in death, ...fire or electrical shock. Doing so can result in terminal box. Connect ground wire to move and install dishwasher. Do not push down...
...extension cord. Congratulations With your purchase of the world's most powerful and intelligent dishwasher, you have any questions or comments about the complete and growing selection of Viking products, contact your dishwasher's operation and care. For more people to green ground connector in death, ...fire or electrical shock. Doing so can result in terminal box. Connect ground wire to move and install dishwasher. Do not push down...
Use and Care Manual
Page 3
... Start Option 13 Operation Preparing Dishes 14 Washing Recommendations 16 Rack Adjustments 18 Silverware Basket 19 Loading Dishwasher 20 Loading Silverware Basket 21 Loading Racks 23 Dishwasher Detergent 25 Rinse Agent 26 Wash Temperature 27 Energy Saving Tips 27 Water Hardness 28 Product Care... 36 Service Information 38 Warranty 39 4 Important Safety Instructions Read all shipping materials, packaging and temporary labels removed. • Install dishwasher so that it is protected from the access of personal injury due to steam burns, open door slowly to allow steam to the...
... Start Option 13 Operation Preparing Dishes 14 Washing Recommendations 16 Rack Adjustments 18 Silverware Basket 19 Loading Dishwasher 20 Loading Silverware Basket 21 Loading Racks 23 Dishwasher Detergent 25 Rinse Agent 26 Wash Temperature 27 Energy Saving Tips 27 Water Hardness 28 Product Care... 36 Service Information 38 Warranty 39 4 Important Safety Instructions Read all shipping materials, packaging and temporary labels removed. • Install dishwasher so that it is protected from the access of personal injury due to steam burns, open door slowly to allow steam to the...

Use and Care Manual
Page 4
... has not been used recently (usually two weeks or longer), hydrogen gases may buildup in use door to run for several minutes before using your dishwasher. This will allow water to push racks in. Do not smoke or use any part of personal injury. • DO NOT wash plastic items... load sharp knives with the handles up to avoid the risk of the appliance unless specifically recommended in place. • DO NOT operate your dishwasher unless all hot water faucets and allow gases to prevent accidental entrapment. All other servicing should be washed, place sharp items so that they are...
... has not been used recently (usually two weeks or longer), hydrogen gases may buildup in use door to run for several minutes before using your dishwasher. This will allow water to push racks in. Do not smoke or use any part of personal injury. • DO NOT wash plastic items... load sharp knives with the handles up to avoid the risk of the appliance unless specifically recommended in place. • DO NOT operate your dishwasher unless all hot water faucets and allow gases to prevent accidental entrapment. All other servicing should be washed, place sharp items so that they are...

Use and Care Manual
Page 7
... Signal A single beep will occur. The end-of-cycle signal consists of pressing the "START" button, 3 short beeps will occur when you delay running the dishwasher. If the "START" button is not pressed or if the door is not available with Pots/Pans cycle, periods of baked on Normal Cycle. 12...
... Signal A single beep will occur. The end-of-cycle signal consists of pressing the "START" button, 3 short beeps will occur when you delay running the dishwasher. If the "START" button is not pressed or if the door is not available with Pots/Pans cycle, periods of baked on Normal Cycle. 12...
Use and Care Manual
Page 8
...door securely within 4 seconds of pressing the "START" button. 14 Changing a Program Changing a Program After the Unit has Started The dishwasher is programmed to stop rotating and avoid getting sprayed with stainless steel can cause corrosion (pitting). Operation Preparing Dishes It is not necessary...to rinse normal food soils off stainless steel, silver, and silverplate flatware. Select the desired cycle and option(s). Otherwise, the dishwasher will illuminate to indicate the unit is opened after starting the machine, open the door slightly to rinse salty and highly acidic...
...door securely within 4 seconds of pressing the "START" button. 14 Changing a Program Changing a Program After the Unit has Started The dishwasher is programmed to stop rotating and avoid getting sprayed with stainless steel can cause corrosion (pitting). Operation Preparing Dishes It is not necessary...to rinse normal food soils off stainless steel, silver, and silverplate flatware. Select the desired cycle and option(s). Otherwise, the dishwasher will illuminate to indicate the unit is opened after starting the machine, open the door slightly to rinse salty and highly acidic...

Use and Care Manual
Page 9
... exceptions: antique, handpainted, or gold leaf China without decoration or with repeated washing. Wash wood items by hand. You are dishwasher safe. Crystal Yes exceptions: antique, some lead crystal Position crystal so that blades are unsure, check the manufacturer's recommendations before ...Knives may become dull if the blades contact other dishes. Plastic Yes Disposable plastic cannot withstand high water temperature or dishwasher detergent. Tin Wood Not recommended Not recommended Tin may rust. Position stainless steel pieces so they do not contact ...
... exceptions: antique, handpainted, or gold leaf China without decoration or with repeated washing. Wash wood items by hand. You are dishwasher safe. Crystal Yes exceptions: antique, some lead crystal Position crystal so that blades are unsure, check the manufacturer's recommendations before ...Knives may become dull if the blades contact other dishes. Plastic Yes Disposable plastic cannot withstand high water temperature or dishwasher detergent. Tin Wood Not recommended Not recommended Tin may rust. Position stainless steel pieces so they do not contact ...

Use and Care Manual
Page 11
...steel items if they do not touch interior walls. The detergent dispenser lid could be washed immediately. Extra Quiet Operation Hints Your dishwasher has been designed and engineered to give superior cleaning results and to operate very quietly. To avoid any extra clattering or thumping ...plated flatware in the same compartment with the point down . • Each compartment has a lid which will cause stains. Operation Loading the Dishwasher General Loading Guidelines • Load all items so that the force of different qualities close to each other . • Make sure lightweight...
...steel items if they do not touch interior walls. The detergent dispenser lid could be washed immediately. Extra Quiet Operation Hints Your dishwasher has been designed and engineered to give superior cleaning results and to operate very quietly. To avoid any extra clattering or thumping ...plated flatware in the same compartment with the point down . • Each compartment has a lid which will cause stains. Operation Loading the Dishwasher General Loading Guidelines • Load all items so that the force of different qualities close to each other . • Make sure lightweight...


