Two-Page Specifications Sheet
Page 1
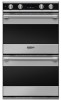
... broiling applications n Concealed six-pass element provides excellent temperature control while allowing oven cavity to be easily cleaned n Meat probe ensures perfect baking/roasting of meats (upper oven only in double oven) n Each oven has five porcelain-coated rack supports and comes standard with three heavy-duty oven racks, including two TruGlideTM full extension oven racks n Digital clock/timer l 100-minute timer allows you to set cooking time for up to cabinet with accessory flush mount installation kit Installation Accessories n Flush mount installation kit for single oven...
... broiling applications n Concealed six-pass element provides excellent temperature control while allowing oven cavity to be easily cleaned n Meat probe ensures perfect baking/roasting of meats (upper oven only in double oven) n Each oven has five porcelain-coated rack supports and comes standard with three heavy-duty oven racks, including two TruGlideTM full extension oven racks n Digital clock/timer l 100-minute timer allows you to set cooking time for up to cabinet with accessory flush mount installation kit Installation Accessories n Flush mount installation kit for single oven...
Installation Instructions
Page 2
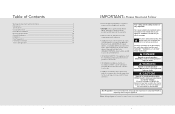
... manual and on top of oven or in the absence of Contents Warnings & Important Safety Information 3 Dimensions 5 Specifications 6 Cutout Dimensions 7 Flush Mount Installation 8 Electrical Requirements 10 General Information 11 Installation 12 Final Preparation 15 Performance Checklist 16 Service & Registration 18 2 IMPORTANT- Note: Wiring diagram is recommended that can happen if the instructions are not followed. Table of codes, the National Electrical Code, ANSI/NFPA-70 -latest edition, or Canadian Electrical Code...
... manual and on top of oven or in the absence of Contents Warnings & Important Safety Information 3 Dimensions 5 Specifications 6 Cutout Dimensions 7 Flush Mount Installation 8 Electrical Requirements 10 General Information 11 Installation 12 Final Preparation 15 Performance Checklist 16 Service & Registration 18 2 IMPORTANT- Note: Wiring diagram is recommended that can happen if the instructions are not followed. Table of codes, the National Electrical Code, ANSI/NFPA-70 -latest edition, or Canadian Electrical Code...

Installation Instructions
Page 3
... not used for space heating. WARNING Frame grounded by a 4-conductor cable assembly. DO NOT USE AN EXTENSION CORD WITH THIS APPLIANCE. This information is heavy-use of the oven door(s) (e.g. IMPORTANT- Remove door before installation to lift the unit. latest edition. SUCH USE MAY RESULT IN FIRE, ELECTRICAL SHOCK OR OTHER PERSONAL INJURY. WARNING The use extreme care when handling. 4 Dimensions 30" Single Oven 2(654-3.0/1cm6") 30" Double Oven 2(654...
... not used for space heating. WARNING Frame grounded by a 4-conductor cable assembly. DO NOT USE AN EXTENSION CORD WITH THIS APPLIANCE. This information is heavy-use of the oven door(s) (e.g. IMPORTANT- Remove door before installation to lift the unit. latest edition. SUCH USE MAY RESULT IN FIRE, ELECTRICAL SHOCK OR OTHER PERSONAL INJURY. WARNING The use extreme care when handling. 4 Dimensions 30" Single Oven 2(654-3.0/1cm6") 30" Double Oven 2(654...
Installation Instructions
Page 6
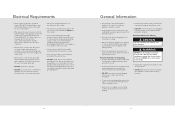
... grounding wire). 10 General Information • All openings in the wall behind oven must be recessed . • A UL-Listed conduit connector must be connected to the proper electrical voltage and frequency as specified on the model/serial rating plate (located inside the vent ont the right sode of the National Electrical Code, ANSI/NFPA 70 - WARNING DO NOT use extreme care when handling. DO NOT lift or carry the door by removing...
... grounding wire). 10 General Information • All openings in the wall behind oven must be recessed . • A UL-Listed conduit connector must be connected to the proper electrical voltage and frequency as specified on the model/serial rating plate (located inside the vent ont the right sode of the National Electrical Code, ANSI/NFPA 70 - WARNING DO NOT use extreme care when handling. DO NOT lift or carry the door by removing...

Installation Instructions
Page 9
.... Convection Bake function-bake and broil elements the same with the convection fan "ON". h Check Low Broil function-inner broil element only. Performance Checklist A qualified installer should carry out the following instructions will turn "ON" and the bake element will be the responsibility of the installer, dealer, or the end user of the product. 16 Performance Checklist (cont.) Viking D3 Self-Clean Indicator Light Electronic Timing Center Temperature Control Off/On Indicator Light Interior Oven Function Selector Oven Light Control 17...
.... Convection Bake function-bake and broil elements the same with the convection fan "ON". h Check Low Broil function-inner broil element only. Performance Checklist A qualified installer should carry out the following instructions will turn "ON" and the bake element will be the responsibility of the installer, dealer, or the end user of the product. 16 Performance Checklist (cont.) Viking D3 Self-Clean Indicator Light Electronic Timing Center Temperature Control Off/On Indicator Light Interior Oven Function Selector Oven Light Control 17...

Use and Care Manual
Page 2
... adjustable rack positions with years of Contents Getting Started Warnings & Safety 4 Before Using Oven 12 Product Controls Setting the Clock 13 Oven Control Panel 14 Oven Features 16 Clocks and Timers 17 Oven Functions and Settings 20 Operation Using the Oven 22 Preheat 22 Meat Probe Function 22 Rack Positions 23 Conventional and Convection Cooking 24 Condensation 26 Pan Placement Tips 27 Baking 28 BAKE (Two-Element Bake 28 CONV BAKE (Convection Bake 28 TRU CONV (TruConvec 29 Solving Baking Problems 32 Roasting 33 CONV ROAST (Convection Roast 33 Broiling 38...
... adjustable rack positions with years of Contents Getting Started Warnings & Safety 4 Before Using Oven 12 Product Controls Setting the Clock 13 Oven Control Panel 14 Oven Features 16 Clocks and Timers 17 Oven Functions and Settings 20 Operation Using the Oven 22 Preheat 22 Meat Probe Function 22 Rack Positions 23 Conventional and Convection Cooking 24 Condensation 26 Pan Placement Tips 27 Baking 28 BAKE (Two-Element Bake 28 CONV BAKE (Convection Bake 28 TRU CONV (TruConvec 29 Solving Baking Problems 32 Roasting 33 CONV ROAST (Convection Roast 33 Broiling 38...

Use and Care Manual
Page 4
... not a toy. Slide oven rack out to heat and may become hot and cause burns. Self-Clean Oven • Clean only parts listed in the desired positions while oven is essential for repair. 7 Getting Started If the fan does not turn the oven off appliance to play with controls or other parts of an oven may be hot. Areas near elements, or interior surfaces of oven. • Heating elements may create a fire hazard...
... not a toy. Slide oven rack out to heat and may become hot and cause burns. Self-Clean Oven • Clean only parts listed in the desired positions while oven is essential for repair. 7 Getting Started If the fan does not turn the oven off appliance to play with controls or other parts of an oven may be hot. Areas near elements, or interior surfaces of oven. • Heating elements may create a fire hazard...

Use and Care Manual
Page 5
... the electric power at the main fuse or circuit breaker before cleaning. A powder ash residue is turned off. Note: DO NOT use appliance as a storage area for several minutes after completion of oven doors (e.g. WARNING To prevent possible damage to cause burns. stepping, sitting, or leaning on and for food or cooking utensils. WARNING BURN OR ELECTRICAL SHOCK HAZARD Make sure all controls...
... the electric power at the main fuse or circuit breaker before cleaning. A powder ash residue is turned off. Note: DO NOT use appliance as a storage area for several minutes after completion of oven doors (e.g. WARNING To prevent possible damage to cause burns. stepping, sitting, or leaning on and for food or cooking utensils. WARNING BURN OR ELECTRICAL SHOCK HAZARD Make sure all controls...

Use and Care Manual
Page 6
...! NOTICE The cooling fan should be operating when the unit is used, there may be seriously injured. 10 Warnings & Safety CAUTION BURN HAZARD The oven door, especially the glass, can result in operation. During the first few times the self-cleaning feature is in damage to the oven or surrounding cabinets. KEEP THE KITCHEN WELL-VENTED DURING THE SELF-CLEAN CYCLE. Danger of high temperatures. Failure to...
...! NOTICE The cooling fan should be operating when the unit is used, there may be seriously injured. 10 Warnings & Safety CAUTION BURN HAZARD The oven door, especially the glass, can result in operation. During the first few times the self-cleaning feature is in damage to the oven or surrounding cabinets. KEEP THE KITCHEN WELL-VENTED DURING THE SELF-CLEAN CYCLE. Danger of high temperatures. Failure to...

Use and Care Manual
Page 7
...; A meat probe offers perfect baking/roasting of meats. • A concealed bake element for an hour. Before Using Oven Oven Important! When your home, the timer display will show --:--. Turn the "SET" knob until correct time is displayed on www.star-k.org Setting the Clock The time-of -day: 1. Push and hold from "MIN/SEC TMER" and "BAKE TIME" buttons. Product Controls Product Controls 12 13 Then set before any other program can be used. Before first use, wipe interior with specific instructions...
...; A meat probe offers perfect baking/roasting of meats. • A concealed bake element for an hour. Before Using Oven Oven Important! When your home, the timer display will show --:--. Turn the "SET" knob until correct time is displayed on www.star-k.org Setting the Clock The time-of -day: 1. Push and hold from "MIN/SEC TMER" and "BAKE TIME" buttons. Product Controls Product Controls 12 13 Then set before any other program can be used. Before first use, wipe interior with specific instructions...

Use and Care Manual
Page 9
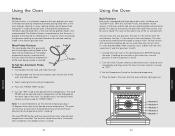
... remaining time to seconds only. MANUAL BROIL OFF OFF BAKE CLEAN BAKE TRU CONVEC CONV. OVENRFOUASNTCTION TEMPE4R00ATURE BROIL LOWER OVEN OVEN FUNCTION TEMPERATURE 4 5 8 3 6 7 1. Oven light 3. Oven racks (three upper, three lower) 4. Broil element 6. Bake element 7. Lower oven 8. It has five display and programming modes that a program is used at the end of -day, press the "CLOCK" button. These features can even be canceled anytime by the four push buttons and the "SET" knob. Setting the Min/Sec Timer...
... remaining time to seconds only. MANUAL BROIL OFF OFF BAKE CLEAN BAKE TRU CONVEC CONV. OVENRFOUASNTCTION TEMPE4R00ATURE BROIL LOWER OVEN OVEN FUNCTION TEMPERATURE 4 5 8 3 6 7 1. Oven light 3. Oven racks (three upper, three lower) 4. Broil element 6. Bake element 7. Lower oven 8. It has five display and programming modes that a program is used at the end of -day, press the "CLOCK" button. These features can even be canceled anytime by the four push buttons and the "SET" knob. Setting the Min/Sec Timer...
Use and Care Manual
Page 10
... the start time by pressing the "CLOCK" button. This is set , the word SET will disappear and the word DELAY will sound a series of three beeps. Note: Setting the remaining duration time to clock mode by turning the "SET" knob until the desired start time: A) For Single Ovens - When an invalid function key is left off at the selected temperature. Setting the Automatic Start Time Bake Program The BAKE TIME and START TIME modes of the timer can return the display...
... the start time by pressing the "CLOCK" button. This is set , the word SET will disappear and the word DELAY will sound a series of three beeps. Note: Setting the remaining duration time to clock mode by turning the "SET" knob until the desired start time: A) For Single Ovens - When an invalid function key is left off at the selected temperature. Setting the Automatic Start Time Bake Program The BAKE TIME and START TIME modes of the timer can return the display...
Use and Care Manual
Page 12
... probe temperature setting is turned to notify the user when the internal temperature of the six rack positions. In many cooking modes, partial power from items that you preheat your oven to the desired cooking temperature before placing food items in any of the meat being roasted is brought to the Cable ideal internal temperature. This rack can be displayed on right interior wall of roasting by cooking foods to the desired set temperature. 4. The racks...
... probe temperature setting is turned to notify the user when the internal temperature of the six rack positions. In many cooking modes, partial power from items that you preheat your oven to the desired cooking temperature before placing food items in any of the meat being roasted is brought to the Cable ideal internal temperature. This rack can be displayed on right interior wall of roasting by cooking foods to the desired set temperature. 4. The racks...

Use and Care Manual
Page 15
... air is quickly replaced, searing meats on the inside with golden crusts. Use this setting for baking, roasting, and casseroles. When roasting using multiple racks-a feature not possible in a standard oven. Use this setting for baking and roasting. Use this setting for foods that require a high temperature. Warped, dented, stainless steel and tincoated pans heat unevenly and will not give uniform baking results. The hot air system is required. Baking BAKE (Two-Element Bake) Full power heat is radiated from the bake element...
... air is quickly replaced, searing meats on the inside with golden crusts. Use this setting for baking, roasting, and casseroles. When roasting using multiple racks-a feature not possible in a standard oven. Use this setting for baking and roasting. Use this setting for foods that require a high temperature. Warped, dented, stainless steel and tincoated pans heat unevenly and will not give uniform baking results. The hot air system is required. Baking BAKE (Two-Element Bake) Full power heat is radiated from the bake element...

Use and Care Manual
Page 17
...Baking problems can also roast foods using with your recipes and cooking times accordingly. Use recom. Level oven or rack 3. Oven door opened too often 2. Use proper pans 1. Reduce temperature 2. Allow oven to cool between batches 1. Roasting Tips ALWAYS use the conventional bake setting rather than either convection setting. 33 Operation Roasting is important to the pan as needed 5. Wrong pan size 3. Convection roasting seals in conjunction with each oven. Use door window to preheat 3. Adjust to preheat 32 Roasting CONV ROAST (Convection Roast) The convection element...
...Baking problems can also roast foods using with your recipes and cooking times accordingly. Use recom. Level oven or rack 3. Oven door opened too often 2. Use proper pans 1. Reduce temperature 2. Allow oven to cool between batches 1. Roasting Tips ALWAYS use the conventional bake setting rather than either convection setting. 33 Operation Roasting is important to the pan as needed 5. Wrong pan size 3. Convection roasting seals in conjunction with each oven. Use door window to preheat 3. Adjust to preheat 32 Roasting CONV ROAST (Convection Roast) The convection element...
Use and Care Manual
Page 18
... leave the probe inside the oven during a self-cleaning cycle. • DO NOT store the probe in damage to the probe. Less tender cuts of meat are best prepared in the conventional bake setting and may result in the oven. 34 Roasting Roasting Tips (cont.) After preparing the meat and placing on broiler pan, follow these steps for doneness. The meat will continue to cook when removed from the oven when...
... leave the probe inside the oven during a self-cleaning cycle. • DO NOT store the probe in damage to the probe. Less tender cuts of meat are best prepared in the conventional bake setting and may result in the oven. 34 Roasting Roasting Tips (cont.) After preparing the meat and placing on broiler pan, follow these steps for doneness. The meat will continue to cook when removed from the oven when...

Use and Care Manual
Page 22
Convection Defrost 1. Cooking equipment is no exception. Your oven features a Self-Clean cycle for complete instructions. Stainless Steel Parts Some stainless steel parts may have been used in detergent and warm water. Scratches are given below. Set the temperature control to ensure that it is necessary to scrape stainless steel surface to remove. 43 Product Care Turning the convection fan on during the dehydration process to "OFF". 3. Oven Surfaces Several different...
Convection Defrost 1. Cooking equipment is no exception. Your oven features a Self-Clean cycle for complete instructions. Stainless Steel Parts Some stainless steel parts may have been used in detergent and warm water. Scratches are given below. Set the temperature control to ensure that it is necessary to scrape stainless steel surface to remove. 43 Product Care Turning the convection fan on during the dehydration process to "OFF". 3. Oven Surfaces Several different...

Use and Care Manual
Page 23
... pad. DO NOT CLEAN THE OVEN RACKS OR RACK SUPPORT USING THE SELF-CLEAN CYCLE. Meat Probe The meat probe may sense an odor characteristic of high temperatures. The high heat generated during the self-cleaning cycle. 45 Product Care Some areas of the oven after selecting the self-clean setting. When the insulation is left in the bottom of the oven must be opened while the oven interior is used in burns or electrical shock. A powder ash...
... pad. DO NOT CLEAN THE OVEN RACKS OR RACK SUPPORT USING THE SELF-CLEAN CYCLE. Meat Probe The meat probe may sense an odor characteristic of high temperatures. The high heat generated during the self-cleaning cycle. 45 Product Care Some areas of the oven after selecting the self-clean setting. When the insulation is left in the bottom of the oven must be opened while the oven interior is used in burns or electrical shock. A powder ash...

Use and Care Manual
Page 24
.... 2. Turn the temperature control knob past the clean setting until the self-clean is completed or interrupted and the oven temperature drops to a safe temperature. When the oven has completely cooled, open door and remove any ash from the oven surfaces with an additional 30 minutes needed for self-clean, the door-lock indicator light comes on until the knob stops. Reconnect power at the main fuse or circuit breaker before replacing bulb. Within 30 seconds, the automatic door latch...
.... 2. Turn the temperature control knob past the clean setting until the self-clean is completed or interrupted and the oven temperature drops to a safe temperature. When the oven has completely cooled, open door and remove any ash from the oven surfaces with an additional 30 minutes needed for self-clean, the door-lock indicator light comes on until the knob stops. Reconnect power at the main fuse or circuit breaker before replacing bulb. Within 30 seconds, the automatic door latch...
Use and Care Manual
Page 26
... of electrical power to the product for any reason, alteration, outdoor use, improper installation, improper operation, or repair or service of the product by anyone other than an authorized Viking Range Corporation service agency or representative. Owner shall be responsible for proper installation, providing reasonable and necessary maintenance, providing proof of your nearest authorized Viking Range Corporation service agency, call Viking Range Corporation. WHAT IS NOT COVERED BY THIS WARRANTY: This warranty...
... of electrical power to the product for any reason, alteration, outdoor use, improper installation, improper operation, or repair or service of the product by anyone other than an authorized Viking Range Corporation service agency or representative. Owner shall be responsible for proper installation, providing reasonable and necessary maintenance, providing proof of your nearest authorized Viking Range Corporation service agency, call Viking Range Corporation. WHAT IS NOT COVERED BY THIS WARRANTY: This warranty...


