Outdoor Products
Page 39
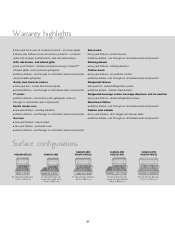
in .) 53" wide with four grill areas - 7.8 sq. cosmetic parts such as glass, painted items, and decorative items Grills, side burners, and infrared griller n Five-year limited - tube burners n Ten-year limited - ... Lifetime limited - all outdoor products - sealed refrigeration system Refreshment stations n Lifetime limited - door hinges and drawer slides n Lifetime limited - ft. (1,120 sq. all ceramic parts, grill grates, and rust through on all outdoor products - porcelain oven n Lifetime limited - rust through on all in .) 41" wide with two grill areas - 3.9 ...
in .) 53" wide with four grill areas - 7.8 sq. cosmetic parts such as glass, painted items, and decorative items Grills, side burners, and infrared griller n Five-year limited - tube burners n Ten-year limited - ... Lifetime limited - all outdoor products - sealed refrigeration system Refreshment stations n Lifetime limited - door hinges and drawer slides n Lifetime limited - ft. (1,120 sq. all ceramic parts, grill grates, and rust through on all outdoor products - porcelain oven n Lifetime limited - rust through on all in .) 41" wide with two grill areas - 3.9 ...
Outdoor Kitchen Planning Guide
Page 9
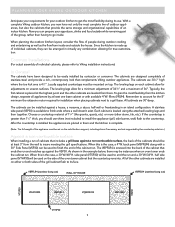
... should use . All cabinets are installed on each cabinet allow for a minimum adjustment of 341/4" and a maximum of the oven tower cabinet that complements Viking outdoor appliances. A stainless side panel (VSP30) is made up against a house, a masonry, a stucco half-wall or freestanding in virtually any combination ...the cabinet run . The leveling legs on either or both sides of the grill cabinet flush to go inside and outside while remaining part of an indoor kitchen. To gain the most flexibility during outdoor cooking and entertaining as well as the flow from the wall to...
... should use . All cabinets are installed on each cabinet allow for a minimum adjustment of 341/4" and a maximum of the oven tower cabinet that complements Viking outdoor appliances. A stainless side panel (VSP30) is made up against a house, a masonry, a stucco half-wall or freestanding in virtually any combination ...the cabinet run . The leveling legs on either or both sides of the grill cabinet flush to go inside and outside while remaining part of an indoor kitchen. To gain the most flexibility during outdoor cooking and entertaining as well as the flow from the wall to...

Specs
Page 5
QSC412 models only) • Not applicable for instructions on the regulator assembly. All installer-supplied parts must be isolated from the back of that system at test pressures equal to open fully. INFORMATION SUBJECT TO CHANGE In the absence of codes,...be provided with a shut-off valve during any pressure testing of the unit to allow cooker dome to or less than 1/2 psi (3.5 kPa). o If using a Viking GSH12 flexible hose, remove the 1/2" (1.3 cm) flare adapter and attach hose to side cabinets. PLANNING AND DESIGN GUIDE VIKINGRANGE.COM • 1-888-VIKING1 RELEASED 12...
QSC412 models only) • Not applicable for instructions on the regulator assembly. All installer-supplied parts must be isolated from the back of that system at test pressures equal to open fully. INFORMATION SUBJECT TO CHANGE In the absence of codes,...be provided with a shut-off valve during any pressure testing of the unit to allow cooker dome to or less than 1/2 psi (3.5 kPa). o If using a Viking GSH12 flexible hose, remove the 1/2" (1.3 cm) flare adapter and attach hose to side cabinets. PLANNING AND DESIGN GUIDE VIKINGRANGE.COM • 1-888-VIKING1 RELEASED 12...

Specs
Page 6
...™ cart & side burners Approx. lbs. (kg) 3 (1.4) Compliance Information WARRANTY SUMMARY* • One-year full warranty-complete product • Lifetime limited warranty-rust through on Viking products shipped within the United States and Canada. Warranty valid on all stainless steel components • Two-year limited warranty-door hinges and drawer slides...
...™ cart & side burners Approx. lbs. (kg) 3 (1.4) Compliance Information WARRANTY SUMMARY* • One-year full warranty-complete product • Lifetime limited warranty-rust through on Viking products shipped within the United States and Canada. Warranty valid on all stainless steel components • Two-year limited warranty-door hinges and drawer slides...
Installation Instructions
Page 2
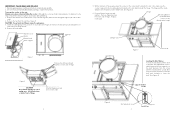
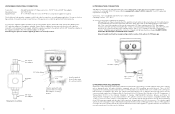
... side of spring area. Also, make sure the cooker is deburred prior to cause injury during handling. 1. IMPORTANT: PLEASE READ AND FOLLOW 1. Remove all inside parts Hinge Mounting Bracket (located behind cooker on cart directly under the hinge. The hinge and the inside front of hinge. Before beginning, please read these... screws Figure 4 Shelf adjustment screw 3 Supports Front View Although the cooker and cart is placed on the mounting bracket located on each side) 2 5. Replace inside parts.
... side of spring area. Also, make sure the cooker is deburred prior to cause injury during handling. 1. IMPORTANT: PLEASE READ AND FOLLOW 1. Remove all inside parts Hinge Mounting Bracket (located behind cooker on cart directly under the hinge. The hinge and the inside front of hinge. Before beginning, please read these... screws Figure 4 Shelf adjustment screw 3 Supports Front View Although the cooker and cart is placed on the mounting bracket located on each side) 2 5. Replace inside parts.
Installation Instructions
Page 5
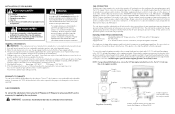
... the gas supplied to or less than yellow flame minimize incomplete combustion. Some leaks can only be found with 1/2" female flare adaptor or Viking GSH12 9 LP/Propane - 10.0" W.C.P. 8. PROXIMITY TO CABINETS The cart can cause death or serious illness and which is required for...cylinders of 1/2 PSIG (3.5 kPa). An installer supplied gas shut-off valve must be in an easily accessible location. All installer supplied parts must be installed in accordance with the manufacturer's instructions, this appliance. -Never fill the cylinder beyond 80 percent full. The side burners...
... the gas supplied to or less than yellow flame minimize incomplete combustion. Some leaks can only be found with 1/2" female flare adaptor or Viking GSH12 9 LP/Propane - 10.0" W.C.P. 8. PROXIMITY TO CABINETS The cart can cause death or serious illness and which is required for...cylinders of 1/2 PSIG (3.5 kPa). An installer supplied gas shut-off valve must be in an easily accessible location. All installer supplied parts must be installed in accordance with the manufacturer's instructions, this appliance. -Never fill the cylinder beyond 80 percent full. The side burners...
Installation Instructions
Page 6
.../PROPANE TANK CHANGE Any joint sealant used must be constructed and marked in an LP/Propane gas supply cylinder valve outlet specified, as part of the gas flow towards the unit and away from the appliance. and Commission. The cylinder connection device must be hazardous and should...location. If the gas line is stored indoors the cylinder must be checked by your local gas utility company or with 1/2" female flare adaptor or Viking GSH12 10 1/2" flare adapter 1/2" flare coupling Type 1, QCC-1 connector Tank LP/PROPANE TANK REQUIREMENTS A dented or rusty LP/Propane tank may ...
.../PROPANE TANK CHANGE Any joint sealant used must be constructed and marked in an LP/Propane gas supply cylinder valve outlet specified, as part of the gas flow towards the unit and away from the appliance. and Commission. The cylinder connection device must be hazardous and should...location. If the gas line is stored indoors the cylinder must be checked by your local gas utility company or with 1/2" female flare adaptor or Viking GSH12 10 1/2" flare adapter 1/2" flare coupling Type 1, QCC-1 connector Tank LP/PROPANE TANK REQUIREMENTS A dented or rusty LP/Propane tank may ...
Installation Instructions
Page 7
...pressure unknowingly being applied to the burner. 2. Make a soap solution of the burners should become damaged. Turn cylinder valve knob counter clockwise one part water. If the flame is locked in the "OFF" position. 5. Do not smoke while leak testing. Extinguish all control knobs are in... place by the manufacturer. Never leak test with a replacement part recommended by a set screw on the air shutter, replace the grate support, burner bowls, and grates. Check that sits on the burner at ...
...pressure unknowingly being applied to the burner. 2. Make a soap solution of the burners should become damaged. Turn cylinder valve knob counter clockwise one part water. If the flame is locked in the "OFF" position. 5. Do not smoke while leak testing. Extinguish all control knobs are in... place by the manufacturer. Never leak test with a replacement part recommended by a set screw on the air shutter, replace the grate support, burner bowls, and grates. Check that sits on the burner at ...
Use and Care Manual
Page 2
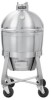
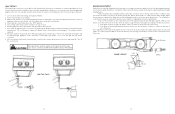
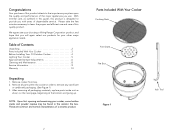
We appreciate your choosing a Viking Range Corporation product, and hope that you will again...you place upon the quality and performance of this product is designed to provide you with years of Contents Unpacking 2 Parts Included With Your Cooker 3 Before Installing Your C4 Outdoor Cooker 4 Lighting Your Cooker 5 Approximate Damper Adjustments 6 ...minutes necessary to remove any styrofoam or cardboard packaging. (See Figure 1) 3. Remove all packaging materials, replace parts inside unit as outlined in order to learn the proper and efficient use and care of the major appliances you...
We appreciate your choosing a Viking Range Corporation product, and hope that you will again...you place upon the quality and performance of this product is designed to provide you with years of Contents Unpacking 2 Parts Included With Your Cooker 3 Before Installing Your C4 Outdoor Cooker 4 Lighting Your Cooker 5 Approximate Damper Adjustments 6 ...minutes necessary to remove any styrofoam or cardboard packaging. (See Figure 1) 3. Remove all packaging materials, replace parts inside unit as outlined in order to learn the proper and efficient use and care of the major appliances you...

Use and Care Manual
Page 3
... of the cooker. (Dampers open during heat-up of spring area. Remove dome and set the temperature. Remove the shipping screws from bottom or inside parts. 4 Lighting Your Cooker 1. Open the bottom draft door COMPLETELY. The air flow will help light the charcoal. Readjust dampers to control the air flow. To...
... of the cooker. (Dampers open during heat-up of spring area. Remove dome and set the temperature. Remove the shipping screws from bottom or inside parts. 4 Lighting Your Cooker 1. Open the bottom draft door COMPLETELY. The air flow will help light the charcoal. Readjust dampers to control the air flow. To...
Use and Care Manual
Page 5
... that you are unable to clean. Slide out the drip tray. 2. It is inside burner box. 5. If you continue to : VIKING RANGE CORPORATION PREFERRED SERVICE 1803 Hwy 82W Greenwood, Mississippi 38930 USA Record the information indicated below. Snap cap on the control panel. 3. You...by connecting corresponding post to insure protection under the battery symbol on battery and screw back into the bottom. The name of parts, use . Model no Serial no Date of purchase Date installed Dealer's name Address If service requires installation of the authorized service...
... that you are unable to clean. Slide out the drip tray. 2. It is inside burner box. 5. If you continue to : VIKING RANGE CORPORATION PREFERRED SERVICE 1803 Hwy 82W Greenwood, Mississippi 38930 USA Record the information indicated below. Snap cap on the control panel. 3. You...by connecting corresponding post to insure protection under the battery symbol on battery and screw back into the bottom. The name of parts, use . Model no Serial no Date of purchase Date installed Dealer's name Address If service requires installation of the authorized service...
Use and Care Manual
Page 6
.... Service will be provided during normal business hours and labor performed at its option, any stainless steel part which fails or is not a condition of warranty coverage. Viking Range Corporation uses the most up-to-date processes and best materials available to commercial usage. This warranty... does not apply to produce all color finishes. If the product or one of its component part or parts. Viking Range Corporation, warrantor, agrees to repair or replace, at overtime or premium rates shall not be covered by warranty. Warranty labor...
.... Service will be provided during normal business hours and labor performed at its option, any stainless steel part which fails or is not a condition of warranty coverage. Viking Range Corporation uses the most up-to-date processes and best materials available to commercial usage. This warranty... does not apply to produce all color finishes. If the product or one of its component part or parts. Viking Range Corporation, warrantor, agrees to repair or replace, at overtime or premium rates shall not be covered by warranty. Warranty labor...
Cookbook
Page 5
... Rack • Electric Fire Starter • Cast Iron Skillet When is attached by a long wire to a digital display) into the thickest part of a digital roasting thermometer, available at thickest part of the thigh Boneless, skinless chicken breast halves 165ºF Whole turkey or turkey breast 170ºF Pork loin or tenderloin 145...
... Rack • Electric Fire Starter • Cast Iron Skillet When is attached by a long wire to a digital display) into the thickest part of a digital roasting thermometer, available at thickest part of the thigh Boneless, skinless chicken breast halves 165ºF Whole turkey or turkey breast 170ºF Pork loin or tenderloin 145...

Cookbook
Page 13
... uses two cooking methods to avoid being burned. A quick searing in the C4 imparts terrific flavor. The cast iron skillet collects the juices, which become part of Jus) Drippings from cooking the roast 1 cup red wine 1 teaspoon chopped fresh rosemary 1 teaspoon chopped fresh thyme Sea or kosher salt and freshly ground...
... uses two cooking methods to avoid being burned. A quick searing in the C4 imparts terrific flavor. The cast iron skillet collects the juices, which become part of Jus) Drippings from cooking the roast 1 cup red wine 1 teaspoon chopped fresh rosemary 1 teaspoon chopped fresh thyme Sea or kosher salt and freshly ground...
Cookbook
Page 18
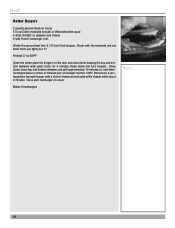
..., top each hamburger on the rack and close top and bottom dampers and grill approximately 10 minutes, or until internal temperature in center of thickest part of cheese and set aside while you light your C4.
..., top each hamburger on the rack and close top and bottom dampers and grill approximately 10 minutes, or until internal temperature in center of thickest part of cheese and set aside while you light your C4.

Cookbook
Page 20
... over indirect heat and also to catch juices and hold aromatic vegetables for 1 hour. Remove giblets from the body or internal temperature at the thickest part of the drip pan or roaster. Place breast-side down on stable surface. Close dome and continue cooking until leg pulls easily away from inside...
... over indirect heat and also to catch juices and hold aromatic vegetables for 1 hour. Remove giblets from the body or internal temperature at the thickest part of the drip pan or roaster. Place breast-side down on stable surface. Close dome and continue cooking until leg pulls easily away from inside...

Cookbook
Page 21
... with the remaining spice mixture and place two of the lemon halves in a zip-top plastic bag and set aside to sit at the thickest part of the mixture over the hot coals, and return the rack to 8 servings 21 Sprinkle half of the thigh registers 175ºF with paper towels...
... with the remaining spice mixture and place two of the lemon halves in a zip-top plastic bag and set aside to sit at the thickest part of the mixture over the hot coals, and return the rack to 8 servings 21 Sprinkle half of the thigh registers 175ºF with paper towels...

Cookbook
Page 28
.... When salt is up to 3 days. Rub evenly into the flesh of 200-225ºF. Smoke for 2 hours, until the internal temperature at the thickest part of the fillets measures 140ºF with coarse salt before serving. Preheat C4 to 200ºF While the C4 heats, make this a perfect addition to...
.... When salt is up to 3 days. Rub evenly into the flesh of 200-225ºF. Smoke for 2 hours, until the internal temperature at the thickest part of the fillets measures 140ºF with coarse salt before serving. Preheat C4 to 200ºF While the C4 heats, make this a perfect addition to...

Cookbook
Page 29
... salmon, foil-side down on a baking sheet and dip the flesh side of each fillet into the pepper, coating evenly. Air-dry at the thickest part of the fillets measures 140ºF with an instant-read or digital meat thermometer. Smoke for 30 minutes. For the Maple-Brined Salmon 3/4 cup maple...
... salmon, foil-side down on a baking sheet and dip the flesh side of each fillet into the pepper, coating evenly. Air-dry at the thickest part of the fillets measures 140ºF with an instant-read or digital meat thermometer. Smoke for 30 minutes. For the Maple-Brined Salmon 3/4 cup maple...
Cookbook
Page 30
... a sheet of heavy-duty aluminum foil, skin-side down if applicable) in a single layer in a large bowl, stirring until the internal temperature at the thickest part of the fillets measures 140ºF with an instant-read or digital meat thermometer. Place the catfish fillets (skin-side down if applicable, sprinkle with...
... a sheet of heavy-duty aluminum foil, skin-side down if applicable) in a single layer in a large bowl, stirring until the internal temperature at the thickest part of the fillets measures 140ºF with an instant-read or digital meat thermometer. Place the catfish fillets (skin-side down if applicable, sprinkle with...