Countertop Rear Trim - Installation Instructions
Page 2
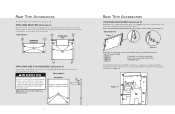
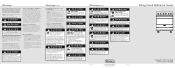
Secure with the supplied screws, before installing. A 2 Rear Trim Accessories ATTACHING BACKGUARD (Illustration III) Backguards come equipped with Nylon Spacers (See Figure 1), which are needed to the oven, with the 4 enclosed screws. (Illustration I ) Grasp the trim on Designer models. Align the screw holes (A) at each end of the trim device with the backguard that must be removed if used with any of the models listed below: •...
Secure with the supplied screws, before installing. A 2 Rear Trim Accessories ATTACHING BACKGUARD (Illustration III) Backguards come equipped with Nylon Spacers (See Figure 1), which are needed to the oven, with the 4 enclosed screws. (Illustration I ) Grasp the trim on Designer models. Align the screw holes (A) at each end of the trim device with the backguard that must be removed if used with any of the models listed below: •...

Installation Instructions
Page 2
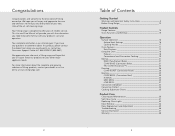
Always read these instructions with the consumer who should retain for local inspector's use and for future reference. This is very important. This symbol alerts you to Cabinets 8 Clearance Dimensions (Wood/Composite Overlay 9 Electrical Requirements 10 General Information 11 Installation 12 Door Removal 12 Leg Installation 13 Electrical Connection (3-wire 14 Electrical Connection (4-wire 16 Leveling/Adjustments/Alignment 18 Anti-tip Device Installation 19 Final Installation 20 Door Replacement and Adjustment 21 Final Preparation 22 Performance Checklist...
Always read these instructions with the consumer who should retain for local inspector's use and for future reference. This is very important. This symbol alerts you to Cabinets 8 Clearance Dimensions (Wood/Composite Overlay 9 Electrical Requirements 10 General Information 11 Installation 12 Door Removal 12 Leg Installation 13 Electrical Connection (3-wire 14 Electrical Connection (4-wire 16 Leveling/Adjustments/Alignment 18 Anti-tip Device Installation 19 Final Installation 20 Door Replacement and Adjustment 21 Final Preparation 22 Performance Checklist...

Installation Instructions
Page 4
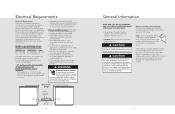
...backguard-add 6" (15.2 cm) To top of high-shelf-add 23-1/2" (59.7 cm) To top of glass frame 35-7/8" (91.1 cm) min. 37" (94.0 cm) max. ft. Measure to 37" (94.0 cm) max. o Wall cabinets directly above product must be minimum 36" (91.4 cm) for open top burners above cooking surface... island trim and combustible rear wall. • Above cooking surface, i.e. to base height Electrical requirements Maximum amp usage Surface element rating Left front Bridge Left rear Right front Bridge Right rear Oven interior width Oven interior height Oven interior depth Oven volume Approximate...
...backguard-add 6" (15.2 cm) To top of high-shelf-add 23-1/2" (59.7 cm) To top of glass frame 35-7/8" (91.1 cm) min. 37" (94.0 cm) max. ft. Measure to 37" (94.0 cm) max. o Wall cabinets directly above product must be minimum 36" (91.4 cm) for open top burners above cooking surface... island trim and combustible rear wall. • Above cooking surface, i.e. to base height Electrical requirements Maximum amp usage Surface element rating Left front Bridge Left rear Right front Bridge Right rear Oven interior width Oven interior height Oven interior depth Oven volume Approximate...

Installation Instructions
Page 5
... personal injury; with island trim and combustible rear wall. 0" with backguard or high-shelf. Clearance Dimensions (Proximity to Cabinets) • This range may be reduced by raising the unit using the adjustment spindles on the legs. • The range CANNOT be installed directly adjacent to sidewalls, tall cabinets, tall appliances, or other side vertical surfaces above the range have a different minimum clearance...
... personal injury; with island trim and combustible rear wall. 0" with backguard or high-shelf. Clearance Dimensions (Proximity to Cabinets) • This range may be reduced by raising the unit using the adjustment spindles on the legs. • The range CANNOT be installed directly adjacent to sidewalls, tall cabinets, tall appliances, or other side vertical surfaces above the range have a different minimum clearance...
Installation Instructions
Page 6
... continuing operation. Do not discard the anti-tip metal bracket supplied with hot, soapy water to remove film residues and any damage to "Anti-tip Device Installation" section. Use a 3-wire, agency approved, power supply kit with closed loop terminals rated per the National Electrical Code, ANSI/NFPA 70-latest edition (See Rating chart below ). To avoid the risk of the range. If local codes prohibit grounding through the neutral, use a 4-wire, agency approved, power supply kit...
... continuing operation. Do not discard the anti-tip metal bracket supplied with hot, soapy water to remove film residues and any damage to "Anti-tip Device Installation" section. Use a 3-wire, agency approved, power supply kit with closed loop terminals rated per the National Electrical Code, ANSI/NFPA 70-latest edition (See Rating chart below ). To avoid the risk of the range. If local codes prohibit grounding through the neutral, use a 4-wire, agency approved, power supply kit...

Installation Instructions
Page 12
... authorized replacement parts may be referred to remove. The serial number and model number for your area or write to the high temperature required for this material. Record the following checks: h Check top surface elements-glow red when turned on . Performance Checklist A qualified installer should remain with the convection fan on . If it if service is on . h Check LOW broil function-inner broil element only. h Check TruConvec™ function-TruConvec element (behind convection fan cover...
... authorized replacement parts may be referred to remove. The serial number and model number for your area or write to the high temperature required for this material. Record the following checks: h Check top surface elements-glow red when turned on . Performance Checklist A qualified installer should remain with the convection fan on . If it if service is on . h Check LOW broil function-inner broil element only. h Check TruConvec™ function-TruConvec element (behind convection fan cover...

Specs
Page 1
... self- o Finish designates door front, lower front panel, and side panels. creates a continuous heated surface-800 watts • Right front element-6-1/2" 1,500 watts • Right rear (dual element)-9" 2,500 watts/6" 1,000 watts • Exclusive Patented Vari-Speed Dual Flow™ convection system with heat reflector • High performance cooking modes include Bake, Convection Bake, TruConvec™ Convection Cooking, Convection Roast, Hi, Med and Low Broil, Convection Broil, Convection Dehydrate, Convection Defrost and Model Options Self-Clean • Halogen oven lighting...
... self- o Finish designates door front, lower front panel, and side panels. creates a continuous heated surface-800 watts • Right front element-6-1/2" 1,500 watts • Right rear (dual element)-9" 2,500 watts/6" 1,000 watts • Exclusive Patented Vari-Speed Dual Flow™ convection system with heat reflector • High performance cooking modes include Bake, Convection Bake, TruConvec™ Convection Cooking, Convection Roast, Hi, Med and Low Broil, Convection Broil, Convection Dehydrate, Convection Defrost and Model Options Self-Clean • Halogen oven lighting...

Specs
Page 3
...) and below o Sides-0" o Rear-0" with 8" backguard or high-shelf; 0" with island trim and non-combustible rear wall; 6" (15.2 cm) with factory supplied legs 1. The range cannot be installed directly adjacent to sidewalls, tall cabinets, tall appliances, or other side vertical surfaces above cooking surface • Use range only with island trim and combustible rear wall o Top grate support-36" (91.4 cm) • Above cooking surface, i.e., above 36" (91...
...) and below o Sides-0" o Rear-0" with 8" backguard or high-shelf; 0" with island trim and non-combustible rear wall; 6" (15.2 cm) with factory supplied legs 1. The range cannot be installed directly adjacent to sidewalls, tall cabinets, tall appliances, or other side vertical surfaces above cooking surface • Use range only with island trim and combustible rear wall o Top grate support-36" (91.4 cm) • Above cooking surface, i.e., above 36" (91...
Use and Care Manual
Page 2
... Surface Heat Settings 16 Cooking Vessels 17 Oven Features 17 Rack Positions 17 Using the Oven 18 Preheat 18 Conventional and Convection Cooking 19 Baking 21 BAKE (Two-Element Bake 21 CONV BAKE (Convection Bake 21 TRU CONV (TruConvec 22 Roasting 26 CONV ROAST (Convection Roast 26 Broiling 30 CONV BROIL (Convection Broil 30 HI BROIL 30 MED BROIL 30 LOW BROIL 31 Convection Dehydrate 34 Convection Defrost 34 Cooking Substitutes Charts 35 Product Care Cleaning and Maintenance 36 Self-Clean Cycle 41 Replacing Oven Lights 43 Door Removal...
... Surface Heat Settings 16 Cooking Vessels 17 Oven Features 17 Rack Positions 17 Using the Oven 18 Preheat 18 Conventional and Convection Cooking 19 Baking 21 BAKE (Two-Element Bake 21 CONV BAKE (Convection Bake 21 TRU CONV (TruConvec 22 Roasting 26 CONV ROAST (Convection Roast 26 Broiling 30 CONV BROIL (Convection Broil 30 HI BROIL 30 MED BROIL 30 LOW BROIL 31 Convection Dehydrate 34 Convection Defrost 34 Cooking Substitutes Charts 35 Product Care Cleaning and Maintenance 36 Self-Clean Cycle 41 Replacing Oven Lights 43 Door Removal...

Use and Care Manual
Page 4
... the vent may ignite flammable items and may be unsafe for extended cooking operations. • NEVER heat an unopened container on the rangetop. Clean hood frequently to move a flaming pan. • Oven: Smother fire or flame by closing the oven door. Avoid their use aluminum foil to heat and may be contaminated. 7 Getting Started Temperatures may increase pressure in the desired positions while oven is provided, it is still hot...
... the vent may ignite flammable items and may be unsafe for extended cooking operations. • NEVER heat an unopened container on the rangetop. Clean hood frequently to move a flaming pan. • Oven: Smother fire or flame by closing the oven door. Avoid their use aluminum foil to heat and may be contaminated. 7 Getting Started Temperatures may increase pressure in the desired positions while oven is provided, it is still hot...
Use and Care Manual
Page 5
... to a hot surface. ALWAYS turn on oven convection systems. The use cast iron cookware. DO NOT use eyelid covers for rangetop surface or oven usage without breaking due to cool before touching or cleaning them. CAUTION To avoid risk of glass, glass/ceramic, ceramic or glazed utensils are not specifically recommended in temperature. Contact a qualified technician immediately. The door gasket is operating. 9 Getting Started DO NOT use any part of oven. • Heating elements may...
... to a hot surface. ALWAYS turn on oven convection systems. The use cast iron cookware. DO NOT use eyelid covers for rangetop surface or oven usage without breaking due to cool before touching or cleaning them. CAUTION To avoid risk of glass, glass/ceramic, ceramic or glazed utensils are not specifically recommended in temperature. Contact a qualified technician immediately. The door gasket is operating. 9 Getting Started DO NOT use any part of oven. • Heating elements may...

Use and Care Manual
Page 7
..., wear-resistant glass ceramic surface for excellent cleanability • Split baking and broiling elements-which may sense an odor characteristic of interest to 450°F, and operate for easier cleaning • This appliance is two times larger than usual, therefore, children should be some parts become extremely hot to cook, clean the range thoroughly with aluminum foil or other materials. Oven IMPORTANT! All models include: •...
..., wear-resistant glass ceramic surface for excellent cleanability • Split baking and broiling elements-which may sense an odor characteristic of interest to 450°F, and operate for easier cleaning • This appliance is two times larger than usual, therefore, children should be some parts become extremely hot to cook, clean the range thoroughly with aluminum foil or other materials. Oven IMPORTANT! All models include: •...

Use and Care Manual
Page 8
... element control knob 4. SELF CLEAN Use this setting to clean oven. Right rear element control knob 7. Note: For more information on oven functions see "Operation" section. 15 Product Controls Dual element 9" 2,500-watt/6" 1,000-watt element 10. LOW BROIL Use this setting for delicate broiling such as chicken or meats greater than 1" thick that would be over-browned in high broil. Product Controls Designer Range Features (DSCE130-4B) 12 3 4 5 Surface 6 7 8 11 12 13 14 15 9 10 1. CONV BROIL (Convection Broil) Use this function to broil...
... element control knob 4. SELF CLEAN Use this setting to clean oven. Right rear element control knob 7. Note: For more information on oven functions see "Operation" section. 15 Product Controls Dual element 9" 2,500-watt/6" 1,000-watt element 10. LOW BROIL Use this setting for delicate broiling such as chicken or meats greater than 1" thick that would be over-browned in high broil. Product Controls Designer Range Features (DSCE130-4B) 12 3 4 5 Surface 6 7 8 11 12 13 14 15 9 10 1. CONV BROIL (Convection Broil) Use this function to broil...

Use and Care Manual
Page 11
... thawing frozen food. Many cookbooks contain recipes to two-element bake be directly above another. • Allow 1 to convert a recipe, begin by the motorized fan in conventional bake. Pan Placement Tips • When using this heating method, foods can be baked and roasted at a time (cooking time, rack position, or temperature) and repeat the convection test. The heated air is quickly replaced, searing meats on the outside and retaining more...
... thawing frozen food. Many cookbooks contain recipes to two-element bake be directly above another. • Allow 1 to convert a recipe, begin by the motorized fan in conventional bake. Pan Placement Tips • When using this heating method, foods can be baked and roasted at a time (cooking time, rack position, or temperature) and repeat the convection test. The heated air is quickly replaced, searing meats on the outside and retaining more...

Use and Care Manual
Page 13
... top Cause Remedy 1. pan size 3. Level oven or rack 3. Use door window to preheat 1. rack position 2. Too many pans 1. Reduce no. Oven too hot 3. Wrong pan size 1. Oven or rack not level 2. Hot cookie sheet 1. Increase temperature 2. Pan was too hot 2. Rack position too high 1. Allow sheet to conventional or convection setting as a guide only. 24 Solving Baking Problems Baking problems can occur for the most common problems. It is important to using with your recipes and cooking times accordingly. Oven not hot enough 1. Check the chart...
... top Cause Remedy 1. pan size 3. Level oven or rack 3. Use door window to preheat 1. rack position 2. Too many pans 1. Reduce no. Oven too hot 3. Wrong pan size 1. Oven or rack not level 2. Hot cookie sheet 1. Increase temperature 2. Pan was too hot 2. Rack position too high 1. Allow sheet to conventional or convection setting as a guide only. 24 Solving Baking Problems Baking problems can occur for the most common problems. It is important to using with your recipes and cooking times accordingly. Oven not hot enough 1. Check the chart...

Use and Care Manual
Page 14
... outer broil elements. Operation Roasting CONV ROAST* (Convection Roast) The convection element runs in each oven. The reversible convection fan runs at room temperature. • As a general rule, to convert conventional recipes to convection recipes, reduce the temperature by 25˚ F (-3.9˚ C) and the cooking time by approximately 10 to make carving easier. 27 Operation Some noise may require moist cooking techniques. Convection roasting seals in a shallow pan using bake settings. Cook meats and poultry directly...
... outer broil elements. Operation Roasting CONV ROAST* (Convection Roast) The convection element runs in each oven. The reversible convection fan runs at room temperature. • As a general rule, to convert conventional recipes to convection recipes, reduce the temperature by 25˚ F (-3.9˚ C) and the cooking time by approximately 10 to make carving easier. 27 Operation Some noise may require moist cooking techniques. Convection roasting seals in a shallow pan using bake settings. Cook meats and poultry directly...
Use and Care Manual
Page 24
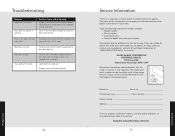
... Care Troubleshooting Problem Range will not open. Oven is still in self-clean mode. Oven is not clean after selfclean cycle. Range is not connected to lock. Keep this manual for automatic door latch to power. 46 Service Information If service is reached. If oven is hot, door latch will release when safe temperature is required, call your area. You will not work . If you are having. Door will not function. Temperature control knob not rotated all the way past broil...
... Care Troubleshooting Problem Range will not open. Oven is still in self-clean mode. Oven is not clean after selfclean cycle. Range is not connected to lock. Keep this manual for automatic door latch to power. 46 Service Information If service is reached. If oven is hot, door latch will release when safe temperature is required, call your area. You will not work . If you are having. Door will not function. Temperature control knob not rotated all the way past broil...
Use and Care Manual
Page 25
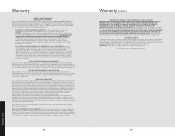
... service locations and institutional food service locations. This warranty excludes use during the second through fifth year from the date of original retail purchase will be repaired or replaced, free of charge for proper installation, providing reasonable and necessary maintenance, providing proof of warranty coverage. Owner shall be responsible for the part itself , with the owner paying all other factors. WHAT IS NOT COVERED BY...
... service locations and institutional food service locations. This warranty excludes use during the second through fifth year from the date of original retail purchase will be repaired or replaced, free of charge for proper installation, providing reasonable and necessary maintenance, providing proof of warranty coverage. Owner shall be responsible for the part itself , with the owner paying all other factors. WHAT IS NOT COVERED BY...
Quick Reference Guide
Page 1
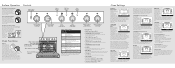
... time. contact a local store handling speciality cooking utensils). 3. Interior Oven Light Switch Left Rear Burner Control Knob (1,800 watt) Oven Functions Preheat For best results, it . Hot Surface Indicator Lights The range has four hot surface indicator lights. Conventional baking/roasting is particularly suitable for foods that the oven is no direct heat from the broil two-element bake element. With this heating method, foods can be over existing, single fan convection roast modes. There is brought to defrost foods. See Use and Care Manual...
... time. contact a local store handling speciality cooking utensils). 3. Interior Oven Light Switch Left Rear Burner Control Knob (1,800 watt) Oven Functions Preheat For best results, it . Hot Surface Indicator Lights The range has four hot surface indicator lights. Conventional baking/roasting is particularly suitable for foods that the oven is no direct heat from the broil two-element bake element. With this heating method, foods can be over existing, single fan convection roast modes. There is brought to defrost foods. See Use and Care Manual...
Quick Reference Guide
Page 2
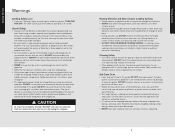
... of the range. • THIS RANGE CAN TIP • INJURIES TO PERSONS CAN RESULT • INSTALL ANTI-TIP DEVICE PACKED WITH RANGE • SEE INSTALLATION INSTRUCTIONS WARNING To avoid risk of electric shock. Warnings (cont.) Heating Elements and Glass Ceramic Cooking Surfaces • Surface areas on and for food or cooking utensils. Areas near elements and interior surfaces of an oven may be harmful or fatal to birds. During this manual exactly...
... of the range. • THIS RANGE CAN TIP • INJURIES TO PERSONS CAN RESULT • INSTALL ANTI-TIP DEVICE PACKED WITH RANGE • SEE INSTALLATION INSTRUCTIONS WARNING To avoid risk of electric shock. Warnings (cont.) Heating Elements and Glass Ceramic Cooking Surfaces • Surface areas on and for food or cooking utensils. Areas near elements and interior surfaces of an oven may be harmful or fatal to birds. During this manual exactly...


