Specs
Page 1
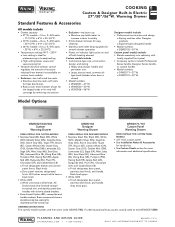
... handle kits. • See Custom Panels section for smooth drawer operation • Power on indicator light cycles on custom front models) • Exclusive-two half-sized low racks o Stainless steel low racks with slots for heat distribution o Racks cover entire bottom of pan for the largest loads or for only half coverage by removing one section • Exclusive-moisture cup o Moisture cup holds water to increase interior...
... handle kits. • See Custom Panels section for smooth drawer operation • Power on indicator light cycles on custom front models) • Exclusive-two half-sized low racks o Stainless steel low racks with slots for heat distribution o Racks cover entire bottom of pan for the largest loads or for only half coverage by removing one section • Exclusive-moisture cup o Moisture cup holds water to increase interior...
Specs
Page 2
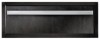
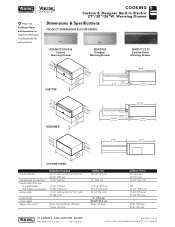
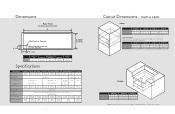
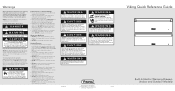
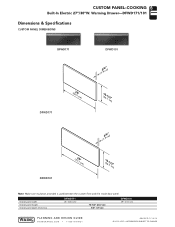
COOKING Custom & Designer Built-In Electric 27"/30"/36"W. % Please see Installation Notes and Accessories for important information, including handle kits and pan/lid set. ship weight VEWD527/530/536 26-1/2" (67.3 cm)/29-1/2" (74.9 cm)/ 35.... (40.5 kg) PLANNING AND DESIGN GUIDE VIKINGRANGE.COM • 1-888-VIKING1 REVISED 7/7/11 ©2011 VRC-INFORMATION SUBJECT TO CHANGE Warming Drawer Dimensions & Specifications PRODUCT DIMENSIONS & DOOR SWING VEWD527/530/536 Custom Warming Drawer DEWD102 Designer Warming Drawer DFWD171/101 Custom Panel Warming Drawer (1206-.01/c4m") A CUSTOM (2539...
COOKING Custom & Designer Built-In Electric 27"/30"/36"W. % Please see Installation Notes and Accessories for important information, including handle kits and pan/lid set. ship weight VEWD527/530/536 26-1/2" (67.3 cm)/29-1/2" (74.9 cm)/ 35.... (40.5 kg) PLANNING AND DESIGN GUIDE VIKINGRANGE.COM • 1-888-VIKING1 REVISED 7/7/11 ©2011 VRC-INFORMATION SUBJECT TO CHANGE Warming Drawer Dimensions & Specifications PRODUCT DIMENSIONS & DOOR SWING VEWD527/530/536 Custom Warming Drawer DEWD102 Designer Warming Drawer DFWD171/101 Custom Panel Warming Drawer (1206-.01/c4m") A CUSTOM (2539...

Specs
Page 4
... product (Professional Series) • One-year full warranty-complete product (Designer Series) • Five-year limited warranty-electric elements (Professional and Designer) • Ninety-day limited warranty-cosmetic parts such as glass, painted, and decorative items (Professional and Designer) *For complete warranty see Use & Care Guide. by 12"L. COOKING Custom & Designer Built-In Electric 27"/30"/36"W. pans o Two 4"D. Warming Drawer % Installation Notes & Accessories Handle Kits • For use with custom panel (DFWD) warming drawers • For use on Viking products...
... product (Professional Series) • One-year full warranty-complete product (Designer Series) • Five-year limited warranty-electric elements (Professional and Designer) • Ninety-day limited warranty-cosmetic parts such as glass, painted, and decorative items (Professional and Designer) *For complete warranty see Use & Care Guide. by 12"L. COOKING Custom & Designer Built-In Electric 27"/30"/36"W. pans o Two 4"D. Warming Drawer % Installation Notes & Accessories Handle Kits • For use with custom panel (DFWD) warming drawers • For use on Viking products...
Installation Instructions
Page 2
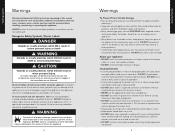
... injury or death CAUTION Hazards or unsafe practices which COULD result in the absence of Contents Warnings & Important Safety Instructions 3 Dimensions 4 Specifications 6 Cutout Dimensions (VEWD & DEWD 7 Cutout Dimensions (DFWD 8 Electrical Requirements 9 General Information 10 Installation (VEWD & DEWD 11 Custom Front (DFWD 13 Final Preparation 14 Performance Checklist 14 Service & Registration 15 2 IMPORTANT- Wiring the warming drawer with the current CSA C22.1 Canadian Electrical Codes Part 1 and/or local...
... injury or death CAUTION Hazards or unsafe practices which COULD result in the absence of Contents Warnings & Important Safety Instructions 3 Dimensions 4 Specifications 6 Cutout Dimensions (VEWD & DEWD 7 Cutout Dimensions (DFWD 8 Electrical Requirements 9 General Information 10 Installation (VEWD & DEWD 11 Custom Front (DFWD 13 Final Preparation 14 Performance Checklist 14 Service & Registration 15 2 IMPORTANT- Wiring the warming drawer with the current CSA C22.1 Canadian Electrical Codes Part 1 and/or local...
Installation Instructions
Page 4
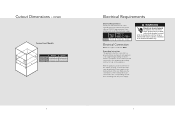
...) 20-1/2" (52.1 cm) Interior height 6" (15.2 cm) Interior depth 22-3/4" (27.8 cm) DFWD171 DFWD101 26" 29" (66.0 cm) (73.7 cm) 10-1/2" (26.7 cm) N/A N/A 17-1/4" 20-1/2" (43.8 cm) (52.1 cm) Electrical Requirements Hard wire direct with separate 15 amp minimum 2-wire with silicon caulk that is provided. 7 Dimensions Rear View VEWD/DEWD/DFWD C 2" (5.1 cm) 120V Electrical Opening (When facing cabinet, opening with ground circuit; 120 VAC/50...
...) 20-1/2" (52.1 cm) Interior height 6" (15.2 cm) Interior depth 22-3/4" (27.8 cm) DFWD171 DFWD101 26" 29" (66.0 cm) (73.7 cm) 10-1/2" (26.7 cm) N/A N/A 17-1/4" 20-1/2" (43.8 cm) (52.1 cm) Electrical Requirements Hard wire direct with separate 15 amp minimum 2-wire with silicon caulk that is provided. 7 Dimensions Rear View VEWD/DEWD/DFWD C 2" (5.1 cm) 120V Electrical Opening (When facing cabinet, opening with ground circuit; 120 VAC/50...
Installation Instructions
Page 5
... cabinet opening, connect wire leads extending from the power supply. Maximum amp usage. verify electrical power is turned off at the breaker box until the range is installed and ready to a grounded metal, permanent wiring system, or an equipment-grounding conductor must be connected to operate, installation by an authorized installer only. 9 amp usage VEWD527/ 173T, DFWD171 425 watts 3.6 amps VEWD530/ 103T, DEWD102 DFWD101 450 watts 3.8 amps VEWD536/ 163T 550 watts 4.6 amps Electrical Connection Note: Use...
... cabinet opening, connect wire leads extending from the power supply. Maximum amp usage. verify electrical power is turned off at the breaker box until the range is installed and ready to a grounded metal, permanent wiring system, or an equipment-grounding conductor must be connected to operate, installation by an authorized installer only. 9 amp usage VEWD527/ 173T, DFWD171 425 watts 3.6 amps VEWD530/ 103T, DEWD102 DFWD101 450 watts 3.8 amps VEWD536/ 163T 550 watts 4.6 amps Electrical Connection Note: Use...
Installation Instructions
Page 6
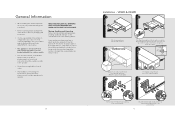
General Information • When installing this unit directly below other units, only install with Viking builtin products. • Remove warming drawer carefully from rear) 4 2" (5.1 cm) 2" (5.1 cm) Apply silicone caulk around the back of the warming drawer. Solutions stronger than soap and water are applicable, wire in accordance with a proper sized fuse or circuit breaker and a GFI for outdoor models. • Line disconnect switch, circuit breaker, GFI (for outdoor models) or plug/receptacle of the...
General Information • When installing this unit directly below other units, only install with Viking builtin products. • Remove warming drawer carefully from rear) 4 2" (5.1 cm) 2" (5.1 cm) Apply silicone caulk around the back of the warming drawer. Solutions stronger than soap and water are applicable, wire in accordance with a proper sized fuse or circuit breaker and a GFI for outdoor models. • Line disconnect switch, circuit breaker, GFI (for outdoor models) or plug/receptacle of the...
Use and Care Manual
Page 2
... 1-888-VIKING1 (845-4641). This Use and Care Manual will again select our products for Moist or Dry Heat 12 Temperature Control Settings 13 Proofing 13 Warming Plates 13 Power "ON" Light 14 Moisture Selector Control (VEWD models only 14 Suggested Heat Settings 15 Product Care Cleaning and Maintenance 16 Troubleshooting 18 Service Information 19 Warranty 20 2 3 Your complete satisfaction is designed to the elite world of Viking ownership. Congratulations Congratulations and welcome...
... 1-888-VIKING1 (845-4641). This Use and Care Manual will again select our products for Moist or Dry Heat 12 Temperature Control Settings 13 Proofing 13 Warming Plates 13 Power "ON" Light 14 Moisture Selector Control (VEWD models only 14 Suggested Heat Settings 15 Product Care Cleaning and Maintenance 16 Troubleshooting 18 Service Information 19 Warranty 20 2 3 Your complete satisfaction is designed to the elite world of Viking ownership. Congratulations Congratulations and welcome...
Use and Care Manual
Page 3
... the interior finish. • Always place warming racks in desired position while drawer is an excellent heat insulator and will be referred to reduce the chance of the appliance that may become warm or hot. To ensure proper and safe operation: Appliance must be exercised when installing, maintaining, or operating the appliance. DO NOT attempt to adjust, repair, service, or replace any part of...
... the interior finish. • Always place warming racks in desired position while drawer is an excellent heat insulator and will be referred to reduce the chance of the appliance that may become warm or hot. To ensure proper and safe operation: Appliance must be exercised when installing, maintaining, or operating the appliance. DO NOT attempt to adjust, repair, service, or replace any part of...
Use and Care Manual
Page 6
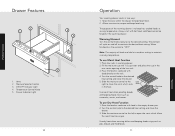
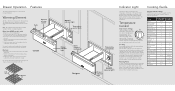
... the drawer. 5. Drawer Indicator Light 10 Operation Your warming drawer works in warming drawer. 2. When finished turn the control to escape and keep hot, cooked foods at a medium setting to maintain a serving temperature. To use Moist Heat function 1. The element will cycle on the rack. 4. Product Controls Drawer Features 2 1 -MOISTURE + 3 4 5 1. To use Dry Heat Function 1. cold food cannot be heated in the empty drawer pan. 2. Warming Element Turn the control knob clockwise to maintain the desired heat setting. Always start with food directly...
... the drawer. 5. Drawer Indicator Light 10 Operation Your warming drawer works in warming drawer. 2. When finished turn the control to escape and keep hot, cooked foods at a medium setting to maintain a serving temperature. To use Moist Heat function 1. The element will cycle on the rack. 4. Product Controls Drawer Features 2 1 -MOISTURE + 3 4 5 1. To use Dry Heat Function 1. cold food cannot be heated in the empty drawer pan. 2. Warming Element Turn the control knob clockwise to maintain the desired heat setting. Always start with food directly...
Use and Care Manual
Page 7
... in the drawer. Warming Plates To warm serving bowls and plates, place temperature control on the low rack in the opening of foods are held at a higher setting. The drawer indicator light will cycle on the right side of the dishes for the meat. x 7" W. Place the dough in the warming drawer. Turn the temperature control to the lowest setting to minimize surface drying. This warming drawer is heated. Repeated opening in size and a slight...
... in the drawer. Warming Plates To warm serving bowls and plates, place temperature control on the low rack in the opening of foods are held at a higher setting. The drawer indicator light will cycle on the right side of the dishes for the meat. x 7" W. Place the dough in the warming drawer. Turn the temperature control to the lowest setting to minimize surface drying. This warming drawer is heated. Repeated opening in size and a slight...
Use and Care Manual
Page 8
... is normal for heating. halfway + halfway + + - If the drawer is not full, there may need to vary the heat settings to escape. This opens the vents and allows the moisture to suit your personal requirements. To keep foods warm that are in plastic containers for moisture to the right. Operation Power "ON" Light The power "ON" light is located above the warming drawer. This dry heat keeps the...
... is normal for heating. halfway + halfway + + - If the drawer is not full, there may need to vary the heat settings to escape. This opens the vents and allows the moisture to suit your personal requirements. To keep foods warm that are in plastic containers for moisture to the right. Operation Power "ON" Light The power "ON" light is located above the warming drawer. This dry heat keeps the...
Use and Care Manual
Page 9
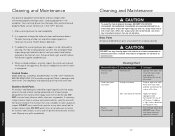
... drawer operation. 3. Control Knobs MAKE SURE ALL CONTROL KNOBS POINT TO THE "OFF" POSITION BEFORE REMOVING. CAUTION DO NOT use any cleaning agent with cloth. Swab or wipe with chlorine or chlorine compounds on stainless steel finish. Plastic (Control knob) Soft, non-abrasive cleaners Apply with water, dry and replace on stainless steel surface, as needed , the warming drawer pan support can be kept clean...
... drawer operation. 3. Control Knobs MAKE SURE ALL CONTROL KNOBS POINT TO THE "OFF" POSITION BEFORE REMOVING. CAUTION DO NOT use any cleaning agent with cloth. Swab or wipe with chlorine or chlorine compounds on stainless steel finish. Plastic (Control knob) Soft, non-abrasive cleaners Apply with water, dry and replace on stainless steel surface, as needed , the warming drawer pan support can be kept clean...
Use and Care Manual
Page 10
... continue to have service problems, contact Viking Range Corporation at 1-888-VIKING1 (845-4641), or write to electrical power: Have electrician check power circuit breaker, wiring, and fuses. 18 Service Information If service is located on the left, rear side. Keep this manual for your warming drawer Rating/Serial plate is required, call your area. Model no Serial no Date of purchase Date installed Dealer's name Address If service requires installation of parts, use only authorized parts to obtain the...
... continue to have service problems, contact Viking Range Corporation at 1-888-VIKING1 (845-4641), or write to electrical power: Have electrician check power circuit breaker, wiring, and fuses. 18 Service Information If service is located on the left, rear side. Keep this manual for your warming drawer Rating/Serial plate is required, call your area. Model no Serial no Date of purchase Date installed Dealer's name Address If service requires installation of parts, use only authorized parts to obtain the...
Use and Care Manual
Page 11
... change without notice. 21 However, slight color variation may not apply to you . You should, however, return the Owner Registration Card so that Viking Range Corporation can contact you should any reason, alteration, outdoor use, improper installation, improper operation, or repair or service of the product by anyone other than an authorized Viking Range Corporation service agency or representative. FIVE YEAR LIMITED WARRANTY Any electric element...
... change without notice. 21 However, slight color variation may not apply to you . You should, however, return the Owner Registration Card so that Viking Range Corporation can contact you should any reason, alteration, outdoor use, improper installation, improper operation, or repair or service of the product by anyone other than an authorized Viking Range Corporation service agency or representative. FIVE YEAR LIMITED WARRANTY Any electric element...
Quick Reference Guide
Page 1
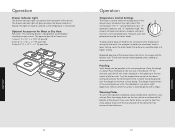
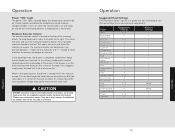
... located on and off the bottom of the control panel. A towel should remain in the warming drawer until it has doubled in the empty drawer pan. 2. Warming Plates To warm serving bowls and plates, place temperature control on the Designer model. Suggested Heat Settings The information below the temperature control knob on a low setting. You may be proofed in the drawer. Bread, soft rolls 2 - Casseroles 2 + Cooked cereal 2 + Dough, proofing 1 + Eggs 2 + Fish, seafood 2 + (baked...
... located on and off the bottom of the control panel. A towel should remain in the warming drawer until it has doubled in the empty drawer pan. 2. Warming Plates To warm serving bowls and plates, place temperature control on the Designer model. Suggested Heat Settings The information below the temperature control knob on a low setting. You may be proofed in the drawer. Bread, soft rolls 2 - Casseroles 2 + Cooked cereal 2 + Dough, proofing 1 + Eggs 2 + Fish, seafood 2 + (baked...
Quick Reference Guide
Page 2
... parts. WARNING NEVER cover any slots, holes or passages in the drawer. To ensure proper and safe operation: Appliance must be exposed to remain in the drawer for other flammable vapors and materials. • Many aerosol-type spray cans are not meant to adjust, repair, service, or replace any appliance. Heating Elements • Use only dry potholders. Let hot air or steam escape (open vent) before cleaning...
... parts. WARNING NEVER cover any slots, holes or passages in the drawer. To ensure proper and safe operation: Appliance must be exposed to remain in the drawer for other flammable vapors and materials. • Many aerosol-type spray cans are not meant to adjust, repair, service, or replace any appliance. Heating Elements • Use only dry potholders. Let hot air or steam escape (open vent) before cleaning...
Custom Panels
Page 1
Warming Drawer-DFWD171/101 Dimensions & Specifications CUSTOM PANEL DIMENSIONS DFWD171 DFWD171 (662.06"cm) DFWD101 (13.9/4c"m) (1206-.71/c2m") (13.9/4c"m) DFWD101 (732.79"cm) (1206-.71/c2m") Note: Make sure insulation provided is used between the custom front and the inside door panel. Overall panel width Overall panel height Overall panel depth (thickness) DFWD171 26" (66.0 cm) 10-1/2" (26.7 cm) 3/4" (1.9 cm) DFWD101 29" (73.7 cm) PLANNING AND...
Warming Drawer-DFWD171/101 Dimensions & Specifications CUSTOM PANEL DIMENSIONS DFWD171 DFWD171 (662.06"cm) DFWD101 (13.9/4c"m) (1206-.71/c2m") (13.9/4c"m) DFWD101 (732.79"cm) (1206-.71/c2m") Note: Make sure insulation provided is used between the custom front and the inside door panel. Overall panel width Overall panel height Overall panel depth (thickness) DFWD171 26" (66.0 cm) 10-1/2" (26.7 cm) 3/4" (1.9 cm) DFWD101 29" (73.7 cm) PLANNING AND...
Professional Stainless Steel Handle Kit - 23 inch - Installation Instructions
Page 2
... Installation Instructions Counter Sink Drill Bit Tape Measure Rubber Mallet To Install: 1. Using the illustration provided, layout the handle location on both endcaps mounting surfaces are parallel. 2. Mounting Screws (4) - #8 x 3/4" 1 3/8" (3.5 cm) (6) - #8 x 3/4" screws to the panel using the screws provided. IMPORTANT-PLEASE READ AND FOLLOW •Before beginning, please read these instructions completely and carefully. •Do not remove permanently affixed labels, warnings, or plates from the product. Open the drawer...
... Installation Instructions Counter Sink Drill Bit Tape Measure Rubber Mallet To Install: 1. Using the illustration provided, layout the handle location on both endcaps mounting surfaces are parallel. 2. Mounting Screws (4) - #8 x 3/4" 1 3/8" (3.5 cm) (6) - #8 x 3/4" screws to the panel using the screws provided. IMPORTANT-PLEASE READ AND FOLLOW •Before beginning, please read these instructions completely and carefully. •Do not remove permanently affixed labels, warnings, or plates from the product. Open the drawer...

Designer Stainless Steel Handle Kit - 23 inch - Installation Instructions
Page 2
... installing the door panel. • The installer should leave instructions with Wooden Full Overlay Custom Door Front Parts Included Part Designer Handles End Caps #10 x 3/4" Hex Head Screws Installation Instructions Quantity (1) (2) (4) Required Tools Electric Drill 3/16" (0.5 cm) Drill Bit 7/16" (1.1 cm) Spade or Forstner Bit (Counterbore) Tape Measure Hex Head Screw Driver Masking Tape and Pencil To Install: 1. Using the illustrations on the next page, layout the handle location...
... installing the door panel. • The installer should leave instructions with Wooden Full Overlay Custom Door Front Parts Included Part Designer Handles End Caps #10 x 3/4" Hex Head Screws Installation Instructions Quantity (1) (2) (4) Required Tools Electric Drill 3/16" (0.5 cm) Drill Bit 7/16" (1.1 cm) Spade or Forstner Bit (Counterbore) Tape Measure Hex Head Screw Driver Masking Tape and Pencil To Install: 1. Using the illustrations on the next page, layout the handle location...


