Specs
Page 1
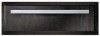
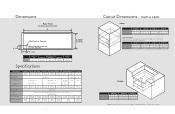
...; Power on indicator light cycles on and off with locally supplied front panel • Accessory options include Professional Series handle, Designer Series handle, or custom handle. • Model numbers o DFWD171-27"W. Custom panel models include • Blends seamlessly into cabinetry with heating element Custom models include • Commercial-type size, construction, design, and styling o Heavy-duty drawer handle and perimeter trim o Large, easy-to increase interior humidity • Entire drawer removes for easy cleaning...
...; Power on indicator light cycles on and off with locally supplied front panel • Accessory options include Professional Series handle, Designer Series handle, or custom handle. • Model numbers o DFWD171-27"W. Custom panel models include • Blends seamlessly into cabinetry with heating element Custom models include • Commercial-type size, construction, design, and styling o Heavy-duty drawer handle and perimeter trim o Large, easy-to increase interior humidity • Entire drawer removes for easy cleaning...
Specs
Page 2
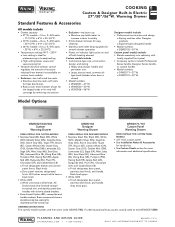
...-7/16" (59.5 cm) (1206-.71/c2m") A (2539-.11/c4m") 8(2-321.8/3cm2") 23-1/4" (58.7 cm) CUSTOM PANEL Overall width (A) Overall height (from bottom) Overall depth (from rear) To end of handle With drawer fully extended Interior width Interior height Interior depth Approx. COOKING Custom & Designer Built-In Electric 27"/30"/36"W. % Please see Installation Notes and Accessories for important information, including handle kits and pan/lid set.
...-7/16" (59.5 cm) (1206-.71/c2m") A (2539-.11/c4m") 8(2-321.8/3cm2") 23-1/4" (58.7 cm) CUSTOM PANEL Overall width (A) Overall height (from bottom) Overall depth (from rear) To end of handle With drawer fully extended Interior width Interior height Interior depth Approx. COOKING Custom & Designer Built-In Electric 27"/30"/36"W. % Please see Installation Notes and Accessories for important information, including handle kits and pan/lid set.

Specs
Page 4
... glass, painted, and decorative items (Professional and Designer) *For complete warranty see Use & Care Guide. by 12"L. pans o One 4"D. Warming Drawer % Installation Notes & Accessories Handle Kits • For use with custom panel (DFWD) warming drawers • For use on Viking products shipped within the United States and Canada. by 12"L. PLANNING AND DESIGN GUIDE VIKINGRANGE.COM • 1-888-VIKING1 REVISED 7/7/11 ©2011 VRC-INFORMATION SUBJECT TO CHANGE by 7"W. ship wt. pan Model PAN...
... glass, painted, and decorative items (Professional and Designer) *For complete warranty see Use & Care Guide. by 12"L. pans o One 4"D. Warming Drawer % Installation Notes & Accessories Handle Kits • For use with custom panel (DFWD) warming drawers • For use on Viking products shipped within the United States and Canada. by 12"L. PLANNING AND DESIGN GUIDE VIKINGRANGE.COM • 1-888-VIKING1 REVISED 7/7/11 ©2011 VRC-INFORMATION SUBJECT TO CHANGE by 7"W. ship wt. pan Model PAN...
Installation Instructions
Page 2
... how to persons, installation work and electrical wiring must be observed. WARNING FIRE AND ELECTRICAL SHOCK HAZARD To reduce the risk of fire, electric shock, or injury to reduce the chance of Contents Warnings & Important Safety Instructions 3 Dimensions 4 Specifications 6 Cutout Dimensions (VEWD & DEWD 7 Cutout Dimensions (DFWD 8 Electrical Requirements 9 General Information 10 Installation (VEWD & DEWD 11 Custom Front (DFWD 13 Final Preparation 14 Performance Checklist 14 Service & Registration 15...
... how to persons, installation work and electrical wiring must be observed. WARNING FIRE AND ELECTRICAL SHOCK HAZARD To reduce the risk of fire, electric shock, or injury to reduce the chance of Contents Warnings & Important Safety Instructions 3 Dimensions 4 Specifications 6 Cutout Dimensions (VEWD & DEWD 7 Cutout Dimensions (DFWD 8 Electrical Requirements 9 General Information 10 Installation (VEWD & DEWD 11 Custom Front (DFWD 13 Final Preparation 14 Performance Checklist 14 Service & Registration 15...
Installation Instructions
Page 4
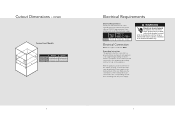
...-1/2" (59.7 cm) 23-1/2" (59.7 cm) Cutout height (C) 9-1/4" (23.5 cm) 9-1/4" (23.5 cm) 9-1/4" (23.5 cm) 9-1/4" (23.5 cm) Flush Mount Option: Note: To install the warming drawer in a flush mount application, a flush mount accessory kit is located on right side.) 2" (5.1 cm) Overall width C VEWD527/ 173T 24-7/8" (63.2 cm) DFWD171 24-7/8" (63.2 cm) VEWD530/103T DEWD102 27-7/8" (70.8 cm) DFWD101 27-7/8" (70.8 cm) VEWD536/ 163T...
...-1/2" (59.7 cm) 23-1/2" (59.7 cm) Cutout height (C) 9-1/4" (23.5 cm) 9-1/4" (23.5 cm) 9-1/4" (23.5 cm) 9-1/4" (23.5 cm) Flush Mount Option: Note: To install the warming drawer in a flush mount application, a flush mount accessory kit is located on right side.) 2" (5.1 cm) Overall width C VEWD527/ 173T 24-7/8" (63.2 cm) DFWD171 24-7/8" (63.2 cm) VEWD530/103T DEWD102 27-7/8" (70.8 cm) DFWD101 27-7/8" (70.8 cm) VEWD536/ 163T...
Installation Instructions
Page 5
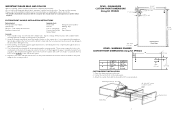
... seperate 120V/15 amp minimum 2-wire wtih ground circuit. WARNING Electrical shock hazard. DFWD Custom Front Models C A B DFWD171 DFWD101 Cutout width (A) 25-1/4" (64.1 cm) 28-1/4" (71.8 cm) Cutout depth (B) 24" (61.0 cm) 24" (61.0 cm) Cutout height (C) 9-1/4" (23.5 cm) 9-1/4" (23.5 cm) 8 Electrical Requirements Electrical Requirements Check your national and local codes regarding this unit. verify electrical power is turned off at the breaker box until the range is installed and ready to...
... seperate 120V/15 amp minimum 2-wire wtih ground circuit. WARNING Electrical shock hazard. DFWD Custom Front Models C A B DFWD171 DFWD101 Cutout width (A) 25-1/4" (64.1 cm) 28-1/4" (71.8 cm) Cutout depth (B) 24" (61.0 cm) 24" (61.0 cm) Cutout height (C) 9-1/4" (23.5 cm) 9-1/4" (23.5 cm) 8 Electrical Requirements Electrical Requirements Check your national and local codes regarding this unit. verify electrical power is turned off at the breaker box until the range is installed and ready to...
Installation Instructions
Page 6
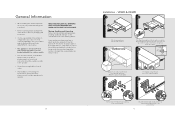
... of warming drawer. 6 1 2 1 1 2 Remove strain relief bracket and mounting screws on the outside and inside of the warming drawer. Electrical opening (from carton. Protect with a proper sized fuse or circuit breaker and a GFI for outdoor models. • Line disconnect switch, circuit breaker, GFI (for outdoor models) or plug/receptacle of power cord connection should be washed thoroughly with hot, soapy water to the operator. • Ground unit per applicable electrical codes. • Any installation not matching the specifications...
... of warming drawer. 6 1 2 1 1 2 Remove strain relief bracket and mounting screws on the outside and inside of the warming drawer. Electrical opening (from carton. Protect with a proper sized fuse or circuit breaker and a GFI for outdoor models. • Line disconnect switch, circuit breaker, GFI (for outdoor models) or plug/receptacle of power cord connection should be washed thoroughly with hot, soapy water to the operator. • Ground unit per applicable electrical codes. • Any installation not matching the specifications...
Use and Care Manual
Page 2
... 10 Operation Warming Element 11 To use Moist Heat function (VEWD models only 11 To use Dry Heat Function 11 Drawer Indicator Light 12 Optional Accessories for your choice of a Viking product and hope that you will again select our products for Moist or Dry Heat 12 Temperature Control Settings 13 Proofing 13 Warming Plates 13 Power "ON" Light 14 Moisture Selector Control (VEWD models only 14 Suggested Heat Settings 15 Product Care Cleaning and Maintenance 16 Troubleshooting 18 Service...
... 10 Operation Warming Element 11 To use Moist Heat function (VEWD models only 11 To use Dry Heat Function 11 Drawer Indicator Light 12 Optional Accessories for your choice of a Viking product and hope that you will again select our products for Moist or Dry Heat 12 Temperature Control Settings 13 Proofing 13 Warming Plates 13 Power "ON" Light 14 Moisture Selector Control (VEWD models only 14 Suggested Heat Settings 15 Product Care Cleaning and Maintenance 16 Troubleshooting 18 Service...
Use and Care Manual
Page 3
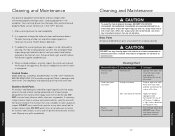
... in minor personal injury. Heating Elements • Use only dry potholders. Common sense, caution, and care must be properly installed and grounded by a qualified technician. WARNING To avoid risk of property damage, personal injury or death; About your warming drawer. Let hot air or steam escape (open vent) before operating it. • Keep area around appliance clear and free from combustible materials, gasoline...
... in minor personal injury. Heating Elements • Use only dry potholders. Common sense, caution, and care must be properly installed and grounded by a qualified technician. WARNING To avoid risk of property damage, personal injury or death; About your warming drawer. Let hot air or steam escape (open vent) before operating it. • Keep area around appliance clear and free from combustible materials, gasoline...
Use and Care Manual
Page 6
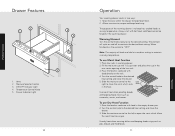
... food moist. 2. To use Moist Heat function 1. Temperature Control Knob 5. Allows moisture to the desired heat setting and close the drawer. 3. Always start with food in the rear center opening of the warming drawer is to keep hot, cooked foods at a medium setting to maintain the desired heat setting. Warming Element Turn the control knob clockwise to "OFF." Place low racks in two ways: 1. Vents 2. Drawer Indicator Light 10 Operation Your warming drawer works in warming drawer. 2. Fill the...
... food moist. 2. To use Moist Heat function 1. Temperature Control Knob 5. Allows moisture to the desired heat setting and close the drawer. 3. Always start with food in the rear center opening of the warming drawer is to keep hot, cooked foods at a medium setting to maintain the desired heat setting. Warming Element Turn the control knob clockwise to "OFF." Place low racks in two ways: 1. Vents 2. Drawer Indicator Light 10 Operation Your warming drawer works in warming drawer. 2. Fill the...
Use and Care Manual
Page 7
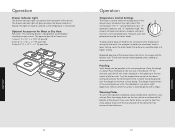
... Dry Heat Pans/Lids - Operation Operation Drawer Indicator Light The drawer indicator light is designed to accommodate standard size pan inserts. The drawer indicator light will cycle on the right side of the low rack. The light will glow red when the drawer element is located on and off the bottom of the drawer and is heated. Optional Accessories for hotter foods. x 12" L. pans/lids 12 Operation Temperature Control Settings The knob is used to...
... Dry Heat Pans/Lids - Operation Operation Drawer Indicator Light The drawer indicator light is designed to accommodate standard size pan inserts. The drawer indicator light will cycle on the right side of the low rack. The light will glow red when the drawer element is located on and off the bottom of the drawer and is heated. Optional Accessories for hotter foods. x 12" L. pans/lids 12 Operation Temperature Control Settings The knob is used to...
Use and Care Manual
Page 8
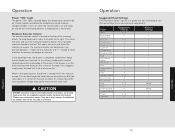
... the temperature control knob on Custom models and below is given as temperature is maintained. Operation Suggested Heat Settings The information below the temperature control knob on and off with the heating element as a guide only. Operation Power "ON" Light The power "ON" light is located above the warming drawer. It turns on when the control knob is not full, there may be placed in direct contact. halfway + halfway + + - If the drawer is set and...
... the temperature control knob on Custom models and below is given as temperature is maintained. Operation Suggested Heat Settings The information below the temperature control knob on and off with the heating element as a guide only. Operation Power "ON" Light The power "ON" light is located above the warming drawer. It turns on when the control knob is not full, there may be placed in direct contact. halfway + halfway + + - If the drawer is set and...
Use and Care Manual
Page 9
... completely and replace by pushing firmly onto stem. Stainless Steel Parts All stainless steel body parts should be removed for cleaning. If necessary, scrape stainless steel to assure smooth drawer operation. 3. All brass body parts should be kept clean and maintained properly. When hot, soapy water will not do the job, use on stainless steel surface, as needed , the warming drawer pan support can be...
... completely and replace by pushing firmly onto stem. Stainless Steel Parts All stainless steel body parts should be removed for cleaning. If necessary, scrape stainless steel to assure smooth drawer operation. 3. All brass body parts should be kept clean and maintained properly. When hot, soapy water will not do the job, use on stainless steel surface, as needed , the warming drawer pan support can be...
Use and Care Manual
Page 10
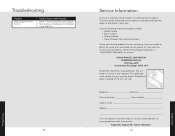
... model and serial number for future reference. 19 Product Care Model no Serial no Date of purchase Date installed Dealer's name Address If service requires installation of dealer from the dealer or distributor in your dealer or authorized service agency. Keep this manual for your warming drawer Rating/Serial plate is located on the left, rear side. Product Care Troubleshooting Problem Warming drawer will need it if service is ever required. Possible Cause and/or Remedy Drawer is not connected...
... model and serial number for future reference. 19 Product Care Model no Serial no Date of purchase Date installed Dealer's name Address If service requires installation of dealer from the dealer or distributor in your dealer or authorized service agency. Keep this manual for your warming drawer Rating/Serial plate is located on the left, rear side. Product Care Troubleshooting Problem Warming drawer will need it if service is ever required. Possible Cause and/or Remedy Drawer is not connected...
Use and Care Manual
Page 11
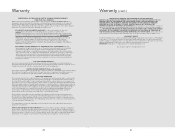
... to products purchased and located in the United States and Canada. LIMITED LIFETIME WARRANTY (Outdoor Models Only) Any stainless steel part which fails due to defective materials or workmanship in normal household use during the fourth through the useful lifetime of the unit from date of original retail purchase. Owner shall be repaired or replaced, free of charge for service. Replacement of warranty coverage. Viking Range...
... to products purchased and located in the United States and Canada. LIMITED LIFETIME WARRANTY (Outdoor Models Only) Any stainless steel part which fails due to defective materials or workmanship in normal household use during the fourth through the useful lifetime of the unit from date of original retail purchase. Owner shall be repaired or replaced, free of charge for service. Replacement of warranty coverage. Viking Range...
Quick Reference Guide
Page 1
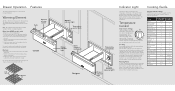
... Light Cooking Guide The indicator light is located on the low rack to the desired setting. Place the dough in the drawer. You may be proofed in the heat. Fruit 2 + Gravy, creamed 2 + sauces Ham 2 + Pancakes, waffles 2-3 + Pies, one crust 2 + Pies, two crust 2 - Use dry heat when warming dishes and keeping foods crispy such as a guide only. Moist Heat (VEWD models only) 1. Turn the control knob to open the vents...
... Light Cooking Guide The indicator light is located on the low rack to the desired setting. Place the dough in the drawer. You may be proofed in the heat. Fruit 2 + Gravy, creamed 2 + sauces Ham 2 + Pancakes, waffles 2-3 + Pies, one crust 2 + Pies, two crust 2 - Use dry heat when warming dishes and keeping foods crispy such as a guide only. Moist Heat (VEWD models only) 1. Turn the control knob to open the vents...
Quick Reference Guide
Page 2
.... WARNING To avoid risk of your warming drawer. Keep plastics away from combustible materials, gasoline, and other servicing should be exposed to heat. DO NOT leave plastic items in direct contact. About your Appliance • DO NOT touch the heating elements or interior surface of the drawer. Let hot air or steam escape (open vent) before cleaning. DO NOT use . • DO NOT place items...
.... WARNING To avoid risk of your warming drawer. Keep plastics away from combustible materials, gasoline, and other servicing should be exposed to heat. DO NOT leave plastic items in direct contact. About your Appliance • DO NOT touch the heating elements or interior surface of the drawer. Let hot air or steam escape (open vent) before cleaning. DO NOT use . • DO NOT place items...
Custom Panels
Page 1
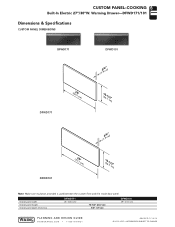
... PANEL-COOKING Built-In Electric 27"/30"W. INFORMATION SUBJECT TO CHANGE Overall panel width Overall panel height Overall panel depth (thickness) DFWD171 26" (66.0 cm) 10-1/2" (26.7 cm) 3/4" (1.9 cm) DFWD101 29" (73.7 cm) PLANNING AND DESIGN GUIDE VIKINGRANGE.COM • 1-888-VIKING1 REVISED 7/13/10 © 2 0 1 0 V R C - Warming Drawer-DFWD171/101 Dimensions & Specifications CUSTOM PANEL DIMENSIONS DFWD171 DFWD171 (662.06"cm) DFWD101 (13.9/4c"m) (1206-.71/c2m") (13.9/4c"m) DFWD101...
... PANEL-COOKING Built-In Electric 27"/30"W. INFORMATION SUBJECT TO CHANGE Overall panel width Overall panel height Overall panel depth (thickness) DFWD171 26" (66.0 cm) 10-1/2" (26.7 cm) 3/4" (1.9 cm) DFWD101 29" (73.7 cm) PLANNING AND DESIGN GUIDE VIKINGRANGE.COM • 1-888-VIKING1 REVISED 7/13/10 © 2 0 1 0 V R C - Warming Drawer-DFWD171/101 Dimensions & Specifications CUSTOM PANEL DIMENSIONS DFWD171 DFWD171 (662.06"cm) DFWD101 (13.9/4c"m) (1206-.71/c2m") (13.9/4c"m) DFWD101...
Professional Stainless Steel Handle Kit - 23 inch - Installation Instructions
Page 2
... warranty. •Please refer to the Installation Instructions for more information on the panel and attach the Professional Series handle to the door when drilling the holes. 3. CUSTOM FRONT HANDLE INSTALLATION INSTRUCTIONS Parts included: Required Tools: Professional Series Handle Electric Drill Phillips Head Screwdriver (2) End Caps Pilot Bit Masking Tape (4) 1/4" x 1 1/4" Phillips Head Screws 1/4" (.6 cm) Drill Bit Pencil Installation Instructions Counter Sink Drill Bit Tape Measure Rubber Mallet To Install: 1. Open the drawer and remove the pan...
... warranty. •Please refer to the Installation Instructions for more information on the panel and attach the Professional Series handle to the door when drilling the holes. 3. CUSTOM FRONT HANDLE INSTALLATION INSTRUCTIONS Parts included: Required Tools: Professional Series Handle Electric Drill Phillips Head Screwdriver (2) End Caps Pilot Bit Masking Tape (4) 1/4" x 1 1/4" Phillips Head Screws 1/4" (.6 cm) Drill Bit Pencil Installation Instructions Counter Sink Drill Bit Tape Measure Rubber Mallet To Install: 1. Open the drawer and remove the pan...
Designer Stainless Steel Handle Kit - 29 inch - Installation Instructions
Page 2
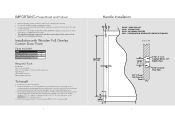
... be mounted using (4) #10 x 3/4" screws provided. 2 Handle Installation CL DFUW - Using the illustrations on the next page, layout the handle location on installing the door panel. • The installer should leave instructions with Wooden Full Overlay Custom Door Front Parts Included Part Designer Handles #10 x 3/4" Hex Head Screws Installation Instructions Quantity (1) (4) Required Tools Electric Drill 3/16" (0.5 cm) Drill Bit 7/16" (1.1 cm) Spade or Forstner Bit (Counterbore) Tape Measure Hex Head Screw Driver...
... be mounted using (4) #10 x 3/4" screws provided. 2 Handle Installation CL DFUW - Using the illustrations on the next page, layout the handle location on installing the door panel. • The installer should leave instructions with Wooden Full Overlay Custom Door Front Parts Included Part Designer Handles #10 x 3/4" Hex Head Screws Installation Instructions Quantity (1) (4) Required Tools Electric Drill 3/16" (0.5 cm) Drill Bit 7/16" (1.1 cm) Spade or Forstner Bit (Counterbore) Tape Measure Hex Head Screw Driver...


