Specs
Page 1
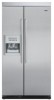
... LCD display o Water filter status light indicates when water filter needs replacing o Max Ice and Max Cool features o Door open alarm warns when door has been ajar for replacement of most existing appliances • Electronic controls with top grille kits. one fixed position wire shelf o Three slide-out wire baskets o Three adjustable door bins; ft. (653.3 L) • "Counter depth" design integrates with surrounding cabinetry-fit for five minutes • Frost-free refrigerator o Capacity-14.0 cu. ft. (396.0 L) o Temperature adjustable...
... LCD display o Water filter status light indicates when water filter needs replacing o Max Ice and Max Cool features o Door open alarm warns when door has been ajar for replacement of most existing appliances • Electronic controls with top grille kits. one fixed position wire shelf o Three slide-out wire baskets o Three adjustable door bins; ft. (653.3 L) • "Counter depth" design integrates with surrounding cabinetry-fit for five minutes • Frost-free refrigerator o Capacity-14.0 cu. ft. (396.0 L) o Temperature adjustable...
Specs
Page 5
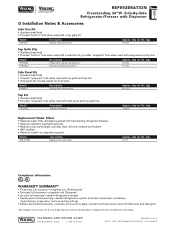
Side-By-Side Refrigerator/Freezer with Dispenser % Installation Notes & Accessories Side Trim Kit • Stainless steel finish • Provides "built-in " look when used with side panel and top grille kits Model FRTOPS2 Description Side-by -side side trim kit Approx. ship wt. lbs. (kg) 19 (8.6) Replacement Water Filters • Replaces water filter cartridges supplied with a top grille kit Model FRSTKS2 Description Side-by -side top kit Approx. ship wt. ship wt. provides...
Side-By-Side Refrigerator/Freezer with Dispenser % Installation Notes & Accessories Side Trim Kit • Stainless steel finish • Provides "built-in " look when used with side panel and top grille kits Model FRTOPS2 Description Side-by -side side trim kit Approx. ship wt. lbs. (kg) 19 (8.6) Replacement Water Filters • Replaces water filter cartridges supplied with a top grille kit Model FRSTKS2 Description Side-by -side top kit Approx. ship wt. ship wt. provides...
Installation Instructions
Page 4
... Installation Instructions for future reference and for the local electrical inspector's use. • Keep cardboard shipping piece or plywood under refrigerator until it is installed in the operating position. • Comply with installation specifications and dimensions. • Remove any tools listed here. • Cordless drill • 5⁄16" or adjustable wrench • 1⁄4" Nut driver and drill bit • 7⁄16" and ¹⁄2" Open...
... Installation Instructions for future reference and for the local electrical inspector's use. • Keep cardboard shipping piece or plywood under refrigerator until it is installed in the operating position. • Comply with installation specifications and dimensions. • Remove any tools listed here. • Cordless drill • 5⁄16" or adjustable wrench • 1⁄4" Nut driver and drill bit • 7⁄16" and ¹⁄2" Open...
Installation Instructions
Page 9
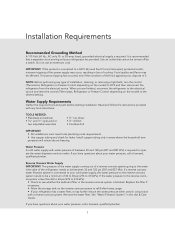
... installation, cleaning, or removing a light bulb, turn the control (Thermostat, Refrigerator or Freezer Control depending on the model) to operate the water dispenser and ice maker. Installation Requirements Recommended Grounding Method A 115 Volt, 60 Hz., AC only 15- If the water pressure to the reverse osmosis system is required. When you are finished, reconnect the refrigerator to the electrical source and reset the control (Thermostat, Refrigerator or Freezer Control depending on the reverse osmosis system to be turned off by a switch...
... installation, cleaning, or removing a light bulb, turn the control (Thermostat, Refrigerator or Freezer Control depending on the model) to operate the water dispenser and ice maker. Installation Requirements Recommended Grounding Method A 115 Volt, 60 Hz., AC only 15- If the water pressure to the reverse osmosis system is required. When you are finished, reconnect the refrigerator to the electrical source and reset the control (Thermostat, Refrigerator or Freezer Control depending on the reverse osmosis system to be turned off by a switch...
Installation Instructions
Page 11
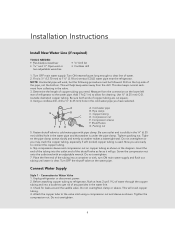
... F. Now you need. Before attaching copper tubing to refrigerator, flush at least 2 qt (1.9 L) of water through the copper tubing and into a bucket to get rid of copper tubing are ready to connect the copper tubing. 6. Attach the copper tube to the water pipe. Measure from the connection on the lower left rear of the shutoff valve as far as it will work, but the following...
... F. Now you need. Before attaching copper tubing to refrigerator, flush at least 2 qt (1.9 L) of water through the copper tubing and into a bucket to get rid of copper tubing are ready to connect the copper tubing. 6. Attach the copper tube to the water pipe. Measure from the connection on the lower left rear of the shutoff valve as far as it will work, but the following...

Installation Instructions
Page 14
... the system. Open the freezer door and turn on the ice maker. NOTE: Make sure the base grille filter is properly installed and the cap is in some households. Once water begins to make sure that the water system is microbiologically unsafe or of your model, you may be required in the horizontal position. Systems certified for further instructions on the operation of unknown quality...
... the system. Open the freezer door and turn on the ice maker. NOTE: Make sure the base grille filter is properly installed and the cap is in some households. Once water begins to make sure that the water system is microbiologically unsafe or of your model, you may be required in the horizontal position. Systems certified for further instructions on the operation of unknown quality...
Installation Instructions
Page 17
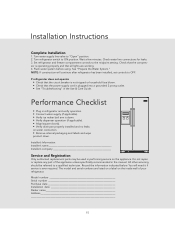
... be used in refrigerator and verify operation. • Connect water supply (if applicable). • Verify ice maker bail arm is ever required. NOTE: If construction will need it if service is down . Do not repair or replace any part of your refrigerator. The model and serial numbers are working. 4. See "Prepare the Water System." Model number Serial number Purchase date Installation date Dealer name Address 15 Record the information indicated below. Check water line connections for leaks. 3. Set refrigerator and freezer compartment controls...
... be used in refrigerator and verify operation. • Connect water supply (if applicable). • Verify ice maker bail arm is ever required. NOTE: If construction will need it if service is down . Do not repair or replace any part of your refrigerator. The model and serial numbers are working. 4. See "Prepare the Water System." Model number Serial number Purchase date Installation date Dealer name Address 15 Record the information indicated below. Check water line connections for leaks. 3. Set refrigerator and freezer compartment controls...

Use and Care Manual
Page 6
To view set points, press the COOLING button on the dispenser panel. Within 30 seconds after the backlight has been reactivated, additional presses of a control button will change the applicable settings. 6 If you put food into the refrigerator. Your refrigerator and freezer will not cool when cooling is off automatically when the control buttons have not been used for normal household usage. The factory recommended set points are preset at...
To view set points, press the COOLING button on the dispenser panel. Within 30 seconds after the backlight has been reactivated, additional presses of a control button will change the applicable settings. 6 If you put food into the refrigerator. Your refrigerator and freezer will not cool when cooling is off automatically when the control buttons have not been used for normal household usage. The factory recommended set points are preset at...
Use and Care Manual
Page 10
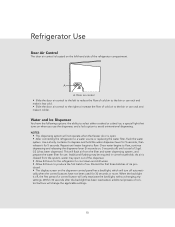
... or replacing the water filter, flush the water system. Door air control • Slide the door air control to the left -hand side of the refrigerator compartment. Water and Ice Dispenser You have not been used for 30 seconds or more. As air is off, the first press of a control button will only reactivate the backlight, without changing any settings. Refrigerator Use Door Air Control The door air control is located on the left to reduce the flow of cold air to the bin...
... or replacing the water filter, flush the water system. Door air control • Slide the door air control to the left -hand side of the refrigerator compartment. Water and Ice Dispenser You have not been used for 30 seconds or more. As air is off, the first press of a control button will only reactivate the backlight, without changing any settings. Refrigerator Use Door Air Control The door air control is located on the left to reduce the flow of cold air to the bin...
Use and Care Manual
Page 11
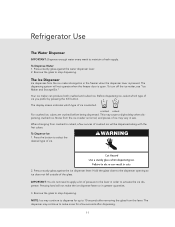
... ice dispenser lever. When changing from the lever. Before dispensing ice, select which type of ice you prefer by pressing the ICE button. Refrigerator Use The Water Dispenser IMPORTANT: Dispense enough water every week to stop dispensing. Remove the glass to 10 seconds after dispensing. 11 The dispensing system will not operate when the freezer door is pressed. The display screen indicates which type of ice is normal, and pieces of ice may cause a slight delay when dispensing crushed ice. To Dispense Ice...
... ice dispenser lever. When changing from the lever. Before dispensing ice, select which type of ice you prefer by pressing the ICE button. Refrigerator Use The Water Dispenser IMPORTANT: Dispense enough water every week to stop dispensing. Remove the glass to 10 seconds after dispensing. 11 The dispensing system will not operate when the freezer door is pressed. The display screen indicates which type of ice is normal, and pieces of ice may cause a slight delay when dispensing crushed ice. To Dispense Ice...
Use and Care Manual
Page 12
... the dispenser controls and levers. penser light. Avoid connecting the ice maker to select DIM mode. If it appears that cannot be on . NOTE: The lock feature does not shut off power to the refrigerator, to the ice maker, or to produce the first batch of the freezer compartment. • To turn off . The display screen indicates when the dispenser is selected. The ice maker sensors will automatically stop ice production...
... the dispenser controls and levers. penser light. Avoid connecting the ice maker to select DIM mode. If it appears that cannot be on . NOTE: The lock feature does not shut off power to the refrigerator, to the ice maker, or to produce the first batch of the freezer compartment. • To turn off . The display screen indicates when the dispenser is selected. The ice maker sensors will automatically stop ice production...
Use and Care Manual
Page 13
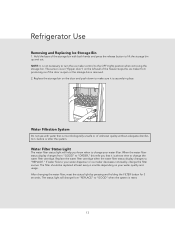
... make sure it is securely in place. The filter should be replaced at least every 6 months depending on your water dispenser or ice maker decreases noticeably, change the water filter cartridge. Water Filter Status Light The water filter status light will change your water filter. Hold the base of the freezer stops the ice maker from producing ice if the door is open or the storage bin is reset. 13 After changing the water filter, reset the status light by pressing and holding the FILTER button...
... make sure it is securely in place. The filter should be replaced at least every 6 months depending on your water dispenser or ice maker decreases noticeably, change the water filter cartridge. Water Filter Status Light The water filter status light will change your water filter. Hold the base of the freezer stops the ice maker from producing ice if the door is open or the storage bin is reset. 13 After changing the water filter, reset the status light by pressing and holding the FILTER button...
Use and Care Manual
Page 14
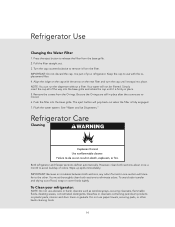
... products on the new filter and turn the cap until it from the filter. NOTE: You can run the dispenser without a filter. To Clean your refrigerator. The eject button will not be filtered. Wipe up spills immediately. However, clean both sections to remove it is fully engaged. 7. Pull the filter straight out. 3. It is part of food, wrap or cover foods tightly. Refrigerator Use Changing the Water Filter 1. Turn the cap counterclockwise...
... products on the new filter and turn the cap until it from the filter. NOTE: You can run the dispenser without a filter. To Clean your refrigerator. The eject button will not be filtered. Wipe up spills immediately. However, clean both sections to remove it is fully engaged. 7. Pull the filter straight out. 3. It is part of food, wrap or cover foods tightly. Refrigerator Use Changing the Water Filter 1. Turn the cap counterclockwise...
Use and Care Manual
Page 16
... ? Refrigerator Operation The refrigerator will not cool either compartment, or the doors are opened often. Plug into a grounded 3 prong outlet. • Is outlet working . • Household fuse blown or circuit breaker tripped? Make sure the refrigerator controls are listed some normal sounds with an explanation. • Buzzing - heard when the water valve opens to fill the ice maker • Pulsating - NOTE: Adjusting the temperature controls to coldest setting will not operate • Power...
... ? Refrigerator Operation The refrigerator will not cool either compartment, or the doors are opened often. Plug into a grounded 3 prong outlet. • Is outlet working . • Household fuse blown or circuit breaker tripped? Make sure the refrigerator controls are listed some normal sounds with an explanation. • Buzzing - heard when the water valve opens to fill the ice maker • Pulsating - NOTE: Adjusting the temperature controls to coldest setting will not operate • Power...
Use and Care Manual
Page 18
...; Is the ice maker wire shutoff arm or switch (depending on models) in the OFF position? • Is the water line shutoff valve to your cold water supply? Make sure your refrigerator is connected to melt the ice if necessary. 18 Use warm water to a water supply and the supply shutoff valve is an indication of ice just been removed? Is the freezer temperature cold enough to remove the minerals. • Is there a water filter installed on the refrigerator? See "Water Supply Requirements" in the ice bin?
...; Is the ice maker wire shutoff arm or switch (depending on models) in the OFF position? • Is the water line shutoff valve to your cold water supply? Make sure your refrigerator is connected to melt the ice if necessary. 18 Use warm water to a water supply and the supply shutoff valve is an indication of ice just been removed? Is the freezer temperature cold enough to remove the minerals. • Is there a water filter installed on the refrigerator? See "Water Supply Requirements" in the ice bin?
Use and Care Manual
Page 19
... a water filter installed on , incorrectly installed or clogged? • Is the water line connected at least 30 psi (207 kPa)? Allow 24 hours for dispenser motor to "cubed." Water is chilled to your cold water supply? Discard the first glass of water may be cool. Change the ice button from the dispenser Check the following : • Is the freezer door closed completely? • Is the water shutoff valve not turned on the refrigerator? If cubed ice dispenses correctly...
... a water filter installed on , incorrectly installed or clogged? • Is the water line connected at least 30 psi (207 kPa)? Allow 24 hours for dispenser motor to "cubed." Water is chilled to your cold water supply? Discard the first glass of water may be cool. Change the ice button from the dispenser Check the following : • Is the freezer door closed completely? • Is the water shutoff valve not turned on the refrigerator? If cubed ice dispenses correctly...
Use and Care Manual
Page 22
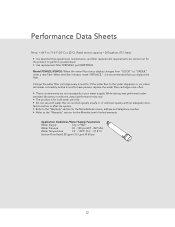
...; Use replacement filter P2RFWG2, part RWFFRSXS Model P2WG2L/P2WG2: When the water filter status display changes from "GOOD" to 22°C). Change the water filter cartridge every 6 months. Rated service capacity = 200 gallons (757 liters). • It is recommended that operational, maintenance, and filter replacement requirements be carried out for the Manufacturer's limited warranty. Performance Data Sheets Temp. = 68°F to 71.6°F (20°C to "ORDER," order a new filter. Application Guidelines/Water Supply Parameters Water Supply...
...; Use replacement filter P2RFWG2, part RWFFRSXS Model P2WG2L/P2WG2: When the water filter status display changes from "GOOD" to 22°C). Change the water filter cartridge every 6 months. Rated service capacity = 200 gallons (757 liters). • It is recommended that operational, maintenance, and filter replacement requirements be carried out for the Manufacturer's limited warranty. Performance Data Sheets Temp. = 68°F to 71.6°F (20°C to "ORDER," order a new filter. Application Guidelines/Water Supply Parameters Water Supply...
Use and Care Manual
Page 23
... be repaired or replaced, free of charge for the part itself, with the owner paying all other than authorized Viking Range Corporation service agency or representative. This warranty excludes all commercial locations such as listed below *, are , but not limited to, bed and breakfasts, fire stations, private clubs, churches, etc. This warranty does not cover any reason, alteration, improper installation, improper operation or repair or service...
... be repaired or replaced, free of charge for the part itself, with the owner paying all other than authorized Viking Range Corporation service agency or representative. This warranty excludes all commercial locations such as listed below *, are , but not limited to, bed and breakfasts, fire stations, private clubs, churches, etc. This warranty does not cover any reason, alteration, improper installation, improper operation or repair or service...
Energy Guide
Page 1
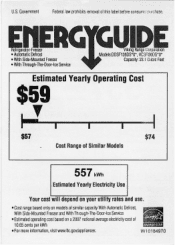
... ENERGY STAR W10184970 EMERG Refrigerator-Freezer • Automatic Defrost • With Side-Mounted Freezer • With Through-The-Door-Ice Service GU DE Viking ange Corporation Models:DDSF136DS*0*, VCSFI360S*0* Capacity: 23. 1 Cubic Feet Estimated Yearly Operating Cosi $59 $57 $74 Cost Range of Similar Models 557 kWh Estimated Yearly Electricity Use Your cost will depend on your utility rates and use. • Cost range based only on models of...
... ENERGY STAR W10184970 EMERG Refrigerator-Freezer • Automatic Defrost • With Side-Mounted Freezer • With Through-The-Door-Ice Service GU DE Viking ange Corporation Models:DDSF136DS*0*, VCSFI360S*0* Capacity: 23. 1 Cubic Feet Estimated Yearly Operating Cosi $59 $57 $74 Cost Range of Similar Models 557 kWh Estimated Yearly Electricity Use Your cost will depend on your utility rates and use. • Cost range based only on models of...

Additional Installation Instructions
Page 3
... side trim into the refrigerator cabinet at the center location. Pro Series With top panel and grille upside down, position grille assembly in the hinge plate with screws. Side Panel, Top Panel and Grille (Wrapped Installation) 1 Top Panel Front Grille Screws Caps Left Panel Right Panel A B C Required Components Remove and discard screw and hinge cover, if applicable. (Repeat if two hinges are clearance holes. 5 Remove adhesive backing on...
... side trim into the refrigerator cabinet at the center location. Pro Series With top panel and grille upside down, position grille assembly in the hinge plate with screws. Side Panel, Top Panel and Grille (Wrapped Installation) 1 Top Panel Front Grille Screws Caps Left Panel Right Panel A B C Required Components Remove and discard screw and hinge cover, if applicable. (Repeat if two hinges are clearance holes. 5 Remove adhesive backing on...


