Specs
Page 1
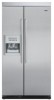
...and Max Cool features o Door open alarm warns when door has been ajar for five minutes • Frost-free refrigerator o Capacity-14.0 cu. REFRIGERATION Freestanding 36"W. one fixed position door shelf o Factory-installed automatic ice maker o Adaptive defrost • Ice and...8226; "Counter depth" design integrates with surrounding cabinetry-fit for details. ft. (257.3 L) o Three adjustable wire shelves; Side-By-Side Refrigerator/Freezer with cover • Frost-free freezer o Capacity-9.1 cu. PLANNING AND DESIGN GUIDE VIKINGRANGE.COM • 1-888-VIKING1 REVISED 5/2/11 ©...
...and Max Cool features o Door open alarm warns when door has been ajar for five minutes • Frost-free refrigerator o Capacity-14.0 cu. REFRIGERATION Freestanding 36"W. one fixed position door shelf o Factory-installed automatic ice maker o Adaptive defrost • Ice and...8226; "Counter depth" design integrates with surrounding cabinetry-fit for details. ft. (257.3 L) o Three adjustable wire shelves; Side-By-Side Refrigerator/Freezer with cover • Frost-free freezer o Capacity-9.1 cu. PLANNING AND DESIGN GUIDE VIKINGRANGE.COM • 1-888-VIKING1 REVISED 5/2/11 ©...
Specs
Page 2
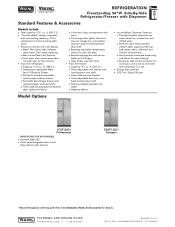
..."W. Side-By-Side Refrigerator/Freezer with Dispenser Dimensions & Specifications PRODUCT DIMENSIONS VCSF136D Professional DDSF136D Designer w/side (3p95a1n-.17el/c8amc")cessory w/side (3p95a1n-.17el/c8amc")cessory (16784-.10/c2m") (ag17wc8r1cii2tle-...
..."W. Side-By-Side Refrigerator/Freezer with Dispenser Dimensions & Specifications PRODUCT DIMENSIONS VCSF136D Professional DDSF136D Designer w/side (3p95a1n-.17el/c8amc")cessory w/side (3p95a1n-.17el/c8amc")cessory (16784-.10/c2m") (ag17wc8r1cii2tle-...

Specs
Page 3
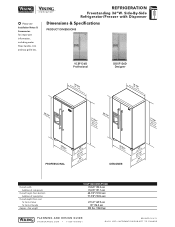
Dimensions & Specifications DOOR SWING REFRIGERATION Freestanding 36"W. Side-By-Side Refrigerator/Freezer with Dispenser VCSF136D Professional 35-5/8" (90.5 cm) DDSF136D Designer 41-3/4" (106.0 cm) 2-1/2" (6.4 cm) 90.0° 90.0° PROFESSIONAL 35-5/8" (90.5 cm) 45-1/2" (115.6 cm) 2-1/2" (6.4 cm) 41-3/4" (106.0 cm) 2-1/2" (6.4 cm) 90.0° 90.0° 45-1/2" (115.6 cm) 2-1/2" (6.4 cm) DESIGNER PLANNING AND DESIGN GUIDE VIKINGRANGE.COM • 1-888-VIKING1 REVISED 5/2/11 ©2011 VRC-INFORMATION SUBJECT TO CHANGE
Dimensions & Specifications DOOR SWING REFRIGERATION Freestanding 36"W. Side-By-Side Refrigerator/Freezer with Dispenser VCSF136D Professional 35-5/8" (90.5 cm) DDSF136D Designer 41-3/4" (106.0 cm) 2-1/2" (6.4 cm) 90.0° 90.0° PROFESSIONAL 35-5/8" (90.5 cm) 45-1/2" (115.6 cm) 2-1/2" (6.4 cm) 41-3/4" (106.0 cm) 2-1/2" (6.4 cm) 90.0° 90.0° 45-1/2" (115.6 cm) 2-1/2" (6.4 cm) DESIGNER PLANNING AND DESIGN GUIDE VIKINGRANGE.COM • 1-888-VIKING1 REVISED 5/2/11 ©2011 VRC-INFORMATION SUBJECT TO CHANGE

Specs
Page 4
... adapter plug for proper air circulation. Cutout width Cutout height Addition of the door must be 2-7/8" (7.3 cm) from the adjacent countertop cabinet. Side-By-Side Refrigerator/Freezer with Dispenser Installation Requirements ACCESS REQUIREMENTS GAS Not applicable ELECTRICAL • Three-wire cord with addition of tops/grilles 72" (182.9 cm) cutout with... waterline requirements- 1/4" copper tubing • 30 psi min.; 120 psi max. 26-1/2" (67.3 cm) 24-1/2" (62.2 cm) min. Sub-flooring or floor coverings (i.e. UTILITY REQUIREMENTS REFRIGERATION Freestanding 36"W.
... adapter plug for proper air circulation. Cutout width Cutout height Addition of the door must be 2-7/8" (7.3 cm) from the adjacent countertop cabinet. Side-By-Side Refrigerator/Freezer with Dispenser Installation Requirements ACCESS REQUIREMENTS GAS Not applicable ELECTRICAL • Three-wire cord with addition of tops/grilles 72" (182.9 cm) cutout with... waterline requirements- 1/4" copper tubing • 30 psi min.; 120 psi max. 26-1/2" (67.3 cm) 24-1/2" (62.2 cm) min. Sub-flooring or floor coverings (i.e. UTILITY REQUIREMENTS REFRIGERATION Freestanding 36"W.
Specs
Page 5
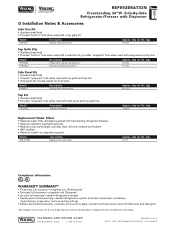
...• Side panel kits include panels for both sides Model FRSPKS2 Description Side-by -side grille kit Approx. ship wt. Warranty valid on Viking products shipped within the United States and Canada. lbs. (kg) 13 (5.9) Top Grille Kits • Stainless steel finish • Provides ... wt. PLANNING AND DESIGN GUIDE VIKINGRANGE.COM • 1-888-VIKING1 REVISED 5/2/11 ©2011 VRC-INFORMATION SUBJECT TO CHANGE Side-By-Side Refrigerator/Freezer with Dispenser % Installation Notes & Accessories Side Trim Kit • Stainless steel finish • Provides "built-in " look when used...
...• Side panel kits include panels for both sides Model FRSPKS2 Description Side-by -side grille kit Approx. ship wt. Warranty valid on Viking products shipped within the United States and Canada. lbs. (kg) 13 (5.9) Top Grille Kits • Stainless steel finish • Provides ... wt. PLANNING AND DESIGN GUIDE VIKINGRANGE.COM • 1-888-VIKING1 REVISED 5/2/11 ©2011 VRC-INFORMATION SUBJECT TO CHANGE Side-By-Side Refrigerator/Freezer with Dispenser % Installation Notes & Accessories Side Trim Kit • Stainless steel finish • Provides "built-in " look when used...
Installation Instructions
Page 4
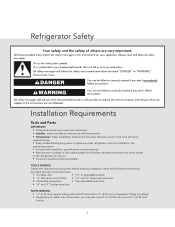
... from kitchen cabinets that would not allow access to the refrigerator for service. • Contact a qualified electrical installer. TOOLS NEEDED: Gather the required tools and parts before starting installation. Refrigerator Safety Installation Requirements Tools and Parts IMPORTANT: • Observe...Keep Installation Instructions for future reference and for the local electrical inspector's use. • Keep cardboard shipping piece or plywood under refrigerator until it is installed in the operating position. • Comply with shutoff valve and a 1⁄4" (6.35 mm) compression ...
... from kitchen cabinets that would not allow access to the refrigerator for service. • Contact a qualified electrical installer. TOOLS NEEDED: Gather the required tools and parts before starting installation. Refrigerator Safety Installation Requirements Tools and Parts IMPORTANT: • Observe...Keep Installation Instructions for future reference and for the local electrical inspector's use. • Keep cardboard shipping piece or plywood under refrigerator until it is installed in the operating position. • Comply with shutoff valve and a 1⁄4" (6.35 mm) compression ...

Installation Instructions
Page 5
Installation Requirements Product Dimensions Top View 30" (76.2 cm) 21⁄2" (6.4 cm) Side View • Height dimensions are shown with the leveling legs extended to the minimum height of 1⁄4" (6.35 mm) below the refrigerator. • The power cord is 66" (167.7 cm) long. • The water line attached to the back of the refrigerator is 78" (198.1 cm) long. 687⁄8" 683⁄4" (175.0 cm) (174.69 cm) 681⁄2" (174.0 cm) When leveling legs are fully extended to 1" (25 mm) below the refrigerator, add 3⁄4" (19 mm) to height dimensions 3
Installation Requirements Product Dimensions Top View 30" (76.2 cm) 21⁄2" (6.4 cm) Side View • Height dimensions are shown with the leveling legs extended to the minimum height of 1⁄4" (6.35 mm) below the refrigerator. • The power cord is 66" (167.7 cm) long. • The water line attached to the back of the refrigerator is 78" (198.1 cm) long. 687⁄8" 683⁄4" (175.0 cm) (174.69 cm) 681⁄2" (174.0 cm) When leveling legs are fully extended to 1" (25 mm) below the refrigerator, add 3⁄4" (19 mm) to height dimensions 3

Installation Instructions
Page 7
...of 150°. Allow 161⁄2" (42 cm) minimum space between the side wall and the freezer side of 1⁄4" (6.35 mm) below the refrigerator, add 3⁄4" (19 mm) to the height dimensions. • Minimum fixed wall position is 131⁄4" (34 cm) from the freezer door .... 69" (175.3 cm) Door Swing Dimensions Location must permit doors to open to the minimum height of the refrigerator. Allow 131⁄4" (34 cm) minimum space between the side wall and the refrigerator side. 135/8" (34.5 cm) 413/4" (106 cm) 25/8" (6.6 cm) 1/2" (12.7 mm) 17" (43.0 cm) 0" 451/2" (0.1 mm...
...of 150°. Allow 161⁄2" (42 cm) minimum space between the side wall and the freezer side of 1⁄4" (6.35 mm) below the refrigerator, add 3⁄4" (19 mm) to the height dimensions. • Minimum fixed wall position is 131⁄4" (34 cm) from the freezer door .... 69" (175.3 cm) Door Swing Dimensions Location must permit doors to open to the minimum height of the refrigerator. Allow 131⁄4" (34 cm) minimum space between the side wall and the refrigerator side. 135/8" (34.5 cm) 413/4" (106 cm) 25/8" (6.6 cm) 1/2" (12.7 mm) 17" (43.0 cm) 0" 451/2" (0.1 mm...

Installation Instructions
Page 8
... connection. 6 Installation Requirements Location Requirements NOTES: • The cabinet depth refrigerator can be removed from the rear of the refrigerator opening , at the end of the base cabinets, all shoe molding and baseboards must support refrigerator weight (more than 600 lbs [272 kg], door panels and contents). See... the "Door Swing Dimensions" section. • Do not install the refrigerator near an oven, radiator, or other heat source, nor in a location where the temperature will fall below 55°F (13°C). ...
... connection. 6 Installation Requirements Location Requirements NOTES: • The cabinet depth refrigerator can be removed from the rear of the refrigerator opening , at the end of the base cabinets, all shoe molding and baseboards must support refrigerator weight (more than 600 lbs [272 kg], door panels and contents). See... the "Door Swing Dimensions" section. • Do not install the refrigerator near an oven, radiator, or other heat source, nor in a location where the temperature will fall below 55°F (13°C). ...
Installation Instructions
Page 9
...switch. Install copper tubing only in the Use & Care Guide. IMPORTANT: If this product is connected to OFF and then disconnect the refrigerator from the electrical source. NOTE: Before performing any tools listed here. Water Pressure A cold water supply with any type of installation, ...blocked. Replace the filter if necessary. • Allow the storage tank on the model) to refill after heavy usage. • If your refrigerator has a water filter, it . Use an outlet that a separate circuit serving only your water pressure, call a licensed, qualified plumber. When...
...switch. Install copper tubing only in the Use & Care Guide. IMPORTANT: If this product is connected to OFF and then disconnect the refrigerator from the electrical source. NOTE: Before performing any tools listed here. Water Pressure A cold water supply with any type of installation, ...blocked. Replace the filter if necessary. • Allow the storage tank on the model) to refill after heavy usage. • If your refrigerator has a water filter, it . Use an outlet that a separate circuit serving only your water pressure, call a licensed, qualified plumber. When...

Installation Instructions
Page 10
... the cleaning instructions in the Use & Care Guide. 8 Installation Instructions Unpack the Refrigerator Remove the Packaging Dispose of/recycle all of the package materials, clean the inside of your refrigerator. Do not use sharp instruments, rubbing alcohol, flammable fluids, or abrasive cleaners to... support and stabilize the full weight of the refrigerator. IMPORTANT: • Use 3⁄8" socket wrench to remove skids....
... the cleaning instructions in the Use & Care Guide. 8 Installation Instructions Unpack the Refrigerator Remove the Packaging Dispose of/recycle all of the package materials, clean the inside of your refrigerator. Do not use sharp instruments, rubbing alcohol, flammable fluids, or abrasive cleaners to... support and stabilize the full weight of the refrigerator. IMPORTANT: • Use 3⁄8" socket wrench to remove skids....
Installation Instructions
Page 11
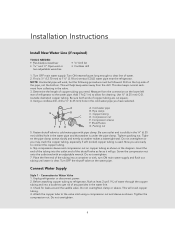
... Supply Style 1 - This will crush copper tubing. 4. Fasten shutoff valve to 11⁄4" (3.18 cm) vertical COLD water pipe near the refrigerator. Tighten packing nut. Find a 1⁄2" (12.70 mm) to cold water pipe with an adjustable wrench. Check for cleaning. Turn ON nearest...the water line. 3. Using a cordless drill, drill a 1⁄4" (6.35 mm) hole in the valve. 3. Connection to clear line of refrigerator to allow for leaks around the saddle valve. Shutoff valve G. Attach the copper tube to connect the copper tubing. 6. This also keeps normal sediment...
... Supply Style 1 - This will crush copper tubing. 4. Fasten shutoff valve to 11⁄4" (3.18 cm) vertical COLD water pipe near the refrigerator. Tighten packing nut. Find a 1⁄2" (12.70 mm) to cold water pipe with an adjustable wrench. Check for cleaning. Turn ON nearest...the water line. 3. Using a cordless drill, drill a 1⁄4" (6.35 mm) hole in the valve. 3. Connection to clear line of refrigerator to allow for leaks around the saddle valve. Shutoff valve G. Attach the copper tube to connect the copper tubing. 6. This also keeps normal sediment...
Installation Instructions
Page 12
...at the valve) or nuts that leak. 10 Do not overtighten clamp or sleeve. If the gray water tube supplied with the refrigerator is not long enough, a 1⁄4" x 1⁄4" coupling is equipped with a wrench two more turns. Bulb D. Ferrule (...ON. 7. Tighten any nuts or connections (including connections at the valve) that leak. Compression nut D E. Refrigerator water tubing B. Nut (purchased) G. Tube clamp screw C. Connection to the refrigerator as shown. Nut (provided) C. Installation Instructions 5. Copper tubing D. Valve inlet E 8. Before attaching copper ...
...at the valve) or nuts that leak. 10 Do not overtighten clamp or sleeve. If the gray water tube supplied with the refrigerator is not long enough, a 1⁄4" x 1⁄4" coupling is equipped with a wrench two more turns. Bulb D. Ferrule (...ON. 7. Tighten any nuts or connections (including connections at the valve) that leak. Compression nut D E. Refrigerator water tubing B. Nut (purchased) G. Tube clamp screw C. Connection to the refrigerator as shown. Nut (provided) C. Installation Instructions 5. Copper tubing D. Valve inlet E 8. Before attaching copper ...

Installation Instructions
Page 13
... A B. This will go. Push the bulb end of any nuts or connections (including connections at least 2 qt (1.9 L) of the refrigerator. 3. Tighten any particles in Refrigerator 1. Thread the provided nut onto the water valve as it with a wrench two more turns. Turn shutoff valve ON. 7. Connection to get... rid of the tubing into the water valve as far as shown. Before attaching copper tubing to refrigerator, flush at the valve) that leak. Check for leaks. Nut (provided) B 6. Plug into a bucket to Shutoff Valve 1. Installation Instructions Style ...
... A B. This will go. Push the bulb end of any nuts or connections (including connections at least 2 qt (1.9 L) of the refrigerator. 3. Tighten any particles in Refrigerator 1. Thread the provided nut onto the water valve as it with a wrench two more turns. Turn shutoff valve ON. 7. Connection to get... rid of the tubing into the water valve as far as shown. Before attaching copper tubing to refrigerator, flush at the valve) that leak. Check for leaks. Nut (provided) B 6. Plug into a bucket to Shutoff Valve 1. Installation Instructions Style ...

Installation Instructions
Page 15
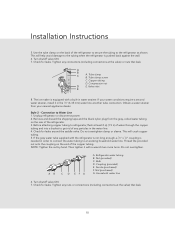
... may take several turns to make it level. Open the refrigerator doors to lower the refrigerator. Front leveling bolt (bottom) B 1. Grasp the grille with the cabinet above the refrigerator, simply adjust the refrigerator to adjust the tilt of the refrigerator. Turn the leveling bolts to the right to raise or... 90°. 2. Top hinges B B. A A. Remove the Base Grille 1. Lift up and tilt the top of the refrigerator behind the grille. Level the Refrigerator There is a set of two leveling bolts on each side of the grille toward you do not have a cabinet above the...
... may take several turns to make it level. Open the refrigerator doors to lower the refrigerator. Front leveling bolt (bottom) B 1. Grasp the grille with the cabinet above the refrigerator, simply adjust the refrigerator to adjust the tilt of the refrigerator. Turn the leveling bolts to the right to raise or... 90°. 2. Top hinges B B. A A. Remove the Base Grille 1. Lift up and tilt the top of the refrigerator behind the grille. Level the Refrigerator There is a set of two leveling bolts on each side of the grille toward you do not have a cabinet above the...

Installation Instructions
Page 16
...height, turn the bolt to the right. • To lower the height, turn the height adjustment bolt. 14 Check to the height adjustment bolt, the refrigerator door should be closed. 2. NOTE: For easier access to make sure the doors are preset with the side cabinets or cabinet end panels. 4. If ... hinge and the cabinet opening. Check that all four leveling legs still touch the floor and that the cabinet doors above the refrigerator open all the way. Door Height Adjustment TOOLS NEEDED: 5⁄16" or adjustable wrench. Adjust the rear leveling bolt to adjust the door height ...
...height, turn the bolt to the right. • To lower the height, turn the height adjustment bolt. 14 Check to the height adjustment bolt, the refrigerator door should be closed. 2. NOTE: For easier access to make sure the doors are preset with the side cabinets or cabinet end panels. 4. If ... hinge and the cabinet opening. Check that all four leveling legs still touch the floor and that the cabinet doors above the refrigerator open all the way. Door Height Adjustment TOOLS NEEDED: 5⁄16" or adjustable wrench. Adjust the rear leveling bolt to adjust the door height ...
Installation Instructions
Page 17
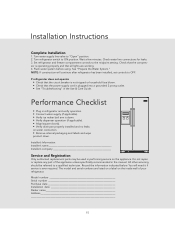
... the compressor is operating properly and that the power supply cord is down . Flush water system before using. Performance Checklist • Plug in refrigerator and verify operation. • Connect water supply (if applicable). • Verify ice maker bail arm is plugged into a grounded 3 prong ...name Installer's company Service and Registration Only authorized replacement parts may be referred to OFF. You will continue after refrigerator has been installed, set controls to a qualified technician. See "Prepare the Water System." Do not repair or replace any part of your...
... the compressor is operating properly and that the power supply cord is down . Flush water system before using. Performance Checklist • Plug in refrigerator and verify operation. • Connect water supply (if applicable). • Verify ice maker bail arm is plugged into a grounded 3 prong ...name Installer's company Service and Registration Only authorized replacement parts may be referred to OFF. You will continue after refrigerator has been installed, set controls to a qualified technician. See "Prepare the Water System." Do not repair or replace any part of your...
Use and Care Manual
Page 3
... attention we have any questions or comments about the complete and growing selection of -theart refrigerator. We appreciate your refrigerator's care and operation. Your Viking appliance is our ultimate goal. Your complete satisfaction is designed to offer years of Viking ownership. For more information about this product, please contact the dealer from whom you...
... attention we have any questions or comments about the complete and growing selection of -theart refrigerator. We appreciate your refrigerator's care and operation. Your Viking appliance is our ultimate goal. Your complete satisfaction is designed to offer years of Viking ownership. For more information about this product, please contact the dealer from whom you...
Use and Care Manual
Page 4
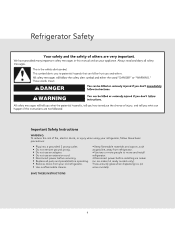
... Important Safety Instructions WARNING: To reduce the risk of fire, electric shock, or injury when using your refrigerator, follow these basic precautions: • Plug into a grounded 3 prong outlet. • Do not remove ground prong. • Do not use an...and panels before operating. • Remove doors from your old refrigerator. • Use nonflammable cleaner. • Keep flammable materials and vapors, such as gasoline, away from refrigerator. • Use two or more people to move and install refrigerator. • Disconnect power before installing ice maker (on ice maker...
... Important Safety Instructions WARNING: To reduce the risk of fire, electric shock, or injury when using your refrigerator, follow these basic precautions: • Plug into a grounded 3 prong outlet. • Do not remove ground prong. • Do not use an...and panels before operating. • Remove doors from your old refrigerator. • Use nonflammable cleaner. • Keep flammable materials and vapors, such as gasoline, away from refrigerator. • Use two or more people to move and install refrigerator. • Disconnect power before installing ice maker (on ice maker...

Use and Care Manual
Page 5
even if they will sit for "just a few days." Junked or abandoned refrigerators are getting rid of the past. If you are still dangerous - Before You Throw Away Your Old Refrigerator or Freezer: • Take off the doors. • Leave the shelves in place so that children may not easily climb inside. 5 Proper Disposal (of your old refrigerator) IMPORTANT: Child entrapment and suffocation are not problems of your old refrigerator, please follow these instructions to help prevent accidents.
even if they will sit for "just a few days." Junked or abandoned refrigerators are getting rid of the past. If you are still dangerous - Before You Throw Away Your Old Refrigerator or Freezer: • Take off the doors. • Leave the shelves in place so that children may not easily climb inside. 5 Proper Disposal (of your old refrigerator) IMPORTANT: Child entrapment and suffocation are not problems of your old refrigerator, please follow these instructions to help prevent accidents.


