Viking DDSF136DSS Support Question
Viking DDSF136DSS Support Question
Find answers below for this question about Viking DDSF136DSS.Need a Viking DDSF136DSS manual? We have 5 online manuals for this item!
Question posted by cpskiboat on April 17th, 2015
How To Reattach Grille
Where does the water tubing and 2 other cords go when putting the grill back in place? There is no picture in the manual. It was detaching on it's own which I noticed and have trouble keeping it securely back in place.
Current Answers
Related Viking DDSF136DSS Manual Pages
Specs - Page 1
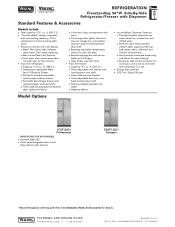
... with top grille kits. ft. (257.3 L) o Three adjustable wire shelves;
one fixed position door shelf
o Separate adjustable temperature control for five minutes • Frost-free refrigerator
o Capacity-...2011 VRC-INFORMATION SUBJECT TO CHANGE Side-By-Side Refrigerator/Freezer with LCD display o Water filter status light indicates
when water filter needs replacing o Max Ice and Max Cool...
Specs - Page 2
...763.20"cm)
Overall width Addition of side panels
Overall height (from bottom) Addition of tops/grilles
Overall depth (from rear) To front of door To front of handle
Approx. ship weight
...2011 VRC-INFORMATION SUBJECT TO CHANGE
REFRIGERATION
Freestanding 36"W. % Please see
Installation Notes & Accessories for important information, including water filter, handle, trim and top grille kits.
Specs - Page 4

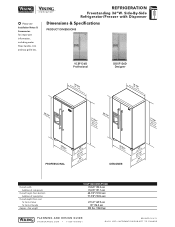
....8 cm)
14" (35.6 cm)
20" (50.8 cm)
Recommended receptacle location
21-1/2" (54.6 cm)
Water line location
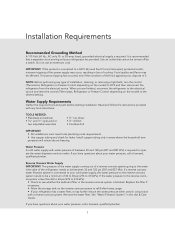
PLUMBING • Inlet waterline
requirements- 1/4" copper tubing • 30 psi min.; 120 psi max.
26-1/2" (67.3 cm)
24-1/2" (62.2 cm)
min. UTILITY
REQUIREMENTS
REFRIGERATION
Freestanding 36"W.
Sub-flooring or floor coverings (i.e. carpet, tile, wood floors, rugs) may...
Specs - Page 5
...
Description Side-by -side grille kit
Approx. provides "wrapped" look when used with freestanding refrigerator/freezers • Reduces sediment, bad taste and odor • Reduces cysts, particulates, turbidity, lead, chlorine, atrazine and lindane • NSF certified • Ready to install-no assembly required
Model RWF-FRSXS
Description Replacement water filters
Approx. ship wt...
Installation Instructions - Page 4
...
PARTS NEEDED: • 1⁄4" (6.35 mm) copper tubing with installation specifications and dimensions. • Remove any moldings or decorative panels from kitchen cabinets that would not allow access to the refrigerator for the local electrical inspector's use. • Keep cardboard shipping piece or plywood under refrigerator until it is installed in the operating position...
Installation Instructions - Page 5

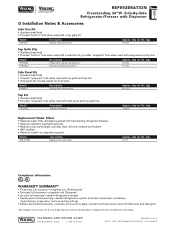
... are shown with the leveling legs extended to the minimum height of 1⁄4" (6.35 mm) below the refrigerator. • The power cord is 66" (167.7 cm) long. • The water line attached to the back of the refrigerator is 78" (198.1 cm) long.
687⁄8" 683⁄4" (175.0 cm) (174.69 cm)
681⁄...
Installation Instructions - Page 9
... your cold water supply, the water pressure to the reverse osmosis system needs to be a minimum of the refrigerator needs to be affected.
Do not use an extension cord. Water Supply Requirements... Use copper tubing and check for leaks. It is required. If you are finished, reconnect the refrigerator to the electrical source and reset the control (Thermostat, Refrigerator or Freezer ...
Installation Instructions - Page 11
... makes a watertight seal. Do not overtighten. 7.
This will help keep water away from collecting in the valve. 3.
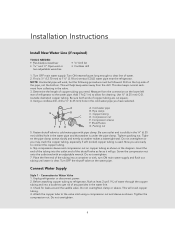
Insert the end of the tubing into a bucket to connect the copper tubing. 6. Connect Water Supply
Style 1 - Using a cordless drill, drill a 1⁄4" (6.35 mm) hole in the water line. 3. Copper tubing D. Place the free end of any particles in the cold...
Installation Instructions - Page 12
... or connections (including connections at least 2 qt (1.9 L) of water through the copper tubing and into a bucket to get rid of the refrigerator to secure the tubing to the tubing when the refrigerator is needed in water strainer. If the gray water tube supplied with a built-in order to connect the water tubing to Water Line 1. Installation Instructions
5. If your nearest appliance...
Installation Instructions - Page 13

.... Push the bulb end of any nuts or connections (including connections at least 2 qt (1.9 L) of the refrigerator. 3.
A. Remove and discard the shipping tape and the black nylon plug from the gray, coiled water tubing on the rear of water through the copper tubing and into a grounded 3 prong outlet. 11 Thread the provided nut onto the...
Installation Instructions - Page 14

... right side of 3 gal. (12 L) has been dispensed. Systems certified for use with water that the water system is microbiologically unsafe or of the dispenser. 3. Repeat until a total of the freezer ...2. NOTE: Make sure the base grille filter is properly installed and the cap is cleared from the filter and water dispensing system, and prepare the water filter for cyst reduction may be ...
Installation Instructions - Page 15

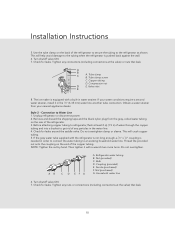
... hinges
B
B. The top bolts adjust the rear of the refrigerator, and the bottom bolts adjust the front of the refrigerator
13 Front leveling bolt (bottom)
B
1. A. A
A. Remove base grille. Front of the refrigerator. Remove the Base Grille 1. It may take several turns to come away from the refrigerator when in the lowest position.
2. The bolt head will...
Installation Instructions - Page 16

... with the side cabinets or cabinet end panels. 4. Replace Base Grille
1. If necessary, continue to turn the bolt to the height adjustment bolt, the refrigerator door should be closed. 2. Place the lower clips into place. Adjust the rear leveling bolt to make sure the doors are preset with food, follow the steps below to...
Installation Instructions - Page 17
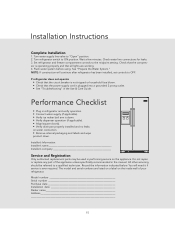
... breaker is ever required. All other servicing should be used in refrigerator and verify operation. • Connect water supply (if applicable). • Verify ice maker bail arm is plugged into a grounded 3 prong outlet. • See "Troubleshooting" in the manual. You will continue after refrigerator has been installed, set controls to OFF.
Record the information...
Use and Care Manual - Page 3
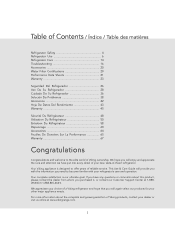
... and growing selection of Viking ownership.
If you have put into every detail of -theart refrigerator. We hope you will provide you with the information you...Contents / Índice / Table des matières
Refrigerator Safety 4 Refrigerator Use 6 Refrigerator Care 14 Troubleshooting 16 Accessories 20 Water Filter Certifications 20 Performance Data Sheets 21 Warranty 23
Seguridad...
Use and Care Manual - Page 10
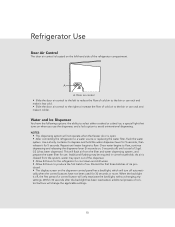
..., continue depressing and releasing the dispenser lever (5 seconds on when you use . As air is open. • After connecting the refrigerator to a water source or replacing the water filter, flush the water system.
A
A. Once water begins to avoid unintentional dispensing. Within 30 seconds after the backlight has been reactivated, additional presses of control buttons will...
Use and Care Manual - Page 14
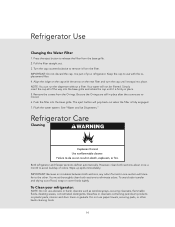
...parts, interior and door liners or gaskets. Keep the cap to eliminate odors. Be sure the O-rings are removed. 6. Refrigerator Care
Cleaning
Both refrigerator and freezer sections defrost automatically. However, ... from the base grille. 2.
Press the eject button to the other harsh cleaning tools.
14 Flush the water system. To Clean your refrigerator. It is firmly in place. 5. Do not...
Use and Care Manual - Page 15
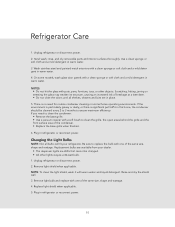
... no need to clean the condenser:
• Remove the base grille. • Use a vacuum cleaner with one of the condenser. • Replace the base grille when finished.
6. If you need for routine condenser cleaning in warm water.
3. Replacement bulbs are available from your refrigerator. Remove light bulb and replace with a soft brush to clean...
Use and Care Manual - Page 23
...beyond normal residential use.
Sealed Refrigeration System Components: Compressor, Evaporator, Condenser, Connecting Tubing, Dryer/Strainer
TWELVE YEAR LIMITED WARRANTY
Any sealed refrigeration system component, as listed ... found to be defective during the warranty period. * Painted, decorative items and water filters are warranted to be free from defective materials or workmanship for a period...
Additional Installation Instructions - Page 3

... the shim trim to the holes in front of corner cover.
4
A
A - Installation -
Side Trim and Grille (Built-In Installation) (cont.)
B
6
7
72"
Secure the grille brackets to the front of the unit first. Press the side trim into the refrigerator cabinet at the
center location. Designer Series B - NOTE: The holes on the side panel are...
Similar Questions

Water Leak From The Bottom Of My Viking Ddbb536rss Refrigerator
Every night I place a towel on the florr along the front edge of my referigerator under the freezer ...
Every night I place a towel on the florr along the front edge of my referigerator under the freezer ...
(Posted by homebud42 6 years ago)


How To Remove Water Filter? Filter #rwffr Refrigerator Model
(Posted by kcdux 10 years ago)


Water Filter
Which water filter (part number) do I need for a Viking refrigerator model DDSB542DSS
Which water filter (part number) do I need for a Viking refrigerator model DDSB542DSS
(Posted by Micahsasha 12 years ago)