
User Guide English
Page 16
....1 78.4 199.2 139.45 354.2 98.1 249.1 174.32 442.8 NOTE: It is recommended that if you intend to permanently install the projector, please physically test the projection size and distance using the actual projector in situ before you permanently install it. 16
....1 78.4 199.2 139.45 354.2 98.1 249.1 174.32 442.8 NOTE: It is recommended that if you intend to permanently install the projector, please physically test the projection size and distance using the actual projector in situ before you permanently install it. 16

User Guide English
Page 46
... should you can project any image from the disc on monitors, TVs, projectors, etc., you require it. Test Pattern Test the color presentation of the LED. Reset Current Color Settings Return current color settings to test the color presentation on the screen and enter the Color Management menu to make adjustments. Light Source... fine color control adjustment to allow for more accurate color reproduction, should Color Management be used to their default values. 46 If you have purchased a test disc, which contains various color test patterns and can be considered.
... should you can project any image from the disc on monitors, TVs, projectors, etc., you require it. Test Pattern Test the color presentation of the LED. Reset Current Color Settings Return current color settings to test the color presentation on the screen and enter the Color Management menu to make adjustments. Light Source... fine color control adjustment to allow for more accurate color reproduction, should Color Management be used to their default values. 46 If you have purchased a test disc, which contains various color test patterns and can be considered.

User Guide English
Page 55
Main Menu Sub-menu Basic Settings Date & Time Settings Firmware Upgrade Advanced Settings Warping Zoom Focus Test Pattern Automatic Date & Time Date Time Time Zone Time Format Software Update Online Software Update by USB OTA Reminder Software Version Power On Source Power On/Off Ring Tone Auto Power On Menu Option Warping Disable Enable Warping Adjustment OK 0.8x 0.9x 1.0x Manual OK Auto Focus Disable Enable OK Disable Enable 12 hours 24 hours Disable Enable Home HDMI 1 HDMI 2 USB-C Disable Enable CEC Disable HDMI 1 HDMI 2 55
Main Menu Sub-menu Basic Settings Date & Time Settings Firmware Upgrade Advanced Settings Warping Zoom Focus Test Pattern Automatic Date & Time Date Time Time Zone Time Format Software Update Online Software Update by USB OTA Reminder Software Version Power On Source Power On/Off Ring Tone Auto Power On Menu Option Warping Disable Enable Warping Adjustment OK 0.8x 0.9x 1.0x Manual OK Auto Focus Disable Enable OK Disable Enable 12 hours 24 hours Disable Enable Home HDMI 1 HDMI 2 USB-C Disable Enable CEC Disable HDMI 1 HDMI 2 55
User Guide English
Page 70
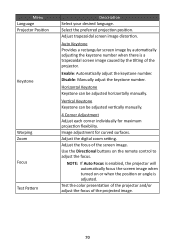
...the focus. Adjust trapezoidal screen image distortion. Horizontal Keystone Keystone can be adjusted horizontally manually. Image adjustment for maximum projection flexibility. Test the color presentation of the projector and/or adjust the focus of the projector. Use the Directional buttons on or when the position... corner individually for curved surfaces. Adjust the focus of the screen image. Menu Language Projector Position Keystone Warping Zoom Focus Test Pattern Description Select your desired language. Adjust the digital zoom setting. Select the preferred projection position.
...the focus. Adjust trapezoidal screen image distortion. Horizontal Keystone Keystone can be adjusted horizontally manually. Image adjustment for maximum projection flexibility. Test the color presentation of the projector and/or adjust the focus of the projector. Use the Directional buttons on or when the position... corner individually for curved surfaces. Adjust the focus of the screen image. Menu Language Projector Position Keystone Warping Zoom Focus Test Pattern Description Select your desired language. Adjust the digital zoom setting. Select the preferred projection position.

User Guide English
Page 94
... receiving antenna. • Increase the separation between the equipment and receiver. • Connect the equipment into an outlet on the unit. This equipment has been tested and found to comply with the instructions, may cause undesired operation. Confirmed corresponding applications shall refer to which can radiate radio frequency energy, and if...
... receiving antenna. • Increase the separation between the equipment and receiver. • Connect the equipment into an outlet on the unit. This equipment has been tested and found to comply with the instructions, may cause undesired operation. Confirmed corresponding applications shall refer to which can radiate radio frequency energy, and if...
