ViewPad E100 User Guide
Page 2
...-exempt RSS standard(s). These limits are designed to Part 15 of the FCC Rules. This equipment generates, uses and can be co-located or operating in conjunction with part 15 of the FCC Rules. Applicable products bear the...operation of the device. Operation is encouraged to try to correct the interference by the party responsible for help. i Changes or modifications not expressly approved by one or more of the following two conditions: (1) This device may not cause harmful interference, and (2) This device must not be determined by turning the equipment off and on, the user...
...-exempt RSS standard(s). These limits are designed to Part 15 of the FCC Rules. This equipment generates, uses and can be co-located or operating in conjunction with part 15 of the FCC Rules. Applicable products bear the...operation of the device. Operation is encouraged to try to correct the interference by the party responsible for help. i Changes or modifications not expressly approved by one or more of the following two conditions: (1) This device may not cause harmful interference, and (2) This device must not be determined by turning the equipment off and on, the user...
ViewPad E100 User Guide
Page 8
... heat during normal operation or charging. PLUGGABLE EQUIPMENT: the socket-outlet shall be installed near the equipment and shall be sure that do not support hot-plug. 15. Never use accessories specified by an incorrect type. Only a certified service technician should perform repair. 17. DO NOT expose the device to disperse heat. Keep it can damage the LCD Screen. POWER INPUT RATING: Refer...
... heat during normal operation or charging. PLUGGABLE EQUIPMENT: the socket-outlet shall be installed near the equipment and shall be sure that do not support hot-plug. 15. Never use accessories specified by an incorrect type. Only a certified service technician should perform repair. 17. DO NOT expose the device to disperse heat. Keep it can damage the LCD Screen. POWER INPUT RATING: Refer...
ViewPad E100 User Guide
Page 9
..., or transmitted by a variety of the input method is a trademark of Google Inc. Copyright Information Copyright © ViewSonic® Corporation, 2012. The actual included applications (apps) may change product specifications without notice. Use of the Wireless Fidelity Alliance. viii Android™ is TOUCHPAL, provided by COOTEK. in this trademark is a trademark of SD Card Association.The prediction engine of Java...
..., or transmitted by a variety of the input method is a trademark of Google Inc. Copyright Information Copyright © ViewSonic® Corporation, 2012. The actual included applications (apps) may change product specifications without notice. Use of the Wireless Fidelity Alliance. viii Android™ is TOUCHPAL, provided by COOTEK. in this trademark is a trademark of SD Card Association.The prediction engine of Java...
ViewPad E100 User Guide
Page 10
... more. Please visit ViewSonic website to working and living green. USA & Canada: http://www.viewsonic.com/company/green/recycle-program/ Europe: http://www.viewsoniceurope.com/uk/kbase/article.php?id=639 Taiwan: http://recycle.epa.gov.tw/recycle/index2.aspx ix For Your Records Product Name: Model Number: Document Number: Serial Number: Purchase Date: ViewPad E100 VS14445/VS14445G ViewPad E100_UG_ENG Rev. 1a...
... more. Please visit ViewSonic website to working and living green. USA & Canada: http://www.viewsonic.com/company/green/recycle-program/ Europe: http://www.viewsoniceurope.com/uk/kbase/article.php?id=639 Taiwan: http://recycle.epa.gov.tw/recycle/index2.aspx ix For Your Records Product Name: Model Number: Document Number: Serial Number: Purchase Date: ViewPad E100 VS14445/VS14445G ViewPad E100_UG_ENG Rev. 1a...
ViewPad E100 User Guide
Page 11
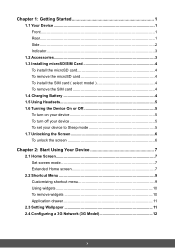
...card 4 To remove the microSD card 4 To install the SIM card ( select model 4 To remove the SIM card 4 1.4 Charging Battery 4 1.5 Using Headsets 5 1.6 Turning the Device On or Off 5 To turn on your device 5 To turn off your device 5 To set your device to Sleep mode 5 1.7 Unlocking the Screen 6 To unlock the screen 6 Chapter 2: Start Using Your Device 7 2.1 Home Screen 7 Set screen mode 7 Extended Home screen 7 2.2 Shortcut Menu 9 Customizing shortcut menu 9 Using widgets 10 To remove widgets 10 Application drawer 11 2.3 Setting Wallpaper 11 2.4 Configuring a 3G Network (3G...
...card 4 To remove the microSD card 4 To install the SIM card ( select model 4 To remove the SIM card 4 1.4 Charging Battery 4 1.5 Using Headsets 5 1.6 Turning the Device On or Off 5 To turn on your device 5 To turn off your device 5 To set your device to Sleep mode 5 1.7 Unlocking the Screen 6 To unlock the screen 6 Chapter 2: Start Using Your Device 7 2.1 Home Screen 7 Set screen mode 7 Extended Home screen 7 2.2 Shortcut Menu 9 Customizing shortcut menu 9 Using widgets 10 To remove widgets 10 Application drawer 11 2.3 Setting Wallpaper 11 2.4 Configuring a 3G Network (3G...
ViewPad E100 User Guide
Page 12
Chapter 3: Settings 13 3.1 Install and Remove an Application 13 Remove an application 13 3.2 Setting Date & Time 14 3.3 Set the System Language 14 3.4 Setting up Wi-Fi 15 To turn Wi-Fi on or off 15 To connect to a Wi-Fi network 15 3.5 Configuring a Bluetooth Connection 16 3.6 Browsing Web Pages 16 To scroll the page 17 To set home page 17 Managing web pages 17 Chapter 4: Using Applications 18 4.1 HDMI Output 18 4.2 Play Music 18 4.3 Gallery...18 4.4 Firmware Update 19 Chapter 5: Other Information 21 Troubleshooting 21 Customer Support 22 Limited Warranty 23 xi
Chapter 3: Settings 13 3.1 Install and Remove an Application 13 Remove an application 13 3.2 Setting Date & Time 14 3.3 Set the System Language 14 3.4 Setting up Wi-Fi 15 To turn Wi-Fi on or off 15 To connect to a Wi-Fi network 15 3.5 Configuring a Bluetooth Connection 16 3.6 Browsing Web Pages 16 To scroll the page 17 To set home page 17 Managing web pages 17 Chapter 4: Using Applications 18 4.1 HDMI Output 18 4.2 Play Music 18 4.3 Gallery...18 4.4 Firmware Update 19 Chapter 5: Other Information 21 Troubleshooting 21 Customer Support 22 Limited Warranty 23 xi
ViewPad E100 User Guide
Page 13
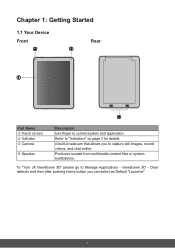
... allows you can select as Default "Launcher" 1 Chapter 1: Getting Started 1.1 Your Device Front ç è Rear æ é Part Name Touch screen Indicator Camera Speaker Description Use finger to Manage Applications - Refer to capture still images, record videos, and chat online. Produces sounds from multimedia content files or system notifications. Clear defaults and then after pushing Home button you to "Indicators" on...
... allows you can select as Default "Launcher" 1 Chapter 1: Getting Started 1.1 Your Device Front ç è Rear æ é Part Name Touch screen Indicator Camera Speaker Description Use finger to Manage Applications - Refer to capture still images, record videos, and chat online. Produces sounds from multimedia content files or system notifications. Clear defaults and then after pushing Home button you to "Indicators" on...
ViewPad E100 User Guide
Page 14
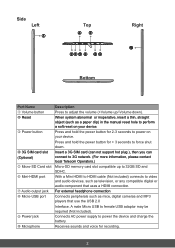
... ï Part Name Volume button Reset Power button 3G SIM card slot (Optional) Micro-SD Card slot Mini-HDMI port Audio output jack Micro-USB port Power jack Microphone Description Press to power the device and charge the battery. For external headphone connection Connects peripherals such as mice, digital cameras and MP3 players that uses a HDMI connection. Connects AC power supply to adjust the volume (+Volume up to video and audio devices, such as...
... ï Part Name Volume button Reset Power button 3G SIM card slot (Optional) Micro-SD Card slot Mini-HDMI port Audio output jack Micro-USB port Power jack Microphone Description Press to power the device and charge the battery. For external headphone connection Connects peripherals such as mice, digital cameras and MP3 players that uses a HDMI connection. Connects AC power supply to adjust the volume (+Volume up to video and audio devices, such as...
ViewPad E100 User Guide
Page 15
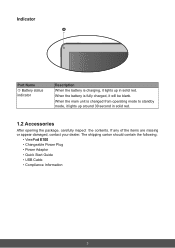
.... Indicator æ Part Name Battery status indicator Description When the battery is charging, it lights up around 30 second in solid red. If any of the items are missing or appear damaged, contact your dealer. The shipping carton should contain the following: • ViewPad E100 • Changeable Power Plug • Power Adaptor • Quick Start Guide • USB Cable • Compliance Information...
.... Indicator æ Part Name Battery status indicator Description When the battery is charging, it lights up around 30 second in solid red. If any of the items are missing or appear damaged, contact your dealer. The shipping carton should contain the following: • ViewPad E100 • Changeable Power Plug • Power Adaptor • Quick Start Guide • USB Cable • Compliance Information...
ViewPad E100 User Guide
Page 16
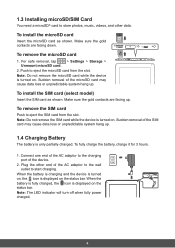
... SIM card from the slot. For safe removal, tap > Settings > Storage > Unmount microSD card. 2. Connect one end of the AC adaptor to the charging port of the microSD card may cause data loss or unpredictable system hang up. 1.4 Charging Battery The battery is displayed on . Make sure the gold contacts are facing up . Push to eject the microSD card from the slot. Make sure the gold contacts are facing down. 1.3 Installing microSD/SIM Card...
... SIM card from the slot. For safe removal, tap > Settings > Storage > Unmount microSD card. 2. Connect one end of the AC adaptor to the charging port of the microSD card may cause data loss or unpredictable system hang up. 1.4 Charging Battery The battery is displayed on . Make sure the gold contacts are facing up . Push to eject the microSD card from the slot. Make sure the gold contacts are facing down. 1.3 Installing microSD/SIM Card...
ViewPad E100 User Guide
Page 17
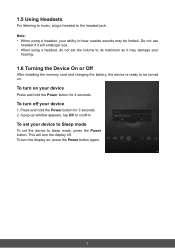
... ability to Sleep mode To set your device 1. To turn on your device Press and hold the Power button for 4 seconds. This will endanger you. • When using a headset, your hearing. 1.6 Turning the Device On or Off After installing the memory card and charging the battery, the device is ready to sleep mode, press the Power button. Do not use headset if it will turn the display on . To turn the display off your device to hear...
... ability to Sleep mode To set your device 1. To turn on your device Press and hold the Power button for 4 seconds. This will endanger you. • When using a headset, your hearing. 1.6 Turning the Device On or Off After installing the memory card and charging the battery, the device is ready to sleep mode, press the Power button. Do not use headset if it will turn the display on . To turn the display off your device to hear...
ViewPad E100 User Guide
Page 18
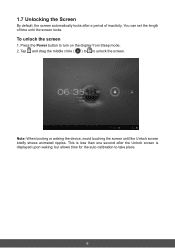
Tap and drag the middle circle ( ) to to turn on the display from Sleep mode. 2. Press the Power button to unlock the screen. You can set the length of inactivity. This is less than one second after a period of time until the Unlock screen briefly shows animated ripples. Note: When booting or waking the device, avoid touching the screen until the screen locks. To unlock the screen 1. 1.7 Unlocking the Screen By default, the screen automatically locks after the Unlock screen is displayed upon waking, but allows time for the auto calibration to take place. 6
Tap and drag the middle circle ( ) to to turn on the display from Sleep mode. 2. Press the Power button to unlock the screen. You can set the length of inactivity. This is less than one second after a period of time until the Unlock screen briefly shows animated ripples. Note: When booting or waking the device, avoid touching the screen until the screen locks. To unlock the screen 1. 1.7 Unlocking the Screen By default, the screen automatically locks after the Unlock screen is displayed upon waking, but allows time for the auto calibration to take place. 6
ViewPad E100 User Guide
Page 19
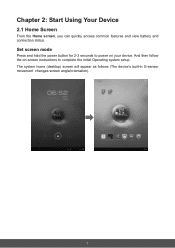
And then follow the on your device. The system home (desktop) screen will appear as follows (The device's built-in G-sensor movement changes screen angle/orientation). 7 Set screen mode Press and hold the power button for 2-3 seconds to power on -screen instructions to complete the initial Operating system setup. Chapter 2: Start Using Your Device 2.1 Home Screen From the Home screen, you can quickly access common features and view battery and connection status.
And then follow the on your device. The system home (desktop) screen will appear as follows (The device's built-in G-sensor movement changes screen angle/orientation). 7 Set screen mode Press and hold the power button for 2-3 seconds to power on -screen instructions to complete the initial Operating system setup. Chapter 2: Start Using Your Device 2.1 Home Screen From the Home screen, you can quickly access common features and view battery and connection status.
ViewPad E100 User Guide
Page 22
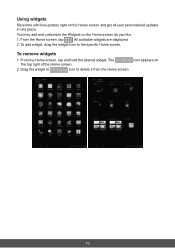
From the Home screen, tap . All available widgets are displayed. 2. From the Home screen, tap and hold the desired widget. Drag the widget to icon to the specific Home screen. icon appears on the Home screen as you like. 1. You may add and customize the Widgets on 10 To remove widgets 1. To add widget, drag the widget icon to delete it from the Home screen. The the top right of the Home screen. 2. Using widgets Save time with live updates right on the Home screen and get all your personalized updates in one place.
From the Home screen, tap . All available widgets are displayed. 2. From the Home screen, tap and hold the desired widget. Drag the widget to icon to the specific Home screen. icon appears on the Home screen as you like. 1. You may add and customize the Widgets on 10 To remove widgets 1. To add widget, drag the widget icon to delete it from the Home screen. The the top right of the Home screen. 2. Using widgets Save time with live updates right on the Home screen and get all your personalized updates in one place.
ViewPad E100 User Guide
Page 24
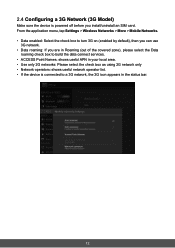
... build the data connect services. • ACCESS Point Names: shows useful APN in your local area. • Use only 2G networks: Please select the check box as using 2G network only • Network operators: shows useful network operator list. • If the device is connected to turn 3G on (enabled by default), then you can use 3G network. • Data roaming: If you install/uninstall an SIM card. From the application menu, tap Settings > Wireless Networks > More > Mobile Networks. • Data enabled: Select the...
... build the data connect services. • ACCESS Point Names: shows useful APN in your local area. • Use only 2G networks: Please select the check box as using 2G network only • Network operators: shows useful network operator list. • If the device is connected to turn 3G on (enabled by default), then you can use 3G network. • Data roaming: If you install/uninstall an SIM card. From the application menu, tap Settings > Wireless Networks > More > Mobile Networks. • Data enabled: Select the...
ViewPad E100 User Guide
Page 25
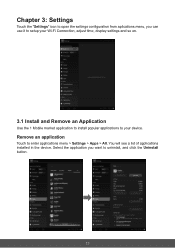
You will see a list of applications installed in the device. Select the application you can use it to setup your Wi-Fi Connection, adjust time, display settings and so on. 3.1 Install and Remove an Application Use the 1 Mobile market application to install popular applications to your device. Remove an application Touch to uninstall, and click the Uninstall button. 13 Chapter 3: Settings Touch the "Settings" icon to open the settings configuration from aplications menu, you want to enter applications menu > Settings > Apps > All.
You will see a list of applications installed in the device. Select the application you can use it to setup your Wi-Fi Connection, adjust time, display settings and so on. 3.1 Install and Remove an Application Use the 1 Mobile market application to install popular applications to your device. Remove an application Touch to uninstall, and click the Uninstall button. 13 Chapter 3: Settings Touch the "Settings" icon to open the settings configuration from aplications menu, you want to enter applications menu > Settings > Apps > All.
ViewPad E100 User Guide
Page 27
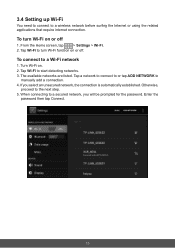
... manually add a connection. 4. Enter the password then tap Connect. 15 Tap Wi-Fi to a secured network, you select an unsecured network, the connection is automatically established. Turn Wi-Fi on or off . If you will be prompted for the password. When connecting to start detecting networks. 3. 3.4 Setting up Wi-Fi You need to connect to a Wi-Fi network 1. The available networks are listed. To connect to a wireless network before surfing the Internet or using...
... manually add a connection. 4. Enter the password then tap Connect. 15 Tap Wi-Fi to a secured network, you select an unsecured network, the connection is automatically established. Turn Wi-Fi on or off . If you will be prompted for the password. When connecting to start detecting networks. 3. 3.4 Setting up Wi-Fi You need to connect to a Wi-Fi network 1. The available networks are listed. To connect to a wireless network before surfing the Internet or using...
ViewPad E100 User Guide
Page 30
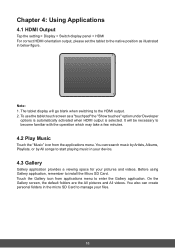
.... To use the tablet touch screen as illustrated in your device. 4.3 Gallery Gallery application provides a viewing space for your files. 18 You can create personal folders in the micro SD Card to manage your pictures and videos. The tablet display will be necessary to become familiar with the operation which may take a few minutes. 4.2 Play Music Touch the "Music" icon from applications menu to enter the...
.... To use the tablet touch screen as illustrated in your device. 4.3 Gallery Gallery application provides a viewing space for your files. 18 You can create personal folders in the micro SD Card to manage your pictures and videos. The tablet display will be necessary to become familiar with the operation which may take a few minutes. 4.2 Play Music Touch the "Music" icon from applications menu to enter the...
ViewPad E100 User Guide
Page 33
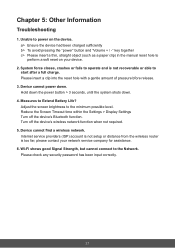
... any security password has been input correctly. 21 a> Ensure the device had been charged sufficiently b> To avoid pressing the "power" button and "Volume + / -" key together c> Please insert a thin, straight object (such as a paper clip) in the manual reset hole to the Network. Turn off the device's Bluetooth function. Adjust the screen brightness to Extend Battery Life? Device cannot power down . 4. Unable to start after a full charge. Reduce the Screen Timeout time within the Settings > Display Settings Turn off the device's wireless network function...
... any security password has been input correctly. 21 a> Ensure the device had been charged sufficiently b> To avoid pressing the "power" button and "Volume + / -" key together c> Please insert a thin, straight object (such as a paper clip) in the manual reset hole to the Network. Turn off the device's Bluetooth function. Adjust the screen brightness to Extend Battery Life? Device cannot power down . 4. Unable to start after a full charge. Reduce the Screen Timeout time within the Settings > Display Settings Turn off the device's wireless network function...
ViewPad E100 User Guide
Page 35
... as electric power fluctuations or failure. How to provide your address, (d) a description of the problem, and (e) the serial number of any data lost. Replacement product or parts may include remanufactured or refurbished parts or components.The replacement unit will need to get service: 1. ViewSonic is valid only for labor from the date of nature, unauthorized product modification, or failure to follow instructions supplied with...
... as electric power fluctuations or failure. How to provide your address, (d) a description of the problem, and (e) the serial number of any data lost. Replacement product or parts may include remanufactured or refurbished parts or components.The replacement unit will need to get service: 1. ViewSonic is valid only for labor from the date of nature, unauthorized product modification, or failure to follow instructions supplied with...


