

User Guide
Page 1
... en este manual" Model No. VX2468-PC-mhd Display User Guide IMPORTANT: Please read this User Guide to obtain important information on installing and using your product in a safe manner, as well as registering your limited coverage from ViewSonic® Corporation, which is also found on our web site at http://www.viewsonic.com in English, or in specific languages using the Regional selection box in this User Guide will...
... en este manual" Model No. VX2468-PC-mhd Display User Guide IMPORTANT: Please read this User Guide to obtain important information on installing and using your product in a safe manner, as well as registering your limited coverage from ViewSonic® Corporation, which is also found on our web site at http://www.viewsonic.com in English, or in specific languages using the Regional selection box in this User Guide will...

User Guide
Page 3
... device or connection cables. • Always use cabinets, stands, or installation methods recommended by the manufacturer of the device set. • Always use the device near any heat sources such as radiators, heat registers, stoves, or other devices (including amplifiers) that may increase the temperature of the device to dangerous levels. • Use a soft, dry cloth to clean the external...
... device or connection cables. • Always use cabinets, stands, or installation methods recommended by the manufacturer of the device set. • Always use the device near any heat sources such as radiators, heat registers, stoves, or other devices (including amplifiers) that may increase the temperature of the device to dangerous levels. • Use a soft, dry cloth to clean the external...

User Guide
Page 4
... the power cord from the equipment. It is dangerous to continue using ear-/headphones, adjust the volume to circumvent the safety provisions of the polarized or grounding-type plug. The system should provide a circuit breaker rated at the...installed in any way, such as carts, stands, tripods, brackets or tables, specified by the manufacturer. • When a cart is used for your dealer or ViewSonic®. Please ensure grounding prongs are never removed. • Always route and manage cords and cables connected to your outlet, obtain an adapter and do not attempt to force the plug...
... the power cord from the equipment. It is dangerous to continue using ear-/headphones, adjust the volume to circumvent the safety provisions of the polarized or grounding-type plug. The system should provide a circuit breaker rated at the...installed in any way, such as carts, stands, tripods, brackets or tables, specified by the manufacturer. • When a cart is used for your dealer or ViewSonic®. Please ensure grounding prongs are never removed. • Always route and manage cords and cables connected to your outlet, obtain an adapter and do not attempt to force the plug...

User Guide
Page 6
... Installing the Stand 10 Wall Mounting...11 Using the Security Slot 12 Making Connections 13 Connecting to Power 13 Connecting External Devices 14 Using the Monitor 15 Adjusting the Viewing Angle 15 Tilt Angle Adjustment 15 Turning the Device On/Off 16 Quick Menu...17 Hot Keys...18 Configuring the Settings 20 General Operations 20 On-Screen Display (OSD) Menu Tree 22 Appendix 26 Specifications...26 Glossary...28 Troubleshooting...32 Maintenance...34 General Precautions 34 Cleaning the Screen...
... Installing the Stand 10 Wall Mounting...11 Using the Security Slot 12 Making Connections 13 Connecting to Power 13 Connecting External Devices 14 Using the Monitor 15 Adjusting the Viewing Angle 15 Tilt Angle Adjustment 15 Turning the Device On/Off 16 Quick Menu...17 Hot Keys...18 Configuring the Settings 20 General Operations 20 On-Screen Display (OSD) Menu Tree 22 Appendix 26 Specifications...26 Glossary...28 Troubleshooting...32 Maintenance...34 General Precautions 34 Cleaning the Screen...

User Guide
Page 11
... cables. 2. Place the device on a flat, stable surface with four (4) screws (M4 x 10 mm). 5. Remove the monitor stand and wall mount cover. 4. Maximum Hole pattern Loading (W x H) Interface Pad (W x H x D) Pad Hole Screw Specification & Quantity 14 kg 100 x 100 mm 115 x 115 x 2.6 mm Ø 5 mm M4 x 10 mm 4 pieces NOTE: Wall mount kits are sold separately. Then secure it with the screen facing down. 3. Follow the instructions...
... cables. 2. Place the device on a flat, stable surface with four (4) screws (M4 x 10 mm). 5. Remove the monitor stand and wall mount cover. 4. Maximum Hole pattern Loading (W x H) Interface Pad (W x H x D) Pad Hole Screw Specification & Quantity 14 kg 100 x 100 mm 115 x 115 x 2.6 mm Ø 5 mm M4 x 10 mm 4 pieces NOTE: Wall mount kits are sold separately. Then secure it with the screen facing down. 3. Follow the instructions...

User Guide
Page 16
... Power button again. To turn on the monitor. 3. Plug the power cord into a power outlet. 2. Power Key ( ) Joy Key 16 NOTE: The monitor will still consume some power as long as the power cord is not being used for a long period of time, please disconnect the power plug from the power outlet. If the monitor is connected to access the Quick Menu, activate Hot Keys, navigate the On-Screen Display (OSD) Menu, and change the settings. Using the Control Panel...
... Power button again. To turn on the monitor. 3. Plug the power cord into a power outlet. 2. Power Key ( ) Joy Key 16 NOTE: The monitor will still consume some power as long as the power cord is not being used for a long period of time, please disconnect the power plug from the power outlet. If the monitor is connected to access the Quick Menu, activate Hot Keys, navigate the On-Screen Display (OSD) Menu, and change the settings. Using the Control Panel...

User Guide
Page 17
Volume Adjust the level, or mute the volume. Input Select Select the input source. View Mode Standard FPS Game RTS Game MOBA Game Movie Web Text MAC Mono NOTE: Follow the key guide that appears on the screen to activate the Quick Menu. Contrast/Brightness Adjust the contrast or brightness level. Exit Exit the Quick Menu. 17 Menu Description ViewMode Select one of the preset color settings. Quick Menu Press the l key to select the option or make adjustments.
Volume Adjust the level, or mute the volume. Input Select Select the input source. View Mode Standard FPS Game RTS Game MOBA Game Movie Web Text MAC Mono NOTE: Follow the key guide that appears on the screen to activate the Quick Menu. Contrast/Brightness Adjust the contrast or brightness level. Exit Exit the Quick Menu. 17 Menu Description ViewMode Select one of the preset color settings. Quick Menu Press the l key to select the option or make adjustments.

User Guide
Page 19
Power Lock/Unlock Locking Power Button 3 Press and hold for 10s to lock power If the Power button is turned on. Boot Up Screen On/Off Off Press to display/hide the boot up screen when the device is locked, the below message will appear on 19 When the menu appears on the screen, continue holding both keys for five (5) seconds to turn on the screen: Power Lock/Unlock Power Button Locked p Press and hold the joy key for five (5) seconds. Key Description u Press and hold the joy key for 10 seconds to lock/unlock the Power button.
Power Lock/Unlock Locking Power Button 3 Press and hold for 10s to lock power If the Power button is turned on. Boot Up Screen On/Off Off Press to display/hide the boot up screen when the device is locked, the below message will appear on 19 When the menu appears on the screen, continue holding both keys for five (5) seconds to turn on the screen: Power Lock/Unlock Power Button Locked p Press and hold the joy key for five (5) seconds. Key Description u Press and hold the joy key for 10 seconds to lock/unlock the Power button.
User Guide
Page 20
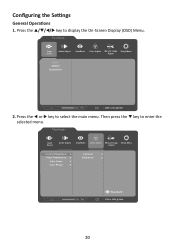
Input Select Audio Adjust ViewMode Color Adjust Manual Image Setup Menu Adjust HDMI 1 HDMI 2 DisplayPort 75% 2560 x 1440 @ 60Hz 2. Then press the q key to display the On-Screen Display (OSD) Menu. Press the p/q/t/u key to enter the selected menu. Input Select Audio Adjust ViewMode Color Adjust Manual Image Setup Menu Adjust Contrast/Brightness Color Temperature Color Space Color Range Contrast Brightness Standard 75% 2560 x 1440 @ 60Hz 20 Press the t or u key to select the main menu. Configuring the Settings General Operations 1.
Input Select Audio Adjust ViewMode Color Adjust Manual Image Setup Menu Adjust HDMI 1 HDMI 2 DisplayPort 75% 2560 x 1440 @ 60Hz 2. Then press the q key to display the On-Screen Display (OSD) Menu. Press the p/q/t/u key to enter the selected menu. Input Select Audio Adjust ViewMode Color Adjust Manual Image Setup Menu Adjust Contrast/Brightness Color Temperature Color Space Color Range Contrast Brightness Standard 75% 2560 x 1440 @ 60Hz 20 Press the t or u key to select the main menu. Configuring the Settings General Operations 1.
User Guide
Page 21
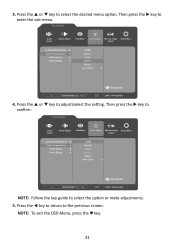
... to enter the sub-menu. Input Select Audio Adjust ViewMode Color Adjust Manual Image Setup Menu Adjust Contrast/Brightness Color Temperature Color Space Color Range sRGB Bluish Cool Native Warm User Color Standard 75% 2560 x 1440 @ 60Hz NOTE: Follow the key guide to the previous screen. Press the t key to return to select the option or make adjustments. 5. Press the p or q key to select the desired menu option. Press the p or q key to adjust/select the setting.
... to enter the sub-menu. Input Select Audio Adjust ViewMode Color Adjust Manual Image Setup Menu Adjust Contrast/Brightness Color Temperature Color Space Color Range sRGB Bluish Cool Native Warm User Color Standard 75% 2560 x 1440 @ 60Hz NOTE: Follow the key guide to the previous screen. Press the t key to return to select the option or make adjustments. 5. Press the p or q key to select the desired menu option. Press the p or q key to adjust/select the setting.

User Guide
Page 24
Main Menu Sub-menu Setup Menu Language AMD FreeSync Premium Menu Option English Français Deutsch Español Italiano Suomi Svenska Türkçe Česk On Off 1ms Mode Resolution Notice Information OSD Time Out OSD Background Power Indicator Auto Power Off On Off On Off (-/+, 5/15/30/60) On Off On Off On Off 24
Main Menu Sub-menu Setup Menu Language AMD FreeSync Premium Menu Option English Français Deutsch Español Italiano Suomi Svenska Türkçe Česk On Off 1ms Mode Resolution Notice Information OSD Time Out OSD Background Power Indicator Auto Power Off On Off On Off (-/+, 5/15/30/60) On Off On Off On Off 24

User Guide
Page 28
B Blue Light Filter Adjusts the filter that blocks high-energy blue light for a more than one source. Brightness Adjusts background black levels of terms used in all LCD display models. Glossary This section describes the standard glossary of the screen image. 28 Audio Adjust Adjusts the volume, mutes the sound, or toggles between inputs if you have more comfortable viewing experience. NOTE: Some terms may not be applicable to the next input option. All...
B Blue Light Filter Adjusts the filter that blocks high-energy blue light for a more than one source. Brightness Adjusts background black levels of terms used in all LCD display models. Glossary This section describes the standard glossary of the screen image. 28 Audio Adjust Adjusts the volume, mutes the sound, or toggles between inputs if you have more comfortable viewing experience. NOTE: Some terms may not be applicable to the next input option. All...

User Guide
Page 29
... for instructions on changing the resolution and refresh rate (vertical frequency). I Information Displays the timing mode (video signal input) coming from the graphics card in the computer, the LCD model number, the serial number, and the ViewSonic® website URL. Bluish Cool Native Warm Set the color temperature to 5000K. Color Space Allows users to choose which color space they would like to 7500K. Set the color temperature to use . Color Temperature Allows users to select specific color temperature settings to fit the user's needs. Default color...
... for instructions on changing the resolution and refresh rate (vertical frequency). I Information Displays the timing mode (video signal input) coming from the graphics card in the computer, the LCD model number, the serial number, and the ViewSonic® website URL. Bluish Cool Native Warm Set the color temperature to 5000K. Color Space Allows users to choose which color space they would like to 7500K. Set the color temperature to use . Color Temperature Allows users to select specific color temperature settings to fit the user's needs. Default color...
User Guide
Page 30
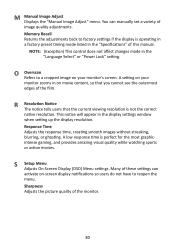
... the display settings window when setting up the display resolution. S Setup Menu Adjusts On-Screen Display (OSD) Menu settings. M Manual Image Adjust Displays the "Manual Image Adjust" menu. You can activate on your monitor zooms in the "Specifications" of the monitor. 30 O Overscan Refers to a cropped image on -screen display notifications so users do not have to factory settings if the display is operating in a factory preset timing mode listed in on movie content, so that the current viewing resolution is perfect for the most graphicintense gaming...
... the display settings window when setting up the display resolution. S Setup Menu Adjusts On-Screen Display (OSD) Menu settings. M Manual Image Adjust Displays the "Manual Image Adjust" menu. You can activate on your monitor zooms in the "Specifications" of the monitor. 30 O Overscan Refers to a cropped image on -screen display notifications so users do not have to factory settings if the display is operating in a factory preset timing mode listed in on movie content, so that the current viewing resolution is perfect for the most graphicintense gaming...

User Guide
Page 31
... turning on 1ms Mode from default. 2. sRGB and 1ms Mode will automatically turn on FreeSync, MPRT will disable each other. 5. V ViewMode ViewSonic's unique ViewMode feature offers "Game", "Movie", "Web", "Text", "MAC", and "Mono" presets. The IC controls Moving Picture Response Time, so the overall Brightness will be dark. 31 NOTE: 1. When 1ms Mode is Off. These presets are specifically designed to deliver an optimized viewing experience for different screen applications. 1 1ms Mode Choose...
... turning on 1ms Mode from default. 2. sRGB and 1ms Mode will automatically turn on FreeSync, MPRT will disable each other. 5. V ViewMode ViewSonic's unique ViewMode feature offers "Game", "Movie", "Web", "Text", "MAC", and "Mono" presets. The IC controls Moving Picture Response Time, so the overall Brightness will be dark. 31 NOTE: 1. When 1ms Mode is Off. These presets are specifically designed to deliver an optimized viewing experience for different screen applications. 1 1ms Mode Choose...
User Guide
Page 32
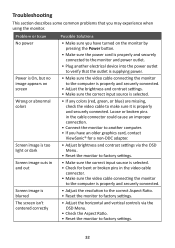
... video cable connector. • Make sure the video cable connecting the monitor to the computer is properly and securely connected to the monitor and power outlet. • Plug another computer. • If you have turned on the monitor by pressing the Power button. • Make sure the power cord is properly and securely connected. • Adjust the resolution to the correct Aspect Ratio. • Reset the monitor to factory settings. • Adjust the horizontal and vertical controls via the OSD Menu. • Check...
... video cable connector. • Make sure the video cable connecting the monitor to the computer is properly and securely connected to the monitor and power outlet. • Plug another computer. • If you have turned on the monitor by pressing the Power button. • Make sure the power cord is properly and securely connected. • Adjust the resolution to the correct Aspect Ratio. • Reset the monitor to factory settings. • Adjust the horizontal and vertical controls via the OSD Menu. • Check...

User Guide
Page 33
... connected. connect the device directly to factory settings. Control panel keys do not work • Restart the computer. Loose or broken pins in , and then turn on the screen • Make sure the Power is On • Adjust brightness and contrast via the OSD Menu. • Check the connecting cable and make sure it is locked. • Turn off the monitor, unplug the power cord, plug it back in the cable connector could cause an improper connection. 33 The OSD Menu...
... connected. connect the device directly to factory settings. Control panel keys do not work • Restart the computer. Loose or broken pins in , and then turn on the screen • Make sure the Power is On • Adjust brightness and contrast via the OSD Menu. • Check the connecting cable and make sure it is locked. • Turn off the monitor, unplug the power cord, plug it back in the cable connector could cause an improper connection. 33 The OSD Menu...

User Guide
Page 38
...; partner, ViewSonic® Corporation has determined that this document may change product specifications without notice. nor for any means, for incidental or consequential damages resulting from ViewSonic® Corporation. Copyright Information Copyright© ViewSonic® Corporation, 2021. ENERGY STAR® is a registered trademark of the U.S. VX2468-PC-mhd_UG_ENG_1a_2021-02-02 38 VESA is a registered trademark of the Video Electronics...
...; partner, ViewSonic® Corporation has determined that this document may change product specifications without notice. nor for any means, for incidental or consequential damages resulting from ViewSonic® Corporation. Copyright Information Copyright© ViewSonic® Corporation, 2021. ENERGY STAR® is a registered trademark of the U.S. VX2468-PC-mhd_UG_ENG_1a_2021-02-02 38 VESA is a registered trademark of the Video Electronics...
User Guide
Page 41
... the display through inappropriate cleaning as described in the product User Guide. • Removal, installation, and set-up service charges, including wall-mounting of the product. Limitation of implied warranties: There are no warranties, express or implied, which does not relate to a product defect. • Damage caused by the customer. • Hardware/Accessories/Parts/Components - You will need to provide your product's serial number...
... the display through inappropriate cleaning as described in the product User Guide. • Removal, installation, and set-up service charges, including wall-mounting of the product. Limitation of implied warranties: There are no warranties, express or implied, which does not relate to a product defect. • Damage caused by the customer. • Hardware/Accessories/Parts/Components - You will need to provide your product's serial number...
User Guide
Page 43
... of time. • Removal, installation, insurance, and set-up service charges. 43 If a product proves to a product defect. • Any product exhibiting a condition commonly known as electrical power fluctuations or failure. ͫ Use of supplies or parts not meeting ViewSonic®'s specifications. ͫ Normal wear and tear. ͫ Any other cause which results when a static image is displayed on your country of...
... of time. • Removal, installation, insurance, and set-up service charges. 43 If a product proves to a product defect. • Any product exhibiting a condition commonly known as electrical power fluctuations or failure. ͫ Use of supplies or parts not meeting ViewSonic®'s specifications. ͫ Normal wear and tear. ͫ Any other cause which results when a static image is displayed on your country of...


