
User Guide
Page 2
Contents Product Registration 2 For Your Records 2 Getting Started Package Contents 3 Precautions 3 Quick Installation 4 Installation of Wall Mount (Optional 5 Using the LCD Display Setting the Timing Mode 6 OSD and Power Button Lock Modes 6 Adjusting the Screen Image 7 Main Menu Controls 9 Other Information Specifications 12 Troubleshooting 13 Customer Support 14 Cleaning the LCD Display 15 Limited Warranty 16 Appendix Safety Guidelines 17 Compliance Information for U.S.A 18 CE Conformity for Europe 18 05/30/04 A ViewSonic VE175 1
Contents Product Registration 2 For Your Records 2 Getting Started Package Contents 3 Precautions 3 Quick Installation 4 Installation of Wall Mount (Optional 5 Using the LCD Display Setting the Timing Mode 6 OSD and Power Button Lock Modes 6 Adjusting the Screen Image 7 Main Menu Controls 9 Other Information Specifications 12 Troubleshooting 13 Customer Support 14 Cleaning the LCD Display 15 Limited Warranty 16 Appendix Safety Guidelines 17 Compliance Information for U.S.A 18 CE Conformity for Europe 18 05/30/04 A ViewSonic VE175 1
User Guide
Page 14
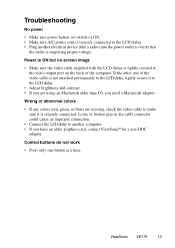
... to verify that the outlet is not attached permanently to the LCD dislay, tightly secure it is tightly secured to the video output port on the back of the video cable is supplying proper voltage. ViewSonic VE175 13 Troubleshooting No power • Make sure power button (or switch) ...is ON. • Make sure A/C power cord is securely connected to the LCD dislay. • Plug another computer. • If you need a ...
... to verify that the outlet is not attached permanently to the LCD dislay, tightly secure it is tightly secured to the video output port on the back of the video cable is supplying proper voltage. ViewSonic VE175 13 Troubleshooting No power • Make sure power button (or switch) ...is ON. • Make sure A/C power cord is securely connected to the LCD dislay. • Plug another computer. • If you need a ...