
User Guide
Page 2
Contents Product Registration 2 For Your Records 2 Getting Started Package Contents 3 Precautions 3 Quick Installation 4 Installation of Wall Mount (Optional 5 Using the LCD Display Setting the Timing Mode 6 OSD and Power Button Lock Modes 6 Adjusting the Screen Image 7 Main Menu Controls 9 Other Information Specifications 12 Troubleshooting 13 Customer Support 14 Cleaning the LCD Display 15 Limited Warranty 16 Appendix Safety Guidelines 17 Compliance Information for U.S.A 18 CE Conformity for Europe 18 05/30/04 A ViewSonic VE175 1
Contents Product Registration 2 For Your Records 2 Getting Started Package Contents 3 Precautions 3 Quick Installation 4 Installation of Wall Mount (Optional 5 Using the LCD Display Setting the Timing Mode 6 OSD and Power Button Lock Modes 6 Adjusting the Screen Image 7 Main Menu Controls 9 Other Information Specifications 12 Troubleshooting 13 Customer Support 14 Cleaning the LCD Display 15 Limited Warranty 16 Appendix Safety Guidelines 17 Compliance Information for U.S.A 18 CE Conformity for Europe 18 05/30/04 A ViewSonic VE175 1

User Guide
Page 3
... use of this product meets the ENERGY STAR® guidelines for incidental or consequential damages resulting from ViewSonic Corporation. For Your Records Product Name: Model Number: Document Number: Serial Number: Purchase Date: ViewSonic VE175 VS10231 A-CD-VE175-3 Product disposal at the end of this document may change product specifications without notice. Please dispose of...
... use of this product meets the ENERGY STAR® guidelines for incidental or consequential damages resulting from ViewSonic Corporation. For Your Records Product Name: Model Number: Document Number: Serial Number: Purchase Date: ViewSonic VE175 VS10231 A-CD-VE175-3 Product disposal at the end of this document may change product specifications without notice. Please dispose of...
User Guide
Page 4
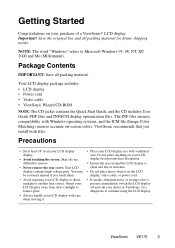
... injured if you install both files. It is clean and free of a ViewSonic® LCD display. ViewSonic VE175 3 Your LCD display package includes: • LCD display • Power cord • Video cable • ViewSonic Wizard CD-ROM NOTE: The CD jacket contains the Quick Start Guide, and...(Image Color Matching) ensures accurate on-screen colors. Getting Started Congratulations on your LCD display in a well-ventilated area. ViewSonic recommends that prevents heat dissipation. • Ensure the area around the LCD display is dangerous to Microsoft Windows 95, 98, NT, XP, 2000 and ...
... injured if you install both files. It is clean and free of a ViewSonic® LCD display. ViewSonic VE175 3 Your LCD display package includes: • LCD display • Power cord • Video cable • ViewSonic Wizard CD-ROM NOTE: The CD jacket contains the Quick Start Guide, and...(Image Color Matching) ensures accurate on-screen colors. Getting Started Congratulations on your LCD display in a well-ventilated area. ViewSonic recommends that prevents heat dissipation. • Ensure the area around the LCD display is dangerous to Microsoft Windows 95, 98, NT, XP, 2000 and ...

User Guide
Page 5
...in this user guide. 1 Connect power cord 2 Connect video cable Make sure both the LCD display and computer are turned OFF Connect the video cable from the LCD display to computer Kensington Lock ViewSonic VE175 4 Attach the adapter to the computer and plug the video cable into the computer s... CD drive Follow the on wall mounting, see page 5 of LCD display.) You can register your region. Quick ...
...in this user guide. 1 Connect power cord 2 Connect video cable Make sure both the LCD display and computer are turned OFF Connect the video cable from the LCD display to computer Kensington Lock ViewSonic VE175 4 Attach the adapter to the computer and plug the video cable into the computer s... CD drive Follow the on wall mounting, see page 5 of LCD display.) You can register your region. Quick ...

User Guide
Page 6
Notice the four screw holes on the wall 5 Attach the LCD display to the wall, following : 1 Disconnect Power. 2 Push the LCD display back and down flat against the base as shown. 3 Lay the LCD display face down on a towel or blanket. ViewSonic VE175 5 Mounted on the back cover. Refer to a wall-mounted display, do the following...
Notice the four screw holes on the wall 5 Attach the LCD display to the wall, following : 1 Disconnect Power. 2 Push the LCD display back and down flat against the base as shown. 3 Lay the LCD display face down on a towel or blanket. ViewSonic VE175 5 Mounted on the back cover. Refer to a wall-mounted display, do the following...

User Guide
Page 7
...mode locks the power of the screen image and minimizing eye strain. WARNING: Do not set the resolution. 2 Set the refresh rate: See your LCD dislay. ViewSonic VE175 6 After setting the timing mode, use the OnView® controls to the control menus until this setting, after a power failure, your... LCD dislay timing mode to: VESA 1280 x 1024 @ 60 Hz. OSD and Power Button Lock Modes OSD Lock This mode locks all current control settings...
...mode locks the power of the screen image and minimizing eye strain. WARNING: Do not set the resolution. 2 Set the refresh rate: See your LCD dislay. ViewSonic VE175 6 After setting the timing mode, use the OnView® controls to the control menus until this setting, after a power failure, your... LCD dislay timing mode to: VESA 1280 x 1024 @ 60 Hz. OSD and Power Button Lock Modes OSD Lock This mode locks all current control settings...

User Guide
Page 8
... page and are defined in "Main Menu Controls" on page 12. Power light Power On/Off Scroll through menu options and adjust the displayed control. ViewSonic VE175 7 Also, displays the control screen for the selected control and toggles between control pairs. Adjusting the Screen Image Use the buttons on the front control...
... page and are defined in "Main Menu Controls" on page 12. Power light Power On/Off Scroll through menu options and adjust the displayed control. ViewSonic VE175 7 Also, displays the control screen for the selected control and toggles between control pairs. Adjusting the Screen Image Use the buttons on the front control...

User Guide
Page 9
... adjustments and exit the menu, press button [1] twice. in your computer's graphic card so that it outputs a video signal 1280 x 1024 @ 60 Hz to the LCD dislay. (Look for instructions on page 11. 2 To highlight a control you want to adjust, press I or J to adjust the screen image: 1 To display the Main... OnView menus and adjustment screens disappear automatically after about 30 seconds. The following to scroll up arrow increases The line at the bottom of the LCD dislay.) ViewSonic VE175 8
... adjustments and exit the menu, press button [1] twice. in your computer's graphic card so that it outputs a video signal 1280 x 1024 @ 60 Hz to the LCD dislay. (Look for instructions on page 11. 2 To highlight a control you want to adjust, press I or J to adjust the screen image: 1 To display the Main... OnView menus and adjustment screens disappear automatically after about 30 seconds. The following to scroll up arrow increases The line at the bottom of the LCD dislay.) ViewSonic VE175 8

User Guide
Page 10
... red. Adds red to the screen image for this function does not work on your LCD dislay, then lower the video refresh rate to 60 Hz and set the resolution to its pre-set value. User - ViewSonic VE175 9 Press the [2] button to eliminate waviness and distortion. The factory setting for cooler white (used...
... red. Adds red to the screen image for this function does not work on your LCD dislay, then lower the video refresh rate to 60 Hz and set the resolution to its pre-set value. User - ViewSonic VE175 9 Press the [2] button to eliminate waviness and distortion. The factory setting for cooler white (used...

User Guide
Page 11
Control Explanation i Information displays the timing mode (video signal input) coming from the graphics card in your LCD dislay. H. NOTE: Try the Auto Adjust (see page 9) before using the Fine Tune control. Sharpness adjusts the clarity and focus of the screen image...the width of the screen image. Fine Tune sharpens focus by pressing button [2]. Manual Image Adjust The Manual Image Adjust controls are explained below: H./V. ViewSonic VE175 10 Horizontal moves the screen image to the left or to the right. NOTE: Vertical size is 60 Hertz. Vertical moves the screen image up...
Control Explanation i Information displays the timing mode (video signal input) coming from the graphics card in your LCD dislay. H. NOTE: Try the Auto Adjust (see page 9) before using the Fine Tune control. Sharpness adjusts the clarity and focus of the screen image...the width of the screen image. Fine Tune sharpens focus by pressing button [2]. Manual Image Adjust The Manual Image Adjust controls are explained below: H./V. ViewSonic VE175 10 Horizontal moves the screen image to the left or to the right. NOTE: Vertical size is 60 Hertz. Vertical moves the screen image up...
User Guide
Page 12
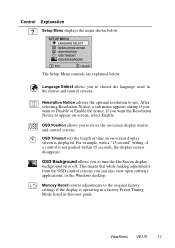
... a control is displayed. Language Select allows you want the Resolution Notice to use. OSD Timeout sets the length of time an on -screen, select Enable. ViewSonic VE175 11 Setup Menu displays the menu shown below . Control Explanation ?
... a control is displayed. Language Select allows you want the Resolution Notice to use. OSD Timeout sets the length of time an on -screen, select Enable. ViewSonic VE175 11 Setup Menu displays the menu shown below . Control Explanation ?

User Guide
Page 13
Other Information Specifications LCD Type Color Filter Glass surface 17" (full 17" viewable diagonal area), TFT (Thin Film Transistor), Active Matrix SXGA LCD, 0.264mm pixel pitch RGB vertical stripe Anti-Glare Maximum Horizontal 140° viewing angles Vertical 130... @ 75 Hz Power Voltage 100-240VAC,50/60Hz(autoswitch) Display area Operating conditions Storage conditions Dimensions Full Scan Temperature Humidity Altitude Temperature Humidity Altitude Physical (LCD Display only) 337.92 mm (H) x 270.336 mm (V) 13.3" (H) x 10.6" (V) 32° F to + 104° F (0° C to + 40&#...
Other Information Specifications LCD Type Color Filter Glass surface 17" (full 17" viewable diagonal area), TFT (Thin Film Transistor), Active Matrix SXGA LCD, 0.264mm pixel pitch RGB vertical stripe Anti-Glare Maximum Horizontal 140° viewing angles Vertical 130... @ 75 Hz Power Voltage 100-240VAC,50/60Hz(autoswitch) Display area Operating conditions Storage conditions Dimensions Full Scan Temperature Humidity Altitude Temperature Humidity Altitude Physical (LCD Display only) 337.92 mm (H) x 270.336 mm (V) 13.3" (H) x 10.6" (V) 32° F to + 104° F (0° C to + 40&#...
User Guide
Page 14
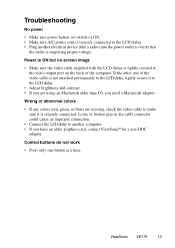
...sure power button (or switch) is ON. • Make sure A/C power cord is securely connected to the LCD dislay. • Plug another computer. • If you have an older graphics card, contact ViewSonic® for a non-DDC adapter. Power is ON but no screen image • Make sure the video ... output port on the back of the video cable is not attached permanently to the LCD dislay, tightly secure it is supplying proper voltage. Control buttons do not work • Press only one button at a time. ViewSonic VE175 13 Wrong or abnormal colors • If any colors (red, green, or blue)...
...sure power button (or switch) is ON. • Make sure A/C power cord is securely connected to the LCD dislay. • Plug another computer. • If you have an older graphics card, contact ViewSonic® for a non-DDC adapter. Power is ON but no screen image • Make sure the video ... output port on the back of the video cable is not attached permanently to the LCD dislay, tightly secure it is supplying proper voltage. Control buttons do not work • Press only one button at a time. ViewSonic VE175 13 Wrong or abnormal colors • If any colors (red, green, or blue)...

User Guide
Page 15
.../Thailand T: 65 273 4018 F: 65 273 1566 service@sg. F: 886 2 8242 3668 viewsonic.com ViewSonic VE175 14 Customer Support For technical support or product service, see the table below or contact your reseller service.eu@ viewsoniceurope.com Australia and New www.viewsonic.com.au Zealand T: +61 2 9906 6277 service@au. NOTE: You will need...
.../Thailand T: 65 273 4018 F: 65 273 1566 service@sg. F: 886 2 8242 3668 viewsonic.com ViewSonic VE175 14 Customer Support For technical support or product service, see the table below or contact your reseller service.eu@ viewsoniceurope.com Australia and New www.viewsonic.com.au Zealand T: +61 2 9906 6277 service@au. NOTE: You will need...

User Guide
Page 16
ViewSonic VE175 15 To clean the screen: 1 Wipe the screen with a clean, soft, lint-free cloth. This removes dust and other particles. 2 If still not clean, apply a small amount of the LCD dislay. Some chemical cleaners have been reported to damage the screen and/or case of non-ammonia, ... 1 Use a soft, dry cloth. 2 If still not clean, apply a small amount of any ammonia or alcohol-based cleaners on the LCD dislay screen or case. Disclaimer ViewSonic® does not recommend the use of a non-ammonia, non-alcohol based, mild non-abrasive detergent onto a clean, soft, lint-free ...
ViewSonic VE175 15 To clean the screen: 1 Wipe the screen with a clean, soft, lint-free cloth. This removes dust and other particles. 2 If still not clean, apply a small amount of the LCD dislay. Some chemical cleaners have been reported to damage the screen and/or case of non-ammonia, ... 1 Use a soft, dry cloth. 2 If still not clean, apply a small amount of any ammonia or alcohol-based cleaners on the LCD dislay screen or case. Disclaimer ViewSonic® does not recommend the use of a non-ammonia, non-alcohol based, mild non-abrasive detergent onto a clean, soft, lint-free ...

User Guide
Page 17
... you specific legal rights, and you will be defective in material or workmanship during the warranty period. ViewSonic LCD Warranty (V3.0) Release Date: 01-29-2002 ViewSonic VE175 16 You will , at its products to be free from defects in the original container to provide your... If a product proves to be required to follow instructions supplied with a like product. Who the warranty protects: This warranty is effective: ViewSonic LCD displays are warranted for three (3) years for all parts including the light source and three (3) years for the first consumer purchaser. c. d....
... you specific legal rights, and you will be defective in material or workmanship during the warranty period. ViewSonic LCD Warranty (V3.0) Release Date: 01-29-2002 ViewSonic VE175 16 You will , at its products to be free from defects in the original container to provide your... If a product proves to be required to follow instructions supplied with a like product. Who the warranty protects: This warranty is effective: ViewSonic LCD displays are warranted for three (3) years for all parts including the light source and three (3) years for the first consumer purchaser. c. d....

User Guide
Page 18
... in the United States and Canada. Cord Type SJT SVT Size of Conductors in Cord 18 AWG 16 AWG 14 AWG 18 AWG 17 AWG Maximum Current Rating of this appliance do not correspond with the letter N or coloured BLACK. WARNING: THIS APPLIANCE MUST BE EARTHED...Canada CSA Germany.......... IMPORTANT: The wires in this unit has been enclosed and has been selected according to the country of the inner conductors. ViewSonic VE175 17 VDE Switzerland ..... The cord set must be easily accessible. If a new plug is HARCertified, and a special mark that is marked with ...
... in the United States and Canada. Cord Type SJT SVT Size of Conductors in Cord 18 AWG 16 AWG 14 AWG 18 AWG 17 AWG Maximum Current Rating of this appliance do not correspond with the letter N or coloured BLACK. WARNING: THIS APPLIANCE MUST BE EARTHED...Canada CSA Germany.......... IMPORTANT: The wires in this unit has been enclosed and has been selected according to the country of the inner conductors. ViewSonic VE175 17 VDE Switzerland ..... The cord set must be easily accessible. If a new plug is HARCertified, and a special mark that is marked with ...

User Guide
Page 19
... cores. Also, any unauthorized changes or modifications not expressly approved by the party responsible for Interference from that interference will not occur in a residential installation. ViewSonic VE175 18 However, there is going to "Safety." This equipment has been tested and found to comply with regard to be determined by one or more...
... cores. Also, any unauthorized changes or modifications not expressly approved by the party responsible for Interference from that interference will not occur in a residential installation. ViewSonic VE175 18 However, there is going to "Safety." This equipment has been tested and found to comply with regard to be determined by one or more...