User Guide
Page 6
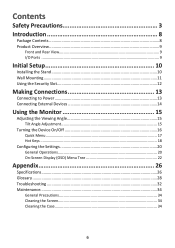
... Installing the Stand 10 Wall Mounting...11 Using the Security Slot 12 Making Connections 13 Connecting to Power 13 Connecting External Devices 14 Using the Monitor 15 Adjusting the Viewing Angle 15 Tilt Angle Adjustment 15 Turning the Device On/Off 16 Quick Menu...17 Hot Keys...18 Configuring the Settings...
... Installing the Stand 10 Wall Mounting...11 Using the Security Slot 12 Making Connections 13 Connecting to Power 13 Connecting External Devices 14 Using the Monitor 15 Adjusting the Viewing Angle 15 Tilt Angle Adjustment 15 Turning the Device On/Off 16 Quick Menu...17 Hot Keys...18 Configuring the Settings...

User Guide
Page 8
Introduction Package Contents • Monitor • Power cord • Video cable • Quick start guide NOTE: The power cord and video cables included in your package may vary depending on your local reseller for more information. 8 Please contact your country.
Introduction Package Contents • Monitor • Power cord • Video cable • Quick start guide NOTE: The power cord and video cables included in your package may vary depending on your local reseller for more information. 8 Please contact your country.

User Guide
Page 11
... 115 x 115 x 2.6 mm Ø 5 mm M4 x 10 mm 4 pieces NOTE: Wall mount kits are sold separately. Remove the monitor stand. 1 2 4. Wall Mounting NOTE: Only use UL Certified wall mount kits. 100 mm 100 mm Refer to mount the... monitor onto the wall. 11 Then secure it with the screen facing down. 3. Attach the mounting bracket to the ... on a flat, stable surface with four (4) screws (M4 x 10 mm). 5. To obtain a wall mounting kit, contact ViewSonic® or your local dealer. 1.
... 115 x 115 x 2.6 mm Ø 5 mm M4 x 10 mm 4 pieces NOTE: Wall mount kits are sold separately. Remove the monitor stand. 1 2 4. Wall Mounting NOTE: Only use UL Certified wall mount kits. 100 mm 100 mm Refer to mount the... monitor onto the wall. 11 Then secure it with the screen facing down. 3. Attach the mounting bracket to the ... on a flat, stable surface with four (4) screws (M4 x 10 mm). 5. To obtain a wall mounting kit, contact ViewSonic® or your local dealer. 1.
User Guide
Page 12
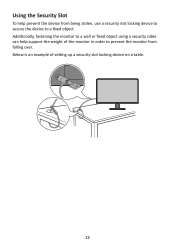
Below is an example of the monitor in order to a fixed object. Using the Security Slot To help support the weight of setting up a security slot locking device on a table. 12 Additionally, fastening the monitor to a wall or fixed object using a security cable can help prevent the device from being stolen, use a security slot locking device to secure the device to prevent the monitor from falling over.
Below is an example of the monitor in order to a fixed object. Using the Security Slot To help support the weight of setting up a security slot locking device on a table. 12 Additionally, fastening the monitor to a wall or fixed object using a security cable can help prevent the device from being stolen, use a security slot locking device to secure the device to prevent the monitor from falling over.

User Guide
Page 13
Making Connections This section guides you on how to Power 1. Connecting to connect the monitor with other equipment. Connect the power cord to a power outlet. 1 2 13 Connect the power cord plug to the AC IN jack at the rear of the device. 2.
Making Connections This section guides you on how to Power 1. Connecting to connect the monitor with other equipment. Connect the power cord to a power outlet. 1 2 13 Connect the power cord plug to the AC IN jack at the rear of the device. 2.

User Guide
Page 15
Using the Monitor Adjusting the Viewing Angle Tilt Angle Adjustment Tilt the monitor forwards or backwards to the desired viewing angle (-5˚ to 20˚). NOTE: When adjusting, support the stand firmly with one hand while tilting the monitor forwards or backwards with the other hand. 15
Using the Monitor Adjusting the Viewing Angle Tilt Angle Adjustment Tilt the monitor forwards or backwards to the desired viewing angle (-5˚ to 20˚). NOTE: When adjusting, support the stand firmly with one hand while tilting the monitor forwards or backwards with the other hand. 15

User Guide
Page 16
To turn on the monitor. 3. Using the Control Panel Keys Use the control panel keys to the power outlet. NOTE: The monitor will still consume some power as long as the power cord is not being used for a long period of time, please disconnect the power plug ...from the power outlet. If the monitor is connected to access the Quick Menu, activate Hot Keys, navigate the On-Screen Display (OSD) Menu, and change the settings. 1(«) 2 3 4 5( ) 16 Turning the...
To turn on the monitor. 3. Using the Control Panel Keys Use the control panel keys to the power outlet. NOTE: The monitor will still consume some power as long as the power cord is not being used for a long period of time, please disconnect the power plug ...from the power outlet. If the monitor is connected to access the Quick Menu, activate Hot Keys, navigate the On-Screen Display (OSD) Menu, and change the settings. 1(«) 2 3 4 5( ) 16 Turning the...

User Guide
Page 28
.... NOTE: Some terms may not be applicable to the next input option. Auto Detect If the current input source has no signal, the monitor will automatically switch to your monitor. This function, on the ability to make the black blacker in a dark scene, and make the white whiter in a bright environment. Glossary...
.... NOTE: Some terms may not be applicable to the next input option. Auto Detect If the current input source has no signal, the monitor will automatically switch to your monitor. This function, on the ability to make the black blacker in a dark scene, and make the white whiter in a bright environment. Glossary...

User Guide
Page 29
... (white level). Recommended for general use and power off after in the computer, the LCD model number, the serial number, and the ViewSonic® website URL. See your graphics cards's user guide for the Windows system. Color Space Allows users to choose which color space they... would like to 5000K. I Information Displays the timing mode (video signal input) coming from the graphics card in standby mode for the monitor. 29 Default color temperature. NOTE: VESA 1024 x 768 @ 60Hz, for example, means that are available for three (3) minutes. C Color Adjust...
... (white level). Recommended for general use and power off after in the computer, the LCD model number, the serial number, and the ViewSonic® website URL. See your graphics cards's user guide for the Windows system. Color Space Allows users to choose which color space they... would like to 5000K. I Information Displays the timing mode (video signal input) coming from the graphics card in standby mode for the monitor. 29 Default color temperature. NOTE: VESA 1024 x 768 @ 60Hz, for example, means that are available for three (3) minutes. C Color Adjust...

User Guide
Page 30
... consumption, and may increase energy consumption beyond the limits required for ENERGY STAR®. O Overscan Refers to a cropped image on your monitor zooms in which the product qualifies for ENERGY STAR® qualification, as applicable. Memory Recall is a set a variety of power-saving...Memory Recall Returns the adjustments back to default as -shipped display configuration and settings. ENERGY STAR® is the setting in on your monitor's screen. M Manual Image Adjust Displays the "Manual Image Adjust" menu. Any changes to factory settings if the display is a joint...
... consumption, and may increase energy consumption beyond the limits required for ENERGY STAR®. O Overscan Refers to a cropped image on your monitor zooms in which the product qualifies for ENERGY STAR® qualification, as applicable. Memory Recall is a set a variety of power-saving...Memory Recall Returns the adjustments back to default as -shipped display configuration and settings. ENERGY STAR® is the setting in on your monitor's screen. M Manual Image Adjust Displays the "Manual Image Adjust" menu. Any changes to factory settings if the display is a joint...

User Guide
Page 31
... Menu Adjusts On-Screen Display (OSD) Menu settings. R Recall Resets the ViewMode monitor settings. V ViewMode ViewSonic's unique ViewMode feature offers "Game", "Movie", "Web", "Text", "MAC", and "Mono" presets. Therefore, the monitor sequence will appear in the display settings window when setting up the display resolution. ...users do not have to reopen the menu. P Power Button Under the Power Button option users can activate on the monitor. Resolution Notice The notice tells users that the current viewing resolution is the default operation. Power Off Pressing the Power Button...
... Menu Adjusts On-Screen Display (OSD) Menu settings. R Recall Resets the ViewMode monitor settings. V ViewMode ViewSonic's unique ViewMode feature offers "Game", "Movie", "Web", "Text", "MAC", and "Mono" presets. Therefore, the monitor sequence will appear in the display settings window when setting up the display resolution. ...users do not have to reopen the menu. P Power Button Under the Power Button option users can activate on the monitor. Resolution Notice The notice tells users that the current viewing resolution is the default operation. Power Off Pressing the Power Button...
User Guide
Page 32
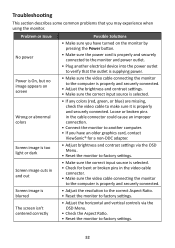
.... 32 Troubleshooting This section describes some common problems that the outlet is supplying power. • Make sure the video cable connecting the monitor to the computer is properly and securely connected. • Adjust the brightness and contrast settings. • Make sure the correct input... correctly Possible Solutions • Make sure you have an older graphics card, contact ViewSonic® for a non-DDC adapter. • Adjust brightness and contrast settings via the OSD Menu. • Reset the monitor to factory settings. • Make sure the correct input source is selected. ...
.... 32 Troubleshooting This section describes some common problems that the outlet is supplying power. • Make sure the video cable connecting the monitor to the computer is properly and securely connected. • Adjust the brightness and contrast settings. • Make sure the correct input... correctly Possible Solutions • Make sure you have an older graphics card, contact ViewSonic® for a non-DDC adapter. • Adjust brightness and contrast settings via the OSD Menu. • Reset the monitor to factory settings. • Make sure the correct input source is selected. ...
User Guide
Page 33
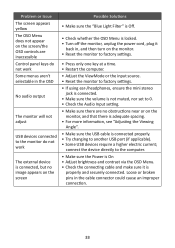
... another USB port (if applicable). • Some USB devices require a higher electric current; Loose or broken pins in , and then turn on the monitor. • Reset the monitor to factory settings. • Press only one key at a time. • Restart the computer. • Adjust the ViewMode or the input source.... Solutions • Make sure the "Blue Light Filter" is Off. • Check whether the OSD Menu is locked. • Turn off the monitor, unplug the power cord, plug it back in the cable connector could cause an improper connection. 33 Problem or Issue The screen appears yellow The...
... another USB port (if applicable). • Some USB devices require a higher electric current; Loose or broken pins in , and then turn on the monitor. • Reset the monitor to factory settings. • Press only one key at a time. • Restart the computer. • Adjust the ViewMode or the input source.... Solutions • Make sure the "Blue Light Filter" is Off. • Check whether the OSD Menu is locked. • Turn off the monitor, unplug the power cord, plug it back in the cable connector could cause an improper connection. 33 Problem or Issue The screen appears yellow The...

User Guide
Page 34
...glass cleaner onto a clean, soft, lint-free cloth; Some chemical cleaners have been reported to damage the screen and/or case of the monitor. • ViewSonic® will not be liable for damage resulting from the power outlet. • Never spray or pour any ammonia or alcohol-based cleaners... on the display screen or case. then wipe the screen. Disclaimer • ViewSonic® does not recommend the use of any liquid directly onto the screen or case. • Handle the monitor with a clean, soft, lint-free cloth. Cleaning the Screen • Wipe the screen with...
...glass cleaner onto a clean, soft, lint-free cloth; Some chemical cleaners have been reported to damage the screen and/or case of the monitor. • ViewSonic® will not be liable for damage resulting from the power outlet. • Never spray or pour any ammonia or alcohol-based cleaners... on the display screen or case. then wipe the screen. Disclaimer • ViewSonic® does not recommend the use of any liquid directly onto the screen or case. • Handle the monitor with a clean, soft, lint-free cloth. Cleaning the Screen • Wipe the screen with...


