

User Manual
Page 8
...to 9°. 1 Lift up and cause malfunctions or damages. LCD panel, lens, etc.). a:Distance from the lens center to mount this manual. • If you operate the liquid crystal projector with its lens upwards, its lens downwards or to the side, the heat generated inside... may be sure to connect it via earth connection so as indicated in the instructions of the accompanying manual "SAFETY INSTRUCTIONS" and in the building using ( the )-1 6ojnore 9°.1 6 ViewSonic PJ1065 b:Distance from the projector to .0004 Tci)7.3g using an optional three-core power supply cord. •...
...to 9°. 1 Lift up and cause malfunctions or damages. LCD panel, lens, etc.). a:Distance from the lens center to mount this manual. • If you operate the liquid crystal projector with its lens upwards, its lens downwards or to the side, the heat generated inside... may be sure to connect it via earth connection so as indicated in the instructions of the accompanying manual "SAFETY INSTRUCTIONS" and in the building using ( the )-1 6ojnore 9°.1 6 ViewSonic PJ1065 b:Distance from the projector to .0004 Tci)7.3g using an optional three-core power supply cord. •...
User Manual
Page 9
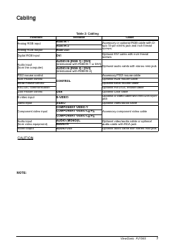
.... For details on how to set to the projector's side. Be sure to read the manual of the respective device to be connected with their core set the computer accordingly, refer to the manual of the computer. • Certain computers may be possible with the devices. • Secure...projector, be sure to read this projector. • For the pin assignment of the projector to each device. ViewSonic PJ1065 7 Make sure the projector is compatible with this manual and the accompanying manual "SAFETY INSTRUCTIONS". • Except of the USB cable, be sure to turn off all devices to be ...
.... For details on how to set to the projector's side. Be sure to read the manual of the respective device to be connected with their core set the computer accordingly, refer to the manual of the computer. • Certain computers may be possible with the devices. • Secure...projector, be sure to read this projector. • For the pin assignment of the projector to each device. ViewSonic PJ1065 7 Make sure the projector is compatible with this manual and the accompanying manual "SAFETY INSTRUCTIONS". • Except of the USB cable, be sure to turn off all devices to be ...
User Manual
Page 10
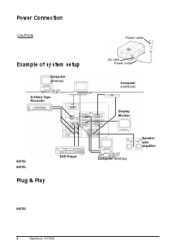
Always observe and follow the instructions in the accompanying manual "SAFETY INSTRUCTIONS". • Firmly connect the power cord. Plug & Play This projector is recognized as to activate the RGB external image output (setting it so ... instruction manual of the projector firmly to the power outlet with amplifier DVD Player NOTE: Computer (desktop) NOTE: • When connecting the projector to a notebook computer, set it to CRT display or to simultaneous LCD and CRT display). Connect the AC inlet of the notebook. Plug & play does not function correctly. 8 ViewSonic PJ1065...
Always observe and follow the instructions in the accompanying manual "SAFETY INSTRUCTIONS". • Firmly connect the power cord. Plug & Play This projector is recognized as to activate the RGB external image output (setting it so ... instruction manual of the projector firmly to the power outlet with amplifier DVD Player NOTE: Computer (desktop) NOTE: • When connecting the projector to a notebook computer, set it to CRT display or to simultaneous LCD and CRT display). Connect the AC inlet of the notebook. Plug & play does not function correctly. 8 ViewSonic PJ1065...
User Manual
Page 11
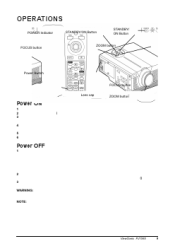
... device. NOTE: • Except in emergencies, follow the above-mentioned procedure for turning the power off ?" Do not project the same image for 5 seconds. ViewSonic PJ1065 9 During this manual and the separate "SAFETY INSTRUCTIONS" thoroughly. Always ensure that the equipment is switched off. Providing a RS-232C cable is connected correctly. 2 Set the power...
... device. NOTE: • Except in emergencies, follow the above-mentioned procedure for turning the power off ?" Do not project the same image for 5 seconds. ViewSonic PJ1065 9 During this manual and the separate "SAFETY INSTRUCTIONS" thoroughly. Always ensure that the equipment is switched off. Providing a RS-232C cable is connected correctly. 2 Set the power...


