M1 mini User Guide
Page 5
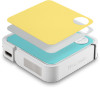
Contents Safety Precautions 3 Introduction 8 Features 8 Package Contents 9 Product Overview 10 Projector...10 Remote Control...11 Remote Control - Projection Orientation 13 Projection Dimensions 14 Top Plate Removal/Installation 15 Making Connections 16 Connecting to Power 16 Using the Battery 17 Battery Usage Time ... Adjusting the Projected Image 20 Adjusting the Projector's Height and Projection Angle 20 Adjusting the Focus 21 Shutting Down the Projector 22 5 Effective Range 12 Remote Control - Replacing the Batteries 12 Initial Setup 13 Choosing a Location -
Contents Safety Precautions 3 Introduction 8 Features 8 Package Contents 9 Product Overview 10 Projector...10 Remote Control...11 Remote Control - Projection Orientation 13 Projection Dimensions 14 Top Plate Removal/Installation 15 Making Connections 16 Connecting to Power 16 Using the Battery 17 Battery Usage Time ... Adjusting the Projected Image 20 Adjusting the Projector's Height and Projection Angle 20 Adjusting the Focus 21 Shutting Down the Projector 22 5 Effective Range 12 Remote Control - Replacing the Batteries 12 Initial Setup 13 Choosing a Location -

M1 mini User Guide
Page 7
Regulatory and Service Information 51 Compliance Information 51 FCC Compliance Statement 51 CE Conformity for European Countries 52 Declaration of RoHS2 Compliance 53 Indian Restriction of Hazardous Substances 54 Remote control:...54 Battery:...54 Product Disposal at End of Product Life 55 Copyright Information 56 Customer Service 57 Limited Warranty 58 Mexico Limited Warranty 61 7
Regulatory and Service Information 51 Compliance Information 51 FCC Compliance Statement 51 CE Conformity for European Countries 52 Declaration of RoHS2 Compliance 53 Indian Restriction of Hazardous Substances 54 Remote control:...54 Battery:...54 Product Disposal at End of Product Life 55 Copyright Information 56 Customer Service 57 Limited Warranty 58 Mexico Limited Warranty 61 7

M1 mini User Guide
Page 11
Remote Control Button Icon Power Home Up/Down/Left/Right OK Settings Return Volume Up Mute Volume Down Description Turns the projector On or Off Access the Home menu Navigates and selects the desired menu items and makes adjustments Confirms the selection Displays the Settings menu Returns to the previous screen Increase the volume level Mute the volume Decrease the volume level 11
Remote Control Button Icon Power Home Up/Down/Left/Right OK Settings Return Volume Up Mute Volume Down Description Turns the projector On or Off Access the Home menu Navigates and selects the desired menu items and makes adjustments Confirms the selection Displays the Settings menu Returns to the previous screen Increase the volume level Mute the volume Decrease the volume level 11

M1 mini User Guide
Page 12
...by aligning it with the same or equivalent type recommended by pressing the side tab and pulling it back into position. Remote Control - IR Receiver Remote Control - NOTE: Observe the battery's polarities as indicated. 3. Remove any existing battery (if necessary) and install one CR2032 ...To ensure proper function of the infrared (IR) remote control sensor(s). The remote control must be using the remote control for an extended period of time, remove the battery to avoid damage to the remote control. • Dispose of the remote control by the battery manufacturer. • If the battery...
...by aligning it with the same or equivalent type recommended by pressing the side tab and pulling it back into position. Remote Control - IR Receiver Remote Control - NOTE: Observe the battery's polarities as indicated. 3. Remove any existing battery (if necessary) and install one CR2032 ...To ensure proper function of the infrared (IR) remote control sensor(s). The remote control must be using the remote control for an extended period of time, remove the battery to avoid damage to the remote control. • Dispose of the remote control by the battery manufacturer. • If the battery...

M1 mini User Guide
Page 19
Using the Projector Starting Up the Projector 1. Ensure the projector is connected to Off. If only using the Power button on the remote control. Alternatively, press the Power button on the remote control to power off, the projector will enter standby mode and the embedded battery will still consume some power. 19 NOTE: When not in use, please push the Power Switch to a power source or that the battery has sufficient charge. 2. Push the Power Switch to your desired viewing angle. Move the Smart Stand to turn on the projector. or 3.
Using the Projector Starting Up the Projector 1. Ensure the projector is connected to Off. If only using the Power button on the remote control. Alternatively, press the Power button on the remote control to power off, the projector will enter standby mode and the embedded battery will still consume some power. 19 NOTE: When not in use, please push the Power Switch to a power source or that the battery has sufficient charge. 2. Push the Power Switch to your desired viewing angle. Move the Smart Stand to turn on the projector. or 3.

M1 mini User Guide
Page 22
... will appear: Photo PrMesusstihce Power BuMttoonviAegain to Off. Shutting Down the Projector 1. Push the Power Switch on the projector or the Power button on the remote control again to power off the projector. NOTE: When not in use, please push the Power Switch to PowHerDOMffI Setting 2. Push the Power Switch or press...
... will appear: Photo PrMesusstihce Power BuMttoonviAegain to Off. Shutting Down the Projector 1. Push the Power Switch on the projector or the Power button on the remote control again to power off the projector. NOTE: When not in use, please push the Power Switch to PowHerDOMffI Setting 2. Push the Power Switch or press...

M1 mini User Guide
Page 23
... Screen at any time by pressing the Home button on the Home Screen. 1 A USB flash drive with the relevant media must be adjusted on the remote control. You can return to the connected HDMI source. Video1 HDMI Setting View and play music files. Home Screen The Home Screen is displayed every time...
... Screen at any time by pressing the Home button on the Home Screen. 1 A USB flash drive with the relevant media must be adjusted on the remote control. You can return to the connected HDMI source. Video1 HDMI Setting View and play music files. Home Screen The Home Screen is displayed every time...

M1 mini User Guide
Page 24
When you find your USB flash drive. 1. Using the directional buttons on your preferred image file, press the OK button to navigate the folders/files. Return Resolution: Size: Date: Time: 1920 x 1080 338 KB 2019/01/01 11:03:01 24 Menu Operations Photo View and display image files on the remote control select Photo, and press OK. Photo Music Movie HDMI Setting 2. Use the directional buttons to open and view it.
When you find your USB flash drive. 1. Using the directional buttons on your preferred image file, press the OK button to navigate the folders/files. Return Resolution: Size: Date: Time: 1920 x 1080 338 KB 2019/01/01 11:03:01 24 Menu Operations Photo View and display image files on the remote control select Photo, and press OK. Photo Music Movie HDMI Setting 2. Use the directional buttons to open and view it.

M1 mini User Guide
Page 25
Using the directional buttons on the remote control select Music, and press OK. Return Album: Title: Bit Rate: Artist: Sampling: Year: Album Name Title Name 112K Artist Name 44K 2018 25 When you find your USB flash drive. 1. Music View and play your music from your preferred music file, press the OK button. Use the directional buttons to navigate the folders/files. Photo Music Movie HDMI Setting 2.
Using the directional buttons on the remote control select Music, and press OK. Return Album: Title: Bit Rate: Artist: Sampling: Year: Album Name Title Name 112K Artist Name 44K 2018 25 When you find your USB flash drive. 1. Music View and play your music from your preferred music file, press the OK button. Use the directional buttons to navigate the folders/files. Photo Music Movie HDMI Setting 2.

M1 mini User Guide
Page 27
Using the directional buttons on the remote control select Movies, and press OK. When you find your USB flash drive. 1. Return File name.mp4 Resolution: Audio Track: Subtitle: Program: Size: 1920 x 1080 1/1 OFF --/0 3870KB 27 Movie View and play your videos from your preferred video file, press the OK button. Photo Music Movie HDMI Setting 2. Use the directional buttons to navigate the folders/files.
Using the directional buttons on the remote control select Movies, and press OK. When you find your USB flash drive. 1. Return File name.mp4 Resolution: Audio Track: Subtitle: Program: Size: 1920 x 1080 1/1 OFF --/0 3870KB 27 Movie View and play your videos from your preferred video file, press the OK button. Photo Music Movie HDMI Setting 2. Use the directional buttons to navigate the folders/files.

M1 mini User Guide
Page 31
While in HDMI input for 20 minutes, the system will power off automatically. 31 Photo Music Movie HDMI Setting 1. Using the directional buttons on the remote control. Connect your media player, PC, or other HDMI compatible device to the projector via an HDMI cable. 2. HDMI Project content from your media player, PC, or other HDMI compatible device. NOTE: If there is no signal in HDMI mode, Image and Basic settings can be adjusted by pressing the Settings [ ] button on the remote control select HDMI, and press OK. 3.
While in HDMI input for 20 minutes, the system will power off automatically. 31 Photo Music Movie HDMI Setting 1. Using the directional buttons on the remote control. Connect your media player, PC, or other HDMI compatible device to the projector via an HDMI cable. 2. HDMI Project content from your media player, PC, or other HDMI compatible device. NOTE: If there is no signal in HDMI mode, Image and Basic settings can be adjusted by pressing the Settings [ ] button on the remote control select HDMI, and press OK. 3.

M1 mini User Guide
Page 32
Using the directional buttons on the remote control select Setting, and press OK. Then use the Left and Right buttons or the OK button to select the desired setting and press OK. Setting Under Setting you can adjust Image and Basic Settings, update Firmware, and view Information. 1. Use the Up and Down buttons to make adjustments or selections. Photo Music Movie HDMI Setting 2. Picture Mode Brightness Contrast Sharpness Saturation Tint Color Temperature Aspect Ratio Movie 0 0 0 10 0 Medium Auto 32
Using the directional buttons on the remote control select Setting, and press OK. Then use the Left and Right buttons or the OK button to select the desired setting and press OK. Setting Under Setting you can adjust Image and Basic Settings, update Firmware, and view Information. 1. Use the Up and Down buttons to make adjustments or selections. Photo Music Movie HDMI Setting 2. Picture Mode Brightness Contrast Sharpness Saturation Tint Color Temperature Aspect Ratio Movie 0 0 0 10 0 Medium Auto 32

M1 mini User Guide
Page 48
..., adjust the height of power, please check and replace if necessary. 1 The battery may automatically turn on either the projector or the remote control. • Adjusting the Focus Ring will help correctly focus the projection lens. • Ensure the projector and screen are no picture The... image is blurred The remote control does not work Possible Solutions • Ensure the power cord is not selected automatically, select the correct source with the same power ...
..., adjust the height of power, please check and replace if necessary. 1 The battery may automatically turn on either the projector or the remote control. • Adjusting the Focus Ring will help correctly focus the projection lens. • Ensure the projector and screen are no picture The... image is blurred The remote control does not work Possible Solutions • Ensure the power cord is not selected automatically, select the correct source with the same power ...

M1 mini User Guide
Page 50
... store the projector for damage resulting from use of any ammonia or alcohol-based cleaners on the lens or case. Disclaimer • ViewSonic® does not recommend the use of any ammonia or alcohol-based cleaners. 50 Storing the Projector If you intend to remove dirt... small amount of the storage area are within the recommend range. • Retract the adjuster foot completely. • Remove the batteries from the remote control. • Pack the projector in its original packaging or equivalent. CAUTION: Never rub the lens with lens cleaner and gently wipe the surface. CAUTION...
... store the projector for damage resulting from use of any ammonia or alcohol-based cleaners on the lens or case. Disclaimer • ViewSonic® does not recommend the use of any ammonia or alcohol-based cleaners. 50 Storing the Projector If you intend to remove dirt... small amount of the storage area are within the recommend range. • Retract the adjuster foot completely. • Remove the batteries from the remote control. • Pack the projector in its original packaging or equivalent. CAUTION: Never rub the lens with lens cleaner and gently wipe the surface. CAUTION...

M1 mini User Guide
Page 54
...is swallowed, it away from children. ͫ If you think batteries might have been swallowed or placed inside any part of the Rule. Remote control: The elements of the instructional safeguard shall be subjected to during use of lead, mercury, hexavalent chromium, polybrominated biphenyls or polybrominated diphenyl ethers... of flammable liquid or gas; • a battery subjected to death. • element 4: ͫ the following or equivalent text ͫ [The remote control supplied with an incorrect type that may result in Schedule 2 of the body, seek immediate medical attention.
...is swallowed, it away from children. ͫ If you think batteries might have been swallowed or placed inside any part of the Rule. Remote control: The elements of the instructional safeguard shall be subjected to during use of lead, mercury, hexavalent chromium, polybrominated biphenyls or polybrominated diphenyl ethers... of flammable liquid or gas; • a battery subjected to death. • element 4: ͫ the following or equivalent text ͫ [The remote control supplied with an incorrect type that may result in Schedule 2 of the body, seek immediate medical attention.


