
User Guide
Page 2
Contents Product Registration 2 For Your Records 2 Getting Started Package Contents 3 Precautions 3 Quick Installation 4 Using the Monitor Setting the Timing Mode 5 OSD Lock Settings 5 Adjusting the Screen Image 6 Main Menu Controls 8 Other Information Specifications 11 Troubleshooting 12 Customer Support 13 Cleaning the Monitor 14 Limited Warranty 15 Appendix Safety Guidelines 16 Compliance Information for U.S.A 17 CE Conformity for Europe 17 05/15/04 A ViewSonic E90f+ 1
Contents Product Registration 2 For Your Records 2 Getting Started Package Contents 3 Precautions 3 Quick Installation 4 Using the Monitor Setting the Timing Mode 5 OSD Lock Settings 5 Adjusting the Screen Image 6 Main Menu Controls 8 Other Information Specifications 11 Troubleshooting 12 Customer Support 13 Cleaning the Monitor 14 Limited Warranty 15 Appendix Safety Guidelines 16 Compliance Information for U.S.A 17 CE Conformity for Europe 17 05/15/04 A ViewSonic E90f+ 1

User Guide
Page 4
...includes: • Color monitor • DB-15 video cable (attached) • Power cord • ViewSonic Wizard CD-ROM NOTE: The CD jacket contains the Quick Start Guide, and the CD includes the User Guide PDF files and INF/ICM display optimization files. Oils from the monitor. • AVOID ...TOUCHING THE SCREEN WITH YOUR FINGERS. The monitor contains high voltage parts. You...
...includes: • Color monitor • DB-15 video cable (attached) • Power cord • ViewSonic Wizard CD-ROM NOTE: The CD jacket contains the Quick Start Guide, and the CD includes the User Guide PDF files and INF/ICM display optimization files. Oils from the monitor. • AVOID ...TOUCHING THE SCREEN WITH YOUR FINGERS. The monitor contains high voltage parts. You...
User Guide
Page 5
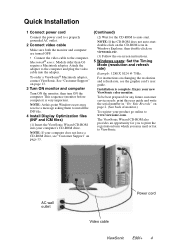
...in "For Your Records" on page 13. 3 Turn ON monitor and computer Turn ON the monitor, then turn ON the computer. Attach the adapter to install the INF file. 4 Install Display Optimization files (INF and ICM files) (1) Insert the ViewSonic Wizard CD-ROM into the adapter. For instructions on changing ...the computer and plug the video cable into your product go online to ViewSonic. NOTE: If your new ViewSonic color monitor. Enjoy your computer does not have a CD-ROM drive, see the graphic card's user guide. The ViewSonic Wizard CD-ROM also provides an opportunity for the CD-ROM to the...
...in "For Your Records" on page 13. 3 Turn ON monitor and computer Turn ON the monitor, then turn ON the computer. Attach the adapter to install the INF file. 4 Install Display Optimization files (INF and ICM files) (1) Insert the ViewSonic Wizard CD-ROM into the adapter. For instructions on changing ...the computer and plug the video cable into your product go online to ViewSonic. NOTE: If your new ViewSonic color monitor. Enjoy your computer does not have a CD-ROM drive, see the graphic card's user guide. The ViewSonic Wizard CD-ROM also provides an opportunity for the CD-ROM to the...

User Guide
Page 6
After setting the timing mode, use the OnView® controls to : VESA 1280 x 1024 @ 75 Hz. ViewSonic E90f+ 5 The message "OSD UNLOCK" will then display briefly, indicating that the OSD image settings are now locked. • OSD Unlock: Press and hold the [1] and [▼] buttons on the drop-down ...area in the window. The timing mode consists of the screen image and minimizing eye strain. To set if you have the option of the monitor for 5 seconds. example 75 Hz). For the best picture quality set your graphics card documentation). NOTE: The refresh rate should already be ...
After setting the timing mode, use the OnView® controls to : VESA 1280 x 1024 @ 75 Hz. ViewSonic E90f+ 5 The message "OSD UNLOCK" will then display briefly, indicating that the OSD image settings are now locked. • OSD Unlock: Press and hold the [1] and [▼] buttons on the drop-down ...area in the window. The timing mode consists of the screen image and minimizing eye strain. To set if you have the option of the monitor for 5 seconds. example 75 Hz). For the best picture quality set your graphics card documentation). NOTE: The refresh rate should already be ...

User Guide
Page 8
... AUTO SIZING VIEWMETER 1:EXIT SELECT:2 2 To select a control you want to adjust the screen image: 1 To display the Main Menu, press button [1]. When the control you want is highlighted, press button [2]. ViewSonic E90f+ 7 SIZE/POSITION V. Display control screen (sample shown in the sample below ). Do the following to adjust, press the arrow buttons... the arrow buttons. 4 To save the control setting and Exit the menu press button [1] twice. NOTE: Some controls on the front control panel of your monitor and scroll through the choices.
... AUTO SIZING VIEWMETER 1:EXIT SELECT:2 2 To select a control you want to adjust the screen image: 1 To display the Main Menu, press button [1]. When the control you want is highlighted, press button [2]. ViewSonic E90f+ 7 SIZE/POSITION V. Display control screen (sample shown in the sample below ). Do the following to adjust, press the arrow buttons... the arrow buttons. 4 To save the control setting and Exit the menu press button [1] twice. NOTE: Some controls on the front control panel of your monitor and scroll through the choices.
User Guide
Page 10
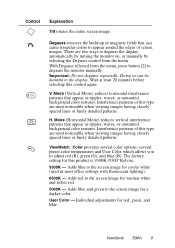
... the edges of screen images. Interference patterns of this type are most noticeable when viewing images having closely spaced lines or finely detailed patterns. ViewSonic E90f+ 9 H. Adds blue to the screen image for a darker color. Important: Do not degauss repeatedly. Adds red to the screen... image for red, green, and blue. Interference patterns of this type are two ways to degauss the display: automatically by turning the monitor on, or manually by selecting the Degauss control from the menu, press button [2] to adjust red (R), green (G), and blue...
... the edges of screen images. Interference patterns of this type are most noticeable when viewing images having closely spaced lines or finely detailed patterns. ViewSonic E90f+ 9 H. Adds blue to the screen image for a darker color. Important: Do not degauss repeatedly. Adds red to the screen... image for red, green, and blue. Interference patterns of this type are two ways to degauss the display: automatically by turning the monitor on, or manually by selecting the Degauss control from the menu, press button [2] to adjust red (R), green (G), and blue...

User Guide
Page 12
... adapter. Other Information Specifications CRT Input Signal Type Dot Pitch Phosphor Glass surface Video Sync Compatibility PC Macintosh1 Resolution Recommended and supported Power Display Area Operating Conditions Storage Conditions Dimensions Weight Regulations Power Saving Modes Voltage Default Full scan Temperature Humidity Altitude Temperature Humidity Altitude Physical (monitor) Net On Off 19" (18.0" viewable diagonal...
... adapter. Other Information Specifications CRT Input Signal Type Dot Pitch Phosphor Glass surface Video Sync Compatibility PC Macintosh1 Resolution Recommended and supported Power Display Area Operating Conditions Storage Conditions Dimensions Weight Regulations Power Saving Modes Voltage Default Full scan Temperature Humidity Altitude Temperature Humidity Altitude Physical (monitor) Net On Off 19" (18.0" viewable diagonal...

User Guide
Page 13
...colors (red, green, or blue) are within the monitor's specified frequency range. • Try the monitor with the monitor is required for proper signal continuity between graphics card and monitor. See "Specifications" on the back of the computer. ViewSonic E90f+ 12 Control buttons do not work •...pins in the cable connector could cause an improper connection. • Connect the monitor to a different outlet. Do this only once. • If you have an older graphics card, contact ViewSonic® Customer Support. Entire screen image rolls vertically • Make sure video ...
...colors (red, green, or blue) are within the monitor's specified frequency range. • Try the monitor with the monitor is required for proper signal continuity between graphics card and monitor. See "Specifications" on the back of the computer. ViewSonic E90f+ 12 Control buttons do not work •...pins in the cable connector could cause an improper connection. • Connect the monitor to a different outlet. Do this only once. • If you have an older graphics card, contact ViewSonic® Customer Support. Entire screen image rolls vertically • Make sure video ...

User Guide
Page 15
...abrasive detergent onto a clean, soft, lint-free cloth, then wipe the surface. DISCLAIMER ViewSonic does not recommend the use of any ammonia or alcohol-based cleaners on the monitor screen or case. ViewSonic will not be liable for damage resulting from use of non-ammonia, non-alcohol based ...glass cleaner onto a clean, soft, lint-free cloth, and wipe the screen. ViewSonic E90f+ 14 This removes dust and other particles...
...abrasive detergent onto a clean, soft, lint-free cloth, then wipe the surface. DISCLAIMER ViewSonic does not recommend the use of any ammonia or alcohol-based cleaners on the monitor screen or case. ViewSonic will not be liable for damage resulting from use of non-ammonia, non-alcohol based ...glass cleaner onto a clean, soft, lint-free cloth, and wipe the screen. ViewSonic E90f+ 14 This removes dust and other particles...

User Guide
Page 16
... PARTY. and Canada: For warranty information and service on ViewSonic products sold outside the U.S.A. and Canada, contact ViewSonic or your product's serial number. 2. To obtain service under warranty, contact ViewSonic Customer Support. Who the warranty protects: This warranty is effective: ViewSonic® color CRT monitors, including the display tubes, are warranted for three (3) years for all parts...
... PARTY. and Canada: For warranty information and service on ViewSonic products sold outside the U.S.A. and Canada, contact ViewSonic or your product's serial number. 2. To obtain service under warranty, contact ViewSonic Customer Support. Who the warranty protects: This warranty is effective: ViewSonic® color CRT monitors, including the display tubes, are warranted for three (3) years for all parts...


