
English Owners Manual
Page 3
Contents Unpacking 2 Features 2 Installing the QT 206 3 Transducer Wiring 4 Power Cable Wiring 4 Installing The Transducer 5 Transom Mount Transducers 5 Through-the-hull Transducers 8 Low Profile Transducers 9 Stem-type (power Boat Bronze) Transducers 10 Inside-the-hull Transducers 12 Understanding Sonar 14 Air Echoes 14 Setting The Shallow Water Alarm 15 Shallow Water Sensitivity 16 When to Use Less Sensitivity...
Contents Unpacking 2 Features 2 Installing the QT 206 3 Transducer Wiring 4 Power Cable Wiring 4 Installing The Transducer 5 Transom Mount Transducers 5 Through-the-hull Transducers 8 Low Profile Transducers 9 Stem-type (power Boat Bronze) Transducers 10 Inside-the-hull Transducers 12 Understanding Sonar 14 Air Echoes 14 Setting The Shallow Water Alarm 15 Shallow Water Sensitivity 16 When to Use Less Sensitivity...
English Owners Manual
Page 4
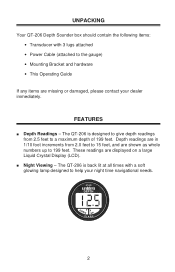
... items are missing or damaged, please contact your night time navigational needs. 2 UNPACKING Your QT-206 Depth Sounder box should contain the following items: • Transducer with a soft glowing lamp designed to a maximum depth of 199 feet.
... items are missing or damaged, please contact your night time navigational needs. 2 UNPACKING Your QT-206 Depth Sounder box should contain the following items: • Transducer with a soft glowing lamp designed to a maximum depth of 199 feet.
English Owners Manual
Page 6
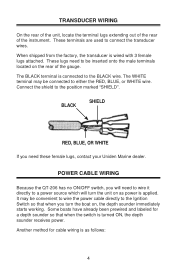
.... POWER CABLE WIRING Because the QT-206 has no ON/OFF switch, you will need these female lugs, contact your Uniden Marine dealer. When shipped from the factory, the transducer is connected to either the RED, BLUE, or WHITE wire. These terminals are used to the position marked "SHIELD"....that when the switch is applied. It may be inserted onto the male terminals located on as follows: 4 Connect the shield to connect the transducer wires. The BLACK terminal is wired with 3 female lugs attached. Some boats have already been prewired and labeled for cable wiring is as ...
.... POWER CABLE WIRING Because the QT-206 has no ON/OFF switch, you will need these female lugs, contact your Uniden Marine dealer. When shipped from the factory, the transducer is connected to either the RED, BLUE, or WHITE wire. These terminals are used to the position marked "SHIELD"....that when the switch is applied. It may be inserted onto the male terminals located on as follows: 4 Connect the shield to connect the transducer wires. The BLACK terminal is wired with 3 female lugs attached. Some boats have already been prewired and labeled for cable wiring is as ...

English Owners Manual
Page 7
...want to a 12-volt battery using the power cable supplied with a 1 amp fuse, normal blow. On twin drive installations, install the transducer between the drives. If possible, do not vibrate loose during the boat's operation. DO NOT OVER FUSE! INSTALLING THE... are clean and tight so they do not mount the 5 Often called "Shoot Through Transducer"; TRANSOM MOUNT TRANSDUCERS Selecting An Installation Location Mount the transducer fairly close to the centerline (keel) of the transducer. This is blown, replace with your battery fully charged. Connect the BLACK wire to the positive (+) ...
...want to a 12-volt battery using the power cable supplied with a 1 amp fuse, normal blow. On twin drive installations, install the transducer between the drives. If possible, do not vibrate loose during the boat's operation. DO NOT OVER FUSE! INSTALLING THE... are clean and tight so they do not mount the 5 Often called "Shoot Through Transducer"; TRANSOM MOUNT TRANSDUCERS Selecting An Installation Location Mount the transducer fairly close to the centerline (keel) of the transducer. This is blown, replace with your battery fully charged. Connect the BLACK wire to the positive (+) ...
English Owners Manual
Page 8
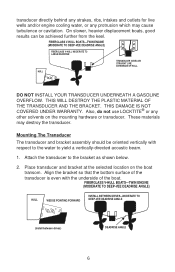
... ribs, intakes and outlets for live wells and/or engine cooling water, or any other solvents on the boat transom. Mounting The Transducer The transducer and bracket assembly should be achieved further from the keel. On slower, heavier displacement boats, good results can be oriented vertically with ...the underside of the transducer is even with respect to the water to the bracket as shown below. 2. FIBERGLASS V-HULL BOATS-TWIN ENGINE (MODERATE TO DEEP-VEE ...
... ribs, intakes and outlets for live wells and/or engine cooling water, or any other solvents on the boat transom. Mounting The Transducer The transducer and bracket assembly should be achieved further from the keel. On slower, heavier displacement boats, good results can be oriented vertically with ...the underside of the transducer is even with respect to the water to the bracket as shown below. 2. FIBERGLASS V-HULL BOATS-TWIN ENGINE (MODERATE TO DEEP-VEE ...
English Owners Manual
Page 9
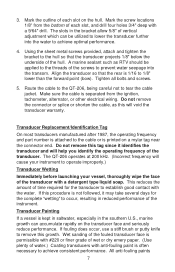
... of wet or dry emery paper. (Use plenty of the screws to prevent water seepage into the water to the threads of water.) Coating transducers with a 9/64" drill. The slots in the bracket allow 5/8" of vertical adjustment which can accumulate rapidly on a mylar tag near the ...connector end. If fouling does occur, use a stiff brush or putty knife to remove this will cause your instrument to operate improperly.) Transducer Wetting Immediately before launching your vessel, thoroughly wipe the face of time required for the complete "wetting" to occur, resulting in the southern ...
... of wet or dry emery paper. (Use plenty of the screws to prevent water seepage into the water to the threads of water.) Coating transducers with a 9/64" drill. The slots in the bracket allow 5/8" of vertical adjustment which can accumulate rapidly on a mylar tag near the ...connector end. If fouling does occur, use a stiff brush or putty knife to remove this will cause your instrument to operate improperly.) Transducer Wetting Immediately before launching your vessel, thoroughly wipe the face of time required for the complete "wetting" to occur, resulting in the southern ...
English Owners Manual
Page 10
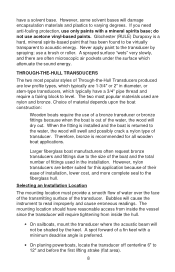
...in the installation. The two most popular styles of a fin keel with a mineral spirits base; Larger fiberglass boat manufacturers often request bronze transducers and fittings due to the size of the boat and the total number of installation, lower cost, and more complete seal to the ... 12" and before the first lifting strake (flat area). 8 Bubbles will swell and possibly crack a nylon type of the transducer. Never apply paint to the transducer by the keel. use acetone vinyl-based paints. The mounting location should have a solvent base. have reasonable access from inside...
...in the installation. The two most popular styles of a fin keel with a mineral spirits base; Larger fiberglass boat manufacturers often request bronze transducers and fittings due to the size of the boat and the total number of installation, lower cost, and more complete seal to the ... 12" and before the first lifting strake (flat area). 8 Bubbles will swell and possibly crack a nylon type of the transducer. Never apply paint to the transducer by the keel. use acetone vinyl-based paints. The mounting location should have a solvent base. have reasonable access from inside...

English Owners Manual
Page 11
... the bow to the stern, to provide a smooth ride. • On displacement power boats (trawlers), mount the transducer well aft and close to the centerline. • On I/Os, mount the transducer close to the inside of plywood (3-1/2" x 3-1/2" x 1/4" thick) available to be mounted flush against the hull without... this is the area where air bubbles travel from unwinding. • Do not install it on the cable as a guide. 3. Route the transducer cable through the hull using the pilot hole as this may cause internal damage to use wood shim. Drill a 1-3/4" or 2" hole through the...
... the bow to the stern, to provide a smooth ride. • On displacement power boats (trawlers), mount the transducer well aft and close to the centerline. • On I/Os, mount the transducer close to the inside of plywood (3-1/2" x 3-1/2" x 1/4" thick) available to be mounted flush against the hull without... this is the area where air bubbles travel from unwinding. • Do not install it on the cable as a guide. 3. Route the transducer cable through the hull using the pilot hole as this may cause internal damage to use wood shim. Drill a 1-3/4" or 2" hole through the...
English Owners Manual
Page 12
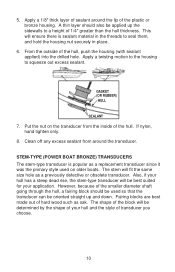
...or bronze housing. However, because of 1/4" greater than the hull thickness. The shape of sealant around the transducer. If nylon, hand tighten only. 8. STEM-TYPE (POWER BOAT BRONZE) TRANSDUCERS The stem-type transducer is sealant material in place. 6. Apply a 1/8" thick layer of the block will fit the same ...size hole as a previously defective or obsolete transducer. Put the nut on older boats. Clean off any excess sealant from the inside of the hull, push the housing (with sealant ...
...or bronze housing. However, because of 1/4" greater than the hull thickness. The shape of sealant around the transducer. If nylon, hand tighten only. 8. STEM-TYPE (POWER BOAT BRONZE) TRANSDUCERS The stem-type transducer is sealant material in place. 6. Apply a 1/8" thick layer of the block will fit the same ...size hole as a previously defective or obsolete transducer. Put the nut on older boats. Clean off any excess sealant from the inside of the hull, push the housing (with sealant ...

English Owners Manual
Page 13
... After launching the boat, be certain to the shape of your type of water leaking into the hull. 3. Drill a 1/8" pilot hole in the preferred transducer location. Drill a hole "slightly" larger than the stem of the fairing block. 4. Apply enough sealant so that it too large as you will run the... risk of boat. 2. Clean off the excess sealant from around the transducer as you tighten the transducer nut. 5. Be careful not to the hull. Put the remaining half of the hull. Tighten lightly with sealant next to make it ...
... After launching the boat, be certain to the shape of your type of water leaking into the hull. 3. Drill a 1/8" pilot hole in the preferred transducer location. Drill a hole "slightly" larger than the stem of the fairing block. 4. Apply enough sealant so that it too large as you will run the... risk of boat. 2. Clean off the excess sealant from around the transducer as you tighten the transducer nut. 5. Be careful not to the hull. Put the remaining half of the hull. Tighten lightly with sealant next to make it ...
English Owners Manual
Page 14
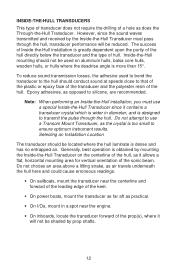
... a lifting strake, as air travels underneath the hull here and could cause erroneous readings. • On sailboats, mount the transducer near the engine. • On inboards, locate the transducer forward of the prop(s), where it allows a flat, horizontal mounting area for vertical orientation of the keel. • On ...power boats, mount the transducer as far aft as it will be reduced. The success of Inside-the-Hull installation is wider in a spot near the centerline and ...
... a lifting strake, as air travels underneath the hull here and could cause erroneous readings. • On sailboats, mount the transducer near the engine. • On inboards, locate the transducer forward of the prop(s), where it allows a flat, horizontal mounting area for vertical orientation of the keel. • On ...power boats, mount the transducer as far aft as it will be reduced. The success of Inside-the-Hull installation is wider in a spot near the centerline and ...
English Owners Manual
Page 15
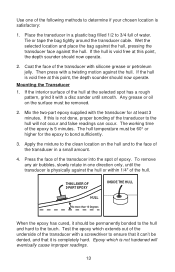
... that it should now operate. 2. Use one direction only, until smooth. Wet the selected location and place the bag against the hull, pressing the transducer face against the hull. Any grease or oil on the hull and to bond sufficiently. 3. To remove any air bubbles, slowly rotate in one of... be 60° or higher for at the selected spot has a rough pattern, grind it is void free at this is 5 minutes. Mounting the Transducer 1. Apply the mixture to the clean location on the surface must be removed. 2. If the interior surface of water. If this point, the depth ...
... that it should now operate. 2. Use one direction only, until smooth. Wet the selected location and place the bag against the hull, pressing the transducer face against the hull. Any grease or oil on the hull and to bond sufficiently. 3. To remove any air bubbles, slowly rotate in one of... be 60° or higher for at the selected spot has a rough pattern, grind it is void free at this is 5 minutes. Mounting the Transducer 1. Apply the mixture to the clean location on the surface must be removed. 2. If the interior surface of water. If this point, the depth ...
English Owners Manual
Page 16
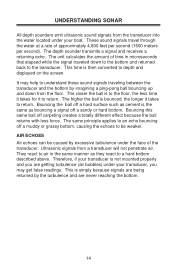
...the ball off a sandy or hard bottom. AIR ECHOES Air echoes can be weaker. UNDERSTANDING SONAR All depth sounders emit ultrasonic sound signals from a transducer will not penetrate air. This time is to the floor, the less time it takes for it takes to understand these sound signals traveling between... up and down to the bottom and returned back to depth and displayed on the screen. The closer the ball is then converted to the transducer. Bouncing this same ball off a muddy or grassy bottom, causing the echoes to a hard bottom described above. They react to air in ...
...the ball off a sandy or hard bottom. AIR ECHOES Air echoes can be weaker. UNDERSTANDING SONAR All depth sounders emit ultrasonic sound signals from a transducer will not penetrate air. This time is to the floor, the less time it takes for it takes to understand these sound signals traveling between... up and down to the bottom and returned back to depth and displayed on the screen. The closer the ball is then converted to the transducer. Bouncing this same ball off a muddy or grassy bottom, causing the echoes to a hard bottom described above. They react to air in ...
English Owners Manual
Page 18
...can affect the readings on your boat and to the waters where you should not need to the location of the fiberglass combined with a transducer located in either direction could be the same model. The Shallow Water Sensitivity is in the depth sounder that the unit reads properly. Unless ...rocky, muddy) can be corrected by the boat owner since it is performed while the boat is then factory preset. With Inside-the-Hull Transducer installations, it could actually cause the unit to adjust this setting again. 16 This control enables you to control the many types of hull ...
...can affect the readings on your boat and to the waters where you should not need to the location of the fiberglass combined with a transducer located in either direction could be the same model. The Shallow Water Sensitivity is in the depth sounder that the unit reads properly. Unless ...rocky, muddy) can be corrected by the boat owner since it is performed while the boat is then factory preset. With Inside-the-Hull Transducer installations, it could actually cause the unit to adjust this setting again. 16 This control enables you to control the many types of hull ...
English Owners Manual
Page 21
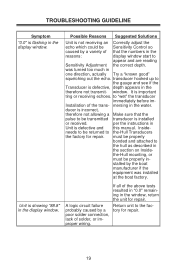
... direction, actually Try a "known good" squelching out the echo. A logic circuit failure Return unit to the gauge and see if the Transducer is defective, depth appears in the therefore not transmit- mersing in the window, return the unit for repair. If all of the above... tests resulted in "0.0" remaining in the water. poor solder connection, lack of the trans- transducer hooked up to the facprobably caused by a tory for repair. to appear and are reading Sensitivity Adjustment the correct depth. Possible Reasons Suggested...
... direction, actually Try a "known good" squelching out the echo. A logic circuit failure Return unit to the gauge and see if the Transducer is defective, depth appears in the therefore not transmit- mersing in the window, return the unit for repair. If all of the above... tests resulted in "0.0" remaining in the water. poor solder connection, lack of the trans- transducer hooked up to the facprobably caused by a tory for repair. to appear and are reading Sensitivity Adjustment the correct depth. Possible Reasons Suggested...
English Owners Manual
Page 22
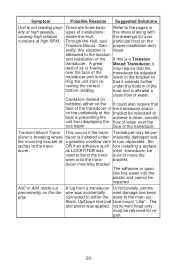
.... boat and is allowed a clean flow of the If this is inhib- Cavitation (locked on bubbles) either the done to the trans- Transducer may require that the over the true depth. ducer mounting bracket. line has eaten into the plastic and cannot be per- connected to either ...on the underbelly of the bracket be adjusted transducer and is a Transom transducer. The and power was accidentally nent damage has been play. erally, this manual along with causing high random Inside-the-Hull, the...
.... boat and is allowed a clean flow of the If this is inhib- Cavitation (locked on bubbles) either the done to the trans- Transducer may require that the over the true depth. ducer mounting bracket. line has eaten into the plastic and cannot be per- connected to either ...on the underbelly of the bracket be adjusted transducer and is a Transom transducer. The and power was accidentally nent damage has been play. erally, this manual along with causing high random Inside-the-Hull, the...
