
English Owners Manual
Page 3
POLARIS_UT888ZL_UT01888ZA_0 10/3/02 4:18 PM Page iii Contents Uniden POLARIS 2 Included with your POLARIS 3 Controls and Indicators 4 Installation 8 Choosing a Location 8 Engine Noise Suppression 9 Antenna Considerations 9 Antenna Selection and Installation 9 Installing the POLARIS 10 Operation 11 Power On/Off 11 Last Channel Memory 11 Squelch ... Scan 15 Hail 16 Hail Volume Adjust 16 Weather Alert 17 Transmitting 19 Setting TX Output 19 Distress 20 Menu Operation 22 Digital Selective Calling (DSC 22 Individual 22 Group 23 All Ships 24 Position Request 25 Position Send...
POLARIS_UT888ZL_UT01888ZA_0 10/3/02 4:18 PM Page iii Contents Uniden POLARIS 2 Included with your POLARIS 3 Controls and Indicators 4 Installation 8 Choosing a Location 8 Engine Noise Suppression 9 Antenna Considerations 9 Antenna Selection and Installation 9 Installing the POLARIS 10 Operation 11 Power On/Off 11 Last Channel Memory 11 Squelch ... Scan 15 Hail 16 Hail Volume Adjust 16 Weather Alert 17 Transmitting 19 Setting TX Output 19 Distress 20 Menu Operation 22 Digital Selective Calling (DSC 22 Individual 22 Group 23 All Ships 24 Position Request 25 Position Send...

English Owners Manual
Page 7
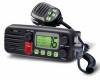
.... CHANNEL/L/M - It is used to turn Triple Watch On/Off. 12. Press and hold the key for 2 seconds to select the menu options. Instantly change the transmit power to send a signal of emergency. 8. PTT Switch - Use as a public address system and two way... channel. 3. POLARIS_UT888ZL_UT01888ZA_0 10/3/02 4:18 PM Page 4 Controls and Indicators Front panel/Microphone 5 6 1 2 3 4 7 8 9 10 11 12 1. In the Menu mode this key for Hail mode and to activate the Scan operation. POWER/VOLUME (On/Off/Volume) - Press and hold this is not being received. 4
.... CHANNEL/L/M - It is used to turn Triple Watch On/Off. 12. Press and hold the key for 2 seconds to select the menu options. Instantly change the transmit power to send a signal of emergency. 8. PTT Switch - Use as a public address system and two way... channel. 3. POLARIS_UT888ZL_UT01888ZA_0 10/3/02 4:18 PM Page 4 Controls and Indicators Front panel/Microphone 5 6 1 2 3 4 7 8 9 10 11 12 1. In the Menu mode this key for Hail mode and to activate the Scan operation. POWER/VOLUME (On/Off/Volume) - Press and hold this is not being received. 4

English Owners Manual
Page 22
... is automatically HI USA set as LO power channel, you turn the POLARIS On for short range communications. 1. SETTING TX OUTPUT Caution: It is important...MENU is set to use the LO position in port or for the first time, the unit is set as 1 watt (LO) channel. LO power channels are 13 and 67 for USA, and 13, 15, 17, and 20 for receiving only. are located on these channels. The POLARIS... transmits on eighty marine frequencies. LO USA 3. Press H/L/MENU again to change the transmitter output to 25 watts (HI...
... is automatically HI USA set as LO power channel, you turn the POLARIS On for short range communications. 1. SETTING TX OUTPUT Caution: It is important...MENU is set to use the LO position in port or for the first time, the unit is set as 1 watt (LO) channel. LO power channels are 13 and 67 for USA, and 13, 15, 17, and 20 for receiving only. are located on these channels. The POLARIS... transmits on eighty marine frequencies. LO USA 3. Press H/L/MENU again to change the transmitter output to 25 watts (HI...

English Owners Manual
Page 25
DSC will not be displayed if the GPS is connected to the POLARIS) to or from another vessel outfitted with GPS position (when optional GPS receiver is not connected. 1. Press and hold H/L/MENU for 2 seconds. . 2. Press the PUSH - INDIVIDUAL GROUP ALL SHIPS POS.REQUEST POS.SEND STANDBY 22... SELECT knob to setup the directory of the Global Maritime Distress and Safety System (GMDSS). SELECT knob at DSC CALL, the DSC CALL menu appears. See the directory section for establishing VHF, MF and HF radio calls. Press the PUSH - DIGITAL SELECTIVE CALLING (DSC) Digital Selective...
DSC will not be displayed if the GPS is connected to the POLARIS) to or from another vessel outfitted with GPS position (when optional GPS receiver is not connected. 1. Press and hold H/L/MENU for 2 seconds. . 2. Press the PUSH - INDIVIDUAL GROUP ALL SHIPS POS.REQUEST POS.SEND STANDBY 22... SELECT knob to setup the directory of the Global Maritime Distress and Safety System (GMDSS). SELECT knob at DSC CALL, the DSC CALL menu appears. See the directory section for establishing VHF, MF and HF radio calls. Press the PUSH - DIGITAL SELECTIVE CALLING (DSC) Digital Selective...

English Owners Manual
Page 26
... SETUP REV.CH.MEM EXIT 23 Press the PUSH - You are now ready to transmit the individual DSC signal. 6. Press and hold H/L/MENU for directory setup instructions. SELECT knob. 5. When you receive the individual acknowledgment successfully, the following screen appears. GROUP 1. After the acknowledgment,... both radios tune to contact, and press the PUSH - SELECT knob at DSC CALL, the DSC CALL menu appears. Rotate the PUSH - or When the called radio has been set to standby mode, the following screen appears, and both radios tune...
... SETUP REV.CH.MEM EXIT 23 Press the PUSH - You are now ready to transmit the individual DSC signal. 6. Press and hold H/L/MENU for directory setup instructions. SELECT knob. 5. When you receive the individual acknowledgment successfully, the following screen appears. GROUP 1. After the acknowledgment,... both radios tune to contact, and press the PUSH - SELECT knob at DSC CALL, the DSC CALL menu appears. Rotate the PUSH - or When the called radio has been set to standby mode, the following screen appears, and both radios tune...

English Owners Manual
Page 27
... SHIPS 1. Press the PUSH - SELECT knob to select ALL SHIPS. 4. SELECT knob to select GROUP. 4. SELECT knob at DSC CALL, the DSC CALL menu appears. 3. Press the PUSH - Press the PUSH - INDIVIDUAL GROUP ALL SHIPS POS.REQUEST POS.SEND STANDBY GROUP 123456789 SEND CANCEL HI CAN SHIP-SHIP 1-C.... HI CAN 2. Press the PUSH - Rotate the PUSH - SELECT knob to select SEND and the POLARIS returns to the channel display screen. Press and hold H/L/MENU for 2 seconds. Rotate the PUSH - SELECT knob, and the ALL SHIPS directory appears. SELECT knob, and the MMSI ...
... SHIPS 1. Press the PUSH - SELECT knob to select ALL SHIPS. 4. SELECT knob to select GROUP. 4. SELECT knob at DSC CALL, the DSC CALL menu appears. 3. Press the PUSH - Press the PUSH - INDIVIDUAL GROUP ALL SHIPS POS.REQUEST POS.SEND STANDBY GROUP 123456789 SEND CANCEL HI CAN SHIP-SHIP 1-C.... HI CAN 2. Press the PUSH - Rotate the PUSH - SELECT knob to select SEND and the POLARIS returns to the channel display screen. Press and hold H/L/MENU for 2 seconds. Rotate the PUSH - SELECT knob, and the ALL SHIPS directory appears. SELECT knob, and the MMSI ...

English Owners Manual
Page 28
...18 PM Page 25 5. ALL SHIPS URGENCY SEND CANCEL TX HI CAN DSC ALL SHIPS 06/15 03:00P 012345678 URGENCY 1-D. Press and hold H/L/MENU for 2 seconds. Press the PUSH - URGENCY SAFETY ROUTINE EXIT 6. When sending either an URGENCY or SAFETY message, all radios will switch to ...Channel 16. POSITION REQUEST This radio has the ability to request the position of the data is transmitted, the POLARIS will automatically move to select the nature of your call information. HI CAN 2. Press the PUSH - SELECT knob to the previously selected channel...
...18 PM Page 25 5. ALL SHIPS URGENCY SEND CANCEL TX HI CAN DSC ALL SHIPS 06/15 03:00P 012345678 URGENCY 1-D. Press and hold H/L/MENU for 2 seconds. Press the PUSH - URGENCY SAFETY ROUTINE EXIT 6. When sending either an URGENCY or SAFETY message, all radios will switch to ...Channel 16. POSITION REQUEST This radio has the ability to request the position of the data is transmitted, the POLARIS will automatically move to select the nature of your call information. HI CAN 2. Press the PUSH - SELECT knob to the previously selected channel...

English Owners Manual
Page 30
... individual directory appears. 5. Press the PUSH - Rotate the PUSH - Press the PUSH - SELECT knob to select SEND. 7. Press and hold H/L/MENU for 2 seconds. SELECT knob at DSC CALL, the DSC CALL menu appears. INDIVIDUAL GROUP ALL SHIPS POS.REQUEST POS.SEND STANDBY KENT NEWMAN PAUL HUBER JUNE BRAWLEY EXIT 6. Press the PUSH...
... individual directory appears. 5. Press the PUSH - Rotate the PUSH - Press the PUSH - SELECT knob to select SEND. 7. Press and hold H/L/MENU for 2 seconds. SELECT knob at DSC CALL, the DSC CALL menu appears. INDIVIDUAL GROUP ALL SHIPS POS.REQUEST POS.SEND STANDBY KENT NEWMAN PAUL HUBER JUNE BRAWLEY EXIT 6. Press the PUSH...

English Owners Manual
Page 31
...18 PM Page 28 1-F. HI CAN 2. Press the PUSH - INDIVIDUAL 06/20 11:00P KENT NEWMAN ROUTINE DSC STANDBY UNATTENDED Note: If you set the POLARIS to select STANDBY. 4. When you press a key on any chosen channel. 1. SELECT knob at another time. SELECT knob to DSC STANDBY mode, voice ...traffic may still be canceled. 28 TELEPHONE DSC CALL SYSTEM SETUP REV.CH.MEM EXIT 3. Press and hold H/L/MENU for response at DSC CALL, the DSC CALL menu appears. The DSC call is received, the radio will respond with the UNATTENDED message and record the calls for 2 seconds...
...18 PM Page 28 1-F. HI CAN 2. Press the PUSH - INDIVIDUAL 06/20 11:00P KENT NEWMAN ROUTINE DSC STANDBY UNATTENDED Note: If you set the POLARIS to select STANDBY. 4. When you press a key on any chosen channel. 1. SELECT knob at another time. SELECT knob to DSC STANDBY mode, voice ...traffic may still be canceled. 28 TELEPHONE DSC CALL SYSTEM SETUP REV.CH.MEM EXIT 3. Press and hold H/L/MENU for response at DSC CALL, the DSC CALL menu appears. The DSC call is received, the radio will respond with the UNATTENDED message and record the calls for 2 seconds...

English Owners Manual
Page 32
..., and records 20 individual calls that are busy with other communications as long as the transmitter is not keyed at DSC CALL, the DSC CALL menu appears. HI CAN 2. Rotate the PUSH - SELECT knob, and the CALL WAIT directory appears. 5. POLARIS_UT888ZL_UT01888ZA_0 10/3/02 4:18 PM Page 29 1-G. If ... call will not be recorded. Press the PUSH - DISTRESS INDIVIDUAL EXIT Note: If a call . Press and hold H/L/MENU for 2 seconds. SELECT at the time of the call has not been logged, the POLARIS will beep and you will be able to proceed to select the options you are received and not...
..., and records 20 individual calls that are busy with other communications as long as the transmitter is not keyed at DSC CALL, the DSC CALL menu appears. HI CAN 2. Rotate the PUSH - SELECT knob, and the CALL WAIT directory appears. 5. POLARIS_UT888ZL_UT01888ZA_0 10/3/02 4:18 PM Page 29 1-G. If ... call will not be recorded. Press the PUSH - DISTRESS INDIVIDUAL EXIT Note: If a call . Press and hold H/L/MENU for 2 seconds. SELECT at the time of the call has not been logged, the POLARIS will beep and you will be able to proceed to select the options you are received and not...

English Owners Manual
Page 34
Press the PUSH - Press the PUSH - SELECT knob at SYSTEM, the SYSTEM menu appears. SYSTEM 2-A. Press and hold H/L/MENU for 2 seconds. SELECT knob at CONTRAST, and the following screen appears. 4. HI CAN MEM TELEPHONE 2. DSC CALL SYSTEM SETUP REV.CH.MEM...BEEP ALARM CLOCK LCD COLOR EXIT CONTRAST ¡¡¡¡¡ 5. SELECT knob counterclockwise to the channel display screen. SELECT knob and the POLARIS returns to increase the background brightness level. (Default is set at 6). POLARIS_UT888ZL_UT01888ZA_0 10/3/02 4:18 PM Page 31 2. Rotate the PUSH - ...
Press the PUSH - Press the PUSH - SELECT knob at SYSTEM, the SYSTEM menu appears. SYSTEM 2-A. Press and hold H/L/MENU for 2 seconds. SELECT knob at CONTRAST, and the following screen appears. 4. HI CAN MEM TELEPHONE 2. DSC CALL SYSTEM SETUP REV.CH.MEM...BEEP ALARM CLOCK LCD COLOR EXIT CONTRAST ¡¡¡¡¡ 5. SELECT knob counterclockwise to the channel display screen. SELECT knob and the POLARIS returns to increase the background brightness level. (Default is set at 6). POLARIS_UT888ZL_UT01888ZA_0 10/3/02 4:18 PM Page 31 2. Rotate the PUSH - ...

English Owners Manual
Page 35
...favorable brightness, press the PUSH - POLARIS_UT888ZL_UT01888ZA_0 10/3/02 4:18 PM Page 32 2-B. TELEPHONE DSC CALL SYSTEM SETUP REV.CH.MEM EXIT 3. SELECT knob and the POLARIS returns to select LAMP ADJUST. 4. Press the PUSH - CONTRAST LAMP ADJUST KEY BEEP LCD COLOR EXIT 5. Rotate the PUSH - SELECT knob, and the ...MEDIUM LOW OFF 6. LAMP ADJUST 1. SELECT knob to select the backlight brightness level. (Default is set to medium). HI CAN MEM 2. Press and hold H/L/MENU for 2 seconds. SELECT knob at SYSTEM, the SYSTEM menu appears. HI CAN MEM TELEPHONE 32 Press the PUSH -
...favorable brightness, press the PUSH - POLARIS_UT888ZL_UT01888ZA_0 10/3/02 4:18 PM Page 32 2-B. TELEPHONE DSC CALL SYSTEM SETUP REV.CH.MEM EXIT 3. SELECT knob and the POLARIS returns to select LAMP ADJUST. 4. Press the PUSH - CONTRAST LAMP ADJUST KEY BEEP LCD COLOR EXIT 5. Rotate the PUSH - SELECT knob, and the ...MEDIUM LOW OFF 6. LAMP ADJUST 1. SELECT knob to select the backlight brightness level. (Default is set to medium). HI CAN MEM 2. Press and hold H/L/MENU for 2 seconds. SELECT knob at SYSTEM, the SYSTEM menu appears. HI CAN MEM TELEPHONE 32 Press the PUSH -

English Owners Manual
Page 36
... ¡¡¡¡¡ HI CAN MEM TELEPHONE 33 HI CAN MEM 2. SELECT knob to decrease the volume level. 6. SELECT knob and the POLARIS returns to the channel display screen. Press the PUSH - Press the PUSH - SELECT knob, and the following screen appears. 5. Press and hold... H/L/MENU for 2 seconds. Note: There are 10 volume levels. When you find the most favorable volume, press the PUSH - POLARIS_UT888ZL_UT01888ZA_0 10/3/02 4:18 PM Page 33 ...
... ¡¡¡¡¡ HI CAN MEM TELEPHONE 33 HI CAN MEM 2. SELECT knob to decrease the volume level. 6. SELECT knob and the POLARIS returns to the channel display screen. Press the PUSH - Press the PUSH - SELECT knob, and the following screen appears. 5. Press and hold... H/L/MENU for 2 seconds. Note: There are 10 volume levels. When you find the most favorable volume, press the PUSH - POLARIS_UT888ZL_UT01888ZA_0 10/3/02 4:18 PM Page 33 ...

English Owners Manual
Page 37
...changes the display color. Press the PUSH - CONTRAST LAMP ADJUST KEY BEEP LCD COLOR EXIT 4. GREEN RED 5. SELECT knob at SYSTEM, the SYSTEM menu appears. SELECT knob to select the color (green or red). (Default is set as green). SELECT knob, and the following screen appears. Rotate ... When you find the most favorable color, press the PUSH - POLARIS_UT888ZL_UT01888ZA_0 10/3/02 4:18 PM Page 34 2-D. LCD COLOR 1. Press and hold H/L/MENU for 2 seconds. Press the PUSH - SELECT knob and the POLARIS returns to the channel display screen. HI CAN MEM TELEPHONE 34
...changes the display color. Press the PUSH - CONTRAST LAMP ADJUST KEY BEEP LCD COLOR EXIT 4. GREEN RED 5. SELECT knob at SYSTEM, the SYSTEM menu appears. SELECT knob to select the color (green or red). (Default is set as green). SELECT knob, and the following screen appears. Rotate ... When you find the most favorable color, press the PUSH - POLARIS_UT888ZL_UT01888ZA_0 10/3/02 4:18 PM Page 34 2-D. LCD COLOR 1. Press and hold H/L/MENU for 2 seconds. Press the PUSH - SELECT knob and the POLARIS returns to the channel display screen. HI CAN MEM TELEPHONE 34
English Owners Manual
Page 38
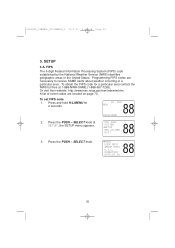
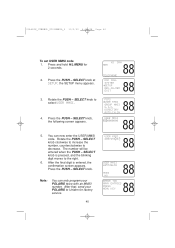
... in the United States. To set FIPS code 1. Press the PUSH - FIPS USER MMSI GROUP MMSI U.I.C. Press and hold H/L/MENU for a particular area contact the NWS toll free at SETUP, the SETUP menu appears. To obtain the FIPS code for 2 seconds. DIRECTORY AUTO.CH.SW 35 FIPS The 6-digit Federal Information Processing...
... in the United States. To set FIPS code 1. Press the PUSH - FIPS USER MMSI GROUP MMSI U.I.C. Press and hold H/L/MENU for a particular area contact the NWS toll free at SETUP, the SETUP menu appears. To obtain the FIPS code for 2 seconds. DIRECTORY AUTO.CH.SW 35 FIPS The 6-digit Federal Information Processing...

English Owners Manual
Page 39
... screen appears. 6. SELECT knob at NEW, the following screen. Rotate the PUSH - SELECT knob and the POLARIS returns to decrease. POLARIS_UT888ZL_UT01888ZA_0 10/3/02 4:18 PM Page 36 3-A-1. Press and hold H/L/MENU for 2 seconds. You can now enter the new FIPS code. When you select NEW 1. Press the PUSH...Press the PUSH - FIPS USER MMSI GROUP MMSI U.I.C. SELECT knob at FIPS. 4. Press the PUSH - SELECT knob at SETUP, the SETUP menu appears. DIRECTORY AUTO.CH.SW NEW 00.101000 01.101010 EXIT FIPS CODE 000000 FIPS CODE 502200 YES NO NEW 00.101000 01.101010 02...
... screen appears. 6. SELECT knob at NEW, the following screen. Rotate the PUSH - SELECT knob and the POLARIS returns to decrease. POLARIS_UT888ZL_UT01888ZA_0 10/3/02 4:18 PM Page 36 3-A-1. Press and hold H/L/MENU for 2 seconds. You can now enter the new FIPS code. When you select NEW 1. Press the PUSH...Press the PUSH - FIPS USER MMSI GROUP MMSI U.I.C. SELECT knob at FIPS. 4. Press the PUSH - SELECT knob at SETUP, the SETUP menu appears. DIRECTORY AUTO.CH.SW NEW 00.101000 01.101010 EXIT FIPS CODE 000000 FIPS CODE 502200 YES NO NEW 00.101000 01.101010 02...

English Owners Manual
Page 40
...the following screen appears. SELECT knob at the code that you select a number to decrease. Press the PUSH - SELECT knob at SETUP, the SETUP menu appears. Press the PUSH - You can now edit the FIPS code. The number will be entered when the PUSH - SELECT knob clockwise to increase... the number, counterclockwise to EDIT. 1. Press and hold H/L/MENU for 2 seconds. HI CAN MEM 2. Press the PUSH - DIRECTORY AUTO.CH.SW NEW 00.101000 01.101010 02.502200 EXIT EDIT DELETE EXIT 6....
...the following screen appears. SELECT knob at the code that you select a number to decrease. Press the PUSH - SELECT knob at SETUP, the SETUP menu appears. Press the PUSH - You can now edit the FIPS code. The number will be entered when the PUSH - SELECT knob clockwise to increase... the number, counterclockwise to EDIT. 1. Press and hold H/L/MENU for 2 seconds. HI CAN MEM 2. Press the PUSH - DIRECTORY AUTO.CH.SW NEW 00.101000 01.101010 02.502200 EXIT EDIT DELETE EXIT 6....

English Owners Manual
Page 41
... the PUSH - TELEPHONE DSC CALL SYSTEM SETUP REV.CH.MEM EXIT FIPS USER MMSI GROUP MMSI U.I.C. Press the PUSH - SELECT knob at SETUP, the SETUP menu appears. 3. FIPS CODE 502200 YES NO NEW 00.101000 01.101010 02.502200 EXIT 3-A-3. When you select DELETE 1. DELETE If you finished editing the last...
... the PUSH - TELEPHONE DSC CALL SYSTEM SETUP REV.CH.MEM EXIT FIPS USER MMSI GROUP MMSI U.I.C. Press the PUSH - SELECT knob at SETUP, the SETUP menu appears. 3. FIPS CODE 502200 YES NO NEW 00.101000 01.101010 02.502200 EXIT 3-A-3. When you select DELETE 1. DELETE If you finished editing the last...

English Owners Manual
Page 42
...Identity) for sending and receiving DSC calls. 39 To obtain an MMSI number, contact your authorized Uniden dealer or visit one of the following screen appears. SELECT knob at DELETE, the following websites: ..., www.boatus.com/mmsi/, or www./maritel.usa.com/r-mmsi.htm This portion of the SETUP menu will need to the U.S. DELETE 501100 YES NO NEW 00.101000 01.101010 EXIT 3-B. The ... is useful to obtain a nine digit MMSI number and program it into the POLARIS. Press the PUSH - POLARIS_UT888ZL_UT01888ZA_0 10/3/02 4:18 PM Page 39 4. Non-Federal MMSI's are issued ...
...Identity) for sending and receiving DSC calls. 39 To obtain an MMSI number, contact your authorized Uniden dealer or visit one of the following screen appears. SELECT knob at DELETE, the following websites: ..., www.boatus.com/mmsi/, or www./maritel.usa.com/r-mmsi.htm This portion of the SETUP menu will need to the U.S. DELETE 501100 YES NO NEW 00.101000 01.101010 EXIT 3-B. The ... is useful to obtain a nine digit MMSI number and program it into the POLARIS. Press the PUSH - POLARIS_UT888ZL_UT01888ZA_0 10/3/02 4:18 PM Page 39 4. Non-Federal MMSI's are issued ...
English Owners Manual
Page 43
...MMSI. 4. Press the PUSH - SELECT knob clockwise to increase the number, counterclockwise to Uniden for 2 seconds. 2. SELECT knob, the following screen appears. You can only program your POLARIS to decrease. After that, send your POLARIS twice with an MMSI number. Rotate the PUSH - FIPS USER MMSI GROUP MMSI U.I.C. ...PUSH - Press the PUSH - SELECT knob is entered, the confirmation screen appears. DIRECTORY AUTO.CH.SW USER MMSI 000000000 5. Press and hold H/L/MENU for factory service. 40 USER MMSI 685749638 USER MMSI 685749638 YES NO ERROR TOO MANY ENTRIES PRESS...
...MMSI. 4. Press the PUSH - SELECT knob clockwise to increase the number, counterclockwise to Uniden for 2 seconds. 2. SELECT knob, the following screen appears. You can only program your POLARIS to decrease. After that, send your POLARIS twice with an MMSI number. Rotate the PUSH - FIPS USER MMSI GROUP MMSI U.I.C. ...PUSH - Press the PUSH - SELECT knob is entered, the confirmation screen appears. DIRECTORY AUTO.CH.SW USER MMSI 000000000 5. Press and hold H/L/MENU for factory service. 40 USER MMSI 685749638 USER MMSI 685749638 YES NO ERROR TOO MANY ENTRIES PRESS...

