
English Owners Manual
Page 5
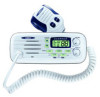
Indicators for detailed descriptions. 2 STEP (also located on microphone) 6. talk (PTT) Switch - Refer to - LCD Panel - WX (Weather mode On/Off) 5. 16/9 (Channel 16/Channel 9; MEM (Memory) 7. to the "Multi-Function Keys" section for ..., SCAN, TRI, U, I, C, HI, LO, MEM, WX, WX ALERT, and Channel Number. 3. Controls and Indicators Front Panel 10 12 3 5 8 4 5678 9 1. H/L (Output Power Hi/Low) 8. Turns the OCEANUS On or Off and varies the audio output. 4. SQUELCH - Press to transmit and release to manually select the desired Communication Channel (01 - 28 and 60...
Indicators for detailed descriptions. 2 STEP (also located on microphone) 6. talk (PTT) Switch - Refer to - LCD Panel - WX (Weather mode On/Off) 5. 16/9 (Channel 16/Channel 9; MEM (Memory) 7. to the "Multi-Function Keys" section for ..., SCAN, TRI, U, I, C, HI, LO, MEM, WX, WX ALERT, and Channel Number. 3. Controls and Indicators Front Panel 10 12 3 5 8 4 5678 9 1. H/L (Output Power Hi/Low) 8. Turns the OCEANUS On or Off and varies the audio output. 4. SQUELCH - Press to transmit and release to manually select the desired Communication Channel (01 - 28 and 60...

English Owners Manual
Page 12
... in the mounting bracket and connect all other mounting knobs than the ones enclosed. Installing the OCEANUS After you have carefully considered the various factors affecting your choice of location, position the radio (with the bracket, microphone, power cord, antenna and any other auxiliary cables and accessories. Note: Do not use any...
... in the mounting bracket and connect all other mounting knobs than the ones enclosed. Installing the OCEANUS After you have carefully considered the various factors affecting your choice of location, position the radio (with the bracket, microphone, power cord, antenna and any other auxiliary cables and accessories. Note: Do not use any...
English Owners Manual
Page 15
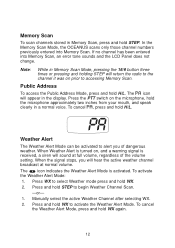
In the Memory Scan Mode, the OCEANUS scans only those channel numbers previously entered into Memory Scan, an error tone sounds and the LCD Panel does not change. Note: While in the ... Scan. -or- 1. To activate the Weather Alert Mode: 1. Memory Scan To scan channels stored in a normal voice. When Weather Alert is turned on the microphone, hold the microphone approximately two inches from your mouth, and speak clearly in Memory Scan, press and hold STEP to alert you will sound at normal volume...
In the Memory Scan Mode, the OCEANUS scans only those channel numbers previously entered into Memory Scan, an error tone sounds and the LCD Panel does not change. Note: While in the ... Scan. -or- 1. To activate the Weather Alert Mode: 1. Memory Scan To scan channels stored in a normal voice. When Weather Alert is turned on the microphone, hold the microphone approximately two inches from your mouth, and speak clearly in Memory Scan, press and hold STEP to alert you will sound at normal volume...
English Owners Manual
Page 16
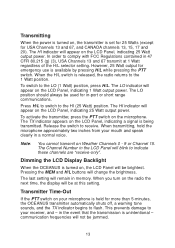
... brightness. The TX indicator appears on the LCD Panel, indicating a signal is set for 25 Watts (except for more than 5-minutes, the OCEANUS transmitter automatically shuts off, a warning tone sounds, and the TX indicator begins to the 1 Watt position. communication frequencies will appear on the ...LCD Panel, indicating 25 Watt output power. The HI indicator will not be brightest. Note: You cannot transmit on the microphone. The HI indicator will blink to the LO (1 Watt) position, press H/L. Transmitting When the power is turned on, the transmitter is ...
... brightness. The TX indicator appears on the LCD Panel, indicating a signal is set for 25 Watts (except for more than 5-minutes, the OCEANUS transmitter automatically shuts off, a warning tone sounds, and the TX indicator begins to the 1 Watt position. communication frequencies will appear on the ...LCD Panel, indicating 25 Watt output power. The HI indicator will not be brightest. Note: You cannot transmit on the microphone. The HI indicator will blink to the LO (1 Watt) position, press H/L. Transmitting When the power is turned on, the transmitter is ...

English Owners Manual
Page 20
... : Antenna, remote speaker, and DC power : 73 mmH x 181 mmW x 132 mmL : 1.1 kg (microphone: 180 g) : 13.8V DC negative ground : Mounting bracket and hardware, DC power cord, microphone hanger, spare fuse, EXT SP PLUG (ø3.5), 2 Terminals for 20 dB S/N : Dual Conversion Super Heterodyne PLL... Channels Controls Status Indicators Channel Display Selector Switch Buttons Connectors Size Weight Supply Voltage Standard Accessories Antenna Impedance Microphone Speaker Operating Temperature Range Shock and Vibration FCC Approvals Transmitter Power Output Power Requirement Modulation Hum and Noise ...
... : Antenna, remote speaker, and DC power : 73 mmH x 181 mmW x 132 mmL : 1.1 kg (microphone: 180 g) : 13.8V DC negative ground : Mounting bracket and hardware, DC power cord, microphone hanger, spare fuse, EXT SP PLUG (ø3.5), 2 Terminals for 20 dB S/N : Dual Conversion Super Heterodyne PLL... Channels Controls Status Indicators Channel Display Selector Switch Buttons Connectors Size Weight Supply Voltage Standard Accessories Antenna Impedance Microphone Speaker Operating Temperature Range Shock and Vibration FCC Approvals Transmitter Power Output Power Requirement Modulation Hum and Noise ...


