English Owners Manual
Page 2
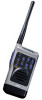
... Battery Pack used in this Battery Pack. Warning! Do not let children operate any radio equipment with the antenna touching or close to cause cancer. Nickel-Cadmium batteries must be disposed of California to the eyes, face, or exposed body parts. Do not operate the transmitter of in any radio equipment near electrical blasting caps or in an explosive atmosphere. Using another charger...
... Battery Pack used in this Battery Pack. Warning! Do not let children operate any radio equipment with the antenna touching or close to cause cancer. Nickel-Cadmium batteries must be disposed of California to the eyes, face, or exposed body parts. Do not operate the transmitter of in any radio equipment near electrical blasting caps or in an explosive atmosphere. Using another charger...
English Owners Manual
Page 3
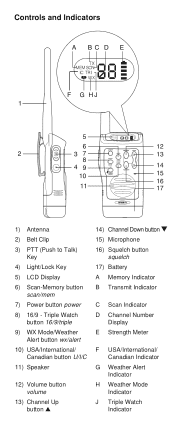
... 1) Antenna 2) Belt Clip 3) PTT (Push to Talk) Key 4) Light/Lock Key 5) LCD Display 6) Scan-Memory button scan/mem 7) Power button power 8) 16/9 - Triple Watch button 16/9/triple 9) WX Mode/Weather Alert button wx/alert 10) USA/International/ Canadian button U/I/C 11) Speaker 12) Volume button volume 13) Channel Up button 14) Channel Down button 15) Microphone 16) Squelch button squelch 17) Battery A Memory Indicator B Transmit Indicator C Scan Indicator D Channel Number Display E Strength Meter F USA/International/ Canadian Indicator G Weather Alert Indicator H Weather Mode Indicator...
... 1) Antenna 2) Belt Clip 3) PTT (Push to Talk) Key 4) Light/Lock Key 5) LCD Display 6) Scan-Memory button scan/mem 7) Power button power 8) 16/9 - Triple Watch button 16/9/triple 9) WX Mode/Weather Alert button wx/alert 10) USA/International/ Canadian button U/I/C 11) Speaker 12) Volume button volume 13) Channel Up button 14) Channel Down button 15) Microphone 16) Squelch button squelch 17) Battery A Memory Indicator B Transmit Indicator C Scan Indicator D Channel Number Display E Strength Meter F USA/International/ Canadian Indicator G Weather Alert Indicator H Weather Mode Indicator...

English Owners Manual
Page 4
... Radio Services Operation . 3 Parts and Accessories 4 Getting Started 5 Mounting the Drop-in Charger . . . . 5 Attaching the Antenna 5 Attaching the Battery Pack . . . . . 6 Charging the Battery Pack. . . . . . 6 Operation 8 Setting the Squelch 8 Selecting a Channel 10 One-touch Channel 16/9 10 Monitoring Weather Channels . . . 11 Triple Watch 11 Weather Alert 12 USA-International-Canadian Channels 12 Program the Memory 13 Delete from Memory 13 Scanning 13 Triple Watch in Scan Mode. . . . . 13 Transmitting 13 Lighted Keys and Display . . . . . 13 Key Lock 14 Marine Channels...
... Radio Services Operation . 3 Parts and Accessories 4 Getting Started 5 Mounting the Drop-in Charger . . . . 5 Attaching the Antenna 5 Attaching the Battery Pack . . . . . 6 Charging the Battery Pack. . . . . . 6 Operation 8 Setting the Squelch 8 Selecting a Channel 10 One-touch Channel 16/9 10 Monitoring Weather Channels . . . 11 Triple Watch 11 Weather Alert 12 USA-International-Canadian Channels 12 Program the Memory 13 Delete from Memory 13 Scanning 13 Triple Watch in Scan Mode. . . . . 13 Transmitting 13 Lighted Keys and Display . . . . . 13 Key Lock 14 Marine Channels...
English Owners Manual
Page 5
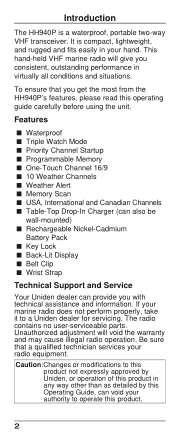
Features Waterproof Triple Watch Mode Priority Channel Startup Programmable Memory One-Touch Channel 16/9 10 Weather Channels Weather Alert Memory Scan USA, International and Canadian Channels Table-Top Drop-In Charger (can also be wall-mounted) Rechargeable Nickel-Cadmium Battery Pack Key Lock Back-Lit Display Belt Clip Wrist Strap Technical Support and Service Your Uniden dealer can void your marine radio does not perform properly, take it to this...
Features Waterproof Triple Watch Mode Priority Channel Startup Programmable Memory One-Touch Channel 16/9 10 Weather Channels Weather Alert Memory Scan USA, International and Canadian Channels Table-Top Drop-In Charger (can also be wall-mounted) Rechargeable Nickel-Cadmium Battery Pack Key Lock Back-Lit Display Belt Clip Wrist Strap Technical Support and Service Your Uniden dealer can void your marine radio does not perform properly, take it to this...

English Owners Manual
Page 6
Maritime Radio Services Operation This transmitter will operate on channels/ frequencies that are currently for exclusive use of the U.S. Coast Guard, use in Canada, and use in the United States. The channel assignments include frequencies assigned for use in international waters. For frequencies/channels that have restricted use in these frequencies without an individual license, please contact the FCC Call Center at 1-888-CALL-FCC. 3 without proper authorization is strictly forbidden. Operation in the U.S.
Maritime Radio Services Operation This transmitter will operate on channels/ frequencies that are currently for exclusive use of the U.S. Coast Guard, use in Canada, and use in the United States. The channel assignments include frequencies assigned for use in international waters. For frequencies/channels that have restricted use in these frequencies without an individual license, please contact the FCC Call Center at 1-888-CALL-FCC. 3 without proper authorization is strictly forbidden. Operation in the U.S.
English Owners Manual
Page 7
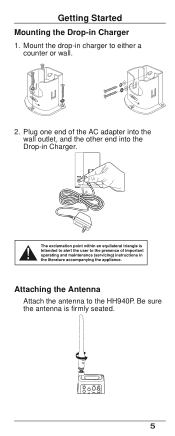
Mount the drop-in charger to the HH940P. Be sure the antenna is firmly seated. 5 Plug one end of the AC adapter into the wall outlet, and the other end into the Drop-in Charger 1. Attaching the Antenna Attach the antenna to either a counter or wall. 2. Getting Started Mounting the Drop-in Charger.
Mount the drop-in charger to the HH940P. Be sure the antenna is firmly seated. 5 Plug one end of the AC adapter into the wall outlet, and the other end into the Drop-in Charger 1. Attaching the Antenna Attach the antenna to either a counter or wall. 2. Getting Started Mounting the Drop-in Charger.

English Owners Manual
Page 8
Charging the Battery Pack Your marine radio is powered by a specially-designed nickel-cadmium battery pack. Be sure the battery pack fits tightly against the HH940P's body. Before operating the HH940P, charge the battery pack for 15 hours without interruption in the drop-in charger. 6 Slide the battery pack onto the bottom of the radio. 2. Use a quarter to turn the screw that connects the battery pack to the HH940P. Attaching the Battery Pack 1.
Charging the Battery Pack Your marine radio is powered by a specially-designed nickel-cadmium battery pack. Be sure the battery pack fits tightly against the HH940P's body. Before operating the HH940P, charge the battery pack for 15 hours without interruption in the drop-in charger. 6 Slide the battery pack onto the bottom of the radio. 2. Use a quarter to turn the screw that connects the battery pack to the HH940P. Attaching the Battery Pack 1.

English Owners Manual
Page 9
Place the HH940P in the drop-in charger! You can monitor incoming calls while the HH940P is in the drop-in charger. 2. The red LED lights and stays on. Do not transmit when the HH940P is in the drop-in charger. The charger won't overcharge the battery pack. 1. You can charge the battery pack alone or connected to the HH940P. 7
Place the HH940P in the drop-in charger! You can monitor incoming calls while the HH940P is in the drop-in charger. 2. The red LED lights and stays on. Do not transmit when the HH940P is in the drop-in charger. The charger won't overcharge the battery pack. 1. You can charge the battery pack alone or connected to the HH940P. 7

English Owners Manual
Page 10
... channel 16 - the United States Coast Guard frequency for 2.0 seconds. 2. Press on your HH940P, it is not in the front of the squelch control as a gate. Use the squelch and chan buttons to adjust the squelch to a comfortable level. 3. Use the volume and chan buttons to adjust the volume to the desired level. Press the squelch button. 8 To turn on the chan button to finish. Think of the operating guide for button and key...
... channel 16 - the United States Coast Guard frequency for 2.0 seconds. 2. Press on your HH940P, it is not in the front of the squelch control as a gate. Use the squelch and chan buttons to adjust the squelch to a comfortable level. 3. Use the volume and chan buttons to adjust the volume to the desired level. Press the squelch button. 8 To turn on the chan button to finish. Think of the operating guide for button and key...
English Owners Manual
Page 11
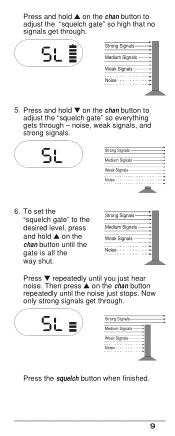
Press and hold on the chan button to adjust the "squelch gate" so high that no signals get through. To set the "squelch gate" to the desired level, press and hold on the chan button until you just hear noise. Press repeatedly until the gate is all the way shut. Now only strong signals get through. 5. Press the squelch button when finished. 9 Then press on the chan button repeatedly until the noise just stops. Press and hold on the chan button to adjust the "squelch gate" so everything gets through - noise, weak signals, and strong signals. 6.
Press and hold on the chan button to adjust the "squelch gate" so high that no signals get through. To set the "squelch gate" to the desired level, press and hold on the chan button until you just hear noise. Press repeatedly until the gate is all the way shut. Now only strong signals get through. 5. Press the squelch button when finished. 9 Then press on the chan button repeatedly until the noise just stops. Press and hold on the chan button to adjust the "squelch gate" so everything gets through - noise, weak signals, and strong signals. 6.
English Owners Manual
Page 12
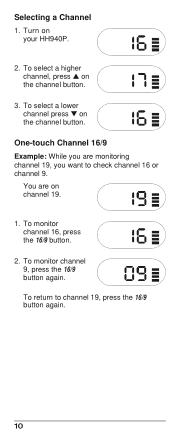
To return to check channel 16 or channel 9. One-touch Channel 16/9 Example: While you want to channel 19, press the 16/9 button again. 10 To select a higher channel, press on your HH940P. 2. You are monitoring channel 19, you are on the channel button. To monitor channel 9, press the 16/9 button again. Turn on the channel button. 3. To select a lower channel press on channel 19. 1. Selecting a Channel 1. To monitor channel 16, press the 16/9 button. 2.
To return to check channel 16 or channel 9. One-touch Channel 16/9 Example: While you want to channel 19, press the 16/9 button again. 10 To select a higher channel, press on your HH940P. 2. You are monitoring channel 19, you are on the channel button. To monitor channel 9, press the 16/9 button again. Turn on the channel button. 3. To select a lower channel press on channel 19. 1. Selecting a Channel 1. To monitor channel 16, press the 16/9 button. 2.
English Owners Manual
Page 13
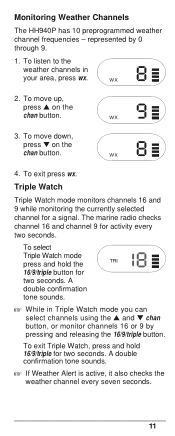
.... 2. A double confirmation tone sounds. Monitoring Weather Channels The HH940P has 10 preprogrammed weather channel frequencies - To select Triple Watch mode press and hold 16/9/triple for two seconds. To exit Triple Watch, press and hold the 16/9/triple button for two seconds. The marine radio checks channel 16 and channel 9 for a signal. If Weather Alert is active, it also checks the weather channel every seven seconds. 11...
.... 2. A double confirmation tone sounds. Monitoring Weather Channels The HH940P has 10 preprogrammed weather channel frequencies - To select Triple Watch mode press and hold 16/9/triple for two seconds. To exit Triple Watch, press and hold the 16/9/triple button for two seconds. The marine radio checks channel 16 and channel 9 for a signal. If Weather Alert is active, it also checks the weather channel every seven seconds. 11...

English Owners Manual
Page 14
... receive, release the PTT key. Scanning To begin scanning the channels programmed in the scan mode, the unit automatically turns on the LED display will confirm that the 16/9/Triple Watch feature has been deactivated. To Delete a Channel from memory by pushing the channel button up or down . This will deactivate. Lighted Keys and Display Momentarily press the LCD backlight button to delete from Memory Select the channel to light...
... receive, release the PTT key. Scanning To begin scanning the channels programmed in the scan mode, the unit automatically turns on the LED display will confirm that the 16/9/Triple Watch feature has been deactivated. To Delete a Channel from memory by pushing the channel button up or down . This will deactivate. Lighted Keys and Display Momentarily press the LCD backlight button to delete from Memory Select the channel to light...

English Owners Manual
Page 15
Key Lock To prevent accidental entries, you can lock the keypad. Press and hold the Light/lock key again for two seconds. The unit will beep two times to confirm hta the keypad is locked. The unit will beep to confirm that the keypad is unlocked. 14 To unlock the keypad, press and hold the LCD backlight button for two seconds.
Key Lock To prevent accidental entries, you can lock the keypad. Press and hold the Light/lock key again for two seconds. The unit will beep two times to confirm hta the keypad is locked. The unit will beep to confirm that the keypad is unlocked. 14 To unlock the keypad, press and hold the LCD backlight button for two seconds.

English Owners Manual
Page 17
... 87 88 Frequency (Mhz) Type Of Ship Ship To Transmit Receive Traffic To Ship Shore - 163.275 NOAA RX Only RX Only Weather - 162.550 NOAA RX Only RX Only Weather - 162.400 NOAA RX Only RX Only Weather - 162.475 NOAA RX Only RX Only Weather - 162...Duplex No Yes 157.375 161.975 Duplex No Yes 157.425 162.025 Duplex Yes No Permanent Scan List Weather Weather Weather Weather Weather Weather Weather Weather Weather Weather Fish Environmental Busy Tel. Busy Tel. Busy Tel. Busy Tel. Busy Tel. Marine Channels - Busy Tel. Fish Fish Fish Fish Coast Guard Coast Guard Busy Tel.
... 87 88 Frequency (Mhz) Type Of Ship Ship To Transmit Receive Traffic To Ship Shore - 163.275 NOAA RX Only RX Only Weather - 162.550 NOAA RX Only RX Only Weather - 162.400 NOAA RX Only RX Only Weather - 162.475 NOAA RX Only RX Only Weather - 162...Duplex No Yes 157.375 161.975 Duplex No Yes 157.425 162.025 Duplex Yes No Permanent Scan List Weather Weather Weather Weather Weather Weather Weather Weather Weather Weather Fish Environmental Busy Tel. Busy Tel. Busy Tel. Busy Tel. Busy Tel. Marine Channels - Busy Tel. Fish Fish Fish Fish Coast Guard Coast Guard Busy Tel.

English Owners Manual
Page 18
Busy Tel. RX Only RX Only Weather WX9 - 161.775 Can. Busy Tel. Marine Channels - Busy Tel. Fish Fish Fish Fish 17 RX Only RX Only Weather 01 156.050 160.650 Duplex Yes Yes 02 156.100 160.700 Duplex Yes Yes 03 156.150 160.750 Duplex Yes Yes 04 ... Yes 72 156.625 156.625 Yes No Fish Environmental Busy Tel. Busy Tel. Canadian Channel Frequency (Mhz) Type Of Ship Ship Permanent Desig Transmit Receive Traffic To Ship To Shore Scan List WXO 163.275 NOAA RX Only RX Only Weather WX1 - 162.550 NOAA RX Only RX Only Weather WX2 - 162.400 NOAA RX Only RX...
Busy Tel. RX Only RX Only Weather WX9 - 161.775 Can. Busy Tel. Marine Channels - Busy Tel. Fish Fish Fish Fish 17 RX Only RX Only Weather 01 156.050 160.650 Duplex Yes Yes 02 156.100 160.700 Duplex Yes Yes 03 156.150 160.750 Duplex Yes Yes 04 ... Yes 72 156.625 156.625 Yes No Fish Environmental Busy Tel. Busy Tel. Canadian Channel Frequency (Mhz) Type Of Ship Ship Permanent Desig Transmit Receive Traffic To Ship To Shore Scan List WXO 163.275 NOAA RX Only RX Only Weather WX1 - 162.550 NOAA RX Only RX Only Weather WX2 - 162.400 NOAA RX Only RX...
English Owners Manual
Page 19
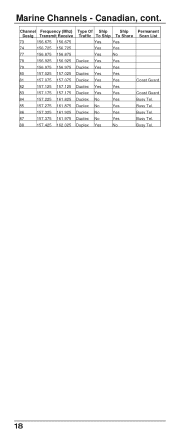
Channel Frequency (Mhz) Type Of Ship Ship Permanent Desig Transmit Receive Traffic To Ship To Shore Scan List 73 156.675 156.675 Yes Yes 74 156.725 156.725 Yes Yes 77 156.875 156.875 Yes No 78 156.925 156.... No Yes Busy Tel. 87 157.375 161.975 Duplex No Yes Busy Tel. 88 157.425 162.025 Duplex Yes No Busy Tel. 18 Marine Channels - Canadian, cont.
Channel Frequency (Mhz) Type Of Ship Ship Permanent Desig Transmit Receive Traffic To Ship To Shore Scan List 73 156.675 156.675 Yes Yes 74 156.725 156.725 Yes Yes 77 156.875 156.875 Yes No 78 156.925 156.... No Yes Busy Tel. 87 157.375 161.975 Duplex No Yes Busy Tel. 88 157.425 162.025 Duplex Yes No Busy Tel. 18 Marine Channels - Canadian, cont.
English Owners Manual
Page 20
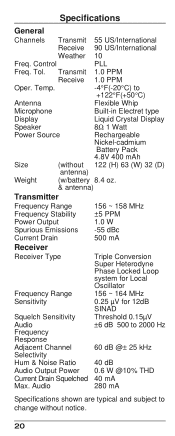
Tol. Transmit 1.0 PPM Receive 1.0 PPM Oper. Temp. -4°F(-20°C) to 2000 Hz Adjacent Channel Selectivity 60 dB @± 25 kHz Hum & Noise Ratio 40 dB Audio Output Power 0.6 W @10% THD Current Drain Squelched 40 mA Max. Audio 280 mA Specifications shown are typical and subject to change without 122 (H) 63 (W) 32 (D) antenna) Weight (w/battery 8.4 oz. & antenna) Transmitter Frequency Range 156 ~ 158 MHz Frequency Stability ±5 PPM Power Output 1.0 W Spurious...
Tol. Transmit 1.0 PPM Receive 1.0 PPM Oper. Temp. -4°F(-20°C) to 2000 Hz Adjacent Channel Selectivity 60 dB @± 25 kHz Hum & Noise Ratio 40 dB Audio Output Power 0.6 W @10% THD Current Drain Squelched 40 mA Max. Audio 280 mA Specifications shown are typical and subject to change without 122 (H) 63 (W) 32 (D) antenna) Weight (w/battery 8.4 oz. & antenna) Transmitter Frequency Range 156 ~ 158 MHz Frequency Stability ±5 PPM Power Output 1.0 W Spurious...

English Owners Manual
Page 21
... invalid if the Product is required for parts, service, or any conjunction with a new or refurbished unit. PROCEDURE FOR OBTAINING PERFORMANCE OF WARRANTY: If, after the date of any configurations not sold by Uniden, (C) improperly installed, (D) serviced or repaired by the Operating Guide for a defect or malfunction covered by this warranty is in connection with the performance of America. THE LIMITED...
... invalid if the Product is required for parts, service, or any conjunction with a new or refurbished unit. PROCEDURE FOR OBTAINING PERFORMANCE OF WARRANTY: If, after the date of any configurations not sold by Uniden, (C) improperly installed, (D) serviced or repaired by the Operating Guide for a defect or malfunction covered by this warranty is in connection with the performance of America. THE LIMITED...


