
English Owners Manual
Page 3
...Controls and Functions Inside Front Cover Introduction 2 • Welcome 2 • Features 2 • Included in Your Package 3 Installing and Adjusting Your Phone 4 • Desk/Tabletop Installation 4 • Wall Installation 5 • Installing the Handset Battery Pack 11 • Charging the Battery Pack 12 ...26 Troubleshooting 27 • Quick Reference Chart 27 Specifications 29 Introduction Installing and Adjusting Using Your New Phone Troubleshooting Specifications Fold out the front cover of this owner's manual to use the handy "Controls and Functions" page for reference...
...Controls and Functions Inside Front Cover Introduction 2 • Welcome 2 • Features 2 • Included in Your Package 3 Installing and Adjusting Your Phone 4 • Desk/Tabletop Installation 4 • Wall Installation 5 • Installing the Handset Battery Pack 11 • Charging the Battery Pack 12 ...26 Troubleshooting 27 • Quick Reference Chart 27 Specifications 29 Introduction Installing and Adjusting Using Your New Phone Troubleshooting Specifications Fold out the front cover of this owner's manual to use the handy "Controls and Functions" page for reference...
English Owners Manual
Page 4
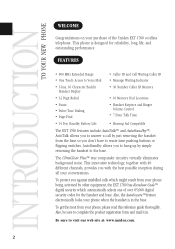
... of the Uniden EXT 1760 cordless telephone. This innovative technology, together with the best possible reception during all your conversations. To protect you to hang up by other equipment, the EXT 1760 has Random Code™ digital security which might result from your phone being activated ...codes for reliability, long life, and outstanding performance. AutoTalk allows you to the base. Also, the AutoSecure™ feature electronically locks your phone when the handset is designed for the handset and base. Be sure to Voice Mail • Caller ID and Call Waiting Caller ID &#...
... of the Uniden EXT 1760 cordless telephone. This innovative technology, together with the best possible reception during all your conversations. To protect you to hang up by other equipment, the EXT 1760 has Random Code™ digital security which might result from your phone being activated ...codes for reliability, long life, and outstanding performance. AutoTalk allows you to the base. Also, the AutoSecure™ feature electronically locks your phone when the handset is designed for the handset and base. Be sure to Voice Mail • Caller ID and Call Waiting Caller ID &#...
English Owners Manual
Page 5
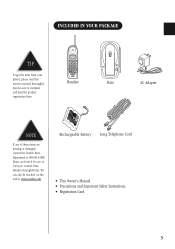
... and mail the product registration form. Also be reached on the web at (800)554-3988. Hours are missing or damaged, contact the Uniden Parts Department at www.uniden.com. Central Time, Monday through Friday. We can also be sure to 5:00 p.m. Rechargeable Battery Long Telephone Cord • This Owner's Manual •... Card 3 INCLUDED IN YOUR PACKAGE TIP To get the most from 8:30 a.m. Handset Base AC Adapter NOTE If any of these items are from your phone, please read this owner's manual thoroughly.
... and mail the product registration form. Also be reached on the web at (800)554-3988. Hours are missing or damaged, contact the Uniden Parts Department at www.uniden.com. Central Time, Monday through Friday. We can also be sure to 5:00 p.m. Rechargeable Battery Long Telephone Cord • This Owner's Manual •... Card 3 INCLUDED IN YOUR PACKAGE TIP To get the most from 8:30 a.m. Handset Base AC Adapter NOTE If any of these items are from your phone, please read this owner's manual thoroughly.

English Owners Manual
Page 6
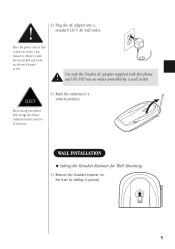
... 1) Plug the AC adapter cord into the DC input jack on the base, then place the telephone cord into the telephone wall jack. (Remember, the phone must be fully charged before you can use it.) 4 from electrical noise caused by objects like motors and fluorescent lighting. 2) Plug one end of the... on the back of the long telephone cord into the right molded channel cord holder. 3) Plug the other end of When choosing a location for your phone, keep the base the base, then place the AC adapter cord inside the molded unit and the handset away strain relief.
... 1) Plug the AC adapter cord into the DC input jack on the base, then place the telephone cord into the telephone wall jack. (Remember, the phone must be fully charged before you can use it.) 4 from electrical noise caused by objects like motors and fluorescent lighting. 2) Plug one end of the... on the back of the long telephone cord into the right molded channel cord holder. 3) Plug the other end of When choosing a location for your phone, keep the base the base, then place the AC adapter cord inside the molded unit and the handset away strain relief.
English Owners Manual
Page 7
WALL INSTALLATION M Setting the Handset Retainer for 15-20 hours. 5) Raise the antenna to a vertical position. Place the power cord so that it does not create a trip hazard or where it upward. 5 Use only the Uniden AC adapter supplied with this phone and DO NOT use an outlet controlled by sliding it could become chafed and create an electrical hazard or fire. HINT Before using your phone, fully charge the NickelCadmium battery pack for Wall Mounting 1) Remove the handset retainer on the base by a wall switch. 4) Plug the AC adapter into a standard 120 V AC wall outlet.
WALL INSTALLATION M Setting the Handset Retainer for 15-20 hours. 5) Raise the antenna to a vertical position. Place the power cord so that it does not create a trip hazard or where it upward. 5 Use only the Uniden AC adapter supplied with this phone and DO NOT use an outlet controlled by sliding it could become chafed and create an electrical hazard or fire. HINT Before using your phone, fully charge the NickelCadmium battery pack for Wall Mounting 1) Remove the handset retainer on the base by a wall switch. 4) Plug the AC adapter into a standard 120 V AC wall outlet.

English Owners Manual
Page 8
DO NOT use an outlet controlled by a wall switch. M Standard Wall Plate Mounting This phone can be mounted on any standard telephone wall plate. 1) Plug the AC adapter into the DC input jack on the back of the telephone cord ...
DO NOT use an outlet controlled by a wall switch. M Standard Wall Plate Mounting This phone can be mounted on any standard telephone wall plate. 1) Plug the AC adapter into the DC input jack on the back of the telephone cord ...

English Owners Manual
Page 9
3) Plug the other end of the cord into the wall jack. (Remember, the phone must be fully charged before you can use it.) 4) Place the base on the two posts of the wall plate and slide it downward to secure. 5) Plug the AC adapter into a standard 120 V AC wall outlet that is not controlled by a wall switch. 6) Raise the antenna on the base. 7
3) Plug the other end of the cord into the wall jack. (Remember, the phone must be fully charged before you can use it.) 4) Place the base on the two posts of the wall plate and slide it downward to secure. 5) Plug the AC adapter into a standard 120 V AC wall outlet that is not controlled by a wall switch. 6) Raise the antenna on the base. 7
English Owners Manual
Page 10
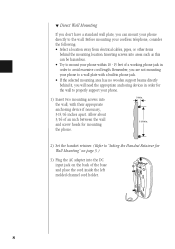
...plate, you will need the appropriate anchoring devices in order for Wall Mounting" on page 5.) 3) Plug the AC adapter into the wall, with a built-in phone jack. • If the selected mounting area has no wooden support beams directly behind the mounting location. Inserting screws into areas such as this can... cord length. Allow about 3/16 of an inch between the wall and screw heads for mounting the phone. 3/16 in. 3 15/16 in order to the wall. Before mounting your phone to mount your phone within 10 - 15 feet of the base and place the cord inside the left molded channel cord...
...plate, you will need the appropriate anchoring devices in order for Wall Mounting" on page 5.) 3) Plug the AC adapter into the wall, with a built-in phone jack. • If the selected mounting area has no wooden support beams directly behind the mounting location. Inserting screws into areas such as this can... cord length. Allow about 3/16 of an inch between the wall and screw heads for mounting the phone. 3/16 in. 3 15/16 in order to the wall. Before mounting your phone to mount your phone within 10 - 15 feet of the base and place the cord inside the left molded channel cord...

English Owners Manual
Page 13
INSTALLING THE HANDSET BATTERY PACK 1) Remove the handset battery cover by pressing in on until it downward. ! 2) Plug the battery's cable into place. 11 Use only the Uniden battery (BT-905) supplied with your phone. 3) Slide the battery cover on the cover release and sliding it snaps into the handset.
INSTALLING THE HANDSET BATTERY PACK 1) Remove the handset battery cover by pressing in on until it downward. ! 2) Plug the battery's cable into place. 11 Use only the Uniden battery (BT-905) supplied with your phone. 3) Slide the battery cover on the cover release and sliding it snaps into the handset.

English Owners Manual
Page 14
... once a month with the base charging contacts. NOTE Rechargeable batteries have a "memory effect" that status/messages LED lights. DO NOT use the phone until " Low Battery appears. M Low battery indicator When the battery pack is very low and needs to be charged, the...good contact with a pencil eraser or other contact cleaner. The handset beeps. CHARGING THE BATTERY PACK M Initial battery charging Before plugging the phone line into your new phone for the first time, fully charge the rechargeable battery pack for 15-20 hours without interruption. 1) Place the handset on the base. 2)...
... once a month with the base charging contacts. NOTE Rechargeable batteries have a "memory effect" that status/messages LED lights. DO NOT use the phone until " Low Battery appears. M Low battery indicator When the battery pack is very low and needs to be charged, the...good contact with a pencil eraser or other contact cleaner. The handset beeps. CHARGING THE BATTERY PACK M Initial battery charging Before plugging the phone line into your new phone for the first time, fully charge the rechargeable battery pack for 15-20 hours without interruption. 1) Place the handset on the base. 2)...
English Owners Manual
Page 15
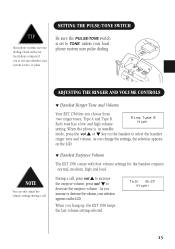
...you change the settings, the selection appears on the LCD. Talk 0:15 13 As you increase or decrease the volume, your local phone system uses pulse dialing. TIP Most phone systems use tone dialing. As you choose from two ringer tones, Type A and Type B. Each tone has a low and ..., press vol L to increase the earpiece volume, press vol M to decrease the earpiece volume. M Handset Earpiece Volume The EXT 1760 comes with your local phone company if you hang up, the EXT 1760 keeps the last volume setting selected. When you 're not sure whether your system is tone or...
...you change the settings, the selection appears on the LCD. Talk 0:15 13 As you increase or decrease the volume, your local phone system uses pulse dialing. TIP Most phone systems use tone dialing. As you choose from two ringer tones, Type A and Type B. Each tone has a low and ..., press vol L to increase the earpiece volume, press vol M to decrease the earpiece volume. M Handset Earpiece Volume The EXT 1760 comes with your local phone company if you hang up, the EXT 1760 keeps the last volume setting selected. When you 're not sure whether your system is tone or...
English Owners Manual
Page 16
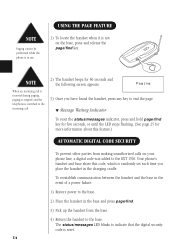
... stops flashing. (See page 25 for 60 seconds and the following screen appears: Paging 3) Once you place the handset in the charging cradle. Your phone's handset and base share this feature.) AUTOMATIC DIGITAL CODE SECURITY To prevent other parties from the base. 4) Return the handset to the EXT 1760. ...The status/messages LED blinks to indicate that the digital security code is not on your phone line, a digital code was added to the base. When an incoming call is received during paging, paging is stopped and the telephone is switched...
... stops flashing. (See page 25 for 60 seconds and the following screen appears: Paging 3) Once you place the handset in the charging cradle. Your phone's handset and base share this feature.) AUTOMATIC DIGITAL CODE SECURITY To prevent other parties from the base. 4) Return the handset to the EXT 1760. ...The status/messages LED blinks to indicate that the digital security code is not on your phone line, a digital code was added to the base. When an incoming call is received during paging, paging is stopped and the telephone is switched...

English Owners Manual
Page 17
... have "call waiting" service and a call . Dial the number, then press 2) Dial the number, then talk. press talk. Making and Receiving Calls USING YOUR NEW PHONE If you subscribe to accept the waiting call waiting tone sounds while you will see the callers information on a call, press flash to Caller ID...
... have "call waiting" service and a call . Dial the number, then press 2) Dial the number, then talk. press talk. Making and Receiving Calls USING YOUR NEW PHONE If you subscribe to accept the waiting call waiting tone sounds while you will see the callers information on a call, press flash to Caller ID...

English Owners Manual
Page 18
...The following screen appears, and a cursor flashes indicating that T the display is ready for the name to be entered. Store Number T 8) Enter the phone number with the handset keypad. Pressing redial/p more than once increases the length of letters, symbols, and numbers. 5) Use the : and ; The ... wait 20 seconds for two seconds. Memory 1 Stored 10)Press memory or return the handset to the charging cradle to standby. 16 STORING A PHONE NUMBER IN MEMORY NOTE Whenever you are using a menu screen, you store a name and number into memory location number one digit. You may also...
...The following screen appears, and a cursor flashes indicating that T the display is ready for the name to be entered. Store Number T 8) Enter the phone number with the handset keypad. Pressing redial/p more than once increases the length of letters, symbols, and numbers. 5) Use the : and ; The ... wait 20 seconds for two seconds. Memory 1 Stored 10)Press memory or return the handset to the charging cradle to standby. 16 STORING A PHONE NUMBER IN MEMORY NOTE Whenever you are using a menu screen, you store a name and number into memory location number one digit. You may also...

English Owners Manual
Page 19
... shows the Memory Store screen. 4) Press select/ch. Memory Store 1> KAYSIE SCHLITZ 2 UNIDEN 3) Use the : and ; keys or number keypad to select the memory location you must press a key within 20 seconds or the phone will return to standby. The < and > keys toggle between the names display and the...this menu. 5) With > cursor next to scroll through the character menu. keys to Edit Memory, press select/ch. Follow these steps to edit a phone number that the display is ready for two seconds. Store Name KAYSIE SCHLITZ 6) Use the : and ; The display shows the Memory Store screen and ...
... shows the Memory Store screen. 4) Press select/ch. Memory Store 1> KAYSIE SCHLITZ 2 UNIDEN 3) Use the : and ; keys or number keypad to select the memory location you must press a key within 20 seconds or the phone will return to standby. The < and > keys toggle between the names display and the...this menu. 5) With > cursor next to scroll through the character menu. keys to Edit Memory, press select/ch. Follow these steps to edit a phone number that the display is ready for two seconds. Store Name KAYSIE SCHLITZ 6) Use the : and ; The display shows the Memory Store screen and ...

English Owners Manual
Page 21
...displays Memory 1 Deleted. Memory 1 Deleted 9) The display then returns to dial a number using a programmed memory location. 1) Press memory. See "Storing A Phone Number in memory. You can enter this number into a memory location for later use by doing the following. 1) Store the access code into one of...account number. HINT Use the < and > keys to enter an access code, such as your programmed memory locations. 1 > KAYSIE SCHLITZ 2 Uniden 3 Grandma 2) Use the : and ; keys or the number keypad to select the memory location you may press memory to return to dial. 1 ...
...displays Memory 1 Deleted. Memory 1 Deleted 9) The display then returns to dial a number using a programmed memory location. 1) Press memory. See "Storing A Phone Number in memory. You can enter this number into a memory location for later use by doing the following. 1) Store the access code into one of...account number. HINT Use the < and > keys to enter an access code, such as your programmed memory locations. 1 > KAYSIE SCHLITZ 2 Uniden 3 Grandma 2) Use the : and ; keys or the number keypad to select the memory location you may press memory to return to dial. 1 ...

English Owners Manual
Page 22
...On 3 Area Code: 20 CIDCW (Caller ID on Call Waiting) performs the same as regular Caller ID on , simply remove the handset from your phone company in the Area Code option, your Caller ID options: 1) Press and hold call . If your calls more effectively. M Setting Up Caller ID ...memory followed by the memory location (0-9). For calls received from your local area code, you must subscribe to Caller ID from outside your phone company in Caller ID messages. USING CALLER ID You must press talk to toggle between numbers when programming the area code. This option is...
...On 3 Area Code: 20 CIDCW (Caller ID on Call Waiting) performs the same as regular Caller ID on , simply remove the handset from your phone company in the Area Code option, your Caller ID options: 1) Press and hold call . If your calls more effectively. M Setting Up Caller ID ...memory followed by the memory location (0-9). For calls received from your local area code, you must subscribe to Caller ID from outside your phone company in Caller ID messages. USING CALLER ID You must press talk to toggle between numbers when programming the area code. This option is...
English Owners Manual
Page 23
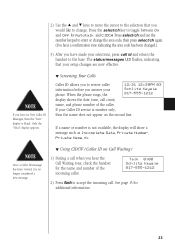
... ID Messages, then the "New" display is number only, then the name does not appear on Call Waiting) 1) During a call count, name, and phone number of the incoming caller. NOTE Once a Caller ID message has been viewed, it is not available, the display will show a message such as Incomplete... Data, Private Number, Private Name, etc. NOTE If you have no longer considered a new message. When the phone rings, the Schlitz Kaysie 817-555-1212 display shows the date, time, call when you to change the area code, then press select/ch again...
... ID Messages, then the "New" display is number only, then the name does not appear on Call Waiting) 1) During a call count, name, and phone number of the incoming caller. NOTE Once a Caller ID message has been viewed, it is not available, the display will show a message such as Incomplete... Data, Private Number, Private Name, etc. NOTE If you have no longer considered a new message. When the phone rings, the Schlitz Kaysie 817-555-1212 display shows the date, time, call when you to change the area code, then press select/ch again...

English Owners Manual
Page 24
... the most recent call appears first, with the date, time, call count, name, and phone number. You must press : to view your Caller ID numbers, follow the steps below. 1) Press call id, and the Caller ID summary screen appears. New : ... new callers and the total number of callers stored in Caller ID memory. HINT For long distance dialing, press 1 to add a 1 to the beginning. Your phone stores the most recent 30 numbers in Caller ID memory. M Calling a Caller ID Number 1) Press call id, and the Caller ID summary screen appears. To...
... the most recent call appears first, with the date, time, call count, name, and phone number. You must press : to view your Caller ID numbers, follow the steps below. 1) Press call id, and the Caller ID summary screen appears. New : ... new callers and the total number of callers stored in Caller ID memory. HINT For long distance dialing, press 1 to add a 1 to the beginning. Your phone stores the most recent 30 numbers in Caller ID memory. M Calling a Caller ID Number 1) Press call id, and the Caller ID summary screen appears. To...
English Owners Manual
Page 27
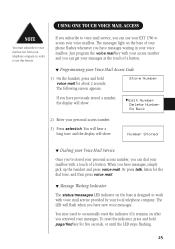
.../messages LED indicator on the base of a button. If you subscribe to voice mail service, you can get your messages at the touch of your phone flashes whenever you have previously stored a number, the display will show : >Edit Number Delete Number Go Back 2) Enter your voice mailbox. When you can use...
.../messages LED indicator on the base of a button. If you subscribe to voice mail service, you can get your messages at the touch of your phone flashes whenever you have previously stored a number, the display will show : >Edit Number Delete Number Go Back 2) Enter your voice mailbox. When you can use...

