
English Owners Manual
Page 5
Contents Important Safety Instructions 3 Battery Safety Precautions 4 Introduction 5 Features 5 Included with the EXAI918 6 Important Electrical Considerations 6 Range 6 Telephone Line Problems 6 Radio Interference 7 More Than One Cordless Telephone 7 Cordless Telephone Privacy 7 Installation 8 Selecting a Location 8 Telephone Line Outlets 8 Connecting the ... the Answering System On/Off 26 Setting the Clock 26 Setting the PIN Code 27 Setting Your Outgoing Message (OGM 27 Selecting a Preset OGM 28 EXAI918 1
Contents Important Safety Instructions 3 Battery Safety Precautions 4 Introduction 5 Features 5 Included with the EXAI918 6 Important Electrical Considerations 6 Range 6 Telephone Line Problems 6 Radio Interference 7 More Than One Cordless Telephone 7 Cordless Telephone Privacy 7 Installation 8 Selecting a Location 8 Telephone Line Outlets 8 Connecting the ... the Answering System On/Off 26 Setting the Clock 26 Setting the PIN Code 27 Setting Your Outgoing Message (OGM 27 Selecting a Preset OGM 28 EXAI918 1
English Owners Manual
Page 6
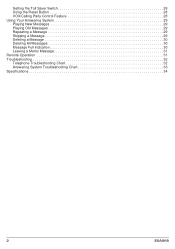
Setting the Toll Saver Switch 28 Using the Reset Button 28 VOX/Calling Party Control Feature 28 Using Your Answering System 29 Playing New Messages 29 Playing Old Messages 29 Repeating a Message 29 Skipping a Message 29 Deleting a Message 30 Deleting All Messages 30 Message Full Indication 30 Leaving a Memo Message 31 Remote Operation 31 Troubleshooting 32 Telephone Troubleshooting Chart 32 Answering System Troubleshooting Chart 33 Specifications 34 2 EXAI918
Setting the Toll Saver Switch 28 Using the Reset Button 28 VOX/Calling Party Control Feature 28 Using Your Answering System 29 Playing New Messages 29 Playing Old Messages 29 Repeating a Message 29 Skipping a Message 29 Deleting a Message 30 Deleting All Messages 30 Message Full Indication 30 Leaving a Memo Message 31 Remote Operation 31 Troubleshooting 32 Telephone Troubleshooting Chart 32 Answering System Troubleshooting Chart 33 Specifications 34 2 EXAI918
English Owners Manual
Page 7
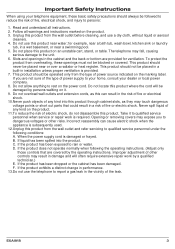
... or removing covers may touch dangerous voltage points or short out parts that are not sure of the type of any kind into the product. D. EXAI918 3 Do not allow anything to qualified service personnel when service or repair work by persons walking on an unstable cart, stand, or table. If the...
... or removing covers may touch dangerous voltage points or short out parts that are not sure of the type of any kind into the product. D. EXAI918 3 Do not allow anything to qualified service personnel when service or repair work by persons walking on an unstable cart, stand, or table. If the...

English Owners Manual
Page 8
...-Cadmium Battery Disposal package insert for use with this product only in accordance with the instructions and limitations specified in this product. 6. SAVE THESE INSTRUCTIONS 4 EXAI918 Released electrolyte is corrosive and may explode. It may overheat and cause burns. 5. Charge the Battery Pack provided with conducting materials such as rings, bracelets...
...-Cadmium Battery Disposal package insert for use with this product only in accordance with the instructions and limitations specified in this product. 6. SAVE THESE INSTRUCTIONS 4 EXAI918 Released electrolyte is corrosive and may explode. It may overheat and cause burns. 5. Charge the Battery Pack provided with conducting materials such as rings, bracelets...

English Owners Manual
Page 9
... conversations. The UltraClear Plus innovative technology, together with an integrated digital answering system. Introduction Congratulations on your purchase of the EXAI918 telephone with 40 different channels, virtually eliminates background noise and provides you hang up by simply returning the Handset to the...the Handset from your phone when the Handset is designed to exacting standards to visit our Internet site at: http:\\www.uniden.com EXAI918 5 Also, the AutoSecure™ feature electronically locks your phone, please read this Operating Guide thoroughly. To get the ...
... conversations. The UltraClear Plus innovative technology, together with an integrated digital answering system. Introduction Congratulations on your purchase of the EXAI918 telephone with 40 different channels, virtually eliminates background noise and provides you hang up by simply returning the Handset to the...the Handset from your phone when the Handset is designed to exacting standards to visit our Internet site at: http:\\www.uniden.com EXAI918 5 Also, the AutoSecure™ feature electronically locks your phone, please read this Operating Guide thoroughly. To get the ...

English Owners Manual
Page 10
...forth by this Operating Guide, could void your household wiring and damage any way other than as a means of comparison against other range claims. 6 EXAI918 This phone is used as detailed by the FCC. We have rated this phone to operate at : (800) 554-3988, 8:00 am to... depends upon the environment in which the telephone is no exception. Caution: Changes or modifications to this product not expressly approved by Uniden, or operation of these items are missing or damaged, contact Uniden Parts at a maximum distance with the EXAI918 If any appliance during an electrical storm.
...forth by this Operating Guide, could void your household wiring and damage any way other than as a means of comparison against other range claims. 6 EXAI918 This phone is used as detailed by the FCC. We have rated this phone to operate at : (800) 554-3988, 8:00 am to... depends upon the environment in which the telephone is no exception. Caution: Changes or modifications to this product not expressly approved by Uniden, or operation of these items are missing or damaged, contact Uniden Parts at a maximum distance with the EXAI918 If any appliance during an electrical storm.

English Owners Manual
Page 11
... placed near or on the unit is the cause, you must operate on the telephone line. Communications between the handset and base of your unit. EXAI918 7 Your unit is caused by radio receiving devices other source of radio waves, your communications can be receiving radio signals from the TV or VCR...
... placed near or on the unit is the cause, you must operate on the telephone line. Communications between the handset and base of your unit. EXAI918 7 Your unit is caused by radio receiving devices other source of radio waves, your communications can be receiving radio signals from the TV or VCR...

English Owners Manual
Page 12
...uninsulated telephone wires or terminals unless the telephone line has been disconnected. • Use caution when installing or modifying telephone lines. 8 EXAI918 This type of installation is sufficient space to rotate the Base Unit antenna to fully vertical. • The Base Unit can be ...Location Before choosing a location for your new phone, there are some important guidelines you should consider: • The location should contact your Uniden telephone dealer or a telephone supply store for advice about their installation. If you should be placed on a desk or tabletop or mounted...
...uninsulated telephone wires or terminals unless the telephone line has been disconnected. • Use caution when installing or modifying telephone lines. 8 EXAI918 This type of installation is sufficient space to rotate the Base Unit antenna to fully vertical. • The Base Unit can be ...Location Before choosing a location for your new phone, there are some important guidelines you should consider: • The location should contact your Uniden telephone dealer or a telephone supply store for advice about their installation. If you should be placed on a desk or tabletop or mounted...

English Owners Manual
Page 13
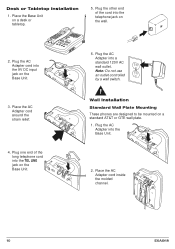
Important: Place the power cord so that it does not create a trip hazard, or where it could become chafed and create a fire or other electrical hazards. ' EXAI918 9 Wrap the power cord around the convenient notch on a desk or table, connect the adapter as shown below. To relieve strain on the DC plug when the phone is placed on the bottom. Applying Power to the Base Unit The EXAI918 phones require an AC outlet, without a switch to interrupt power, and the included AC adapter.
Important: Place the power cord so that it does not create a trip hazard, or where it could become chafed and create a fire or other electrical hazards. ' EXAI918 9 Wrap the power cord around the convenient notch on a desk or table, connect the adapter as shown below. To relieve strain on the DC plug when the phone is placed on the bottom. Applying Power to the Base Unit The EXAI918 phones require an AC outlet, without a switch to interrupt power, and the included AC adapter.
English Owners Manual
Page 14
... telephone jack on a desk or tabletop. Place the AC Adapter cord around the strain relief. 4. Place the AC Adapter cord inside the molded channel. 10 EXAI918 talk caller id mem 5. Plug the AC Adapter into a standard 120V AC wall outlet. Place the Base Unit on the wall. 2. Plug one end of...
... telephone jack on a desk or tabletop. Place the AC Adapter cord around the strain relief. 4. Place the AC Adapter cord inside the molded channel. 10 EXAI918 talk caller id mem 5. Plug the AC Adapter into a standard 120V AC wall outlet. Place the Base Unit on the wall. 2. Plug one end of...

English Owners Manual
Page 15
Place the Base Unit on the bottom of the telephone cord into the Base Unit. 3. EXAI918 11 Allow about ! $ of the short telephone cord into a standard 120V AC wall outlet. Direct Wall Mounting If you do not have a standard wall plate, ...
Place the Base Unit on the bottom of the telephone cord into the Base Unit. 3. EXAI918 11 Allow about ! $ of the short telephone cord into a standard 120V AC wall outlet. Direct Wall Mounting If you do not have a standard wall plate, ...

English Owners Manual
Page 16
... retainer on a wall. Push down until it 's firmly seated. 7. Place the cord inside the molded channel on the Handset retainer until it snaps into place. 4. EXAI918
... retainer on a wall. Push down until it 's firmly seated. 7. Place the cord inside the molded channel on the Handset retainer until it snaps into place. 4. EXAI918

English Owners Manual
Page 17
Installing the Handset Battery Pack 1. EXAI918 13 Slide the battery compartment cover down. Note: The built-in Memory Backup feature allows up to 3 minutes to the vertical position. Place the battery ...
Installing the Handset Battery Pack 1. EXAI918 13 Slide the battery compartment cover down. Note: The built-in Memory Backup feature allows up to 3 minutes to the vertical position. Place the battery ...

English Owners Manual
Page 18
... Handset Retainer before plugging the phone line into your new phone. 1. Note: You can place the Handset face down or face up the phone. 14 EXAI918 Do not use any liquids or solvents. Hang the Handset on the Base Unit.
... Handset Retainer before plugging the phone line into your new phone. 1. Note: You can place the Handset face down or face up the phone. 14 EXAI918 Do not use any liquids or solvents. Hang the Handset on the Base Unit.

English Owners Manual
Page 19
... was added to 20 hours. None of the more than 65,000 codes. Return the Handset to normal operation. Then, charge the battery for charging. EXAI918 15 This Digital Code is in the TONE position. 2. Press page/find on the Base Unit. Setting the Pulse/Tone Switch Be sure the PULSE... the Handset on the Base Unit. Automatic Digital Code Security To avoid unauthorized calls on your phone to the Base Unit for 15 to all EXAI918 phones. The code is set to the Base Unit for the Handset to save power. Complete your system is Tone or Pulse dialing. 4. Note: Allow...
... was added to 20 hours. None of the more than 65,000 codes. Return the Handset to normal operation. Then, charge the battery for charging. EXAI918 15 This Digital Code is in the TONE position. 2. Press page/find on the Base Unit. Setting the Pulse/Tone Switch Be sure the PULSE... the Handset on the Base Unit. Automatic Digital Code Security To avoid unauthorized calls on your phone to the Base Unit for 15 to all EXAI918 phones. The code is set to the Base Unit for the Handset to save power. Complete your system is Tone or Pulse dialing. 4. Note: Allow...

English Owners Manual
Page 20
... Security Code is off the Base Unit, the Digital Code may be erased. When this happens, the Handset will blink to select a clearer channel. 16 EXAI918 Two-tone High Two-tone Low Three-tone High Three-tone Low To adjust the receiver volume, press volume/cancel while you hear the desired...
... Security Code is off the Base Unit, the Digital Code may be erased. When this happens, the Handset will blink to select a clearer channel. 16 EXAI918 Two-tone High Two-tone Low Three-tone High Three-tone Low To adjust the receiver volume, press volume/cancel while you hear the desired...

English Owners Manual
Page 21
... Call Waiting from the Base Unit. 2. Place the Handset on the Base Unit. Enter your local phone service to use this feature set your EXAI918 phone to display information about calls that the area code is deleted. AREA CODE 1-817 4. To delete your local area code for a brief... OFF ON-1 OFF-0 3. Press mem. Remove the Handset from the Base Unit. 2. Press flash/function twice. Remove the Handset from your local area code. EXAI918 17 Press chan/delete three times. 4. CI DCW ON-1 ON OFF-0 5. Place the Handset on : 1. You can set you will not be able to...
... Call Waiting from the Base Unit. 2. Place the Handset on the Base Unit. Enter your local phone service to use this feature set your EXAI918 phone to display information about calls that the area code is deleted. AREA CODE 1-817 4. To delete your local area code for a brief... OFF ON-1 OFF-0 3. Press mem. Remove the Handset from the Base Unit. 2. Press flash/function twice. Remove the Handset from your local area code. EXAI918 17 Press chan/delete three times. 4. CI DCW ON-1 ON OFF-0 5. Place the Handset on : 1. You can set you will not be able to...

English Owners Manual
Page 22
... the Base Unit. AUTOTALK OFF ON-1 OFF-0 5. Place the Handset on the Base Unit will blink to indicate that the setting has been stored. 18 EXAI918 The Status LED on the Base Unit. Remove the Handset from the Base Unit. 2. Setting the AutoTalk Feature To turn AutoTalk on for two seconds...
... the Base Unit. AUTOTALK OFF ON-1 OFF-0 5. Place the Handset on the Base Unit will blink to indicate that the setting has been stored. 18 EXAI918 The Status LED on the Base Unit. Remove the Handset from the Base Unit. 2. Setting the AutoTalk Feature To turn AutoTalk on for two seconds...

English Owners Manual
Page 23
...private number, the PRIVATE NUM. If the name of the person calling is a private name, the LCD displays: PRIVATE NAME 817-858-3333 - EXAI918 - Making Calls Receiving Calls 1. If Caller ID information about the person calling is received, the LCD displays: KATHLEEN ROL 817-858-3333 - ...OR - Remove the Handset from your conversation the LCD displays the call . - To cancel making the call . Note: You must subscribe to your EXAI918, the phone is invalid, the LCD displays: LINE ERROR UKNOWN NUM. - When you have connected power and a telephone line to Caller ID services ...
...private number, the PRIVATE NUM. If the name of the person calling is a private name, the LCD displays: PRIVATE NAME 817-858-3333 - EXAI918 - Making Calls Receiving Calls 1. If Caller ID information about the person calling is received, the LCD displays: KATHLEEN ROL 817-858-3333 - ...OR - Remove the Handset from your conversation the LCD displays the call . - To cancel making the call . Note: You must subscribe to your EXAI918, the phone is invalid, the LCD displays: LINE ERROR UKNOWN NUM. - When you have connected power and a telephone line to Caller ID services ...

English Owners Manual
Page 24
... louder or M for softer. Redialing the Last Number Called 1. Remove the Handset from your voice to answer an incoming call , press flash/function again. 20 EXAI918 Using the Speakerphone To use this feature. 1. To hang up the CH-10 Handset and press CH-10 talk.. CH-10 CH-10 Note: If...
... louder or M for softer. Redialing the Last Number Called 1. Remove the Handset from your voice to answer an incoming call , press flash/function again. 20 EXAI918 Using the Speakerphone To use this feature. 1. To hang up the CH-10 Handset and press CH-10 talk.. CH-10 CH-10 Note: If...