
English Owners Manual
Page 3
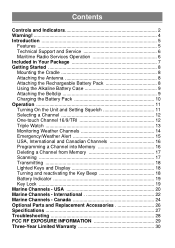
... 27 Troubleshooting 28 FCC RF EXPOSURE INFORMATION 29 Three-Year Limited Warranty 30 Contents Controls and Indicators 2 Warning 4 Introduction 5 Features 5 Technical Support and Service 6 Maritime Radio Services Operation 6 Included in Your Package 7 Getting Started 8 Mounting the Cradle 8 Attaching the Antenna 8 Attaching the Rechargeable Battery Pack 8 Using the Alkaline Battery Case 9 Attaching...
... 27 Troubleshooting 28 FCC RF EXPOSURE INFORMATION 29 Three-Year Limited Warranty 30 Contents Controls and Indicators 2 Warning 4 Introduction 5 Features 5 Technical Support and Service 6 Maritime Radio Services Operation 6 Included in Your Package 7 Getting Started 8 Mounting the Cradle 8 Attaching the Antenna 8 Attaching the Rechargeable Battery Pack 8 Using the Alkaline Battery Case 9 Attaching...
English Owners Manual
Page 6
...only when both the antenna and the battery are properly attached. • Do not operate the transmitter of any radio equipment unless all the Radio Frequency (RF) connectors are secure and any open connectors are properly terminated. • Do not operate the transmitter of... operate any transmitter-equipped radio equipment without proper supervision. • Have your radio equipment serviced by a qualified technician. • Do not operate the transmitter of any Adapter other than the one designed to charge this Battery Pack. Warning! • The ATLANTIS 250 is intended to alert the...
...only when both the antenna and the battery are properly attached. • Do not operate the transmitter of any radio equipment unless all the Radio Frequency (RF) connectors are secure and any open connectors are properly terminated. • Do not operate the transmitter of... operate any transmitter-equipped radio equipment without proper supervision. • Have your radio equipment serviced by a qualified technician. • Do not operate the transmitter of any Adapter other than the one designed to charge this Battery Pack. Warning! • The ATLANTIS 250 is intended to alert the...
English Owners Manual
Page 7
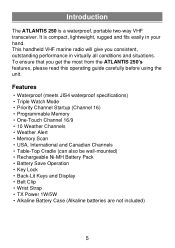
... batteries are not included) 5 It is a waterproof, portable two-way VHF transceiver. Introduction The ATLANTIS 250 is compact, lightweight, rugged and fits easily in virtually all conditions and situations. This handheld VHF marine radio will give you get the most from the ATLANTIS 250's features, please read this operating guide carefully before using the unit.
... batteries are not included) 5 It is a waterproof, portable two-way VHF transceiver. Introduction The ATLANTIS 250 is compact, lightweight, rugged and fits easily in virtually all conditions and situations. This handheld VHF marine radio will give you get the most from the ATLANTIS 250's features, please read this operating guide carefully before using the unit.
English Owners Manual
Page 8
... warranty and may cause illegal radio operation. Please contact the FCC Call Center at 1-800-586-0409. If your marine radio does not perform properly, follow the troubleshooting tips in the back of this operating guide. Technical Support and Service Your Uniden dealer can void your authority ...to this product not expressly approved by Uniden, or operation of this product in any...
... warranty and may cause illegal radio operation. Please contact the FCC Call Center at 1-800-586-0409. If your marine radio does not perform properly, follow the troubleshooting tips in the back of this operating guide. Technical Support and Service Your Uniden dealer can void your authority ...to this product not expressly approved by Uniden, or operation of this product in any...
English Owners Manual
Page 10
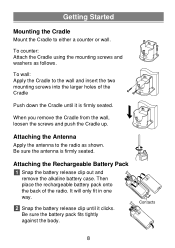
... battery pack onto the back of the Cradle Push down the Cradle until it is firmly seated. Attaching the Antenna Apply the antenna to the radio as follows. To wall: Apply the Cradle to either a counter or wall. Be sure the battery pack fits tightly against the body. To counter: Attach... as shown. Getting Started Mounting the Cradle Mount the Cradle to the wall and insert the two mounting screws into the larger holes of the radio.
... battery pack onto the back of the Cradle Push down the Cradle until it is firmly seated. Attaching the Antenna Apply the antenna to the radio as follows. To wall: Apply the Cradle to either a counter or wall. Be sure the battery pack fits tightly against the body. To counter: Attach... as shown. Getting Started Mounting the Cradle Mount the Cradle to the wall and insert the two mounting screws into the larger holes of the radio.
English Owners Manual
Page 11
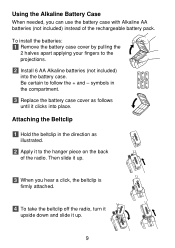
... AA AA AA AA Using the Alkaline Battery Case When needed, you hear a click, the beltclip is firmly attached. 4 To take the beltclip off the radio, turn it upside down and slide it up . 3 When you can use the battery case with Alkaline AA batteries (not included) instead of the... radio. To install the batteries: 1 Remove the battery case cover by pulling the 2 halves apart applying your fingers to the projections. 2 Install 6 AA Alkaline batteries (not ...
... AA AA AA AA Using the Alkaline Battery Case When needed, you hear a click, the beltclip is firmly attached. 4 To take the beltclip off the radio, turn it upside down and slide it up . 3 When you can use the battery case with Alkaline AA batteries (not included) instead of the... radio. To install the batteries: 1 Remove the battery case cover by pulling the 2 halves apart applying your fingers to the projections. 2 Install 6 AA Alkaline batteries (not ...
English Owners Manual
Page 12
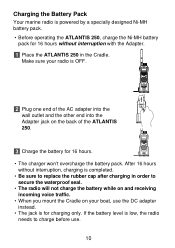
...OFF. If the battery level is low, the radio needs to secure the waterproof seal. • The radio will not charge the battery while on and receiving incoming voice traffic. • When you mount the Cradle on the back of the ATLANTIS 250. 3 Charge the battery for 16 hours. ...Charging the Battery Pack Your marine radio is powered by a specially designed Ni-MH battery pack. • Before operating the ATLANTIS 250, charge the Ni-MH battery pack for 16 hours without interruption,...
...OFF. If the battery level is low, the radio needs to secure the waterproof seal. • The radio will not charge the battery while on and receiving incoming voice traffic. • When you mount the Cradle on the back of the ATLANTIS 250. 3 Charge the battery for 16 hours. ...Charging the Battery Pack Your marine radio is powered by a specially designed Ni-MH battery pack. • Before operating the ATLANTIS 250, charge the Ni-MH battery pack for 16 hours without interruption,...

English Owners Manual
Page 15
.... A double confirmation tone sounds and TRIPLE appears on channel 9 if you listen to the Triple Watch mode, simply press the button again. 13 The marine radio checks channel 16 and 9 for activity every 2 seconds. 1 To select Triple Watch mode, press and hold the 16/9/TRI button for 2 seconds.
.... A double confirmation tone sounds and TRIPLE appears on channel 9 if you listen to the Triple Watch mode, simply press the button again. 13 The marine radio checks channel 16 and 9 for activity every 2 seconds. 1 To select Triple Watch mode, press and hold the 16/9/TRI button for 2 seconds.
English Owners Manual
Page 17
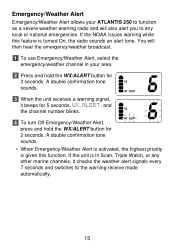
...ALERT button for 2 seconds. A double confirmation tone sounds. • When Emergency/Weather Alert is activated, the highest priority is turned On, the radio sounds an alert tone. A double confirmation tone sounds. 3 When the unit receives a warning signal, it checks the weather alert signals every 7 ... allows your area. 2 Press and hold the WX/ALERT button for 2 seconds. If the unit is in your ATLANTIS 250 to function as a severe weather warning radio and will then hear the emergency/weather broadcast. 1 To use Emergency/Weather Alert, select the emergency/weather channel in ...
...ALERT button for 2 seconds. A double confirmation tone sounds. • When Emergency/Weather Alert is activated, the highest priority is turned On, the radio sounds an alert tone. A double confirmation tone sounds. 3 When the unit receives a warning signal, it checks the weather alert signals every 7 ... allows your area. 2 Press and hold the WX/ALERT button for 2 seconds. If the unit is in your ATLANTIS 250 to function as a severe weather warning radio and will then hear the emergency/weather broadcast. 1 To use Emergency/Weather Alert, select the emergency/weather channel in ...
English Owners Manual
Page 18
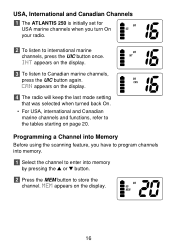
.... MEM appears on the display. 4 The radio will keep the last mode setting that was selected when turned back On. • For USA, international and Canadian marine channels and functions, refer to store the channel. USA, International and Canadian Channels 1 The ATLANTIS 250 is initially set for USA marine channels when... To listen to international marine channels, press the UIC button once. Programming a Channel into Memory Before using the scanning feature, you turn On your radio. 2 To listen to Canadian marine channels, press the UIC button again. CAN appears on the display. 16
.... MEM appears on the display. 4 The radio will keep the last mode setting that was selected when turned back On. • For USA, international and Canadian marine channels and functions, refer to store the channel. USA, International and Canadian Channels 1 The ATLANTIS 250 is initially set for USA marine channels when... To listen to international marine channels, press the UIC button once. Programming a Channel into Memory Before using the scanning feature, you turn On your radio. 2 To listen to Canadian marine channels, press the UIC button again. CAN appears on the display. 16
English Owners Manual
Page 20
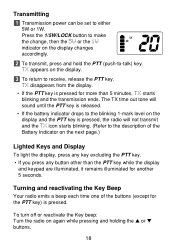
... not transmit and the TX icon starts blinking. (Refer to receive, release the PTT key. To turn off or reactivate the Key beep: Turn the radio on the display. 3 To return to the description of the buttons (except for the PTT key) is pressed for another 5 seconds. Press the 1/... and keypad are illuminated, it remains illuminated for more than 5 minutes, TX starts blinking and the transmission ends. Turning and reactivating the Key Beep Your radio emits a beep each time one of the Battery Indicator on the display changes accordingly. 2 To transmit, press and hold the PTT (push-to either...
... not transmit and the TX icon starts blinking. (Refer to receive, release the PTT key. To turn off or reactivate the Key beep: Turn the radio on the display. 3 To return to the description of the buttons (except for the PTT key) is pressed for another 5 seconds. Press the 1/... and keypad are illuminated, it remains illuminated for more than 5 minutes, TX starts blinking and the transmission ends. Turning and reactivating the Key Beep Your radio emits a beep each time one of the Battery Indicator on the display changes accordingly. 2 To transmit, press and hold the PTT (push-to either...
English Owners Manual
Page 21
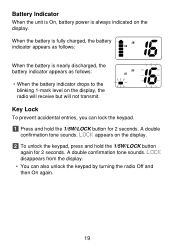
...double confirmation tone sounds. A double confirmation tone sounds. Key Lock To prevent accidental entries, you can also unlock the keypad by turning the radio Off and then On again. 19 Battery Indicator When the unit is On, battery power is nearly discharged, the battery indicator appears as follows:... • When the battery indicator drops to the blinking 1-mark level on the display, the radio will receive but will not transmit. When the battery is fully charged, the battery indicator appears as follows: When the battery is always...
...double confirmation tone sounds. A double confirmation tone sounds. Key Lock To prevent accidental entries, you can also unlock the keypad by turning the radio Off and then On again. 19 Battery Indicator When the unit is On, battery power is nearly discharged, the battery indicator appears as follows:... • When the battery indicator drops to the blinking 1-mark level on the display, the radio will receive but will not transmit. When the battery is fully charged, the battery indicator appears as follows: When the battery is always...
English Owners Manual
Page 30
Cause: Low voltage ⇒ The radio is not designed to transmit while charging. The adaptor does not supply enough power for transmitting. Will not transmit while charging. Battery will transmit on 5 watt range but will not charge. Cause: Low voltage ⇒ Do not to transmit while charging. Troubleshooting Not enough range Cause: Line of sight blocked ⇒ Increase antenna height. DC or AC adapter does not supply enough power for transmitting. 28 Will not transmit on the 1 watt range. Cause: Low voltage ⇒ Recharge or replace the batteries.
Cause: Low voltage ⇒ The radio is not designed to transmit while charging. The adaptor does not supply enough power for transmitting. Will not transmit while charging. Battery will transmit on 5 watt range but will not charge. Cause: Low voltage ⇒ Do not to transmit while charging. Troubleshooting Not enough range Cause: Line of sight blocked ⇒ Increase antenna height. DC or AC adapter does not supply enough power for transmitting. 28 Will not transmit on the 1 watt range. Cause: Low voltage ⇒ Recharge or replace the batteries.
English Owners Manual
Page 31
...FCC RF exposure requirements, body-worn operations are consistent with FCC RF exposure requirements and should be held operation, the radio should be avoided. and international standards bodies. The design of the following : Use only the supplied or an approved antenna. Please...electromagnetic energy emitted by both U.S. The use the radio with the FCC guidelines and these requirements may result. Body-worn Operation This device was tested for typical body-worn operations using an external speaker microphone, USE ONLY THE UNIDEN MODEL HHVTA07 (black) or HHVTAW07 (white). For...
...FCC RF exposure requirements, body-worn operations are consistent with FCC RF exposure requirements and should be held operation, the radio should be avoided. and international standards bodies. The design of the following : Use only the supplied or an approved antenna. Please...electromagnetic energy emitted by both U.S. The use the radio with the FCC guidelines and these requirements may result. Body-worn Operation This device was tested for typical body-worn operations using an external speaker microphone, USE ONLY THE UNIDEN MODEL HHVTA07 (black) or HHVTAW07 (white). For...


