
User Guide
Page 25
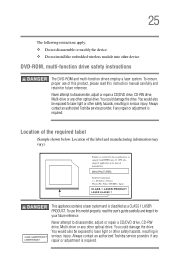
... a laser system. Never attempt to disassemble, adjust or repair a CD/DVD drive, CD-RW drive, Multi-drive or any other optical drive. Always contact an authorized Toshiba service provider, if any repair or adjustment is required. You would also be exposed to laser light or ... future reference. To ensure proper use this instruction manual carefully and retain for your future reference. You could damage the drive. Always contact an authorized Toshiba service provider, if any repair or adjustment is classified as a CLASS 1 LASER PRODUCT. Location of the required label ...
... a laser system. Never attempt to disassemble, adjust or repair a CD/DVD drive, CD-RW drive, Multi-drive or any other optical drive. Always contact an authorized Toshiba service provider, if any repair or adjustment is required. You would also be exposed to laser light or ... future reference. To ensure proper use this instruction manual carefully and retain for your future reference. You could damage the drive. Always contact an authorized Toshiba service provider, if any repair or adjustment is classified as a CLASS 1 LASER PRODUCT. Location of the required label ...

User Guide
Page 29
... key 66 Using a mouse 66 Connecting a mouse 66 Connecting a local printer 67 Connecting a USB printer 67 Connecting a parallel printer 67 Connecting an optional external diskette drive........68 Connecting external speakers or headphones.........69 Connecting an external microphone 70 Using an expansion device 70 Adding memory 71 Installing memory modules 71 Hard...
... key 66 Using a mouse 66 Connecting a mouse 66 Connecting a local printer 67 Connecting a USB printer 67 Connecting a parallel printer 67 Connecting an optional external diskette drive........68 Connecting external speakers or headphones.........69 Connecting an external microphone 70 Using an expansion device 70 Adding memory 71 Installing memory modules 71 Hard...

User Guide
Page 31
...your work 114 File names 116 Using a file extension 116 Printing your work 116 Using the DVD-ROM or multi-function drive.........117 DVD-ROM or multi-function drive components 118 Inserting a compact disc 119 Removing a compact disc with the computer on 122 Removing a compact disc with ... turned off 123 Caring for CDs and DVDs 123 Using your computer at the office 124 Powering down the computer 124 Using Turn Off or Shut down 125 Using Hibernation 127 Using Standby 130 Toshiba's online resources 132 Chapter 4: Mobile Computing 133 Toshiba's energy-saver design 133 Running...
...your work 114 File names 116 Using a file extension 116 Printing your work 116 Using the DVD-ROM or multi-function drive.........117 DVD-ROM or multi-function drive components 118 Inserting a compact disc 119 Removing a compact disc with the computer on 122 Removing a compact disc with ... turned off 123 Caring for CDs and DVDs 123 Using your computer at the office 124 Powering down the computer 124 Using Turn Off or Shut down 125 Using Hibernation 127 Using Standby 130 Toshiba's online resources 132 Chapter 4: Mobile Computing 133 Toshiba's energy-saver design 133 Running...

User Guide
Page 33
... Changing or removing existing key assignments 176 TOSHIBA HW Setup 176 Accessing TOSHIBA HW Setup 176 TOSHIBA Power Saver 179 TOSHIBA Mobile Extension 180 TOSHIBA Password Utility 182 TOSHIBA Zooming Utility 184 TOSHIBA CD/DVD Drive Acoustic Silencer ...........185 TOSHIBA SD™ Memory Boot Utility 186 PC Diagnostic Tool 187 TOSHIBA Mic Effect 188 TOSHIBA Application Installer 188 Chapter 7: Keeping Your Files...
... Changing or removing existing key assignments 176 TOSHIBA HW Setup 176 Accessing TOSHIBA HW Setup 176 TOSHIBA Power Saver 179 TOSHIBA Mobile Extension 180 TOSHIBA Password Utility 182 TOSHIBA Zooming Utility 184 TOSHIBA CD/DVD Drive Acoustic Silencer ...........185 TOSHIBA SD™ Memory Boot Utility 186 PC Diagnostic Tool 187 TOSHIBA Mic Effect 188 TOSHIBA Application Installer 188 Chapter 7: Keeping Your Files...

User Guide
Page 69
When the headphone is inserted, the internal speakers are automatically disabled. Continuous exposure to an audio CD, turn the volume dial down, and do not set the volume too high when using headphones or external speakers, see "Using external speakers or headphones" ... jack. For more information on using the headphones. Connecting Other External Devices Connecting external speakers or headphones 69 Sample connecting an optional external USB diskette drive Connecting external speakers or headphones Before putting on headphones to listen to loud sound can harm your hearing.
When the headphone is inserted, the internal speakers are automatically disabled. Continuous exposure to an audio CD, turn the volume dial down, and do not set the volume too high when using headphones or external speakers, see "Using external speakers or headphones" ... jack. For more information on using the headphones. Connecting Other External Devices Connecting external speakers or headphones 69 Sample connecting an optional external USB diskette drive Connecting external speakers or headphones Before putting on headphones to listen to loud sound can harm your hearing.

User Guide
Page 77
... to allow you turn on the computer, it . Using the HDD Recovery, you can: ❖ Create Hard Drive Recovery CDs or DVDs using your hard disk drive or reinstall selected applications and software features or utilities. NOTE It is strongly recommended that you may have created intact,...restart it automatically recognizes the additional memory. For more information on creating Recovery media, see "Creating Recovery CDs/DVDs" on page 78. Connecting Other External Devices Hard Drive Recovery Utilities 77 The clips on either side of the memory module will click to secure the memory...
... to allow you turn on the computer, it . Using the HDD Recovery, you can: ❖ Create Hard Drive Recovery CDs or DVDs using your hard disk drive or reinstall selected applications and software features or utilities. NOTE It is strongly recommended that you may have created intact,...restart it automatically recognizes the additional memory. For more information on creating Recovery media, see "Creating Recovery CDs/DVDs" on page 78. Connecting Other External Devices Hard Drive Recovery Utilities 77 The clips on either side of the memory module will click to secure the memory...
User Guide
Page 78
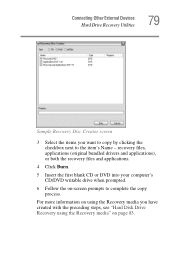
... bundled with your system. If your optical disk drive is not writable, contact TOSHIBA Customer Support to obtain the Recovery media for your computer. NOTE The system prompts you may be able to copy the Hard Drive Recovery Utilities to CD or DVD. To create recovery CDs/DVDs: 1 Double-click the Recovery Disc Creator icon...
... bundled with your system. If your optical disk drive is not writable, contact TOSHIBA Customer Support to obtain the Recovery media for your computer. NOTE The system prompts you may be able to copy the Hard Drive Recovery Utilities to CD or DVD. To create recovery CDs/DVDs: 1 Double-click the Recovery Disc Creator icon...
User Guide
Page 79
... and applications), or both the recovery files and applications. 4 Click Burn. 5 Insert the first blank CD or DVD into your computer's CD/DVD writable drive when prompted. 6 Follow the on page 83. Connecting Other External Devices Hard Drive Recovery Utilities 79 Sample Recovery Disc Creator screen 3 Select the items you have created with the...
... and applications), or both the recovery files and applications. 4 Click Burn. 5 Insert the first blank CD or DVD into your computer's CD/DVD writable drive when prompted. 6 Follow the on page 83. Connecting Other External Devices Hard Drive Recovery Utilities 79 Sample Recovery Disc Creator screen 3 Select the items you have created with the...
User Guide
Page 83
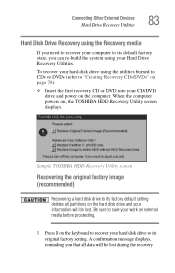
To recover your hard disk drive using the utilities burned to CDs or DVDs (refer to "Creating Recovery CDs/DVDs" on page 78): ❖ Insert the first recovery CD or DVD into your CD/DVD drive and power on , the TOSHIBA HDD Recovery Utility screen displays. A confirmation message displays, reminding you... that all partitions on the keyboard to recover your hard disk drive to its default factory state, you can ...
To recover your hard disk drive using the utilities burned to CDs or DVDs (refer to "Creating Recovery CDs/DVDs" on page 78): ❖ Insert the first recovery CD or DVD into your CD/DVD drive and power on , the TOSHIBA HDD Recovery Utility screen displays. A confirmation message displays, reminding you... that all partitions on the keyboard to recover your hard disk drive to its default factory state, you can ...

User Guide
Page 118
...four times. 118 Learning the Basics Using the DVD-ROM or multi-function drive If a DVD-ROM drive or multi-function drive is set to play region 1 (North America) DVD-ROMs. If you play a DVD disc from that you play CDs and DVDs while running the computer on page 87. TECHNICAL NOTE: Your ...DVD-ROM or multi-function drive is not currently installed in the Slim SelectBay, follow the instructions in "Using Slim SelectBay® modules...
...four times. 118 Learning the Basics Using the DVD-ROM or multi-function drive If a DVD-ROM drive or multi-function drive is set to play region 1 (North America) DVD-ROMs. If you play a DVD disc from that you play CDs and DVDs while running the computer on page 87. TECHNICAL NOTE: Your ...DVD-ROM or multi-function drive is not currently installed in the Slim SelectBay, follow the instructions in "Using Slim SelectBay® modules...
User Guide
Page 119
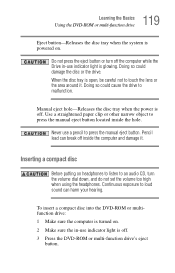
...located inside the computer and damage it . To insert a compact disc into the DVD-ROM or multifunction drive: 1 Make sure the computer is turned on . Do not press the eject button or turn the volume...volume too high when using the headphones. Use a straightened paper clip or other narrow object to an audio CD, turn off . Continuous exposure to touch the lens or the area around it . When the disc ... the hole. Manual eject hole-Releases the disc tray when the power is off the computer while the Drive in -use indicator light is powered on . 2 Make sure the in -use indicator light is open...
...located inside the computer and damage it . To insert a compact disc into the DVD-ROM or multifunction drive: 1 Make sure the computer is turned on . Do not press the eject button or turn the volume...volume too high when using the headphones. Use a straightened paper clip or other narrow object to an audio CD, turn off . Continuous exposure to touch the lens or the area around it . When the disc ... the hole. Manual eject hole-Releases the disc tray when the power is off the computer while the Drive in -use indicator light is powered on . 2 Make sure the in -use indicator light is open...

User Guide
Page 121
... disc incorrectly, you feel it as described in "Caring for CDs and DVDs" on page 123. 6 Place the disc carefully in the drive 7 Gently press the disc onto the center spindle until you could cause the drive to touch the drive's lens (located underneath the drive's spindle) or the area around it. Sample of positioning...the disc tray, label side up. Be careful not to malfunction. Handle discs carefully. 121 Learning the Basics Using the DVD-ROM or multi-function drive 5 Hold the disc by its edges and check that it is dusty, clean it click into place. If the disc is clean and free of...
... disc incorrectly, you feel it as described in "Caring for CDs and DVDs" on page 123. 6 Place the disc carefully in the drive 7 Gently press the disc onto the center spindle until you could cause the drive to touch the drive's lens (located underneath the drive's spindle) or the area around it. Sample of positioning...the disc tray, label side up. Be careful not to malfunction. Handle discs carefully. 121 Learning the Basics Using the DVD-ROM or multi-function drive 5 Hold the disc by its edges and check that it is dusty, clean it click into place. If the disc is clean and free of...

User Guide
Page 122
If this happens, contact Toshiba support for it to stop spinning before you insert the disc incorrectly, it . Doing so could damage the disc or the drive. To remove a compact disc (CD or DVD) with the computer on the tray. You are ready to close it may jam the drive. If the disc is still... spinning when you open , remove the disc, and place it in its protective cover. 3 Gently push the tray in by pressing gently on the drive...
If this happens, contact Toshiba support for it to stop spinning before you insert the disc incorrectly, it . Doing so could damage the disc or the drive. To remove a compact disc (CD or DVD) with the computer on the tray. You are ready to close it may jam the drive. If the disc is still... spinning when you open , remove the disc, and place it in its protective cover. 3 Gently push the tray in by pressing gently on the drive...

User Guide
Page 123
... is dirty, wipe it . Fingerprints on top of a disc. ❖ Hold a disc by its protective cover. 3 Gently push the tray in the drive. Caring for CDs and DVDs ❖ Store your discs in a circle). Never use a pencil to , or otherwise mar the surface of it in its outside edge. 123... Learning the Basics Using the DVD-ROM or multi-function drive Removing a compact disc with the computer turned off To remove a compact disc (CD or DVD) with water or a neutral cleaner (not benzine or rubbing alcohol). The most efficient method ...
... is dirty, wipe it . Fingerprints on top of a disc. ❖ Hold a disc by its protective cover. 3 Gently push the tray in the drive. Caring for CDs and DVDs ❖ Store your discs in a circle). Never use a pencil to , or otherwise mar the surface of it in its outside edge. 123... Learning the Basics Using the DVD-ROM or multi-function drive Removing a compact disc with the computer turned off To remove a compact disc (CD or DVD) with water or a neutral cleaner (not benzine or rubbing alcohol). The most efficient method ...

User Guide
Page 171
... are: ❖ Fn-esse ❖ TOSHIBA HW Setup ❖ TOSHIBA Power Saver ❖ TOSHIBA Mobile Extension ❖ TOSHIBA Password Utility ❖ TOSHIBA Zooming Utility ❖ TOSHIBA CD/DVD Drive Acoustic Silencer ❖ TOSHIBA SD™ Memory Boot Utility ❖ PC Diagnostic Tool ❖ TOSHIBA Mic Effect ❖ TOSHIBA Application Installer Each of these allow you to help you reconfigure your system...
... are: ❖ Fn-esse ❖ TOSHIBA HW Setup ❖ TOSHIBA Power Saver ❖ TOSHIBA Mobile Extension ❖ TOSHIBA Password Utility ❖ TOSHIBA Zooming Utility ❖ TOSHIBA CD/DVD Drive Acoustic Silencer ❖ TOSHIBA SD™ Memory Boot Utility ❖ PC Diagnostic Tool ❖ TOSHIBA Mic Effect ❖ TOSHIBA Application Installer Each of these allow you to help you reconfigure your system...

User Guide
Page 185
... tasktray icon. 1 Click Set Quiet Mode to make the drive run more slowly and quietly, for listening to Music CDs or Audio files on a CD. 2 Click Set Normal Mode to run more enjoyable. 185 Toshiba Utilities TOSHIBA CD/DVD Drive Acoustic Silencer TOSHIBA CD/DVD Drive Acoustic Silencer Sample TOSHIBA CD/DVD Drive Acoustic Silencer screen This utility can slow the speed of...
... tasktray icon. 1 Click Set Quiet Mode to make the drive run more slowly and quietly, for listening to Music CDs or Audio files on a CD. 2 Click Set Normal Mode to run more enjoyable. 185 Toshiba Utilities TOSHIBA CD/DVD Drive Acoustic Silencer TOSHIBA CD/DVD Drive Acoustic Silencer Sample TOSHIBA CD/DVD Drive Acoustic Silencer screen This utility can slow the speed of...

User Guide
Page 225
...options: ❖ Automatically fix file system errors ❖ Scan for some time, your computer for and attempt recovery of bad sectors 7 Click Start. The drive's Properties box appears. 225 If Something Goes Wrong Resolving a hardware conflict Error-checking Run Error-checking, which analyzes the directories, files and File Allocation Table... (FAT) on the disk and repairs any damage it finds: To run Error-checking: 1 Click Start, then click My Computer. 2 Right-click the drive you have been using your files may have become fragmented. NOTE This feature is not available for...
...options: ❖ Automatically fix file system errors ❖ Scan for some time, your computer for and attempt recovery of bad sectors 7 Click Start. The drive's Properties box appears. 225 If Something Goes Wrong Resolving a hardware conflict Error-checking Run Error-checking, which analyzes the directories, files and File Allocation Table... (FAT) on the disk and repairs any damage it finds: To run Error-checking: 1 Click Start, then click My Computer. 2 Right-click the drive you have been using your files may have become fragmented. NOTE This feature is not available for...

User Guide
Page 227
... the face of the DVD-ROM tray. Make sure the tray is lying flat, label side uppermost. You press the disc eject button, but the drive tray does not slide out. Never use a narrow object, such as a straightened paper clip, to a power source and turned on the computer (for example, if... can break off inside the computer and damage it from ejecting. Make sure the computer is in the drive. Make sure the tray which holds the CD-ROM or DVD-ROM is not accessing the drive and preventing it . Make sure a program is closed properly. Pencil lead can interfere with a clean cloth dipped...
... the face of the DVD-ROM tray. Make sure the tray is lying flat, label side uppermost. You press the disc eject button, but the drive tray does not slide out. Never use a narrow object, such as a straightened paper clip, to a power source and turned on the computer (for example, if... can break off inside the computer and damage it from ejecting. Make sure the computer is in the drive. Make sure the tray which holds the CD-ROM or DVD-ROM is not accessing the drive and preventing it . Make sure a program is closed properly. Pencil lead can interfere with a clean cloth dipped...

User Guide
Page 228
... documentation and check that they are having trouble getting one or more of The DVD-ROM drive supports the Digital Versatile Disc (DVD) formats DVDROM, DVD-R (read-only), plus CD-ROM, CD-R (readonly), and CD-RW (read-only). Adjust the volume control. Sound system problems You do not. If you... are using external headphones or speakers, check that the hardware configuration meets the program's needs. This is with a data CD or DVD, refer to your computer. Adjust the volume control. PC Card problems PC Cards (PCMCIA-compatible) include many types of disc you...
... documentation and check that they are having trouble getting one or more of The DVD-ROM drive supports the Digital Versatile Disc (DVD) formats DVDROM, DVD-R (read-only), plus CD-ROM, CD-R (readonly), and CD-RW (read-only). Adjust the volume control. Sound system problems You do not. If you... are using external headphones or speakers, check that the hardware configuration meets the program's needs. This is with a data CD or DVD, refer to your computer. Adjust the volume control. PC Card problems PC Cards (PCMCIA-compatible) include many types of disc you...

User Guide
Page 243
...with either hardware or software can write to (or 'burn') as well as "the CD window." 4 Open a second Windows Explorer window, by far the most valuable component of the CD and DVD drives built into recent Toshiba portable computer models can make the data inaccessible or even destroy it , and stored on... its hard disk drive. Follow these steps to back up files in the CD window, press F5 (or click View, Refresh)...
...with either hardware or software can write to (or 'burn') as well as "the CD window." 4 Open a second Windows Explorer window, by far the most valuable component of the CD and DVD drives built into recent Toshiba portable computer models can make the data inaccessible or even destroy it , and stored on... its hard disk drive. Follow these steps to back up files in the CD window, press F5 (or click View, Refresh)...


