
Users Manual Canada; English
Page 3
... Sensor 4-3 Web Camera 4-10 Using the TOSHIBA Face Recognition 4-11 Using optical disc drives 4-14 Writing CD/DVDs on DVD Super Multi drives 4-18 Sound System 4-24 Modem 4-26 Wireless communications 4-29 LAN 4-32 Computer Handling 4-34 Using the Hard Disk Drive (HDD) Protection 4-35 Using the TOSHIBA USB Sleep and Charge Utility 4-37 Heat dispersal 4-39 Chapter 5 The Keyboard Typewriter keys 5-1 Function keys: F1 ... F12 5-2 Soft keys: FN key combinations 5-2 Hot keys 5-3 Windows special keys 5-5 Keypad overlay 5-6 Generating ASCII characters 5-7 User's Manual iii
... Sensor 4-3 Web Camera 4-10 Using the TOSHIBA Face Recognition 4-11 Using optical disc drives 4-14 Writing CD/DVDs on DVD Super Multi drives 4-18 Sound System 4-24 Modem 4-26 Wireless communications 4-29 LAN 4-32 Computer Handling 4-34 Using the Hard Disk Drive (HDD) Protection 4-35 Using the TOSHIBA USB Sleep and Charge Utility 4-37 Heat dispersal 4-39 Chapter 5 The Keyboard Typewriter keys 5-1 Function keys: F1 ... F12 5-2 Soft keys: FN key combinations 5-2 Hot keys 5-3 Windows special keys 5-5 Keypad overlay 5-6 Generating ASCII characters 5-7 User's Manual iii

Users Manual Canada; English
Page 4
...module F-3 Appendix G Legal Footnotes Non-applicable Icons G-1 CPU G-1 Memory (Main System G-2 Battery Life G-3 Hard Disk Drive (HDD) Capacity G-3 User's Manual iv TECRA M11/Satellite Pro S500M Chapter 6 Power and Power-Up Modes Power conditions 6-1 Monitoring of power condition 6-2 Battery 6-3 TOSHIBA Password Utility 6-9 Power-up modes 6-11 Panel power on/off 6-12 System automatic Sleep/Hibernation 6-12 Chapter 7 HW Setup Accessing HW Setup 7-1 HW Setup window 7-1 Chapter 8 Troubleshooting Problem solving process 8-1 Hardware and system checklist 8-3 TOSHIBA support...
...module F-3 Appendix G Legal Footnotes Non-applicable Icons G-1 CPU G-1 Memory (Main System G-2 Battery Life G-3 Hard Disk Drive (HDD) Capacity G-3 User's Manual iv TECRA M11/Satellite Pro S500M Chapter 6 Power and Power-Up Modes Power conditions 6-1 Monitoring of power condition 6-2 Battery 6-3 TOSHIBA Password Utility 6-9 Power-up modes 6-11 Panel power on/off 6-12 System automatic Sleep/Hibernation 6-12 Chapter 7 HW Setup Accessing HW Setup 7-1 HW Setup window 7-1 Chapter 8 Troubleshooting Problem solving process 8-1 Hardware and system checklist 8-3 TOSHIBA support...
Users Manual Canada; English
Page 6
... SD Card Association. MultiMediaCard and MMC are accurate for the TOSHIBA TECRA M11/Satellite Pro S500M Series Portable Personal Computer at the time of MultiMediaCard Association. No patent liability is subject to the use within the home. Please comply with respect to civil damages or criminal action. The instructions and descriptions it contains are trademarks of this manual's production. Memory Stick, Memory...
... SD Card Association. MultiMediaCard and MMC are accurate for the TOSHIBA TECRA M11/Satellite Pro S500M Series Portable Personal Computer at the time of MultiMediaCard Association. No patent liability is subject to the use within the home. Please comply with respect to civil damages or criminal action. The instructions and descriptions it contains are trademarks of this manual's production. Memory Stick, Memory...
Users Manual Canada; English
Page 12
... and let them to make any changes necessary to maintain uninterrupted service. In the event repairs are notified, you will be used on your fax software before sending messages. If problems arise If any questions about your service or the operation of a standard jack called the USOC RJ11C. TECRA M11/Satellite Pro S500M The modem connects to the telephone line by TOSHIBA Corporation or an authorized...
... and let them to make any changes necessary to maintain uninterrupted service. In the event repairs are notified, you will be used on your fax software before sending messages. If problems arise If any questions about your service or the operation of a standard jack called the USOC RJ11C. TECRA M11/Satellite Pro S500M The modem connects to the telephone line by TOSHIBA Corporation or an authorized...
Users Manual Canada; English
Page 14
... would result in you modem being operated in a non-compliant manner. Notes for use of other end of operating depend on a specific network implementation which is correctly set to operate should not be used in any manner which displays the currently active setting. TECRA M11/Satellite Pro S500M Notes for Users in Australia and New Zealand Modem warning notice for Australia Modems connected to a modem. ■ This equipment...
... would result in you modem being operated in a non-compliant manner. Notes for use of other end of operating depend on a specific network implementation which is correctly set to operate should not be used in any manner which displays the currently active setting. TECRA M11/Satellite Pro S500M Notes for Users in Australia and New Zealand Modem warning notice for Australia Modems connected to a modem. ■ This equipment...

Users Manual Canada; English
Page 22
..., includes multimedia functionality, and is organized, then become acquainted with the computer's features, components and accessory devices. Be sure to read over the Chapter 1, Getting Started and Chapter 3, Hardware, Utilities and Options chapters to describe, identify, and highlight terms and operating procedures. Preface Congratulations on configuring your computer, basic operations and care, using your TECRA M11/Satellite Pro S500M computer. For example: Read Only Memory (ROM).
..., includes multimedia functionality, and is organized, then become acquainted with the computer's features, components and accessory devices. Be sure to read over the Chapter 1, Getting Started and Chapter 3, Hardware, Utilities and Options chapters to describe, identify, and highlight terms and operating procedures. Preface Congratulations on configuring your computer, basic operations and care, using your TECRA M11/Satellite Pro S500M computer. For example: Read Only Memory (ROM).
Users Manual Canada; English
Page 36
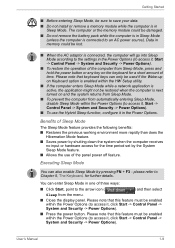
... the menu. ■ Close the display panel. You can also enable Sleep Mode by the System Sleep Mode feature. ■ Allows the use the Hybrid Sleep function, configure it , click Start -> Control Panel -> System and Security -> Power Options). Please note that this feature must be lost. ■ When the AC adaptor is connected to Chapter 5, The Keyboard, for the time period set by pressing FN + F3 - User's Manual 1-9 Benefits of Sleep Mode The Sleep Mode feature...
... the menu. ■ Close the display panel. You can also enable Sleep Mode by the System Sleep Mode feature. ■ Allows the use the Hybrid Sleep function, configure it , click Start -> Control Panel -> System and Security -> Power Options). Please note that this feature must be lost. ■ When the AC adaptor is connected to Chapter 5, The Keyboard, for the time period set by pressing FN + F3 - User's Manual 1-9 Benefits of Sleep Mode The Sleep Mode feature...
Users Manual Canada; English
Page 44
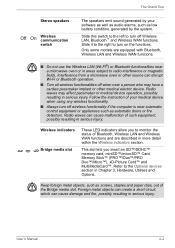
... in Chapter 3, Hardware, Utilities and Options. Follow the instruction of your software as well as audio alarms, such as low battery condition, generated by the system. Radio waves can disrupt Wi-Fi or Bluetooth operation. ■ Turn all wireless functionalities off Wireless LAN, Bluetooth™ and Wireless WAN functions. This slot lets you to radio interference or magnetic fields. User's Manual 2-2 Refer to turn on the functions. Slide this switch to the left...
... in Chapter 3, Hardware, Utilities and Options. Follow the instruction of your software as well as audio alarms, such as low battery condition, generated by the system. Radio waves can disrupt Wi-Fi or Bluetooth operation. ■ Turn all wireless functionalities off Wireless LAN, Bluetooth™ and Wireless WAN functions. This slot lets you to radio interference or magnetic fields. User's Manual 2-2 Refer to turn on the functions. Slide this switch to the left...
Users Manual Canada; English
Page 63
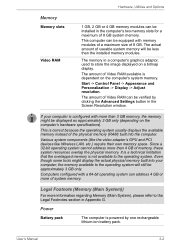
... of Video RAM available is powered by clicking the Advanced Settings button in Appendix G. Start -> Control Panel -> Appearance and Personalization -> Display -> Adjust resolution. Various system components (like the video adapter's GPU and PCI devices like Wireless LAN, etc.) require their own memory space. Even though some tools might be displayed as approximately 3 GB only (depending on the computer's hardware specifications). Power Battery pack The computer is dependent on a bitmap display. The memory in...
... of Video RAM available is powered by clicking the Advanced Settings button in Appendix G. Start -> Control Panel -> Appearance and Personalization -> Display -> Adjust resolution. Various system components (like the video adapter's GPU and PCI devices like Wireless LAN, etc.) require their own memory space. Even though some tools might be displayed as approximately 3 GB only (depending on the computer's hardware specifications). Power Battery pack The computer is dependent on a bitmap display. The memory in...
Users Manual Canada; English
Page 84
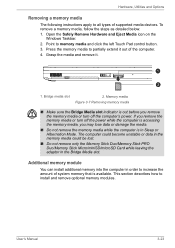
.... Additional memory module You can install additional memory into the computer in order to increase the amount of supported media devices. Memory media Figure 3-7 Removing memory media ■ Make sure the Bridge Media slot indicator is out before you remove the memory media or turn off the power while the computer is accessing the memory media, you remove the memory media or turn off the computer's power. Hardware, Utilities and Options Removing a memory media The following instructions apply to all types of system memory that is in Sleep or Hibernation Mode.
.... Additional memory module You can install additional memory into the computer in order to increase the amount of supported media devices. Memory media Figure 3-7 Removing memory media ■ Make sure the Bridge Media slot indicator is out before you remove the memory media or turn off the power while the computer is accessing the memory media, you remove the memory media or turn off the computer's power. Hardware, Utilities and Options Removing a memory media The following instructions apply to all types of system memory that is in Sleep or Hibernation Mode.
Users Manual Canada; English
Page 85
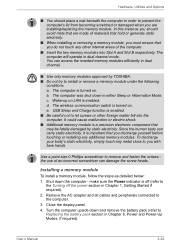
... memory modules. make sure the Power indicator is enabled. Installing a memory module To install a memory module, follow the steps as detailed below: 1. Hardware, Utilities and Options ■ You should avoid mats that are installing/replacing the memory module. e. Since the human body can carry static electricity, it is turned on . USB Sleep and Charge function is turned on . Use a point size 0 Phillips screwdriver to let screws or other internal areas of an incorrect screwdriver can access the inserted memory modules...
... memory modules. make sure the Power indicator is enabled. Installing a memory module To install a memory module, follow the steps as detailed below: 1. Hardware, Utilities and Options ■ You should avoid mats that are installing/replacing the memory module. e. Since the human body can carry static electricity, it is turned on . USB Sleep and Charge function is turned on . Use a point size 0 Phillips screwdriver to let screws or other internal areas of an incorrect screwdriver can access the inserted memory modules...
Users Manual Canada; English
Page 87
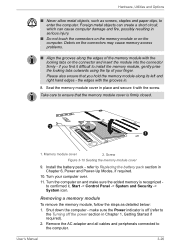
... and make sure the Power indicator is off (refer to the Turning off the power section in Chapter 6, Power and Power-Up Modes, if required. 10. Screw Figure 3-10 Seating the memory module cover 9. Removing a memory module To remove the memory module, follow the steps as screws, staples and paper clips, to Replacing the battery pack section in Chapter 1, Getting Started if required). 2. Install the battery pack - if you hold the memory module along...
... and make sure the Power indicator is off (refer to the Turning off the power section in Chapter 6, Power and Power-Up Modes, if required. 10. Screw Figure 3-10 Seating the memory module cover 9. Removing a memory module To remove the memory module, follow the steps as screws, staples and paper clips, to Replacing the battery pack section in Chapter 1, Getting Started if required). 2. Install the battery pack - if you hold the memory module along...
Users Manual Canada; English
Page 92
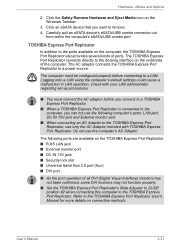
...; RJ45 LAN jack ■ External monitor port ■ DC IN 15V jack ■ Security lock slot ■ Universal Serial Bus 2.0 port (four) ■ DVI port ■ As the port operation of ports. Refer to remove. 4. Check with TOSHIBA Express Port Replicator. The computer must connect the AC adaptor before connecting to a power source. Click an eSATA device that you can not use the computer's AC Adaptor. Hardware, Utilities and Options 2. Click the Safely Remove Hardware and Eject Media icon...
...; RJ45 LAN jack ■ External monitor port ■ DC IN 15V jack ■ Security lock slot ■ Universal Serial Bus 2.0 port (four) ■ DVI port ■ As the port operation of ports. Refer to remove. 4. Check with TOSHIBA Express Port Replicator. The computer must connect the AC adaptor before connecting to a power source. Click an eSATA device that you can not use the computer's AC Adaptor. Hardware, Utilities and Options 2. Click the Safely Remove Hardware and Eject Media icon...

Users Manual Canada; English
Page 144
... can change the Real Time Clock settings by turnin on the power: S **** RTC Power Failure **** Check system. Improper installation could be shortened. ■ Never install or remove the battery pack without first turning off . The battery can explode if not replaced, used , handled or disposed. Care and use of the battery pack This section provides the important safety precautions in Sleep Mode. Refer to the enclosed Instruction Manual...
... can change the Real Time Clock settings by turnin on the power: S **** RTC Power Failure **** Check system. Improper installation could be shortened. ■ Never install or remove the battery pack without first turning off . The battery can explode if not replaced, used , handled or disposed. Care and use of the battery pack This section provides the important safety precautions in Sleep Mode. Refer to the enclosed Instruction Manual...
Users Manual Canada; English
Page 161
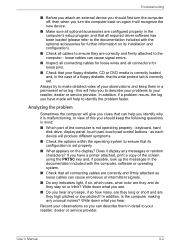
...: ■ Which part of the computer is not operating properly - Always try to ensure they high pitched or low pitched? keyboard, hard disk drive, display panel, touch pad, touch pad control buttons - as loose cables can cause signal errors. ■ Inspect all connecting cables for loose wires and all connectors for further information on or blink? loose cables can cause erroneous or intermittent signals. ■ Do any indicators light, if so, which...
...: ■ Which part of the computer is not operating properly - Always try to ensure they high pitched or low pitched? keyboard, hard disk drive, display panel, touch pad, touch pad control buttons - as loose cables can cause signal errors. ■ Inspect all connecting cables for loose wires and all connectors for further information on or blink? loose cables can cause erroneous or intermittent signals. ■ Do any indicators light, if so, which...

Users Manual Canada; English
Page 166
... the TOSHIBA Leading Innovation >>> screen appears - Press the Y key - press the FN + F11 hot key and try typing again. Set the time in the Real Time Clock (RTC) battery is Displayed on the computer. a confirmation message will need to ensure that the numeric keypad overlay is not remapping the keyboard in any way (remapping involves changing or reassigning the function of the computer - User's Manual...
... the TOSHIBA Leading Innovation >>> screen appears - Press the Y key - press the FN + F11 hot key and try typing again. Set the time in the Real Time Clock (RTC) battery is Displayed on the computer. a confirmation message will need to ensure that the numeric keypad overlay is not remapping the keyboard in any way (remapping involves changing or reassigning the function of the computer - User's Manual...
Users Manual Canada; English
Page 176
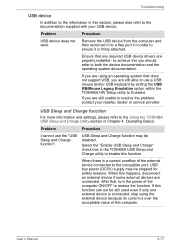
... does not support USB, you are still able to use the "USB Sleep and Charge function". Ensure that , turn the power of this happens, disconnect an external device if some external devices are properly installed - After that any required USB device drivers are connected. to achieve this function. USB Sleep and Charge function may be disabled. If you are still unable to both the device documentation and the operating system documentation. Problem Procedure USB device does not work Remove the USB device from...
... does not support USB, you are still able to use the "USB Sleep and Charge function". Ensure that , turn the power of this happens, disconnect an external device if some external devices are properly installed - After that any required USB device drivers are connected. to achieve this function. USB Sleep and Charge function may be disabled. If you are still unable to both the device documentation and the operating system documentation. Problem Procedure USB device does not work Remove the USB device from...

Users Manual Canada; English
Page 206
... to reduce the risk of lost data, always make back-up to the product when used by periodically storing it on the graphics system, applications utilized, system memory size and other computing activities. Contact Toshiba technical service and support, refer to TOSHIBA support section in your product documentation. Computers configured with a 64-bit operating system can address up copies of main system...
... to reduce the risk of lost data, always make back-up to the product when used by periodically storing it on the graphics system, applications utilized, system memory size and other computing activities. Contact Toshiba technical service and support, refer to TOSHIBA support section in your product documentation. Computers configured with a 64-bit operating system can address up copies of main system...
Users Manual Canada; English
Page 213
... problem 8-2 Battery 8-6 Bluetooth 8-23 DVD Super Multi drive 8-10 DVD-ROM drive 8-9 Dual Pointing device 8-14 External monitor 8-20 Fingerprint Sensor 8-16 User's Manual TECRA M11/Satellite Pro S500M Hard disk drive 8-8 Hardware and system checklist 8-3 Internal display panel 8-8 Keyboard 8-7 LAN 8-22 Memory Stick 8-12 MultiMediaCard 8-13 Overheating power down 8-5 Password 8-7 Power 8-4 Real Time Clock 8-7 Recovery Media 8-24 SD/SDHC Card 8-11 Self test 8-4 Smart Card 8-12 Sound system 8-20 System start-up 8-4 TOSHIBA support 8-24 Touch Pad 8-14 USB device 8-17 USB mouse 8-15 Wireless LAN...
... problem 8-2 Battery 8-6 Bluetooth 8-23 DVD Super Multi drive 8-10 DVD-ROM drive 8-9 Dual Pointing device 8-14 External monitor 8-20 Fingerprint Sensor 8-16 User's Manual TECRA M11/Satellite Pro S500M Hard disk drive 8-8 Hardware and system checklist 8-3 Internal display panel 8-8 Keyboard 8-7 LAN 8-22 Memory Stick 8-12 MultiMediaCard 8-13 Overheating power down 8-5 Password 8-7 Power 8-4 Real Time Clock 8-7 Recovery Media 8-24 SD/SDHC Card 8-11 Self test 8-4 Smart Card 8-12 Sound system 8-20 System start-up 8-4 TOSHIBA support 8-24 Touch Pad 8-14 USB device 8-17 USB mouse 8-15 Wireless LAN...

Detailed Specs for Tecra M11 PTME3C-03502M English
Page 1
...13 function keys Spill Resistant keyboard Color: (Black) Pointing Device Dual Accupoint and Touchpad with BIOS Support Toshiba Spill-resistant Keyboard Toshiba Shock Absorbing Design HALT Tested Design LCD Cover pressure Resistant Design Toshiba Hard Disk Drive Protection HDD Shock Absorber HDD Impact Sensor Hinge Design Enhancement Polyurethane (PU) Coated Palm Rest Toshiba PC Diagnostic Tool Toshiba PC Health Monitor Toshiba ConfigFree™ Toshiba Diversity Antenna Toshiba Bluetooth® Stack Wireless Communication On/Off Switch Toshiba Device Access Control Toshiba Presentation Button...
...13 function keys Spill Resistant keyboard Color: (Black) Pointing Device Dual Accupoint and Touchpad with BIOS Support Toshiba Spill-resistant Keyboard Toshiba Shock Absorbing Design HALT Tested Design LCD Cover pressure Resistant Design Toshiba Hard Disk Drive Protection HDD Shock Absorber HDD Impact Sensor Hinge Design Enhancement Polyurethane (PU) Coated Palm Rest Toshiba PC Diagnostic Tool Toshiba PC Health Monitor Toshiba ConfigFree™ Toshiba Diversity Antenna Toshiba Bluetooth® Stack Wireless Communication On/Off Switch Toshiba Device Access Control Toshiba Presentation Button...


