
User Guide
Page 5
... the telephone network, the telephone company will be required. Disconnection If you should ever decide to permanently disconnect your right to provide you believe it is resolved. Contact the state public utility commission, public service commission or corporation commission for repair or limited warranty information, please contact Toshiba Corporation, Toshiba America Information Systems, Inc. Connection to party...
... the telephone network, the telephone company will be required. Disconnection If you should ever decide to permanently disconnect your right to provide you believe it is resolved. Contact the state public utility commission, public service commission or corporation commission for repair or limited warranty information, please contact Toshiba Corporation, Toshiba America Information Systems, Inc. Connection to party...
User Guide
Page 29
... and specifications ....54 Turning on the power 54 Adding memory 55 Installing a memory module 56 Removing a memory module 60 Hard Drive Recovery Utilities 62 Creating Recovery CDs/DVDs 63 Hard Disk Drive Recovery using the recovery partition 64 Hard Disk Drive Recovery using the Recovery media 67 Deleting the Hard Disk Recovery Utility 70 Installing drivers and applications 71 Using the TouchPad 72 Scrolling with the TouchPad 73 Control buttons 73 Disabling or enabling the TouchPad 73 Turning off the computer 75 Closing the display panel 76 Using external display devices 76...
... and specifications ....54 Turning on the power 54 Adding memory 55 Installing a memory module 56 Removing a memory module 60 Hard Drive Recovery Utilities 62 Creating Recovery CDs/DVDs 63 Hard Disk Drive Recovery using the recovery partition 64 Hard Disk Drive Recovery using the Recovery media 67 Deleting the Hard Disk Recovery Utility 70 Installing drivers and applications 71 Using the TouchPad 72 Scrolling with the TouchPad 73 Control buttons 73 Disabling or enabling the TouchPad 73 Turning off the computer 75 Closing the display panel 76 Using external display devices 76...

User Guide
Page 31
... battery 117 Charging the RTC battery 117 Monitoring battery power 119 What to do when the battery alarm sounds ....121 Changing batteries 122 Taking care of your battery 124 Safety precautions 124 Maximizing battery life 125 Disposing of used batteries 127 Conserving power 128 Power profiles in Windows XP 129 Using a hot key to set the power profile..........129 Additional options for power 130 Chapter 4: Expansion Options 131 Devices for office computing 131 Using an external keyboard 132 Using a mouse 132 Connecting a USB mouse...
... battery 117 Charging the RTC battery 117 Monitoring battery power 119 What to do when the battery alarm sounds ....121 Changing batteries 122 Taking care of your battery 124 Safety precautions 124 Maximizing battery life 125 Disposing of used batteries 127 Conserving power 128 Power profiles in Windows XP 129 Using a hot key to set the power profile..........129 Additional options for power 130 Chapter 4: Expansion Options 131 Devices for office computing 131 Using an external keyboard 132 Using a mouse 132 Connecting a USB mouse...

User Guide
Page 33
... Utilities 160 Fn-esse 161 Starting Fn-esse 161 Using the keyboard or pointing device to assign keys 163 Viewing existing key assignments 164 Changing or removing existing key assignments 164 TOSHIBA Console 165 Customizing Your Computer 166 Network 166 Security 166 TOSHIBA Power Saver 166 Mouse utility 168 Hotkey utility 169 TOSHIBA Mobile Extension 169 TOSHIBA HW Setup 171 Enabling Hibernation 173 Setting user passwords 174 Using an instant password 175 Setting a user password 175 Disabling a user password 176 Using a supervisor password 176 Setting a supervisor password...
... Utilities 160 Fn-esse 161 Starting Fn-esse 161 Using the keyboard or pointing device to assign keys 163 Viewing existing key assignments 164 Changing or removing existing key assignments 164 TOSHIBA Console 165 Customizing Your Computer 166 Network 166 Security 166 TOSHIBA Power Saver 166 Mouse utility 168 Hotkey utility 169 TOSHIBA Mobile Extension 169 TOSHIBA HW Setup 171 Enabling Hibernation 173 Setting user passwords 174 Using an instant password 175 Setting a user password 175 Disabling a user password 176 Using a supervisor password 176 Setting a supervisor password...
User Guide
Page 56
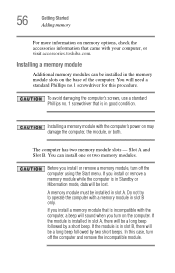
... the module is in the memory module slots on the base of the computer. You will need a standard Phillips no . 1 screwdriver that is in Standby or Hibernation mode, data will be installed in slot B only. If you turn off the computer using the Start menu. 56 Getting Started Adding memory For more information on memory options, check the accessories information that came with the computer's power on...
... the module is in the memory module slots on the base of the computer. You will need a standard Phillips no . 1 screwdriver that is in Standby or Hibernation mode, data will be installed in slot B only. If you turn off the computer using the Start menu. 56 Getting Started Adding memory For more information on memory options, check the accessories information that came with the computer's power on...
User Guide
Page 58
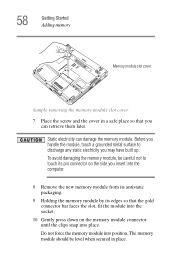
... Started Adding memory Memory module slot cover Sample removing the memory module slot cover 7 Place the screw and the cover in place. Static electricity can retrieve them later. The memory module should be careful not to discharge any static electricity you can damage the memory module. Before you handle the module, touch a grounded metal surface to touch its pin connector on the side you insert into the computer. 8 Remove the new memory module...
... Started Adding memory Memory module slot cover Sample removing the memory module slot cover 7 Place the screw and the cover in place. Static electricity can retrieve them later. The memory module should be careful not to discharge any static electricity you can damage the memory module. Before you handle the module, touch a grounded metal surface to touch its pin connector on the side you insert into the computer. 8 Remove the new memory module...

User Guide
Page 60
In either of the slot. 3 Carefully remove the memory module from the memory module. The following : Press the power button and hold it on the power: Warning: Resume Failure Press Any Key To Continue If the computer hangs up the next time you turn it down the computer and open the memory module slot cover. Do not remove the memory module while the computer is in ""Installing a memory module"" to shut down for...
In either of the slot. 3 Carefully remove the memory module from the memory module. The following : Press the power button and hold it on the power: Warning: Resume Failure Press Any Key To Continue If the computer hangs up the next time you turn it down the computer and open the memory module slot cover. Do not remove the memory module while the computer is in ""Installing a memory module"" to shut down for...
User Guide
Page 61
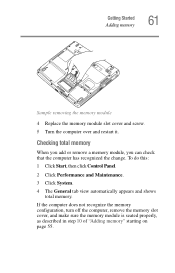
Getting Started Adding memory 61 Sample removing the memory module 4 Replace the memory module slot cover and screw. 5 Turn the computer over and restart it. If the computer does not recognize the memory configuration, turn off the computer, remove the memory slot cover, and make sure the memory module is seated properly, as described in step 10 of "Adding memory" starting on page 55. To do this: 1 Click Start, then click Control Panel. 2 Click Performance and Maintenance. 3 Click...
Getting Started Adding memory 61 Sample removing the memory module 4 Replace the memory module slot cover and screw. 5 Turn the computer over and restart it. If the computer does not recognize the memory configuration, turn off the computer, remove the memory slot cover, and make sure the memory module is seated properly, as described in step 10 of "Adding memory" starting on page 55. To do this: 1 Click Start, then click Control Panel. 2 Click Performance and Maintenance. 3 Click...
User Guide
Page 76
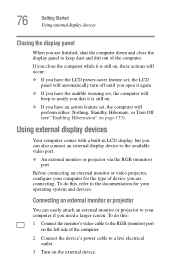
... on. ❖ If you are connecting. Using external display devices Your computer comes with a built-in LCD display, but you need a larger screen. If you close the display panel to keep dust and dirt out of the computer. 2 Connect the device's power cable to a live electrical outlet. 3 Turn on page 173). 76 Getting Started Using external display devices Closing the display panel When you have an action feature set, the computer will beep to...
... on. ❖ If you are connecting. Using external display devices Your computer comes with a built-in LCD display, but you need a larger screen. If you close the display panel to keep dust and dirt out of the computer. 2 Connect the device's power cable to a live electrical outlet. 3 Turn on page 173). 76 Getting Started Using external display devices Closing the display panel When you have an action feature set, the computer will beep to...

User Guide
Page 166
... to control your computer's power usage, regardless of the source, and use the many preset power modes, or create one yourself. Security The features available in this category are : ❖ Power Management ❖ Mouse ❖ Hotkey assignment (for detailed information, see "Fn-esse®" on page 161) ❖ Toshiba Hardware Settings ❖ Toshiba Button Control ❖ ConfigFree ❖ CD/DVD Drive Acoustic Silencer ❖ TOSHIBA Application Installer Network The Network category features Connectivity...
... to control your computer's power usage, regardless of the source, and use the many preset power modes, or create one yourself. Security The features available in this category are : ❖ Power Management ❖ Mouse ❖ Hotkey assignment (for detailed information, see "Fn-esse®" on page 161) ❖ Toshiba Hardware Settings ❖ Toshiba Button Control ❖ ConfigFree ❖ CD/DVD Drive Acoustic Silencer ❖ TOSHIBA Application Installer Network The Network category features Connectivity...
User Guide
Page 188
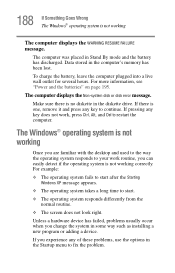
... screen does not look right. If pressing any of these problems, use the options in Stand By mode and the battery has discharged. The computer was placed in the Startup menu to continue. 188 If Something Goes Wrong The Windows® operating system is not working Once you experience any key does not work routine, you change the system in some way such as installing a new...
... screen does not look right. If pressing any of these problems, use the options in Stand By mode and the battery has discharged. The computer was placed in the Startup menu to continue. 188 If Something Goes Wrong The Windows® operating system is not working Once you experience any key does not work routine, you change the system in some way such as installing a new...

User Guide
Page 197
... Goes Wrong Resolving a hardware conflict Check the power options using the hard disk more keyboard error messages. Is the display power set to activate the screen. If the numeric keypad or cursor control light is on . Refer to the software's documentation and check that takes its power from the battery? If it . Press any of the keys. If you type, strange things happen or nothing happens, the problem may be on...
... Goes Wrong Resolving a hardware conflict Check the power options using the hard disk more keyboard error messages. Is the display power set to activate the screen. If the numeric keypad or cursor control light is on . Refer to the software's documentation and check that takes its power from the battery? If it . Press any of the keys. If you type, strange things happen or nothing happens, the problem may be on...
User Guide
Page 198
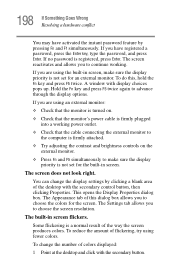
... screen. If you are using an external monitor: ❖ Check that the monitor is turned on the external monitor. ❖ Press Fn and F5 simultaneously to continue working power outlet. ❖ Check that the monitor's power cable is firmly plugged into a working . Hold the Fn key and press F5 twice again to choose the screen resolution. Some flickering is firmly attached. ❖ Try adjusting the contrast and brightness controls...
... screen. If you are using an external monitor: ❖ Check that the monitor is turned on the external monitor. ❖ Press Fn and F5 simultaneously to continue working power outlet. ❖ Check that the monitor's power cable is firmly plugged into a working . Hold the Fn key and press F5 twice again to choose the screen resolution. Some flickering is firmly attached. ❖ Try adjusting the contrast and brightness controls...
User Guide
Page 218
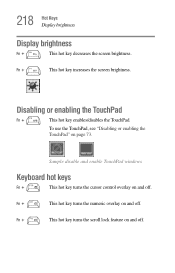
To use the TouchPad, see "Disabling or enabling the TouchPad" on and off. Sample disable and enable TouchPad windows Keyboard hot keys Fn + This hot key turns the cursor control overlay on and off . Fn + This hot key turns the numeric overlay on and off . Fn + This hot key turns the scroll lock feature on page 73. Fn + This hot key increases the screen brightness. Disabling or enabling the TouchPad Fn + This hot key enables/disables the TouchPad. 218 Hot Keys Display brightness Display brightness Fn + This hot key decreases the screen brightness.
To use the TouchPad, see "Disabling or enabling the TouchPad" on and off. Sample disable and enable TouchPad windows Keyboard hot keys Fn + This hot key turns the cursor control overlay on and off . Fn + This hot key turns the numeric overlay on and off . Fn + This hot key turns the scroll lock feature on page 73. Fn + This hot key increases the screen brightness. Disabling or enabling the TouchPad Fn + This hot key enables/disables the TouchPad. 218 Hot Keys Display brightness Display brightness Fn + This hot key decreases the screen brightness.
User Guide
Page 221
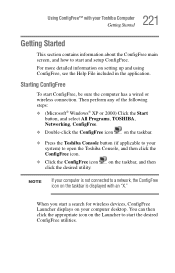
... the ConfigFree main screen, and how to start the desired ConfigFree utilities. Starting ConfigFree To start a search for wireless devices, ConfigFree Launcher displays on the taskbar. ❖ Press the Toshiba Console button (if applicable to your computer desktop. Then perform any of the following steps: ❖ (Microsoft® Windows® XP or 2000) Click the Start button, and select All Programs, TOSHIBA, Networking, ConfigFree. ❖...
... the ConfigFree main screen, and how to start the desired ConfigFree utilities. Starting ConfigFree To start a search for wireless devices, ConfigFree Launcher displays on the taskbar. ❖ Press the Toshiba Console button (if applicable to your computer desktop. Then perform any of the following steps: ❖ (Microsoft® Windows® XP or 2000) Click the Start button, and select All Programs, TOSHIBA, Networking, ConfigFree. ❖...
User Guide
Page 227
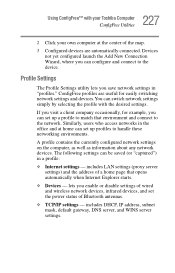
... enable or disable settings of the map. 3 Configured devices are useful for easily switching network settings and devices.You can configure and connect to handle these networking environments. A profile contains the currently configured network settings on the computer, as well as information about any network devices. includes DHCP, IP address, subnet mask, default gateway, DNS server, and WINS server settings. ConfigFree profiles are automatically connected. Similarly, users who access networks in a profile: ❖ Internet settings - Profile Settings...
... enable or disable settings of the map. 3 Configured devices are useful for easily switching network settings and devices.You can configure and connect to handle these networking environments. A profile contains the currently configured network settings on the computer, as well as information about any network devices. includes DHCP, IP address, subnet mask, default gateway, DNS server, and WINS server settings. ConfigFree profiles are automatically connected. Similarly, users who access networks in a profile: ❖ Internet settings - Profile Settings...
User Guide
Page 250
... setup 47 computer-friendly environment 41 computing tips 83 connecting to a power source 49 connection set up 144 control buttons 73 critical applications 3 Ctrl keys 86 D desktop creating new icon 139 major features 139 desktop exploration 138 desktop icons 139 Device Manager 193 checking properties 194 disabling a device 193, 194 devices keyboard 78 mouse 78 disable/enable TOSHIBA Touch and Launch 183 Disk Defragmenter 201 disk drive corrupted/damaged data files 201 missing files/trouble accessing a disk...
... setup 47 computer-friendly environment 41 computing tips 83 connecting to a power source 49 connection set up 144 control buttons 73 critical applications 3 Ctrl keys 86 D desktop creating new icon 139 major features 139 desktop exploration 138 desktop icons 139 Device Manager 193 checking properties 194 disabling a device 193, 194 devices keyboard 78 mouse 78 disable/enable TOSHIBA Touch and Launch 183 Disk Defragmenter 201 disk drive corrupted/damaged data files 201 missing files/trouble accessing a disk...
User Guide
Page 251
... display device external 76 display modes hot key 217 display output settings 77 display panel closing 76 display, external adjusting 78 disposal information 27 disposing of used batteries 127 DMA (Direct Memory Access) 192 double-click 73 DVD-ROM or multi-function drive cannot access disc 202 DVD-ROM/multi-function drive drive tray will not open 202 problems 202 troubleshooting 194 E energy saving features 114 ergonomics 44 error messages device driver conflict 191 general hardware problem 191 non-system disk or disk error 188, 202 problem with display settings/ current settings not working...
... display device external 76 display modes hot key 217 display output settings 77 display panel closing 76 display, external adjusting 78 disposal information 27 disposing of used batteries 127 DMA (Direct Memory Access) 192 double-click 73 DVD-ROM or multi-function drive cannot access disc 202 DVD-ROM/multi-function drive drive tray will not open 202 problems 202 troubleshooting 194 E energy saving features 114 ergonomics 44 error messages device driver conflict 191 general hardware problem 191 non-system disk or disk error 188, 202 problem with display settings/ current settings not working...
User Guide
Page 252
... mode 214 Stand By mode 215 volume mute 213 hot key power usage mode 129 hot key utility 168, 169 hot keys 213 hot swapping PC Cards 101 I icon 139 definition 39 desktop 139 hint 39 Internet Explorer 140 moving to desktop 139 recycle bin 140 safety 38 technical note 39 Industry Canada requirement 4 installation memory module 56 installing memory modules 55 mouse 78 instant passwords, using 175 Internal/External mode 199 Internet bookmarked site not found 190 connecting...
... mode 214 Stand By mode 215 volume mute 213 hot key power usage mode 129 hot key utility 168, 169 hot keys 213 hot swapping PC Cards 101 I icon 139 definition 39 desktop 139 hint 39 Internet Explorer 140 moving to desktop 139 recycle bin 140 safety 38 technical note 39 Industry Canada requirement 4 installation memory module 56 installing memory modules 55 mouse 78 instant passwords, using 175 Internal/External mode 199 Internet bookmarked site not found 190 connecting...

User Guide
Page 253
... slot cover 57 memory module inserting 58 installation 56 removing 61 microphone 152 external, connecting 82 Microsoft Support Online Web site 191 modem connecting to a telephone line 158 determining COM port 142 problem solving 207, 208 resetting port to default settings 142 upgrading 142 modules Wi-Fi Mini PC 136 monitor 76 connecting 76 not working 198 mouse installing 78 serial 78 using 132 N network 166 accessing 143 Dial-Up Networking Wizard 143 networking wireless 143 O office computing 131 opening the display panel 53 optional devices...
... slot cover 57 memory module inserting 58 installation 56 removing 61 microphone 152 external, connecting 82 Microsoft Support Online Web site 191 modem connecting to a telephone line 158 determining COM port 142 problem solving 207, 208 resetting port to default settings 142 upgrading 142 modules Wi-Fi Mini PC 136 monitor 76 connecting 76 not working 198 mouse installing 78 serial 78 using 132 N network 166 accessing 143 Dial-Up Networking Wizard 143 networking wireless 143 O office computing 131 opening the display panel 53 optional devices...


