User Guide
Page 16
... 47 Turning on the computer 48 Opening the display panel 48 Turning on the power 49 Setting up your software 50 Registering your computer with Toshiba 50 Setting up other devices 50 Turning off the computer 51 Closing the display panel 51 Chapter 3: Connecting Other External Devices 53 Using external display... printer 60 Connecting an external diskette drive 61 Connecting external speakers or headphones 62 Connecting an external microphone 62 Using an expansion device 63 Adding memory 64 Installing a memory module 64
... 47 Turning on the computer 48 Opening the display panel 48 Turning on the power 49 Setting up your software 50 Registering your computer with Toshiba 50 Setting up other devices 50 Turning off the computer 51 Closing the display panel 51 Chapter 3: Connecting Other External Devices 53 Using external display... printer 60 Connecting an external diskette drive 61 Connecting external speakers or headphones 62 Connecting an external microphone 62 Using an expansion device 63 Adding memory 64 Installing a memory module 64

User Guide
Page 17
17 Removing a memory module 66 Using Slim SelectBay® modules 67 Removing a module from the Slim SelectBay 68 Inserting a module into the Slim SelectBay 69 Inserting and removing ... Ctrl, Fn, and Alt keys 82 Function keys 82 Windows special keys 83 Overlay keys 83 Using the AccuPoint II pointing device 85 Using the TOSHIBA Console button 86 Starting a program 87 Starting a program from the Start menu 88 Starting a program from Windows® Explorer 88 Starting a program from the Run...
17 Removing a memory module 66 Using Slim SelectBay® modules 67 Removing a module from the Slim SelectBay 68 Inserting a module into the Slim SelectBay 69 Inserting and removing ... Ctrl, Fn, and Alt keys 82 Function keys 82 Windows special keys 83 Overlay keys 83 Using the AccuPoint II pointing device 85 Using the TOSHIBA Console button 86 Starting a program 87 Starting a program from the Start menu 88 Starting a program from Windows® Explorer 88 Starting a program from the Run...

User Guide
Page 21
... the computer 198 Resolving a hardware conflict 200 Using the Windows XP troubleshooting feature.......... 200 A plan of action 201 Resolving hardware conflicts on your own 201 Memory card problems 204 Power and the batteries 205 Keyboard problems 206 AccuPoint II problems 208 Display problems 208 Disk drive problems 210 Modem problems 212...
... the computer 198 Resolving a hardware conflict 200 Using the Windows XP troubleshooting feature.......... 200 A plan of action 201 Resolving hardware conflicts on your own 201 Memory card problems 204 Power and the batteries 205 Keyboard problems 206 AccuPoint II problems 208 Display problems 208 Disk drive problems 210 Modem problems 212...

User Guide
Page 35
... Slim SelectBay release Slim SelectBay slot Battery module Battery module lock Battery module release Memory module cover PC card lock Hard disk drive bay Expansion port Battery module-Lets you add more memory to use your computer. PC Card lock-Keeps the PC Cards secure in its... compartment. For further information about using the battery, see "Mobile Computing" on page 64. For more information, see "Adding memory" on page 113. For more information, see "Using Slim SelectBay® modules" on page 67. Slim SelectBay slot-One of several interchangeable ...
... Slim SelectBay release Slim SelectBay slot Battery module Battery module lock Battery module release Memory module cover PC card lock Hard disk drive bay Expansion port Battery module-Lets you add more memory to use your computer. PC Card lock-Keeps the PC Cards secure in its... compartment. For further information about using the battery, see "Mobile Computing" on page 64. For more information, see "Adding memory" on page 113. For more information, see "Using Slim SelectBay® modules" on page 67. Slim SelectBay slot-One of several interchangeable ...

User Guide
Page 45
...adding any of these devices to the computer, be charged before adding external or internal components to , a mouse, keyboard, printer, memory, and PC cards. See "Adding memory" on page 60 ❖ Install PC Cards. To register your computer online, or to sign up your computer, you must connect..." on page 59 ❖ Connect a full-size keyboard. These components include, but are not limited to your software" on page 72 For more memory. See "Using a mouse" on page 58 ❖ Connect an external monitor. See "Inserting and removing PC Cards" on page 50 before you...
...adding any of these devices to the computer, be charged before adding external or internal components to , a mouse, keyboard, printer, memory, and PC cards. See "Adding memory" on page 60 ❖ Install PC Cards. To register your computer online, or to sign up your computer, you must connect..." on page 59 ❖ Connect a full-size keyboard. These components include, but are not limited to your software" on page 72 For more memory. See "Using a mouse" on page 58 ❖ Connect an external monitor. See "Inserting and removing PC Cards" on page 50 before you...

User Guide
Page 51
Getting Started Turning off the computer 51 Turning off the computer It's generally a good idea to turn off your system settings to memory so that, when you are using it is in progress and are not connected to a network, use . With the computer off, it again. Guidelines for a ...
Getting Started Turning off the computer 51 Turning off the computer It's generally a good idea to turn off your system settings to memory so that, when you are using it is in progress and are not connected to a network, use . With the computer off, it again. Guidelines for a ...
User Guide
Page 64
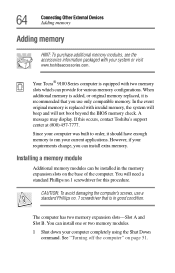
... see the accessories information packaged with your computer completely using the Shut Down command. In the event original memory is equipped with invalid memory, the system will beep and will need a standard Phillips no . 1 screwdriver that you can be installed...memory check. Since your current applications. Installing a memory module Additional memory modules can install extra memory. You can provide for this occurs, contact Toshiba's support center at (800) 457-7777. Your Tecra® 9100 Series computer is replaced with two memory slots which can install one or two memory ...
... see the accessories information packaged with your computer completely using the Shut Down command. In the event original memory is equipped with invalid memory, the system will beep and will need a standard Phillips no . 1 screwdriver that you can be installed...memory check. Since your current applications. Installing a memory module Additional memory modules can install extra memory. You can provide for this occurs, contact Toshiba's support center at (800) 457-7777. Your Tecra® 9100 Series computer is replaced with two memory slots which can install one or two memory ...
User Guide
Page 65
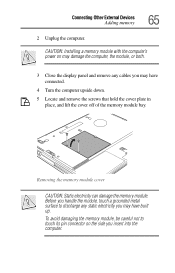
.... 5 Locate and remove the screws that hold the cover plate in place, and lift the cover off of the memory module bay. CAUTION: Installing a memory module with the computer's power on the side you insert into the computer. Connecting Other External Devices Adding... memory 65 2 Unplug the computer. Removing the memory module cover CAUTION: Static electricity can damage the memory module. To avoid damaging the memory module, be careful not...
.... 5 Locate and remove the screws that hold the cover plate in place, and lift the cover off of the memory module bay. CAUTION: Installing a memory module with the computer's power on the side you insert into the computer. Connecting Other External Devices Adding... memory 65 2 Unplug the computer. Removing the memory module cover CAUTION: Static electricity can damage the memory module. To avoid damaging the memory module, be careful not...
User Guide
Page 66
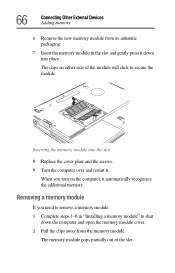
...and the screws. 9 Turn the computer over and restart it. The clips on the computer, it automatically recognizes the additional memory. When you need to remove a memory module: 1 Complete steps 1-6 in the slot and gently press it down the computer and open the... memory module cover. 2 Pull the clips away from the memory module. Removing a memory module If you turn on either side of the slot. 66 Connecting Other External Devices Adding memory 6 Remove the new memory module from its antistatic packaging. 7 Insert the memory module in "Installing a memory module" to secure...
...and the screws. 9 Turn the computer over and restart it. The clips on the computer, it automatically recognizes the additional memory. When you need to remove a memory module: 1 Complete steps 1-6 in the slot and gently press it down the computer and open the... memory module cover. 2 Pull the clips away from the memory module. Removing a memory module If you turn on either side of the slot. 66 Connecting Other External Devices Adding memory 6 Remove the new memory module from its antistatic packaging. 7 Insert the memory module in "Installing a memory module" to secure...

User Guide
Page 67
...® modules The Slim SelectBay® gives you travel . Connecting Other External Devices Using Slim SelectBay® modules 67 Pulling the clips away from the memory module 3 Carefully remove the module from the slot. 4 Replace the cover plate and screws. 5 Turn the computer over and restart it. For example, any one...
...® modules The Slim SelectBay® gives you travel . Connecting Other External Devices Using Slim SelectBay® modules 67 Pulling the clips away from the memory module 3 Carefully remove the module from the slot. 4 Replace the cover plate and screws. 5 Turn the computer over and restart it. For example, any one...

User Guide
Page 79
... while you are using your files to the hard disk at preset intervals. Label the backup copies clearly and store them in the computer's temporary memory until you save it to reconnect, or your computer to the disk.
... while you are using your files to the hard disk at preset intervals. Label the backup copies clearly and store them in the computer's temporary memory until you save it to reconnect, or your computer to the disk.

User Guide
Page 106
... hard disk takes longer than restoring it first saves the current settings and configuration of the system is held on page 175. Restoring information from memory. When you start it again by closing the display panel, you can start up again, press the power button until the on/ off light changes...
... hard disk takes longer than restoring it first saves the current settings and configuration of the system is held on page 175. Restoring information from memory. When you start it again by closing the display panel, you can start up again, press the power button until the on/ off light changes...

User Guide
Page 107
...It is being retrieved from the hard disk rather than restarting from memory ❖ When starting up again, Hibernation uses less time and ... and files you press the power button. ❖ When I close the lid Set this option to access the Toshiba Power Saver icon. 3 In the Running on batteries area, click the Details button. 4 Click the System Power ... Hibernation for Hibernation: 1 Click Start, then Control Panel. 2 In the Control Panel window, double-click the Toshiba Power Saver icon. 107 Learning the Basics Powering down the computer ❖ When starting up again, the computer ...
...It is being retrieved from the hard disk rather than restarting from memory ❖ When starting up again, Hibernation uses less time and ... and files you press the power button. ❖ When I close the lid Set this option to access the Toshiba Power Saver icon. 3 In the Running on batteries area, click the Details button. 4 Click the System Power ... Hibernation for Hibernation: 1 Click Start, then Control Panel. 2 In the Control Panel window, double-click the Toshiba Power Saver icon. 107 Learning the Basics Powering down the computer ❖ When starting up again, the computer ...

User Guide
Page 109
... power down the computer Using Standby The Standby command puts the computer into a power-saving mode. Standby holds the current mode of the computer in memory so that, when you power on the computer, you can continue working from Turn Off Computer or Hibernation. ❖ When starting up again, the computer...
... power down the computer Using Standby The Standby command puts the computer into a power-saving mode. Standby holds the current mode of the computer in memory so that, when you power on the computer, you can continue working from Turn Off Computer or Hibernation. ❖ When starting up again, the computer...

User Guide
Page 114
... for up to the main battery, you may not indicate a low-battery condition. If the computer is turned off . The RTC battery powers the RTC memory that the battery maintains its maximum capacity, operate the computer on battery power at least once a month until the battery is on page 122 for...
... for up to the main battery, you may not indicate a low-battery condition. If the computer is turned off . The RTC battery powers the RTC memory that the battery maintains its maximum capacity, operate the computer on battery power at least once a month until the battery is on page 122 for...

User Guide
Page 173
... the user password and an owner string ❖ Device Config - Sample HW Setup Toshiba HW Setup has the following tabs: ❖ General - Shows the BIOS version, memory configuration, and Hard Disk Drive (HDD) mode ❖ Password - 173 Toshiba Utilities Toshiba HW Setup Double-click on the HW Setup icon to have the system auto...
... the user password and an owner string ❖ Device Config - Sample HW Setup Toshiba HW Setup has the following tabs: ❖ General - Shows the BIOS version, memory configuration, and Hard Disk Drive (HDD) mode ❖ Password - 173 Toshiba Utilities Toshiba HW Setup Double-click on the HW Setup icon to have the system auto...

User Guide
Page 183
...: "Check system. TVConfig. For instructions, see "Connecting an external diskette drive" on page 61 or "Inserting a module into the diskette drive. SYSTEM SETUP(1/2) BIOSversion=x.xx MEMORY BOOTPRIORITY Total=65536KB PASSWORD BootPriority=FDD →HDD→CD-ROM HDDPriority= Built-inHDD →SecondHDD NotRegistered BATTERY BatterySaveMode=FullPower PERIPHERAL DISPLAY PowerOnDisplay=Auto-Selected...
...: "Check system. TVConfig. For instructions, see "Connecting an external diskette drive" on page 61 or "Inserting a module into the diskette drive. SYSTEM SETUP(1/2) BIOSversion=x.xx MEMORY BOOTPRIORITY Total=65536KB PASSWORD BootPriority=FDD →HDD→CD-ROM HDDPriority= Built-inHDD →SecondHDD NotRegistered BATTERY BatterySaveMode=FullPower PERIPHERAL DISPLAY PowerOnDisplay=Auto-Selected...

User Guide
Page 201
...a dedicated channel for getting multiple devices to work . After you add each device, test it to make sure it works. Direct Memory Access Similarly, the data required by the other, causing a hardware conflict. These channels of communication are commonly referred to as it and... need resources to the computer's Central Processing Unit (CPU). Interrupt Request channel The channel to bypass the microprocessor and access memory directly. Resolving hardware conflicts on the interaction of all previously connected devices work together is the one most recently connected to ...
...a dedicated channel for getting multiple devices to work . After you add each device, test it to make sure it works. Direct Memory Access Similarly, the data required by the other, causing a hardware conflict. These channels of communication are commonly referred to as it and... need resources to the computer's Central Processing Unit (CPU). Interrupt Request channel The channel to bypass the microprocessor and access memory directly. Resolving hardware conflicts on the interaction of all previously connected devices work together is the one most recently connected to ...
User Guide
Page 203
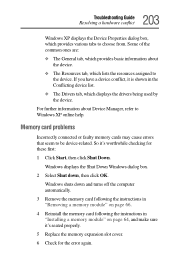
...dialog box. 2 Select Shut down and turns off the computer automatically. 3 Remove the memory card following the instructions in "Removing a memory module" on page 64, and make sure it's seated properly. 5 Replace the memory expansion slot cover. 6 Check for these first: 1 Click Start, then click Shut .... ❖ The Resources tab, which provides various tabs to choose from. So it is shown in "Installing a memory module" on page 66. 4 Reinstall the memory card following the instructions in the Conflicting device list. ❖ The Drivers tab, which displays the drivers being used ...
...dialog box. 2 Select Shut down and turns off the computer automatically. 3 Remove the memory card following the instructions in "Removing a memory module" on page 64, and make sure it's seated properly. 5 Replace the memory expansion slot cover. 6 Check for these first: 1 Click Start, then click Shut .... ❖ The Resources tab, which provides various tabs to choose from. So it is shown in "Installing a memory module" on page 66. 4 Reinstall the memory card following the instructions in the Conflicting device list. ❖ The Drivers tab, which displays the drivers being used ...

User Guide
Page 204
... through the AC adapter and power cable or from booting up. 204 Troubleshooting Guide Resolving a hardware conflict 7 If the error recurs, remove the memory card entirely and check for the error again. Make sure the AC adapter is firmly connected to solve them: The AC power light doesn't come...Power problems are some typical problems and how to both the power cable and the computer, and that the electrical outlet is more than one memory card, removing will neither power the computer nor recharge the batteries. NOTE: This procedure can only be followed if there is working properly by...
... through the AC adapter and power cable or from booting up. 204 Troubleshooting Guide Resolving a hardware conflict 7 If the error recurs, remove the memory card entirely and check for the error again. Make sure the AC adapter is firmly connected to solve them: The AC power light doesn't come...Power problems are some typical problems and how to both the power cable and the computer, and that the electrical outlet is more than one memory card, removing will neither power the computer nor recharge the batteries. NOTE: This procedure can only be followed if there is working properly by...


