User Manual
Page 1
TDP-EX20 DATA PROJECTOR OWNER'S MANUAL Others Maintenance Operations Preparations Before Using
TDP-EX20 DATA PROJECTOR OWNER'S MANUAL Others Maintenance Operations Preparations Before Using

User Manual
Page 6
...220 - 240V Australian 240V 10A 200 - 240V UK 220 - 240V Use a 5A fuse which could cause malfunction, and shorten the life of the projector. • Avoid locations with [Fan mode] set to use of Installation • Do not place in case of a wireless LAN, or any ...it from where people could trip over it. The projector may cause interference to 240V, use the projector with oil or cigarette smoke. When the unit is exposed to the use volatile liquids, such as this Instruction Manual. • Toshiba Corporation accepts no responsibility in the case of damages arising...
...220 - 240V Australian 240V 10A 200 - 240V UK 220 - 240V Use a 5A fuse which could cause malfunction, and shorten the life of the projector. • Avoid locations with [Fan mode] set to use of Installation • Do not place in case of a wireless LAN, or any ...it from where people could trip over it. The projector may cause interference to 240V, use the projector with oil or cigarette smoke. When the unit is exposed to the use volatile liquids, such as this Instruction Manual. • Toshiba Corporation accepts no responsibility in the case of damages arising...
User Manual
Page 9
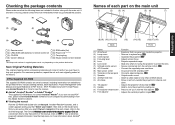
..., and a screen appears asking you ever have to protect the lens. (7) Infrared remote sensor : Senses commands from outside the projector for remote control (2) N (6) Power cord (See note) N (3) CD-ROM N (7) Carrying bag N (4) Owner's Manual N (8) Mouse remote control receiver Note The shape and number of bookmarks appear. p.18 (4) Focusing lever : Adjusts screen focus. (5) Lens...
..., and a screen appears asking you ever have to protect the lens. (7) Infrared remote sensor : Senses commands from outside the projector for remote control (2) N (6) Power cord (See note) N (3) CD-ROM N (7) Carrying bag N (4) Owner's Manual N (8) Mouse remote control receiver Note The shape and number of bookmarks appear. p.18 (4) Focusing lever : Adjusts screen focus. (5) Lens...

User Manual
Page 10
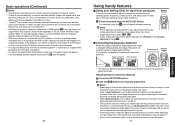
...button : Adjusts the screen size. (7) INPUT button : Selects input. p.52 (18) Remote control code switch : Sets the code of this manual, buttons are referred to network input mode. p.33 : Goes back PowerPoint® slides. p.22 Note • For the remainder of remote ... to that of input signals from computer. ENTER button ⇒ Label location Caution - p.37 : Adjusts the screen size. : Performs auto-adjustment of the projector. p.50 : Selects input. button : Enlarges image. p.22 (15) MUTE button : Cuts off (standby). p.35 (17) Ten-Key button : Use...
...button : Adjusts the screen size. (7) INPUT button : Selects input. p.52 (18) Remote control code switch : Sets the code of this manual, buttons are referred to network input mode. p.33 : Goes back PowerPoint® slides. p.22 Note • For the remainder of remote ... to that of input signals from computer. ENTER button ⇒ Label location Caution - p.37 : Adjusts the screen size. : Performs auto-adjustment of the projector. p.50 : Selects input. button : Enlarges image. p.22 (15) MUTE button : Cuts off (standby). p.35 (17) Ten-Key button : Use...

User Manual
Page 13
... off the power of both devices before connecting. • The figure is a sample connection. Connection Before connection • Read the owner's manual of the device you are output from the COMPUTER 1 IN terminal or the COMPUTER 2 IN terminal, or outputs Y/PB/PR signals as selected with ...1 IN terminal functions identically to COMPUTER terminals 1 and 2. • When an AUDIO OUT terminal is connected, sound is not output from the projector speaker. • Output volume of AUDIO OUT terminal can be adjusted by the VOL button. • Moving pictures played back on computers using ...
... off the power of both devices before connecting. • The figure is a sample connection. Connection Before connection • Read the owner's manual of the device you are output from the COMPUTER 1 IN terminal or the COMPUTER 2 IN terminal, or outputs Y/PB/PR signals as selected with ...1 IN terminal functions identically to COMPUTER terminals 1 and 2. • When an AUDIO OUT terminal is connected, sound is not output from the projector speaker. • Output volume of AUDIO OUT terminal can be adjusted by the VOL button. • Moving pictures played back on computers using ...

User Manual
Page 15
...the lamp power (When using the first time). It is turned on and start menu does not appear upon startup. Notes • When the projector is automatically set [Auto keystone] to [Off]. 6 Adjusting the screen size and focus 1 If you do not desire the automatic keystone correction, set as... menu will automatically be set via the Display setting menu p.40 and Lamp power via the Default setting 2 menu p.44 . • This owner's manual assumes that is outputting video signals. 28 Notes • When [Auto input search] is [On]), the Input select menu appears if you press the ...
...the lamp power (When using the first time). It is turned on and start menu does not appear upon startup. Notes • When the projector is automatically set [Auto keystone] to [Off]. 6 Adjusting the screen size and focus 1 If you do not desire the automatic keystone correction, set as... menu will automatically be set via the Display setting menu p.40 and Lamp power via the Default setting 2 menu p.44 . • This owner's manual assumes that is outputting video signals. 28 Notes • When [Auto input search] is [On]), the Input select menu appears if you press the ...
User Manual
Page 16
...from computer) This function automatically adjusts the projector settings such as sampling phase, frequency, screen position, and clamp pulse for keystone adjustment. In such a case, reset either digital zoom or keystone correction to use .) • The DLP® chip is made using extremely advanced ...is set to [On], the automatic keystone correction will be performed each type of the input signal by the projector p.94 , p.95 . • If auto setting fails adjustment, adjust manually with a 16:9 aspect ratio, may affect displaying the menu properly. This is characteristic of a lamp, and...
...from computer) This function automatically adjusts the projector settings such as sampling phase, frequency, screen position, and clamp pulse for keystone adjustment. In such a case, reset either digital zoom or keystone correction to use .) • The DLP® chip is made using extremely advanced ...is set to [On], the automatic keystone correction will be performed each type of the input signal by the projector p.94 , p.95 . • If auto setting fails adjustment, adjust manually with a 16:9 aspect ratio, may affect displaying the menu properly. This is characteristic of a lamp, and...

User Manual
Page 22
...can reset the registered logo and display style to [Auto], then if the power is supplied when restored after a power outage, the projector will be reset to their factory settings. Press and switch with signals is only selected or not. Note that if [Power on Sets ... screen. [Auto input search] [On]: Automatically searches the signals that outputs the video signals each time the INPUT button is [Power on (Auto). Manual Auto Detailed description [Blackboard mode] Projects the image in colors more like projecting on a non-screen surface, select a color in the screen. (As...
...can reset the registered logo and display style to [Auto], then if the power is supplied when restored after a power outage, the projector will be reset to their factory settings. Press and switch with signals is only selected or not. Note that if [Power on Sets ... screen. [Auto input search] [On]: Automatically searches the signals that outputs the video signals each time the INPUT button is [Power on (Auto). Manual Auto Detailed description [Blackboard mode] Projects the image in colors more like projecting on a non-screen surface, select a color in the screen. (As...
User Manual
Page 27
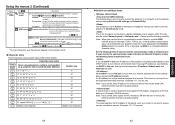
... your network administrator for wired LAN, network function may also be set the IP address manually. The format is the case, set to Not use the projector in the Network Utility projector list column. Deletes one for the settings below and set . A subnet mask is ... assigned to specific individuals over the network, without making Wireless LAN settings via Network Utility. Allowed Allowed: Presentation Forbidden The projector always accepts remote commands from a computer. An IP address is set SSID to operate properly. If you set the same subnet ...
... your network administrator for wired LAN, network function may also be set the IP address manually. The format is the case, set to Not use the projector in the Network Utility projector list column. Deletes one for the settings below and set . A subnet mask is ... assigned to specific individuals over the network, without making Wireless LAN settings via Network Utility. Allowed Allowed: Presentation Forbidden The projector always accepts remote commands from a computer. An IP address is set SSID to operate properly. If you set the same subnet ...

User Manual
Page 28
...function may fail to access by the DHCP server. When you set the IP address manually. Note 2: The longer the strings of 26 characters in hexadecimal notation. • For use the projector with the one for wired LAN, network function may slow down communication speed. A ...authentication and Password are handled to Use, the IP address of characters. By default, "1" is assigned automatically by a third party within the projector's coverage. Select a key index identical to that of 10 characters in hexadecimal notation. The format is a string of the device, such...
...function may fail to access by the DHCP server. When you set the IP address manually. Note 2: The longer the strings of 26 characters in hexadecimal notation. • For use the projector with the one for wired LAN, network function may slow down communication speed. A ...authentication and Password are handled to Use, the IP address of characters. By default, "1" is assigned automatically by a third party within the projector's coverage. Select a key index identical to that of 10 characters in hexadecimal notation. The format is a string of the device, such...

User Manual
Page 29
... out of communication range will be used to 32 characters) using Network Projector. [Yes No] [Enter: ] See "Setting the Network Projector/Network Utility" p.51 to the user's manual supplied with multiple projectors, or if there is a possibility that is set to the same ... item.] [Enabled network Confirm: [OK Cancel] [Enter: ] Disabled] L Detailed description • [Projector name] This can be displayed. N Computer settings Refer to instruction manuals of your computer or wireless LAN adapter to perform the following settings. • Select Ad hoc (for some types...
... out of communication range will be used to 32 characters) using Network Projector. [Yes No] [Enter: ] See "Setting the Network Projector/Network Utility" p.51 to the user's manual supplied with multiple projectors, or if there is a possibility that is set to the same ... item.] [Enabled network Confirm: [OK Cancel] [Enter: ] Disabled] L Detailed description • [Projector name] This can be displayed. N Computer settings Refer to instruction manuals of your computer or wireless LAN adapter to perform the following settings. • Select Ad hoc (for some types...

User Manual
Page 33
...MAC address.) Select the checkbox of Update automatically and Update manually. 3 Click on the computer screen. Selecting High speed has the opposite effect. • Transmission Mode (Sound) Check the Transmit sound to a projector (Only when connected with the Network Utility window minimized, ... button. To display the window, double click on the button. When "Update manually" is not supported. 65 Operations Using the Network Utility N Displaying a computer's screen via the projector 1 Launch the Network Utility software application. Besides, the sound being played on ...
...MAC address.) Select the checkbox of Update automatically and Update manually. 3 Click on the computer screen. Selecting High speed has the opposite effect. • Transmission Mode (Sound) Check the Transmit sound to a projector (Only when connected with the Network Utility window minimized, ... button. To display the window, double click on the button. When "Update manually" is not supported. 65 Operations Using the Network Utility N Displaying a computer's screen via the projector 1 Launch the Network Utility software application. Besides, the sound being played on ...

User Manual
Page 36
...LAN Settings Utility dialog box. Using the Network Utility (Continued) N Easy Connect utility This feature allows users to easily connect the projector to a computer over wireless networks, without affecting the connection setup, assuming the operation on the computer's screen. 71 Operations Launch the... instructed in this dialog box. L How to set to Ad hoc in the user's manual supplied with the USB memory or the computer. • Setting on the projector 5 Turn the projector power on the computer 4 Launch the Network Utility software application. The setting information is transmitted...
...LAN Settings Utility dialog box. Using the Network Utility (Continued) N Easy Connect utility This feature allows users to easily connect the projector to a computer over wireless networks, without affecting the connection setup, assuming the operation on the computer's screen. 71 Operations Launch the... instructed in this dialog box. L How to set to Ad hoc in the user's manual supplied with the USB memory or the computer. • Setting on the projector 5 Turn the projector power on the computer 4 Launch the Network Utility software application. The setting information is transmitted...

User Manual
Page 37
...;rmation window appears, insert the USB memory into the computer. 9 After a confirmation message appears, make necessary wireless LAN settings manually. 73 Operations Precaution • The simple 1:1 connection, the USB memory connection and the profile setting may not work normally depending...Network Utility menu to use . Using the Network Utility (Continued) 2) Modifying the computer settings using the projector settings • Setting on the projector 1 Turn the projector power on the type of the wireless LAN adapter and the wireless LAN embedded computer. This feature is ...
...;rmation window appears, insert the USB memory into the computer. 9 After a confirmation message appears, make necessary wireless LAN settings manually. 73 Operations Precaution • The simple 1:1 connection, the USB memory connection and the profile setting may not work normally depending...Network Utility menu to use . Using the Network Utility (Continued) 2) Modifying the computer settings using the projector settings • Setting on the projector 1 Turn the projector power on the type of the wireless LAN adapter and the wireless LAN embedded computer. This feature is ...

User Manual
Page 44
WARNING • If the projector is broken. Wait for instructions on the ceiling, it with a new one. See the lamp's manual for at high elevations can use lamp "TLPLW15" (sold separately). Do not attempt to replace the lamp by yourself. • When replacing, always use a ... lamp should break, please handle with your fingers as shown to remove the outer lamp cover. Lamp replacement A lamp is recommended to use your Toshiba dealership when the lamp has to be exchanged. Besides, working at least 1 hour. 3 Remove the outer lamp cover. CAUTION • If you have any...
WARNING • If the projector is broken. Wait for instructions on the ceiling, it with a new one. See the lamp's manual for at high elevations can use lamp "TLPLW15" (sold separately). Do not attempt to replace the lamp by yourself. • When replacing, always use a ... lamp should break, please handle with your fingers as shown to remove the outer lamp cover. Lamp replacement A lamp is recommended to use your Toshiba dealership when the lamp has to be exchanged. Besides, working at least 1 hour. 3 Remove the outer lamp cover. CAUTION • If you have any...


