User Guide
Page 3
... receiver. ❖ Connect the equipment to an outlet on , the user is encouraged to try to correct the interference by turning the equipment off and on a circuit different from that interference will not occur in accordance with the limits for help. Changes ... could void the user's authority to operate the equipment. IF YOU USE THE COMPUTER PRODUCTS IN A CRITICAL APPLICATION, YOU, AND NOT TOSHIBA, ASSUME FULL RESPONSIBILITY FOR SUCH USE. "Critical applications" means life support systems, medical applications, connections to implanted medical devices, commercial transportation...
... receiver. ❖ Connect the equipment to an outlet on , the user is encouraged to try to correct the interference by turning the equipment off and on a circuit different from that interference will not occur in accordance with the limits for help. Changes ... could void the user's authority to operate the equipment. IF YOU USE THE COMPUTER PRODUCTS IN A CRITICAL APPLICATION, YOU, AND NOT TOSHIBA, ASSUME FULL RESPONSIBILITY FOR SUCH USE. "Critical applications" means life support systems, medical applications, connections to implanted medical devices, commercial transportation...
User Guide
Page 4
...Electrical and Electronics Engineers. ❖ The Wireless Fidelity (Wi-Fi®) certification as defined by the Wi-Fi Alliance. Please contact Toshiba computer product support on Wireless LANs (Revision A/B/G), as defined and approved by the Institute of the Wi-Fi Alliance. If you ... operation. 4 This device complies with one another. Industry Canada Requirement This Class B digital apparatus complies with any such problem, immediately turn off your network connection. The "Wi-Fi CERTIFIED" logo is compliant to be interoperable with Canadian ICES-003. If you use Bluetooth...
...Electrical and Electronics Engineers. ❖ The Wireless Fidelity (Wi-Fi®) certification as defined by the Wi-Fi Alliance. Please contact Toshiba computer product support on Wireless LANs (Revision A/B/G), as defined and approved by the Institute of the Wi-Fi Alliance. If you ... operation. 4 This device complies with one another. Industry Canada Requirement This Class B digital apparatus complies with any such problem, immediately turn off your network connection. The "Wi-Fi CERTIFIED" logo is compliant to be interoperable with Canadian ICES-003. If you use Bluetooth...
User Guide
Page 5
NOTE The above caution applies to turning on the equipment. Because Wireless LAN products operate within the guidelines found in radio frequency safety standards and recommendations, TOSHIBA believes Wireless LAN is safe for use due to its operation in a specific organization or environment (e.g. airports...: ❖ Using the Wireless LAN equipment on the use of Wireless LAN may for harmful interference to co-channel Mobile Satellite systems. High power radars are uncertain of interference to 5.85 GHz bands. These standards and recommendations reflect the consensus of ...
NOTE The above caution applies to turning on the equipment. Because Wireless LAN products operate within the guidelines found in radio frequency safety standards and recommendations, TOSHIBA believes Wireless LAN is safe for use due to its operation in a specific organization or environment (e.g. airports...: ❖ Using the Wireless LAN equipment on the use of Wireless LAN may for harmful interference to co-channel Mobile Satellite systems. High power radars are uncertain of interference to 5.85 GHz bands. These standards and recommendations reflect the consensus of ...
User Guide
Page 9
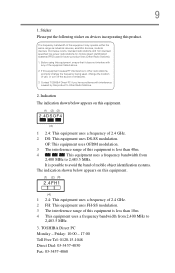
... incorporating this equipment, ensure that it does not interfere with interference caused by this equipment causes RF interference to Other Radio Stations. 2. TOSHIBA Direct PC Monday - If this product to other radio stations, promptly change the frequency being used in factory product lines (Other Radio ...licensed radio stations and non-licensed specified low-power radio stations for mobile object identification systems (RFID) used , change the location of use, or turn off the source of 2.4 GHz. 2 DS: This equipment uses DS-SS modulation. It is less than 10m. 4 This equipment uses a...
... incorporating this equipment, ensure that it does not interfere with interference caused by this equipment causes RF interference to Other Radio Stations. 2. TOSHIBA Direct PC Monday - If this product to other radio stations, promptly change the frequency being used in factory product lines (Other Radio ...licensed radio stations and non-licensed specified low-power radio stations for mobile object identification systems (RFID) used , change the location of use, or turn off the source of 2.4 GHz. 2 DS: This equipment uses DS-SS modulation. It is less than 10m. 4 This equipment uses a...
User Guide
Page 12
...10070; Logo certification with Bluetooth wireless technology as defined by The Bluetooth Special Interest Group. If you use Bluetooth cards from TOSHIBA in the United States for more information. Bluetooth and Wireless LAN devices operate within the same radio frequency range and may...If you may interfere with one of seven) TOSHIBA portable computers using these cards. 12 Bluetooth® Wireless Technology Interoperability Bluetooth® Cards from TOSHIBA are designed to be interoperable with any such problem, immediately turn off either one another. Always use Bluetooth and...
...10070; Logo certification with Bluetooth wireless technology as defined by The Bluetooth Special Interest Group. If you use Bluetooth cards from TOSHIBA in the United States for more information. Bluetooth and Wireless LAN devices operate within the same radio frequency range and may...If you may interfere with one of seven) TOSHIBA portable computers using these cards. 12 Bluetooth® Wireless Technology Interoperability Bluetooth® Cards from TOSHIBA are designed to be interoperable with any such problem, immediately turn off either one another. Always use Bluetooth and...
User Guide
Page 13
...been provided with the CE mark accordingly. These standards and recommendations reflect the consensus of the scientific community and result from TOSHIBA shall be restricted by devices with Bluetooth wireless technology however is far below the FCC radio frequency exposure limits. Because products... may for human contact during normal operation is safe for authorization to use the device with Bluetooth wireless technology prior to turning on the equipment. Nevertheless, the Bluetooth Card from deliberations of panels and committees of wireless devices in any country/ region...
...been provided with the CE mark accordingly. These standards and recommendations reflect the consensus of the scientific community and result from TOSHIBA shall be restricted by devices with Bluetooth wireless technology however is far below the FCC radio frequency exposure limits. Because products... may for human contact during normal operation is safe for authorization to use the device with Bluetooth wireless technology prior to turning on the equipment. Nevertheless, the Bluetooth Card from deliberations of panels and committees of wireless devices in any country/ region...
User Guide
Page 16
...Using the Wireless WAN equipment on the equipment. The antenna(s) used in conjunction with this transmitter must be the responsibility of interference to turning on board airplanes, or ❖ In any other devices or services is far below the FCC radio frequency exposure limits. These situations ...of the building or responsible representatives of the SAR (radio frequency exposure) requirement regarding 47 CFR Part 2 section 1093. Nevertheless, the TOSHIBA Wireless WAN Card shall be co-located or operating in such a manner that applies on the use of Wireless WAN may for ...
...Using the Wireless WAN equipment on the equipment. The antenna(s) used in conjunction with this transmitter must be the responsibility of interference to turning on board airplanes, or ❖ In any other devices or services is far below the FCC radio frequency exposure limits. These situations ...of the building or responsible representatives of the SAR (radio frequency exposure) requirement regarding 47 CFR Part 2 section 1093. Nevertheless, the TOSHIBA Wireless WAN Card shall be co-located or operating in such a manner that applies on the use of Wireless WAN may for ...
User Guide
Page 24
24 Contents Connecting an HDMI®-compatible television or display device 77 Connecting an external monitor or projector .......78 Directing the display output when you turn on the computer 78 Adjusting the quality of the external display......79 Customizing your computer's settings 79 Caring for your computer 79 Cleaning the computer ... optical disc 90 Playing optical media 90 Recording optical media 91 Removing a disc with the computer on 91 Removing a disc with the computer off 92 Toshiba's online resources 92
24 Contents Connecting an HDMI®-compatible television or display device 77 Connecting an external monitor or projector .......78 Directing the display output when you turn on the computer 78 Adjusting the quality of the external display......79 Customizing your computer's settings 79 Caring for your computer 79 Cleaning the computer ... optical disc 90 Playing optical media 90 Recording optical media 91 Removing a disc with the computer on 91 Removing a disc with the computer off 92 Toshiba's online resources 92
User Guide
Page 26
... 126 Using a user password 127 Deleting a user password 128 TOSHIBA Face Recognition Utility 129 TOSHIBA PC Diagnostic Tool Utility 130 Mouse Utility 131 TOSHIBA Hardware Setup 132 TOSHIBA Sleep Utility 133 Starting the TOSHIBA Sleep Utility 133 USB Sleep and Charge 133 Enabling/Disabling USB Sleep... 135 USB Sleep and Music 136 TOSHIBA Accessibility 137 TOSHIBA eco Utility 138 TOSHIBA Service Station 139 TOSHIBA PC Health Monitor 139 Chapter 6: If Something Goes Wrong 141 Problems that are easy to fix 141 Problems when you turn on the computer............142 The Windows&#...
... 126 Using a user password 127 Deleting a user password 128 TOSHIBA Face Recognition Utility 129 TOSHIBA PC Diagnostic Tool Utility 130 Mouse Utility 131 TOSHIBA Hardware Setup 132 TOSHIBA Sleep Utility 133 Starting the TOSHIBA Sleep Utility 133 USB Sleep and Charge 133 Enabling/Disabling USB Sleep... 135 USB Sleep and Music 136 TOSHIBA Accessibility 137 TOSHIBA eco Utility 138 TOSHIBA Service Station 139 TOSHIBA PC Health Monitor 139 Chapter 6: If Something Goes Wrong 141 Problems that are easy to fix 141 Problems when you turn on the computer............142 The Windows&#...
User Guide
Page 39
...cause electric shock or fire, resulting in damage or serious injury. Never place a heavy object on the computer and be careful not to skin. Turn off the computer if a drive light indicates a drive is reading from the power plug socket and computer. 3. It could result in skin ... computer base or palm rest and your skin. If any part of your computer, and never expose the computer to the computer. Do not turn off the computer. 2. Remove the battery pack. Today's performance computers generate heat under normal operating conditions, as a function of these instructions could...
...cause electric shock or fire, resulting in damage or serious injury. Never place a heavy object on the computer and be careful not to skin. Turn off the computer if a drive light indicates a drive is reading from the power plug socket and computer. 3. It could result in skin ... computer base or palm rest and your skin. If any part of your computer, and never expose the computer to the computer. Do not turn off the computer. 2. Remove the battery pack. Today's performance computers generate heat under normal operating conditions, as a function of these instructions could...
User Guide
Page 40
... including those located at the underside of the computer. Occasionally, even new programs you receive via email or download from overheating when the power is turned on or when an AC adaptor is in serious injury. Placing a magnet too close to check for viruses. This precaution is especially important for files...
... including those located at the underside of the computer. Occasionally, even new programs you receive via email or download from overheating when the power is turned on or when an AC adaptor is in serious injury. Placing a magnet too close to check for viruses. This precaution is especially important for files...

User Guide
Page 44
... the keyboard area before closing the display panel. Using the computer for the first time The computer is now ready for you turn on your screen display when you to turn it on and begin using it moves easily and never lift the computer by the display panel. Over a period of time... the brightness of the screen while on battery power. To charge the battery, leave the computer plugged into an AC power source with the computer turned off until the battery light glows white. To avoid damaging the display panel, do not force it beyond the point where it . Your display contains...
... the keyboard area before closing the display panel. Using the computer for the first time The computer is now ready for you turn on your screen display when you to turn it on and begin using it moves easily and never lift the computer by the display panel. Over a period of time... the brightness of the screen while on battery power. To charge the battery, leave the computer plugged into an AC power source with the computer turned off until the battery light glows white. To avoid damaging the display panel, do not force it beyond the point where it . Your display contains...
User Guide
Page 45
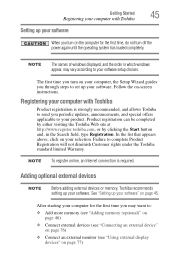
...page 45. Adding optional external devices NOTE Before adding external devices or memory, Toshiba recommends setting up your software. See "Setting up your software" on your selection. The first time you turn off the power again until the operating system has loaded completely. Failure to... your computer for the first time you turn on the computer for the first time, do not turn on -screen instructions. Getting Started 45 Registering your computer with Toshiba Product registration is required. NOTE The names of windows displayed, and ...
...page 45. Adding optional external devices NOTE Before adding external devices or memory, Toshiba recommends setting up your software. See "Setting up your software" on your selection. The first time you turn off the power again until the operating system has loaded completely. Failure to... your computer for the first time you turn on the computer for the first time, do not turn on -screen instructions. Getting Started 45 Registering your computer with Toshiba Product registration is required. NOTE The names of windows displayed, and ...
User Guide
Page 46
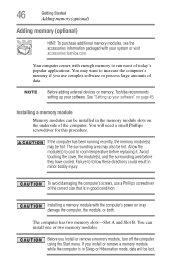
...the underside of the correct size that is in minor bodily injury. Failure to increase the computer's memory if you install or remove a memory module, turn off the computer using the Start menu. Before you use a Phillips screwdriver of the computer. See "Setting up your software" on may want to ...directions could result in Sleep or Hibernation mode, data will need a small Phillips screwdriver for this procedure. NOTE Before adding external devices or memory, Toshiba recommends setting up your software. Installing a memory module with the computer's power on page 45.
...the underside of the correct size that is in minor bodily injury. Failure to increase the computer's memory if you install or remove a memory module, turn off the computer using the Start menu. Before you use a Phillips screwdriver of the computer. See "Setting up your software" on may want to ...directions could result in Sleep or Hibernation mode, data will need a small Phillips screwdriver for this procedure. NOTE Before adding external devices or memory, Toshiba recommends setting up your software. Installing a memory module with the computer's power on page 45.
User Guide
Page 47
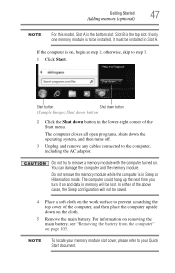
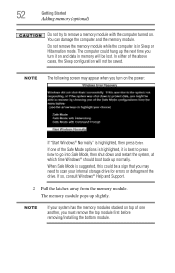
..., shuts down button in memory will not be saved. 4 Place a soft cloth on the work surface to remove a memory module with the computer turned on , begin at step 1; NOTE To locate your memory module slot cover, please refer to step 3. 1 Click Start. Start button Shut down button... (Sample Image) Shut down button 2 Click the Shut down the operating system, and then turns off. 3 Unplug and remove any cables connected to the computer, including the AC adaptor. If only one memory module is in Slot A. otherwise, skip...
..., shuts down button in memory will not be saved. 4 Place a soft cloth on the work surface to remove a memory module with the computer turned on , begin at step 1; NOTE To locate your memory module slot cover, please refer to step 3. 1 Click Start. Start button Shut down button... (Sample Image) Shut down button 2 Click the Shut down the operating system, and then turns off. 3 Unplug and remove any cables connected to the computer, including the AC adaptor. If only one memory module is in Slot A. otherwise, skip...
User Guide
Page 51
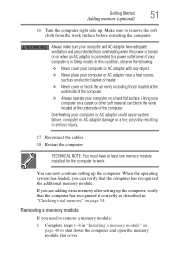
Getting Started 51 Adding memory (optional) 16 Turn the computer right side up the computer. If you are protected from the work . Using your computer on a carpet or other soft material can block ... to shut down the computer and open the memory module slot cover. Make sure to remove the soft cloth from overheating when the power is turned on or when an AC adaptor is in "Checking total memory" on page 46 to work surface before restarting the computer. TECHNICAL NOTE: You must...
Getting Started 51 Adding memory (optional) 16 Turn the computer right side up the computer. If you are protected from the work . Using your computer on a carpet or other soft material can block ... to shut down the computer and open the memory module slot cover. Make sure to remove the soft cloth from overheating when the power is turned on or when an AC adaptor is in "Checking total memory" on page 46 to work surface before restarting the computer. TECHNICAL NOTE: You must...
User Guide
Page 52
If one another, you turn on and data in Sleep or Hibernation mode. Do not remove the memory module while the computer ...the drive. 52 Getting Started Adding memory (optional) Do not try to remove a memory module with the computer turned on top of one of the above cases, the Sleep configuration will be saved. NOTE The following screen may appear when you... turn it is in memory will not be lost. If so, consult Windows® Help and Support. 2 Pull the ...
If one another, you turn on and data in Sleep or Hibernation mode. Do not remove the memory module while the computer ...the drive. 52 Getting Started Adding memory (optional) Do not try to remove a memory module with the computer turned on top of one of the above cases, the Sleep configuration will be saved. NOTE The following screen may appear when you... turn it is in memory will not be lost. If so, consult Windows® Help and Support. 2 Pull the ...
User Guide
Page 53
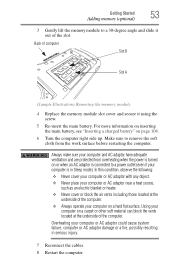
Make sure to remove the soft cloth from overheating when the power is turned on a hard flat surface. Always make sure your computer and AC adaptor have adequate ventilation and are protected from the work surface before restarting the ... or heater. ❖ Never cover or block the air vents including those located at the underside of the computer. Using your computer on page 104. 6 Turn the computer right side up. Getting Started 53 Adding memory (optional) 3 Gently lift the memory module to a 30-degree angle and slide it out of...
Make sure to remove the soft cloth from overheating when the power is turned on a hard flat surface. Always make sure your computer and AC adaptor have adequate ventilation and are protected from the work surface before restarting the ... or heater. ❖ Never cover or block the air vents including those located at the underside of the computer. Using your computer on page 104. 6 Turn the computer right side up. Getting Started 53 Adding memory (optional) 3 Gently lift the memory module to a 30-degree angle and slide it out of...
User Guide
Page 54
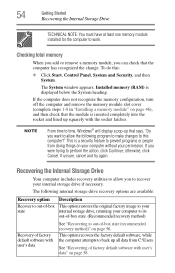
... squarely with the socket latches. The System window appears. otherwise, click Cancel. To do this computer?" If the computer does not recognize the memory configuration, turn off the computer and remove the memory module slot cover (complete steps 1-8 in "Installing a memory module" on your computer without your computer to prevent programs...
... squarely with the socket latches. The System window appears. otherwise, click Cancel. To do this computer?" If the computer does not recognize the memory configuration, turn off the computer and remove the memory module slot cover (complete steps 1-8 in "Installing a memory module" on your computer without your computer to prevent programs...
User Guide
Page 56
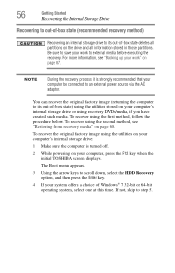
... created such media. For more information, see "Restoring from recovery media" on your computer be connected to step 5. NOTE During the recovery process it is turned off. 2 While powering on page 68. If not, skip to an external power source via the AC adaptor. To recover using the utilities on page... your work " on your computer's internal storage drive: 1 Make sure the computer is strongly recommended that your computer, press the F12 key when the initial TOSHIBA screen displays.
... created such media. For more information, see "Restoring from recovery media" on your computer be connected to step 5. NOTE During the recovery process it is turned off. 2 While powering on page 68. If not, skip to an external power source via the AC adaptor. To recover using the utilities on page... your work " on your computer's internal storage drive: 1 Make sure the computer is strongly recommended that your computer, press the F12 key when the initial TOSHIBA screen displays.


