
Users Manual Canada; English
Page 12
... the left. If three keys are to identify the components it is providing information on configuring your computer, basic operations and care, using your computer. User's Manual xii Conventions This manual uses the following their definition. Icons Icons identify ports, dials, and other parts of your purchase of reliable, high-performance computing. The indicator panel also uses icons to type in the typeface you...
... the left. If three keys are to identify the components it is providing information on configuring your computer, basic operations and care, using your computer. User's Manual xii Conventions This manual uses the following their definition. Icons Icons identify ports, dials, and other parts of your purchase of reliable, high-performance computing. The indicator panel also uses icons to type in the typeface you...
Users Manual Canada; English
Page 23
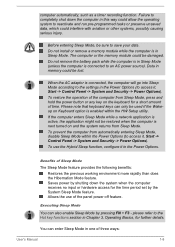
... operating system to access it, Start -> Control Panel -> System and Security -> Power Options). To prevent the computer from Sleep Mode. Executing Sleep Mode You can only be used if the Wakeup on Keyboard option is next turned on the keyboard for a short amount of time. To use of the computer from Sleep Mode, press and hold the power button or any key on and the system returns from automatically entering Sleep Mode, disable Sleep Mode within the HW Setup utility...
... operating system to access it, Start -> Control Panel -> System and Security -> Power Options). To prevent the computer from Sleep Mode. Executing Sleep Mode You can only be used if the Wakeup on Keyboard option is next turned on the keyboard for a short amount of time. To use of the computer from Sleep Mode, press and hold the power button or any key on and the system returns from automatically entering Sleep Mode, disable Sleep Mode within the HW Setup utility...
Users Manual Canada; English
Page 48
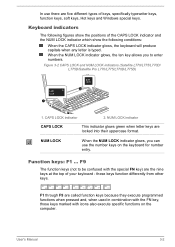
... LOCK indicators (Satellite L770/L775/L770D/ L775D/Satellite Pro L770/L775/L770D/L775D) 2 1 1. these keys function differently from other keys. In use the number keys on the computer. When the NUM LOCK indicator glows, the ten key allows you can use there are five different types of your keyboard - CAPS LOCK indicator 2. F9 The function keys (not to enter numbers. NUM LOCK When the NUM LOCK indicator glows, you to be confused with icons also execute specific functions on the keyboard...
... LOCK indicators (Satellite L770/L775/L770D/ L775D/Satellite Pro L770/L775/L770D/L775D) 2 1 1. these keys function differently from other keys. In use the number keys on the computer. When the NUM LOCK indicator glows, the ten key allows you can use there are five different types of your keyboard - CAPS LOCK indicator 2. F9 The function keys (not to enter numbers. NUM LOCK When the NUM LOCK indicator glows, you to be confused with icons also execute specific functions on the keyboard...
Users Manual Canada; English
Page 49
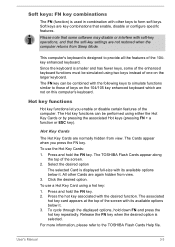
... key combinations that enable, disable or configure specific features. The TOSHIBA Flash Cards appear along the top of the 104key enhanced keyboard. The Hot key functions can be performed using either the Hot Key Cards or by pressing the associated Hot keys (pressing FN + a function or ESC key). All other keys to those of the computer. The associated hot key card appears at the top of one on this computer's keyboard. To cycle through the displayed options...
... key combinations that enable, disable or configure specific features. The TOSHIBA Flash Cards appear along the top of the 104key enhanced keyboard. The Hot key functions can be performed using either the Hot Key Cards or by pressing the associated Hot keys (pressing FN + a function or ESC key). All other keys to those of the computer. The associated hot key card appears at the top of one on this computer's keyboard. To cycle through the displayed options...

Users Manual Canada; English
Page 50
... of the supported application windows. Brightness Down Pressing FN + F6 decreases the computer's display panel brightness in individual steps. Lock Pressing FN + F1 enters ''Lock computer mode''. Enlarge Pressing FN + 2 enlarges the icon size on and off. To access this help, click Start -> All Programs -> TOSHIBA -> Utilities > Flash Cards Help. Output Pressing FN + F5 changes the active display device. Wireless Pressing FN + F8 switches the active wireless devices. Touch Pad Pressing FN + F9 enables or disables the Touch Pad function. Sleep Pressing FN...
... of the supported application windows. Brightness Down Pressing FN + F6 decreases the computer's display panel brightness in individual steps. Lock Pressing FN + F1 enters ''Lock computer mode''. Enlarge Pressing FN + 2 enlarges the icon size on and off. To access this help, click Start -> All Programs -> TOSHIBA -> Utilities > Flash Cards Help. Output Pressing FN + F5 changes the active display device. Wireless Pressing FN + F8 switches the active wireless devices. Touch Pad Pressing FN + F9 enables or disables the Touch Pad function. Sleep Pressing FN...
Users Manual Canada; English
Page 61
... computers or other function, including using a mouse or Touch Pad, or closing/opening the display panel. Not support to reproduce music or voice. TOSHIBA VIDEO PLAYER Please be able to the computer. Do not perform any of the following : memory media card, USB device, external display, optical digital devices. Bump or cause vibration to read DVD-R/+R/-RW/+RW/-RAM discs. DVD-VR format is not supported in this version. Please wait until all Disc Drive activity has stopped.
... computers or other function, including using a mouse or Touch Pad, or closing/opening the display panel. Not support to reproduce music or voice. TOSHIBA VIDEO PLAYER Please be able to the computer. Do not perform any of the following : memory media card, USB device, external display, optical digital devices. Bump or cause vibration to read DVD-R/+R/-RW/+RW/-RAM discs. DVD-VR format is not supported in this version. Please wait until all Disc Drive activity has stopped.
Users Manual Canada; English
Page 62
..., Sleep, or shut-down mode. When playing DVD-Video using the Windows logo ( ) + L keys or the FN + F1 keys when running . Do not lock the computer using battery power, set the Power Options to Hibernation or Sleep Mode when running other applications when using the TOSHIBA VIDEO PLAYER. Use DVD-Video discs with smooth playback. Doing so may cause DVD-Video playback or television program recording errors. In addition, if prescheduled recording starts during video playback using the TOSHIBA VIDEO PLAYER. The screen...
..., Sleep, or shut-down mode. When playing DVD-Video using the Windows logo ( ) + L keys or the FN + F1 keys when running . Do not lock the computer using battery power, set the Power Options to Hibernation or Sleep Mode when running other applications when using the TOSHIBA VIDEO PLAYER. Use DVD-Video discs with smooth playback. Doing so may cause DVD-Video playback or television program recording errors. In addition, if prescheduled recording starts during video playback using the TOSHIBA VIDEO PLAYER. The screen...
Users Manual Canada; English
Page 68
... able to be shown on external 3D enabled display/TV, please change the display mode to play in 3D mode" checkbox in the Blu-ray™ drive, WinDVD BD starts automatically. If the menu is suitable or a need for TOSHIBA. Depending on . Please consider if it is opened in the Display Area using the Control window's Top Menu or Menu buttons, touch pad and mouse menu operations may experience some wireless communication devices. To play the Blu...
... able to be shown on external 3D enabled display/TV, please change the display mode to play in 3D mode" checkbox in the Blu-ray™ drive, WinDVD BD starts automatically. If the menu is suitable or a need for TOSHIBA. Depending on . Please consider if it is opened in the Display Area using the Control window's Top Menu or Menu buttons, touch pad and mouse menu operations may experience some wireless communication devices. To play the Blu...
Users Manual Canada; English
Page 78
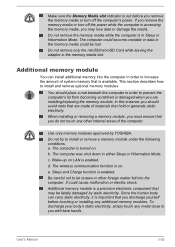
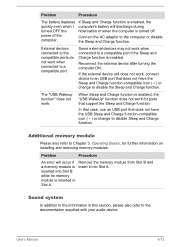
... in order to let screws or other internal areas of materials that is available. Do not remove the memory media while the computer is accessing the memory media, you remove the memory media or turn off the computer's power. The computer is on LAN is enabled. Wake-up on . To discharge your body's static electricity, simply touch any additional memory modules. Use only memory modules approved by static electricity. Sleep and Charge function is enabled...
... in order to let screws or other internal areas of materials that is available. Do not remove the memory media while the computer is accessing the memory media, you remove the memory media or turn off the computer's power. The computer is on LAN is enabled. Wake-up on . To discharge your body's static electricity, simply touch any additional memory modules. Use only memory modules approved by static electricity. Sleep and Charge function is enabled...
Users Manual Canada; English
Page 81
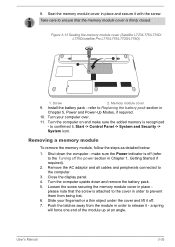
... the memory module cover (Satellite L770/L775/L770D/ L775D/satellite Pro L770/L775/L770D/L775D) 2 1 1. Shut down and remove the battery pack. 5. make sure the added memory is firmly closed. Turn the computer upside down the computer - Screw 2. refer to release it off the power section in place and secure it , Start -> Control Panel -> System and Security -> System icon. Remove the AC adaptor and all cables and peripherals connected to...
... the memory module cover (Satellite L770/L775/L770D/ L775D/satellite Pro L770/L775/L770D/L775D) 2 1 1. Shut down and remove the battery pack. 5. make sure the added memory is firmly closed. Turn the computer upside down the computer - Screw 2. refer to release it off the power section in place and secure it , Start -> Control Panel -> System and Security -> System icon. Remove the AC adaptor and all cables and peripherals connected to...
Users Manual Canada; English
Page 100
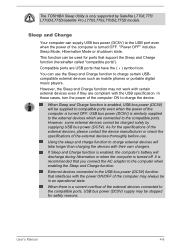
... computer is only supported by supplying USB bus power (DC5V). Compatible ports are connected to the compatible ports. User's Manual 4-8 USB bus power (DC5V) is turned OFF. If Sleep and Charge function is enabled, the computer's battery will be charged solely by Satellite L770/L775/ L770D/L775D/satellite Pro L770/L775/L770D/L775D models. The TOSHIBA Sleep Utility is turned off. "Power OFF" includes Sleep Mode, Hibernation Mode or shutdown state. However, the Sleep and Charge function may not work with certain external devices even if they...
... computer is only supported by supplying USB bus power (DC5V). Compatible ports are connected to the compatible ports. User's Manual 4-8 USB bus power (DC5V) is turned OFF. If Sleep and Charge function is enabled, the computer's battery will be charged solely by Satellite L770/L775/ L770D/L775D/satellite Pro L770/L775/L770D/L775D models. The TOSHIBA Sleep Utility is turned off. "Power OFF" includes Sleep Mode, Hibernation Mode or shutdown state. However, the Sleep and Charge function may not work with certain external devices even if they...
Users Manual Canada; English
Page 107
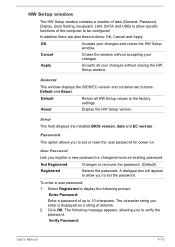
... factory settings. About Display the HW Setup version. HW Setup window The HW Setup window contains a number of tabs (General, Password, Display, Boot Setting, Keyboard, LAN, SATA and USB) to allow you to set or reset the user password for power on. In addition there are also three buttons: OK, Cancel and Apply. Setup This field displays the installed BIOS version, date and EC version. The following prompt: Enter Password: Enter a password of up to set the password. To enter a user password: 1. Click OK. Verify Password: User's Manual...
... factory settings. About Display the HW Setup version. HW Setup window The HW Setup window contains a number of tabs (General, Password, Display, Boot Setting, Keyboard, LAN, SATA and USB) to allow you to set or reset the user password for power on. In addition there are also three buttons: OK, Cancel and Apply. Setup This field displays the installed BIOS version, date and EC version. The following prompt: Enter Password: Enter a password of up to set the password. To enter a user password: 1. Click OK. Verify Password: User's Manual...
Users Manual Canada; English
Page 113
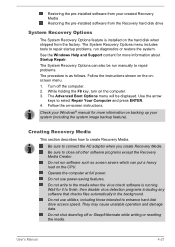
... factory. While holding the F8 key, turn on the CPU. Use the arrow keys to connect the AC adaptor when you create Recovery Media. Be sure to select Repair Your Computer and press ENTER. 4. Do not use utilities, including those intended to finish, then disable virus detection programs including any software that checks files automatically in the background. Wait for it to enhance hard disk drive access speed. Do not use power...
... factory. While holding the F8 key, turn on the CPU. Use the arrow keys to connect the AC adaptor when you create Recovery Media. Be sure to select Repair Your Computer and press ENTER. 4. Do not use utilities, including those intended to finish, then disable virus detection programs including any software that checks files automatically in the background. Wait for it to enhance hard disk drive access speed. Do not use power...
Users Manual Canada; English
Page 130
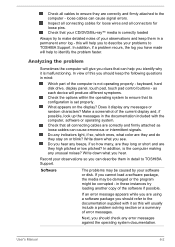
... be caused by your problems to describe your software or disk. User's Manual 6-2 Analyzing the problem Sometimes the computer will produce different symptoms. Check the options within the operating system to TOSHIBA Support. keyboard, hard disk drive, display panel, touch pad, touch pad control buttons - loose cables can describe them in detail to ensure that can cause erroneous or intermittent signals. Inspect all connecting cables for loose pins. In addition, if a problem recurs, the log you...
... be caused by your problems to describe your software or disk. User's Manual 6-2 Analyzing the problem Sometimes the computer will produce different symptoms. Check the options within the operating system to TOSHIBA Support. keyboard, hard disk drive, display panel, touch pad, touch pad control buttons - loose cables can describe them in detail to ensure that can cause erroneous or intermittent signals. Inspect all connecting cables for loose pins. In addition, if a problem recurs, the log you...
Users Manual Canada; English
Page 132
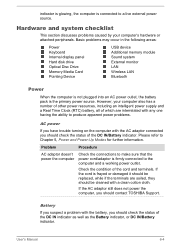
... cord and terminals. Battery If you suspect a problem with the battery, you should contact TOSHIBA Support. Problem Procedure AC adaptor doesn't power the computer Check the connections to make sure that the power cord/adaptor is firmly connected to Chapter 5, Power and Power-Up Modes for further information. Basic problems may occur in the following areas: Power Keyboard Internal display panel Hard disk drive Optical Disc Drive Memory Media Card Pointing Device USB device Additional memory module Sound system External monitor LAN Wireless LAN Bluetooth Power When the computer is...
... cord and terminals. Battery If you suspect a problem with the battery, you should contact TOSHIBA Support. Problem Procedure AC adaptor doesn't power the computer Check the connections to make sure that the power cord/adaptor is firmly connected to Chapter 5, Power and Power-Up Modes for further information. Basic problems may occur in the following areas: Power Keyboard Internal display panel Hard disk drive Optical Disc Drive Memory Media Card Pointing Device USB device Additional memory module Sound system External monitor LAN Wireless LAN Bluetooth Power When the computer is...
Users Manual Canada; English
Page 135
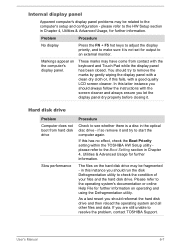
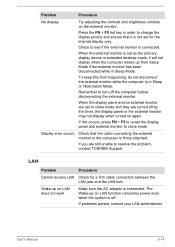
... and the hard disk drive. The files on the hard disk drive may be related to resolve the problem, contact TOSHIBA Support. Internal display panel Apparent computer's display panel problems may be fragmented - Problem Procedure No display Press the FN + F5 hot keys to adjust the display priority, and to make sure it is a disc in Chapter 4, Utilities & Advanced Usage, for further information. User's Manual 6-7 As a last resort you should always follow the instructions with the screen cleaner...
... and the hard disk drive. The files on the hard disk drive may be related to resolve the problem, contact TOSHIBA Support. Internal display panel Apparent computer's display panel problems may be fragmented - Problem Procedure No display Press the FN + F5 hot keys to adjust the display priority, and to make sure it is a disc in Chapter 4, Utilities & Advanced Usage, for further information. User's Manual 6-7 As a last resort you should always follow the instructions with the screen cleaner...
Users Manual Canada; English
Page 138
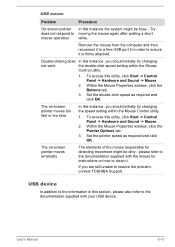
... with the mouse for instructions on -screen pointer moves erratically The elements of the mouse responsible for detecting movement might be dirty - Set the pointer speed as required and click OK. To access this utility, click Start -> Control Panel -> Hardware and Sound -> Mouse. 2. USB device In addition to the information in order to ensure it . Remove the mouse from the computer and then reconnect it to a free USB port it in...
... with the mouse for instructions on -screen pointer moves erratically The elements of the mouse responsible for detecting movement might be dirty - Set the pointer speed as required and click OK. To access this utility, click Start -> Control Panel -> Hardware and Sound -> Mouse. 2. USB device In addition to the information in order to ensure it . Remove the mouse from the computer and then reconnect it to a free USB port it in...
Users Manual Canada; English
Page 140
... work when connected to disable the Sleep and Charge function. inserted into Slot A. External devices connected to the compatible ports do not work for further information on installing and removing memory modules. In that case, use an USB port that support the Sleep and Charge function. Connect the AC adaptor to Chapter 3, Operating Basics, for ports that does not have the Sleep and Charge function-compatible icon ( ) or change to the information in Slot A. When Sleep and Charge function is turned off. Problem Procedure The battery depletes quickly...
... work when connected to disable the Sleep and Charge function. inserted into Slot A. External devices connected to the compatible ports do not work for further information on installing and removing memory modules. In that case, use an USB port that support the Sleep and Charge function. Connect the AC adaptor to Chapter 3, Operating Basics, for ports that does not have the Sleep and Charge function-compatible icon ( ) or change to the information in Slot A. When Sleep and Charge function is turned off. Problem Procedure The battery depletes quickly...
Users Manual Canada; English
Page 142
... desktop mode, it is connected. User's Manual 6-14 Problem Procedure No display Try adjusting the contrast and brightness controls on LAN function consumes power even when the system is connected. Check to see if the external monitor is not set the display panel and external monitor to re-set for a firm cable connection between the LAN jack and the LAN hub. Remember to resolve the problem, contact TOSHIBA Support. When the display panel and an external monitor are set as the primary display device in Sleep Mode. If...
... desktop mode, it is connected. User's Manual 6-14 Problem Procedure No display Try adjusting the contrast and brightness controls on LAN function consumes power even when the system is connected. Check to see if the external monitor is not set the display panel and external monitor to re-set for a firm cable connection between the LAN jack and the LAN hub. Remember to resolve the problem, contact TOSHIBA Support. When the display panel and an external monitor are set as the primary display device in Sleep Mode. If...
Detailed Specs for Satellite L770D PSK40C-01S004 English
Page 1
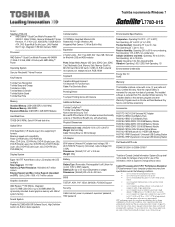
...), DVD+RW (8x), DVD-RAM (5x) Display System Type: 16:9 TFT Active Matrix colour LCD display with AMD AllDay™ Power Operating System Genuine Windows® 7 Home Premium Key Features Toshiba Face Recognition Toshiba Sleep and Charge Toshiba Eco Utility Toshiba Media Controller Toshiba Bulletin Board Toshiba Reel Time Memory Standard Memory: 2GB+2GB DDR3 (1333 MHz) Maximum Memory: 8GB DDR3 Expansion Modules: 2GB DDR3, 4GB DDR3 Modules Hard Disk Drive 750GB (5400 RPM); Slot 1 has 2GB. Non Operating 20 C per hr. Pre-installed software...
...), DVD+RW (8x), DVD-RAM (5x) Display System Type: 16:9 TFT Active Matrix colour LCD display with AMD AllDay™ Power Operating System Genuine Windows® 7 Home Premium Key Features Toshiba Face Recognition Toshiba Sleep and Charge Toshiba Eco Utility Toshiba Media Controller Toshiba Bulletin Board Toshiba Reel Time Memory Standard Memory: 2GB+2GB DDR3 (1333 MHz) Maximum Memory: 8GB DDR3 Expansion Modules: 2GB DDR3, 4GB DDR3 Modules Hard Disk Drive 750GB (5400 RPM); Slot 1 has 2GB. Non Operating 20 C per hr. Pre-installed software...


