User Manual
Page 29
Contents Introduction 36 This guide 38 Safety icons 39 Other icons used 39 Your computer's features and specifications 40 Other documentation 40 Service options 40 Chapter 1: Getting Started 41 Selecting a place to work 41 Setting up a work environment 41 Keeping yourself comfortable 42 Precautions 42 Important information on your computer's cooling fan 44 Setting up your computer 44 Connecting to a power source 45 Charging the main battery 47 29
Contents Introduction 36 This guide 38 Safety icons 39 Other icons used 39 Your computer's features and specifications 40 Other documentation 40 Service options 40 Chapter 1: Getting Started 41 Selecting a place to work 41 Setting up a work environment 41 Keeping yourself comfortable 42 Precautions 42 Important information on your computer's cooling fan 44 Setting up your computer 44 Connecting to a power source 45 Charging the main battery 47 29
User Manual
Page 31
... 98 Ctrl, Fn, and Alt keys 99 Function keys 99 Special Windows® keys 99 Overlay keys 100 Starting a program 101 Starting a program from the Start menu.........101 Starting a program from Windows® Explorer 102 Starting a program using the Search programs and files field 103 Saving your work 103 Printing your work 105 Backing up...
... 98 Ctrl, Fn, and Alt keys 99 Function keys 99 Special Windows® keys 99 Overlay keys 100 Starting a program 101 Starting a program from the Start menu.........101 Starting a program from Windows® Explorer 102 Starting a program using the Search programs and files field 103 Saving your work 103 Printing your work 105 Backing up...
User Manual
Page 40
... a full line of the many possible icons used on page 162. Toshiba's standard limited warranty, extended warranty, and service upgrade terms and conditions are designed to accommodate all the features and icons described in this document) ❖ A Quick Start Card ❖ A Resource Guide ❖ It may also contain guides for an entire...
... a full line of the many possible icons used on page 162. Toshiba's standard limited warranty, extended warranty, and service upgrade terms and conditions are designed to accommodate all the features and icons described in this document) ❖ A Quick Start Card ❖ A Resource Guide ❖ It may also contain guides for an entire...
User Manual
Page 41
... attempt to use your computer. Setting up a work Your computer is portable and designed to be used in a variety of circumstances and locations. Chapter 1 Getting Started This chapter provides tips for the computer and any other equipment to provide adequate ventilation. The "Instruction Manual for Safety and Comfort," that is large...
... attempt to use your computer. Setting up a work Your computer is portable and designed to be used in a variety of circumstances and locations. Chapter 1 Getting Started This chapter provides tips for the computer and any other equipment to provide adequate ventilation. The "Instruction Manual for Safety and Comfort," that is large...
User Manual
Page 42
...conditioner vents or heaters. ❖ Extreme heat, cold, or humidity. ❖ Liquids and corrosive chemicals. Keeping yourself comfortable The Toshiba Instruction Manual for Safety and Comfort, included with the underside or surface of these instructions could result in serious injury or permanent damage ... connected to the computer) or speakerphones. ❖ Rapid changes in temperature or humidity and sources of travel. 42 Getting Started Selecting a place to work To keep your computer in prime operating condition, protect your work environment and tips for working comfortably ...
...conditioner vents or heaters. ❖ Extreme heat, cold, or humidity. ❖ Liquids and corrosive chemicals. Keeping yourself comfortable The Toshiba Instruction Manual for Safety and Comfort, included with the underside or surface of these instructions could result in serious injury or permanent damage ... connected to the computer) or speakerphones. ❖ Rapid changes in temperature or humidity and sources of travel. 42 Getting Started Selecting a place to work To keep your computer in prime operating condition, protect your work environment and tips for working comfortably ...
User Manual
Page 43
... from a supplier may damage the disk/disc or flash media, the drive, or both. ❖ Keep the computer and disks away from the Internet. Getting Started 43 Selecting a place to skin. Turning off the computer if a drive light indicates a drive is shipped with the underside or surface of the disc.
... from a supplier may damage the disk/disc or flash media, the drive, or both. ❖ Keep the computer and disks away from the Internet. Getting Started 43 Selecting a place to skin. Turning off the computer if a drive light indicates a drive is shipped with the underside or surface of the disc.
User Manual
Page 44
... computer. ❖ Always operate your computer on a carpet or other soft material can use external power or to a power source" on the computer. 44 Getting Started Setting up your software" on page 49 before you must complete all setup steps up to and including "Setting up your computer Important information on...
... computer. ❖ Always operate your computer on a carpet or other soft material can use external power or to a power source" on the computer. 44 Getting Started Setting up your software" on page 49 before you must complete all setup steps up to and including "Setting up your computer Important information on...
User Manual
Page 45
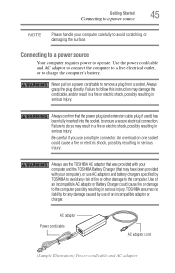
...adaptor that was provided with your computer and the TOSHIBA Battery Charger (that the power plug (and extension cable plug if used) has been fully inserted into the socket, to the computer possibly resulting in serious injury. Getting Started 45 Connecting to a power source NOTE Please handle ...your computer), or use AC adaptors and battery chargers specified by TOSHIBA to avoid any damage caused by use of fire or other damage to the...
...adaptor that was provided with your computer and the TOSHIBA Battery Charger (that the power plug (and extension cable plug if used) has been fully inserted into the socket, to the computer possibly resulting in serious injury. Getting Started 45 Connecting to a power source NOTE Please handle ...your computer), or use AC adaptors and battery chargers specified by TOSHIBA to avoid any damage caused by use of fire or other damage to the...
User Manual
Page 46
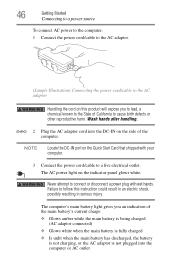
...attempt to a live electrical outlet. The AC power light on the indicator panel glows white. NOTE Locate the DC-IN port on the Quick Start Card that shipped with your computer. 3 Connect the power cord/cable to connect or disconnect a power plug with wet hands. Failure to cause... a chemical known to the State of California to follow this instruction could result in an electric shock, possibly resulting in serious injury. 46 Getting Started Connecting to a power source To connect AC power to the computer: 1 Connect the power cord/cable to the AC adaptor. (Sample Illustration) ...
...attempt to a live electrical outlet. The AC power light on the indicator panel glows white. NOTE Locate the DC-IN port on the Quick Start Card that shipped with your computer. 3 Connect the power cord/cable to connect or disconnect a power plug with wet hands. Failure to cause... a chemical known to the State of California to follow this instruction could result in an electric shock, possibly resulting in serious injury. 46 Getting Started Connecting to a power source To connect AC power to the computer: 1 Connect the power cord/cable to the AC adaptor. (Sample Illustration) ...
User Manual
Page 47
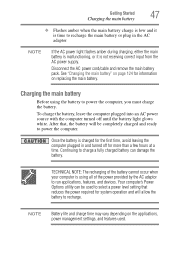
... to recharge the main battery or plug in and turned off until the battery light glows white. Continuing to run applications, features, and devices. Getting Started 47 Charging the main battery ❖ Flashes amber when the main battery charge is low and it is not receiving correct input from the AC...
... to recharge the main battery or plug in and turned off until the battery light glows white. Continuing to run applications, features, and devices. Getting Started 47 Charging the main battery ❖ Flashes amber when the main battery charge is low and it is not receiving correct input from the AC...
User Manual
Page 48
... or close the display panel. Opening the display panel 1 Facing the front of the computer, locate the center of the TFT manufacturing technology. 48 Getting Started Using the computer for the first time Using the computer for the first time The computer is now ready for you to turn on the...
... or close the display panel. Opening the display panel 1 Facing the front of the computer, locate the center of the TFT manufacturing technology. 48 Getting Started Using the computer for the first time Using the computer for the first time The computer is now ready for you to turn on the...
User Manual
Page 49
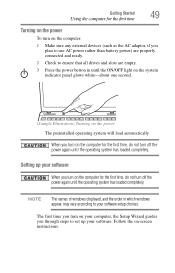
... software setup choices. Follow the on your computer, the Setup Wizard guides you turn on the power The preinstalled operating system will load automatically. Getting Started 49 Using the computer for the first time, do not turn off the power again until the operating system has loaded completely. When you through...
... software setup choices. Follow the on your computer, the Setup Wizard guides you turn on the power The preinstalled operating system will load automatically. Getting Started 49 Using the computer for the first time, do not turn off the power again until the operating system has loaded completely. When you through...
User Manual
Page 50
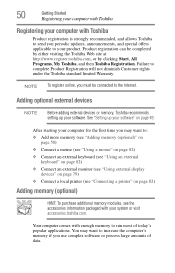
... To register online, you must be completed by either visiting the Toshiba Web site at http://www.register.toshiba.com, or by clicking Start, All Programs, My Toshiba, and then Toshiba Registration. Your computer comes with enough memory to complete Product Registration ... memory modules, see the accessories information packaged with your product. 50 Getting Started Registering your computer with Toshiba Registering your computer with Toshiba Product registration is strongly recommended, and allows Toshiba to send you periodic updates, announcements, and special offers applicable to your...
... To register online, you must be completed by either visiting the Toshiba Web site at http://www.register.toshiba.com, or by clicking Start, All Programs, My Toshiba, and then Toshiba Registration. Your computer comes with enough memory to complete Product Registration ... memory modules, see the accessories information packaged with your product. 50 Getting Started Registering your computer with Toshiba Registering your computer with Toshiba Product registration is strongly recommended, and allows Toshiba to send you periodic updates, announcements, and special offers applicable to your...
User Manual
Page 51
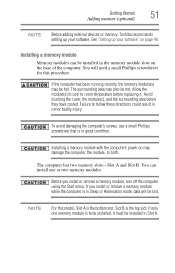
... temperature before they have cooled. NOTE For this procedure. If you install or remove a memory module, turn off the computer using the Start menu. You will be installed, it . The surrounding area may also be installed in minor bodily injury. Avoid touching the cover, the... module(s), and the surrounding area before replacing it must be hot. Getting Started 51 Adding memory (optional) NOTE Before adding external devices or memory, Toshiba recommends setting up your software. See "Setting up your software" on the base of the computer. ...
... temperature before they have cooled. NOTE For this procedure. If you install or remove a memory module, turn off the computer using the Start menu. You will be installed, it . The surrounding area may also be installed in minor bodily injury. Avoid touching the cover, the... module(s), and the surrounding area before replacing it must be hot. Getting Started 51 Adding memory (optional) NOTE Before adding external devices or memory, Toshiba recommends setting up your software. See "Setting up your software" on the base of the computer. ...
User Manual
Page 52
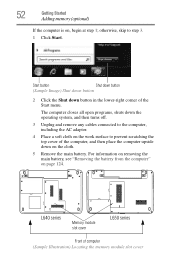
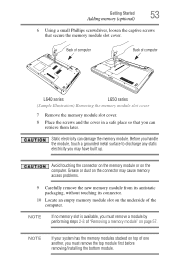
... remove any cables connected to the computer, including the AC adaptor. 4 Place a soft cloth on the work surface to step 3. 1 Click Start. The computer closes all open programs, shuts down button in the lower-right corner of computer (Sample Illustration) Locating the memory module slot cover ...L640 series Memory module slot cover L650 series Front of the Start menu. For information on removing the main battery, see "Removing the battery from the computer" on the cloth. 5 Remove the main...
... remove any cables connected to the computer, including the AC adaptor. 4 Place a soft cloth on the work surface to step 3. 1 Click Start. The computer closes all open programs, shuts down button in the lower-right corner of computer (Sample Illustration) Locating the memory module slot cover ...L640 series Memory module slot cover L650 series Front of the Start menu. For information on removing the main battery, see "Removing the battery from the computer" on the cloth. 5 Remove the main...
User Manual
Page 53
... cover. 8 Place the screws and the cover in a safe place so that secure the memory module slot cover. Static electricity can retrieve them later. Getting Started 53 Adding memory (optional) 6 Using a small Phillips screwdriver, loosen the captive screws that you must remove the top module first before removing/installing the bottom...
... cover. 8 Place the screws and the cover in a safe place so that secure the memory module slot cover. Static electricity can retrieve them later. Getting Started 53 Adding memory (optional) 6 Using a small Phillips screwdriver, loosen the captive screws that you must remove the top module first before removing/installing the bottom...

User Manual
Page 54
... memory module with the matching key in Slot A. 11 Pick up the memory module by its sides, avoiding any contact with its connector. 54 Getting Started Adding memory (optional) NOTE For this model, Slot A is to the horizontal surface of the computer). (Sample Illustration) Inserting the memory module into the socket...
... memory module with the matching key in Slot A. 11 Pick up the memory module by its sides, avoiding any contact with its connector. 54 Getting Started Adding memory (optional) NOTE For this model, Slot A is to the horizontal surface of the computer). (Sample Illustration) Inserting the memory module into the socket...
User Manual
Page 55
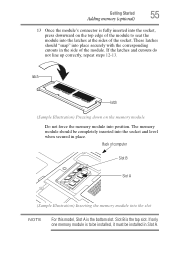
... slot. latch latch (Sample Illustration) Pressing down on the top edge of the module to be installed, it must be completely inserted into position. Getting Started 55 Adding memory (optional) 13 Once the module's connector is fully inserted into the socket, press downward on the memory module Do not force the...
... slot. latch latch (Sample Illustration) Pressing down on the top edge of the module to be installed, it must be completely inserted into position. Getting Started 55 Adding memory (optional) 13 Once the module's connector is fully inserted into the socket, press downward on the memory module Do not force the...
User Manual
Page 56
... operate your computer or AC adaptor near a heat source, such as described in serious injury. 17 Reconnect the cables. 18 Restart the computer. 56 Getting Started Adding memory (optional) 14 Replace the memory module slot cover and secure it correctly as an electric blanket or heater. ❖ Never cover or block...
... operate your computer or AC adaptor near a heat source, such as described in serious injury. 17 Reconnect the cables. 18 Restart the computer. 56 Getting Started Adding memory (optional) 14 Replace the memory module slot cover and secure it correctly as an electric blanket or heater. ❖ Never cover or block...
User Manual
Page 57
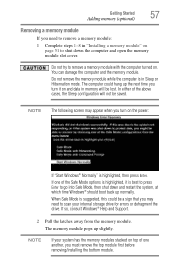
... If your internal storage drive for errors or defragment the drive. The memory module pops up the next time you turn on the power: If "Start Windows® Normally" is in Sleep or Hibernation mode. In either of the Safe Mode options is highlighted, it on and data in memory will... not try to go into Safe Mode, then shut down the computer and open the memory module slot cover. The computer could be lost. Getting Started 57 Adding memory (optional) Removing a memory module If you need to scan your system has the memory modules stacked on top of one of the...
... If your internal storage drive for errors or defragment the drive. The memory module pops up the next time you turn on the power: If "Start Windows® Normally" is in Sleep or Hibernation mode. In either of the Safe Mode options is highlighted, it on and data in memory will... not try to go into Safe Mode, then shut down the computer and open the memory module slot cover. The computer could be lost. Getting Started 57 Adding memory (optional) Removing a memory module If you need to scan your system has the memory modules stacked on top of one of the...


