
User Manual
Page 1
GMAD00251012 03/10 Satellite® L640/L650 Series User's Guide If you need assistance: ❖ Toshiba's Support Web site pcsupport.toshiba.com ❖ Toshiba Customer Support Center Calling within the United States (800) 457-7777 Calling from outside the United States (949) 859-4273 For more information, see "If Something Goes Wrong" on page 162 in this guide.
GMAD00251012 03/10 Satellite® L640/L650 Series User's Guide If you need assistance: ❖ Toshiba's Support Web site pcsupport.toshiba.com ❖ Toshiba Customer Support Center Calling within the United States (800) 457-7777 Calling from outside the United States (949) 859-4273 For more information, see "If Something Goes Wrong" on page 162 in this guide.
User Manual
Page 2
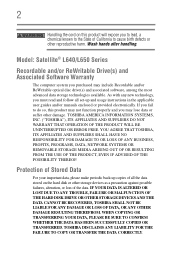
... DUE TO ANY TROUBLE, FAILURE OR MALFUNCTION OF THE HARD DISK DRIVE OR OTHER STORAGE DEVICES AND THE DATA CANNOT BE RECOVERED, TOSHIBA SHALL NOT BE LIABLE FOR ANY DAMAGE OR LOSS OF DATA, OR ANY OTHER DAMAGE RESULTING THEREFROM. WHEN COPYING OR TRANSFERRING YOUR DATA...may include Recordable and/or ReWritable optical disc drive(s) and associated software, among the most advanced data storage technologies available. Model: Satellite® L640/L650 Series Recordable and/or ReWritable Drive(s) and Associated Software Warranty The computer system you must read and follow all the data stored on ...
... DUE TO ANY TROUBLE, FAILURE OR MALFUNCTION OF THE HARD DISK DRIVE OR OTHER STORAGE DEVICES AND THE DATA CANNOT BE RECOVERED, TOSHIBA SHALL NOT BE LIABLE FOR ANY DAMAGE OR LOSS OF DATA, OR ANY OTHER DAMAGE RESULTING THEREFROM. WHEN COPYING OR TRANSFERRING YOUR DATA...may include Recordable and/or ReWritable optical disc drive(s) and associated software, among the most advanced data storage technologies available. Model: Satellite® L640/L650 Series Recordable and/or ReWritable Drive(s) and Associated Software Warranty The computer system you must read and follow all the data stored on ...
User Manual
Page 14
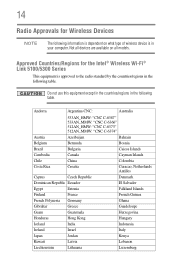
14 Radio Approvals for the Intel® Wireless Wi-Fi® Link 5100/5300 Series This equipment is in the following table. Not all devices are available on what type of wireless device is approved to the radio standard by ...
14 Radio Approvals for the Intel® Wireless Wi-Fi® Link 5100/5300 Series This equipment is in the following table. Not all devices are available on what type of wireless device is approved to the radio standard by ...
User Manual
Page 15
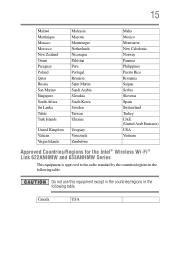
... Slovenia Spain Switzerland Turkey UAE (United Arab Emirates) USA Vietnam Approved Countries/Regions for the Intel® Wireless Wi-Fi® Link 622ANHMW and 633ANHMW Series This equipment is approved to the radio standard by the countries/regions in the following table.
... Slovenia Spain Switzerland Turkey UAE (United Arab Emirates) USA Vietnam Approved Countries/Regions for the Intel® Wireless Wi-Fi® Link 622ANHMW and 633ANHMW Series This equipment is approved to the radio standard by the countries/regions in the following table.
User Manual
Page 16
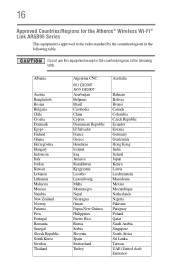
16 Approved Countries/Regions for the Atheros® Wireless Wi-Fi® Link AR5B95 Series This equipment is approved to the radio standard by the countries/regions in the following table. Albania Austria Bangladesh Bosnia Bulgaria Chile Croatia Denmark Egypt ...
16 Approved Countries/Regions for the Atheros® Wireless Wi-Fi® Link AR5B95 Series This equipment is approved to the radio standard by the countries/regions in the following table. Albania Austria Bangladesh Bosnia Bulgaria Chile Croatia Denmark Egypt ...
User Manual
Page 38
...accuracy of the information provided herein, product specifications, configurations, prices, system/component/options availability are designed for a product Series. For the most up-to-date product information about the features and specifications on your computer, or to stay ...the table of publication to change without notice. For more detailed information about your particular model, please visit Toshiba's Web site at pcsupport.toshiba.com. 38 Introduction This guide NOTE The product specifications and configuration information are all the features and specifications listed...
...accuracy of the information provided herein, product specifications, configurations, prices, system/component/options availability are designed for a product Series. For the most up-to-date product information about the features and specifications on your computer, or to stay ...the table of publication to change without notice. For more detailed information about your particular model, please visit Toshiba's Web site at pcsupport.toshiba.com. 38 Introduction This guide NOTE The product specifications and configuration information are all the features and specifications listed...
User Manual
Page 40
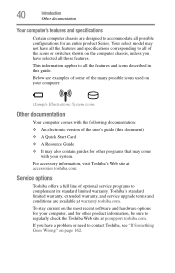
... It may come with the following documentation: ❖ An electronic version of optional service programs to regularly check the Toshiba Web site at accessories.toshiba.com. To stay current on your computer: (Sample Illustration) System icons Other documentation Your computer comes with your computer..., and for other programs that may also contain guides for an entire product Series. Service options Toshiba offers a full line of the user's guide (this guide. Toshiba's standard limited warranty, extended warranty, and service upgrade terms and conditions are examples ...
... It may come with the following documentation: ❖ An electronic version of optional service programs to regularly check the Toshiba Web site at accessories.toshiba.com. To stay current on your computer: (Sample Illustration) System icons Other documentation Your computer comes with your computer..., and for other programs that may also contain guides for an entire product Series. Service options Toshiba offers a full line of the user's guide (this guide. Toshiba's standard limited warranty, extended warranty, and service upgrade terms and conditions are examples ...
User Manual
Page 52
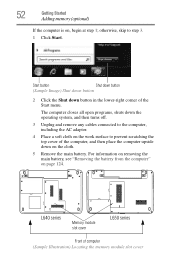
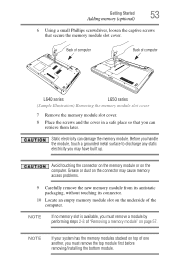
For information on removing the main battery, see "Removing the battery from the computer" on , begin at step 1; L640 series Memory module slot cover L650 series Front of the Start menu. The computer closes all open programs, shuts down the operating system, and then turns off. 3 Unplug and remove any cables ...
For information on removing the main battery, see "Removing the battery from the computer" on , begin at step 1; L640 series Memory module slot cover L650 series Front of the Start menu. The computer closes all open programs, shuts down the operating system, and then turns off. 3 Unplug and remove any cables ...
User Manual
Page 53
.... NOTE If your system has the memory modules stacked on the underside of one another, you must remove a module by performing steps 2-3 of computer L640 series L650 series (Sample Illustration) Removing the memory module slot cover 7 Remove the memory module slot cover. 8 Place the screws and the cover in a safe place so that...
.... NOTE If your system has the memory modules stacked on the underside of one another, you must remove a module by performing steps 2-3 of computer L640 series L650 series (Sample Illustration) Removing the memory module slot cover 7 Remove the memory module slot cover. 8 Place the screws and the cover in a safe place so that...
User Manual
Page 97
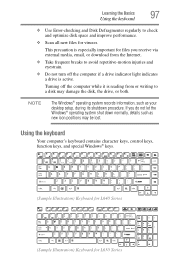
... shutdown procedure. Using the keyboard Your computer's keyboard contains character keys, control keys, function keys, and special Windows® keys. (Sample Illustration) Keyboard for L640 Series (Sample Illustration) Keyboard for viruses. Learning the Basics 97 Using the keyboard ❖ Use Error-checking and Disk Defragmenter regularly to a disk may be lost... a drive indicator light indicates a drive is reading from or writing to check and optimize disk space and improve performance. ❖ Scan all new files for L650 Series
... shutdown procedure. Using the keyboard Your computer's keyboard contains character keys, control keys, function keys, and special Windows® keys. (Sample Illustration) Keyboard for L640 Series (Sample Illustration) Keyboard for viruses. Learning the Basics 97 Using the keyboard ❖ Use Error-checking and Disk Defragmenter regularly to a disk may be lost... a drive indicator light indicates a drive is reading from or writing to check and optimize disk space and improve performance. ❖ Scan all new files for L650 Series
User Manual
Page 98
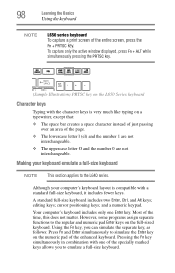
...fewer keys. editing keys; Most of the entire screen, press the Fn + PRTSC key. 98 Learning the Basics Using the keyboard NOTE L650 series keyboard To capture a print screen of the time, this does not matter. Making your computer's keyboard layout is very much like typing on ...the L650 Series keyboard Character keys Typing with the character keys is compatible with one Enter key. cursor positioning keys; and a numeric keypad. Although your ...
...fewer keys. editing keys; Most of the entire screen, press the Fn + PRTSC key. 98 Learning the Basics Using the keyboard NOTE L650 series keyboard To capture a print screen of the time, this does not matter. Making your computer's keyboard layout is very much like typing on ...the L650 Series keyboard Character keys Typing with the character keys is compatible with one Enter key. cursor positioning keys; and a numeric keypad. Although your ...
User Manual
Page 100
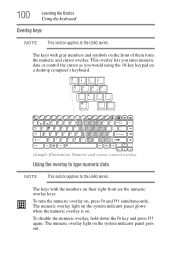
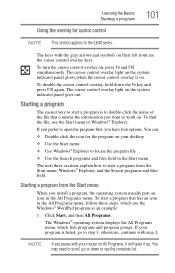
... on their right front are the numeric overlay keys. 100 Learning the Basics Using the keyboard Overlay keys NOTE This section applies to the L640 series. To disable the numeric overlay, hold down the Fn key and press F11 again. The numeric overlay light on . To turn the numeric...a desktop computer's keyboard. (Sample Illustration) Numeric and cursor control overlay Using the overlay to type numeric data NOTE This section applies to the L640 series. This overlay lets you enter numeric data or control the cursor as you would using the 10-key keypad on , press Fn and F11 simultaneously....
... on their right front are the numeric overlay keys. 100 Learning the Basics Using the keyboard Overlay keys NOTE This section applies to the L640 series. To disable the numeric overlay, hold down the Fn key and press F11 again. The numeric overlay light on . To turn the numeric...a desktop computer's keyboard. (Sample Illustration) Numeric and cursor control overlay Using the overlay to type numeric data NOTE This section applies to the L640 series. This overlay lets you enter numeric data or control the cursor as you would using the 10-key keypad on , press Fn and F11 simultaneously....
User Manual
Page 101
... may need to step 3, otherwise, continue with the gray arrows and symbols on . The cursor control overlay light on your program is to the L640 series.
... may need to step 3, otherwise, continue with the gray arrows and symbols on . The cursor control overlay light on your program is to the L640 series.
User Manual
Page 125
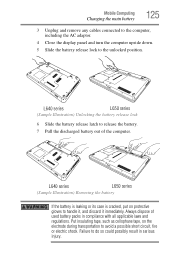
L640 series L650 series (Sample Illustration) Unlocking the battery release lock 6 Slide the battery release latch to release the battery. 7 Pull the discharged battery out of used battery packs ... release lock to avoid a possible short circuit, fire or electric shock. Failure to handle it, and discard it immediately. Always dispose of the computer. L640 series L650 series (Sample Illustration) Removing the battery If the battery is leaking or its case is cracked, put on the electrode during transportation to the unlocked position.
L640 series L650 series (Sample Illustration) Unlocking the battery release lock 6 Slide the battery release latch to release the battery. 7 Pull the discharged battery out of used battery packs ... release lock to avoid a possible short circuit, fire or electric shock. Failure to handle it, and discard it immediately. Always dispose of the computer. L640 series L650 series (Sample Illustration) Removing the battery If the battery is leaking or its case is cracked, put on the electrode during transportation to the unlocked position.

User Manual
Page 126
L640 series L650 series (Sample Illustration) Inserting the battery 3 Slide the battery release lock to ensure a good connection. 2 Insert the charged battery into the slot until the latch clicks. ... unlocked position and try again. The battery pack has been designed so that you cannot install it with a clean cloth to the locked position. L640 series L650 series (Sample Illustration) Locking the battery release lock 4 Turn the computer right side up. 126 Mobile Computing Changing the main battery Inserting a charged battery To insert...
L640 series L650 series (Sample Illustration) Inserting the battery 3 Slide the battery release lock to ensure a good connection. 2 Insert the charged battery into the slot until the latch clicks. ... unlocked position and try again. The battery pack has been designed so that you cannot install it with a clean cloth to the locked position. L640 series L650 series (Sample Illustration) Locking the battery release lock 4 Turn the computer right side up. 126 Mobile Computing Changing the main battery Inserting a charged battery To insert...

User Manual
Page 140
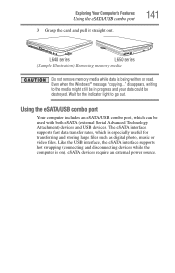
... of supported media devices. 1 Turn the media so that the contacts (metal areas) are face down. 2 Push the media into the adapter until it . L640 series L650 series (Sample Illustration) Inserting memory media When inserting memory media, do not touch the metal contacts. Inserting memory media The following instructions apply to release it...
... of supported media devices. 1 Turn the media so that the contacts (metal areas) are face down. 2 Push the media into the adapter until it . L640 series L650 series (Sample Illustration) Inserting memory media When inserting memory media, do not touch the metal contacts. Inserting memory media The following instructions apply to release it...
User Manual
Page 141
Exploring Your Computer's Features Using the eSATA/USB combo port 3 Grasp the card and pull it straight out. 141 L640 series L650 series (Sample Illustration) Removing memory media Do not remove memory media while data is on). Like the USB interface, the eSATA interface supports hot swapping (connecting ...
Exploring Your Computer's Features Using the eSATA/USB combo port 3 Grasp the card and pull it straight out. 141 L640 series L650 series (Sample Illustration) Removing memory media Do not remove memory media while data is on). Like the USB interface, the eSATA interface supports hot swapping (connecting ...
User Manual
Page 171
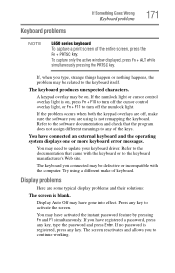
... displayed, press Fn + ALT while simultaneously pressing the PRTSC key. You have gone into effect. Keyboard problems If Something Goes Wrong Keyboard problems 171 NOTE L650 series keyboard To capture a print screen of keyboard. If the numlock light or cursor control overlay light is registered, press any of the keys. If you...
... displayed, press Fn + ALT while simultaneously pressing the PRTSC key. You have gone into effect. Keyboard problems If Something Goes Wrong Keyboard problems 171 NOTE L650 series keyboard To capture a print screen of keyboard. If the numlock light or cursor control overlay light is registered, press any of the keys. If you...
User Manual
Page 204
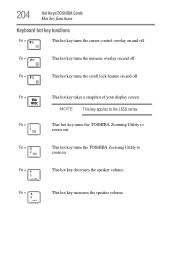
...display screen. NOTE This key applies to zoom out. Fn + This hot key turns the TOSHIBA Zooming Utility to the L650 series. Fn + This hot key increases the speaker volume. 204 Hot Keys/TOSHIBA Cards Hot key functions Keyboard hot key functions Fn + This hot key turns the cursor ...control overlay on and off . Fn + This hot key turns the TOSHIBA Zooming Utility to zoom in. ...
...display screen. NOTE This key applies to zoom out. Fn + This hot key turns the TOSHIBA Zooming Utility to the L650 series. Fn + This hot key increases the speaker volume. 204 Hot Keys/TOSHIBA Cards Hot key functions Keyboard hot key functions Fn + This hot key turns the cursor ...control overlay on and off . Fn + This hot key turns the TOSHIBA Zooming Utility to zoom in. ...
User Guide 2
Page 1
GMAD00251013 10/10 Satellite® L640/L650 Series User's Guide If you need assistance: ❖ Toshiba's Support Web site pcsupport.toshiba.com ❖ Toshiba Customer Support Center Calling within the United States (800) 457-7777 Calling from outside the United States (949) 859-4273 For more information, see "If Something Goes Wrong" on page 162 in this guide.
GMAD00251013 10/10 Satellite® L640/L650 Series User's Guide If you need assistance: ❖ Toshiba's Support Web site pcsupport.toshiba.com ❖ Toshiba Customer Support Center Calling within the United States (800) 457-7777 Calling from outside the United States (949) 859-4273 For more information, see "If Something Goes Wrong" on page 162 in this guide.


