User Guide
Page 31
Contents 31 Turning on the power 50 Setting up your software 51 Registering your computer with Toshiba 51 Adding optional external devices 52 Adding memory (optional 52 Installing a memory module 53 Removing a memory module 58 Checking total memory 60 Recovering the Internal... display device 76 Directing the display output when you turn on the computer 77 Adjusting the quality of the external display......78 Using an external keyboard 78 Using a mouse 78 Connecting a printer 79 Setting up a printer 80 Turning off the computer 80 Options for turning off the computer 81 Using the...
Contents 31 Turning on the power 50 Setting up your software 51 Registering your computer with Toshiba 51 Adding optional external devices 52 Adding memory (optional 52 Installing a memory module 53 Removing a memory module 58 Checking total memory 60 Recovering the Internal... display device 76 Directing the display output when you turn on the computer 77 Adjusting the quality of the external display......78 Using an external keyboard 78 Using a mouse 78 Connecting a printer 79 Setting up a printer 80 Turning off the computer 80 Options for turning off the computer 81 Using the...
User Guide
Page 32
... your computer 90 Cleaning the computer 90 Moving the computer 91 Using a computer lock 91 Chapter 2: Learning the Basics 93 Computing tips 93 Using the keyboard 94 Character keys 94 Ctrl, Fn, and Alt keys 95 Function keys 95 Special Windows® keys 95 Starting a program 96 Starting a program from the... media 106 Recording optical media 106 Removing a disc with the computer on...........107 Removing a disc with the computer off ..........107 Caring for optical discs 108 Toshiba's online resources 108
... your computer 90 Cleaning the computer 90 Moving the computer 91 Using a computer lock 91 Chapter 2: Learning the Basics 93 Computing tips 93 Using the keyboard 94 Character keys 94 Ctrl, Fn, and Alt keys 95 Function keys 95 Special Windows® keys 95 Starting a program 96 Starting a program from the... media 106 Recording optical media 106 Removing a disc with the computer on...........107 Removing a disc with the computer off ..........107 Caring for optical discs 108 Toshiba's online resources 108

User Guide
Page 35
... Resolving a hardware conflict 175 A plan of action 175 Fixing a problem with Device Manager ...........176 Memory problems 177 Power and the batteries 178 Keyboard problems 179 Display problems 180 Disk or internal storage drive problems ..........182 Optical drive problems 183 Sound system problems 184 Printer problems 185 Modem problems... 189 Data and system configuration backup in the Windows® operating system 190 If you need further assistance 195 Before you contact Toshiba 195 Contacting Toshiba 195 Other Toshiba Internet Web sites 196 Toshiba's worldwide offices 196
... Resolving a hardware conflict 175 A plan of action 175 Fixing a problem with Device Manager ...........176 Memory problems 177 Power and the batteries 178 Keyboard problems 179 Display problems 180 Disk or internal storage drive problems ..........182 Optical drive problems 183 Sound system problems 184 Printer problems 185 Modem problems... 189 Data and system configuration backup in the Windows® operating system 190 If you need further assistance 195 Before you contact Toshiba 195 Contacting Toshiba 195 Other Toshiba Internet Web sites 196 Toshiba's worldwide offices 196
User Guide
Page 36
36 Contents Appendix A: Hot Keys/TOSHIBA Cards 198 Hot Key Cards 198 Using the Hot Key Cards 199 Application Cards 200 Using the Application Cards 201 Card Case 201 Hot key functions 202 Volume Mute 202 Lock (Instant security 203 Power plan 204 Sleep mode 205 Hibernation mode 206 Output (Display switch 207 Display brightness 208 Disabling or enabling wireless devices............209 Disabling or enabling the TouchPad 210 Zoom (Display resolution 211 Keyboard hot key functions 212 Appendix B: Power Cord/Cable Connectors 213 Glossary 214 Index 228
36 Contents Appendix A: Hot Keys/TOSHIBA Cards 198 Hot Key Cards 198 Using the Hot Key Cards 199 Application Cards 200 Using the Application Cards 201 Card Case 201 Hot key functions 202 Volume Mute 202 Lock (Instant security 203 Power plan 204 Sleep mode 205 Hibernation mode 206 Output (Display switch 207 Display brightness 208 Disabling or enabling wireless devices............209 Disabling or enabling the TouchPad 210 Zoom (Display resolution 211 Keyboard hot key functions 212 Appendix B: Power Cord/Cable Connectors 213 Glossary 214 Index 228
User Guide
Page 45
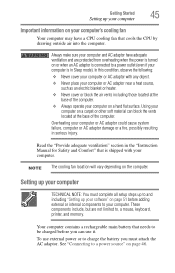
... if your computer is turned on page 46. Always make sure your computer and AC adaptor have a CPU cooling fan that is connected to , a mouse, keyboard, printer, and memory. Read the "Provide adequate ventilation" section in Sleep mode). These components include, but are protected from overheating when the power is in...
... if your computer is turned on page 46. Always make sure your computer and AC adaptor have a CPU cooling fan that is connected to , a mouse, keyboard, printer, and memory. Read the "Provide adequate ventilation" section in Sleep mode). These components include, but are protected from overheating when the power is in...
User Guide
Page 49
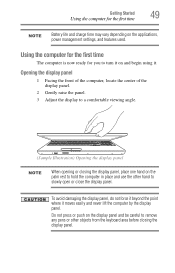
... close the display panel. Do not press or push on the display panel and be careful to remove any pens or other objects from the keyboard area before closing the display panel, place one hand on the applications, power management settings, and features used.
... close the display panel. Do not press or push on the display panel and be careful to remove any pens or other objects from the keyboard area before closing the display panel, place one hand on the applications, power management settings, and features used.
User Guide
Page 52
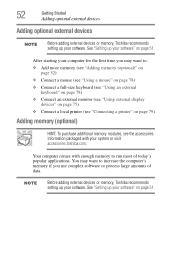
..."Adding memory (optional)" on page 52) ❖ Connect a mouse (see "Using a mouse" on page 78) ❖ Connect a full-size keyboard (see "Using an external keyboard" on page 78) ❖ Connect an external monitor (see "Using external display devices" on page 75) ❖ Connect a local printer (see ..."Connecting a printer" on page 51. You may want to run most of data. See "Setting up your system or visit accessories.toshiba....
..."Adding memory (optional)" on page 52) ❖ Connect a mouse (see "Using a mouse" on page 78) ❖ Connect a full-size keyboard (see "Using an external keyboard" on page 78) ❖ Connect an external monitor (see "Using external display devices" on page 75) ❖ Connect a local printer (see ..."Connecting a printer" on page 51. You may want to run most of data. See "Setting up your system or visit accessories.toshiba....

User Guide
Page 62
... first method, follow the procedure below. To recover the original factory image using the second method, see "Creating recovery media" on page 69. ❖ The Toshiba Recovery Wizard also provides the option of -box state deletes all information stored in those partitions. 62 Getting Started Recovering the Internal Storage Drive NOTE... recover the original factory image (returning the computer to an external power source via the AC adaptor. For more information. Be sure to save your keyboard while powering on page 70.
... first method, follow the procedure below. To recover the original factory image using the second method, see "Creating recovery media" on page 69. ❖ The Toshiba Recovery Wizard also provides the option of -box state deletes all information stored in those partitions. 62 Getting Started Recovering the Internal Storage Drive NOTE... recover the original factory image (returning the computer to an external power source via the AC adaptor. For more information. Be sure to save your keyboard while powering on page 70.
User Guide
Page 64
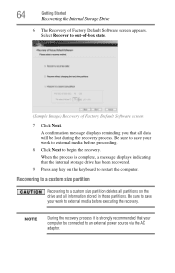
... recommended that your computer be lost during the recovery process. Recovering to a custom size partition Recovering to a custom size partition deletes all partitions on the keyboard to external media before executing the recovery. Select Recover to an external power source via the AC adaptor. A confirmation message displays reminding you that the...
... recommended that your computer be lost during the recovery process. Recovering to a custom size partition Recovering to a custom size partition deletes all partitions on the keyboard to external media before executing the recovery. Select Recover to an external power source via the AC adaptor. A confirmation message displays reminding you that the...
User Guide
Page 65
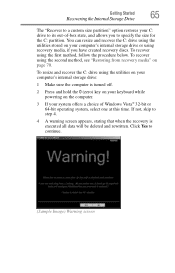
... -box state, and allows you have created recovery discs. To recover using the second method, see "Restoring from recovery media" on the computer. 3 If your keyboard while powering on page 70. If not, skip to continue. (Sample Image) Warning screen Getting Started Recovering the Internal Storage Drive 65 The "Recover to...
... -box state, and allows you have created recovery discs. To recover using the second method, see "Restoring from recovery media" on the computer. 3 If your keyboard while powering on page 70. If not, skip to continue. (Sample Image) Warning screen Getting Started Recovering the Internal Storage Drive 65 The "Recover to...
User Guide
Page 67
... indicating that your work to external media before executing the recovery. When the process is turned off. 2 Press and hold the 0 (zero) key on your keyboard while powering on the computer. 3 If your computer's internal storage drive or by either using the utilities stored on them will remain intact and any... 67 9 Click Next to an external power source via the AC adaptor. To recover using the second method, see "Restoring from recovery media" on the keyboard to step 4.
... indicating that your work to external media before executing the recovery. When the process is turned off. 2 Press and hold the 0 (zero) key on your keyboard while powering on the computer. 3 If your computer's internal storage drive or by either using the utilities stored on them will remain intact and any... 67 9 Click Next to an external power source via the AC adaptor. To recover using the second method, see "Restoring from recovery media" on the keyboard to step 4.
User Guide
Page 69
... may be lost during the recovery process. outside the United States it is complete, a message displays, indicating that all data on the keyboard to save your system. Getting Started Recovering the Internal Storage Drive 69 6 The Recovery of Factory Default Software screen 7 Click Next. Be... C: drive will prompt you have replaced your optical disc drive is (800) 457-777; The Toshiba Customer Support Center in the United States is not a writable drive, contact Toshiba Customer Support to obtain the Recovery media for your work to external media before proceeding. 8 Click ...
... may be lost during the recovery process. outside the United States it is complete, a message displays, indicating that all data on the keyboard to save your system. Getting Started Recovering the Internal Storage Drive 69 6 The Recovery of Factory Default Software screen 7 Click Next. Be... C: drive will prompt you have replaced your optical disc drive is (800) 457-777; The Toshiba Customer Support Center in the United States is not a writable drive, contact Toshiba Customer Support to obtain the Recovery media for your work to external media before proceeding. 8 Click ...
User Guide
Page 72
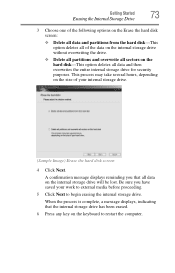
... screen that the drive has been recovered. 10 Press any key on the keyboard to continue. ❖ To access the Recovery Wizard on your data to external... the internal storage drive will delete all data and partitions from the internal storage drive: 1 Access the Toshiba Recovery Wizard on your internal storage drive or on your recovery DVDs. ❖ To access the Recovery ... if your internal storage drive: Press and hold the 0 (zero) key while powering on the computer. Select Toshiba Recovery Wizard, and then click Next. 2 Select Erase the hard disk and then click Next. To delete all...
... screen that the drive has been recovered. 10 Press any key on the keyboard to continue. ❖ To access the Recovery Wizard on your data to external... the internal storage drive will delete all data and partitions from the internal storage drive: 1 Access the Toshiba Recovery Wizard on your internal storage drive or on your recovery DVDs. ❖ To access the Recovery ... if your internal storage drive: Press and hold the 0 (zero) key while powering on the computer. Select Toshiba Recovery Wizard, and then click Next. 2 Select Erase the hard disk and then click Next. To delete all...
User Guide
Page 73
Be sure you that the internal storage drive has been erased. 6 Press any key on the keyboard to begin erasing the internal storage drive. When the process is complete, a message displays, indicating that all data and then overwrites the entire internal storage ...
Be sure you that the internal storage drive has been erased. 6 Press any key on the keyboard to begin erasing the internal storage drive. When the process is complete, a message displays, indicating that all data and then overwrites the entire internal storage ...
User Guide
Page 74
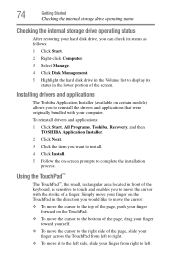
..., rectangular area located in the direction you to left side, slide your computer. Simply move your finger on the TouchPad in front of the keyboard, is sensitive to touch and enables you want to install. 4 Click Install. 5 Follow the on the TouchPad. ❖ To move the... from right to reinstall the drivers and applications that were originally bundled with the stroke of the screen. Installing drivers and applications The Toshiba Application Installer (available on certain models) allows you would like to move the cursor: ❖ To move it to complete the installation...
..., rectangular area located in the direction you to left side, slide your computer. Simply move your finger on the TouchPad in front of the keyboard, is sensitive to touch and enables you want to install. 4 Click Install. 5 Follow the on the TouchPad. ❖ To move the... from right to reinstall the drivers and applications that were originally bundled with the stroke of the screen. Installing drivers and applications The Toshiba Application Installer (available on certain models) allows you would like to move the cursor: ❖ To move it to complete the installation...
User Guide
Page 78
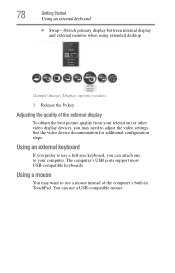
... video settings. Adjusting the quality of the computer's built-in TouchPad. The computer's USB ports support most USB-compatible keyboards. 78 Getting Started Using an external keyboard ❖ Swap-Switch primary display between internal display and external monitor when using extended desktop (Sample Image) Display options ...window 3 Release the Fn key. See the video device documentation for additional configuration steps. Using an external keyboard If you can use a mouse instead of the external display To obtain the best picture quality from your computer.
... video settings. Adjusting the quality of the computer's built-in TouchPad. The computer's USB ports support most USB-compatible keyboards. 78 Getting Started Using an external keyboard ❖ Swap-Switch primary display between internal display and external monitor when using extended desktop (Sample Image) Display options ...window 3 Release the Fn key. See the video device documentation for additional configuration steps. Using an external keyboard If you can use a mouse instead of the external display To obtain the best picture quality from your computer.
User Guide
Page 90
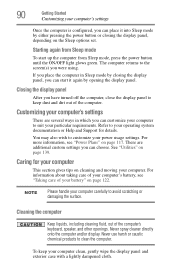
... you can choose. To keep dust and dirt out of your battery" on the Sleep options set. For information about taking care of the computer's keyboard, speaker, and other openings. The computer returns to the screen(s) you can customize your computer to keep your computer clean, gently wipe the display panel...
... you can choose. To keep dust and dirt out of your battery" on the Sleep options set. For information about taking care of the computer's keyboard, speaker, and other openings. The computer returns to the screen(s) you can customize your computer to keep your computer clean, gently wipe the display panel...
User Guide
Page 94
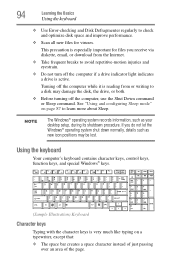
...diskette, email, or download from or writing to a disk may be lost. Using the keyboard Your computer's keyboard contains character keys, control keys, function keys, and special Windows® keys. (Sample Illustration) Keyboard Character keys Typing with the character keys is reading from the Internet. ❖ Take ... the computer while it is very much like typing on page 87 to learn more about Sleep. 94 Learning the Basics Using the keyboard ❖ Use Error-checking and Disk Defragmenter regularly to check and optimize disk space and improve performance. ❖ Scan all new ...
...diskette, email, or download from or writing to a disk may be lost. Using the keyboard Your computer's keyboard contains character keys, control keys, function keys, and special Windows® keys. (Sample Illustration) Keyboard Character keys Typing with the character keys is reading from the Internet. ❖ Take ... the computer while it is very much like typing on page 87 to learn more about Sleep. 94 Learning the Basics Using the keyboard ❖ Use Error-checking and Disk Defragmenter regularly to check and optimize disk space and improve performance. ❖ Scan all new ...
User Guide
Page 95
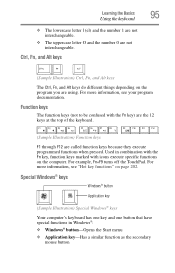
...program you are not interchangeable. Special Windows® keys Windows® button Application key (Sample Illustration) Special Windows® keys Your computer's keyboard has one key and one button that have special functions in combination with the Fn key, function keys marked with the Fn key) are... the 12 keys at the top of the keyboard. (Sample Illustration) Function keys F1 through F12 are called function keys because they execute programmed functions when pressed. Used in Windows®:...
...program you are not interchangeable. Special Windows® keys Windows® button Application key (Sample Illustration) Special Windows® keys Your computer's keyboard has one key and one button that have special functions in combination with the Fn key, function keys marked with the Fn key) are... the 12 keys at the top of the keyboard. (Sample Illustration) Function keys F1 through F12 are called function keys because they execute programmed functions when pressed. Used in Windows®:...
User Guide
Page 100
... work File names The Windows® operating system supports long file names that identifies the file as being created in "Setting up a printer" on the keyboard, except for your printer as described in the program with a particular format.
... work File names The Windows® operating system supports long file names that identifies the file as being created in "Setting up a printer" on the keyboard, except for your printer as described in the program with a particular format.

