User Guide
Page 20
... in Sleep mode 44 Adding optional external devices 45 Adding memory (optional 45 Installing a memory module 45 Removing a memory module 51 Checking total memory 53 Recovering the Internal Storage Drive 54 Creating recovery media 55 Restoring from recovery media 57 Refresh your PC (with user's data 58 Reset your PC 60 Installing drivers and applications 63 Using the touch pad 64 Adjusting touch pad settings 66 Disabling or enabling the touch pad 67 Connecting an external device 67 Using external display devices 67 Selecting video cables 68 Connecting an HDMI™-compatible...
... in Sleep mode 44 Adding optional external devices 45 Adding memory (optional 45 Installing a memory module 45 Removing a memory module 51 Checking total memory 53 Recovering the Internal Storage Drive 54 Creating recovery media 55 Restoring from recovery media 57 Refresh your PC (with user's data 58 Reset your PC 60 Installing drivers and applications 63 Using the touch pad 64 Adjusting touch pad settings 66 Disabling or enabling the touch pad 67 Connecting an external device 67 Using external display devices 67 Selecting video cables 68 Connecting an HDMI™-compatible...
User Guide
Page 23
... a user password 118 System Settings 119 Sleep and Charge 120 USB Sleep and Charge 120 Enabling/Disabling USB Sleep and Charge......122 Power supply mode settings 122 Function Key 123 PC Diagnostic Tool Utility 124 PC Health Monitor 125 Recovery Media Creator 126 Service Station 126 TOSHIBA Application Installer 127 Chapter 6: If Something Goes Wrong 128 Problems that are easy to fix 128 Problems when you turn on the computer............129 The Windows® operating system is not working 131 Using Startup options to fix problems 132 Internet problems...
... a user password 118 System Settings 119 Sleep and Charge 120 USB Sleep and Charge 120 Enabling/Disabling USB Sleep and Charge......122 Power supply mode settings 122 Function Key 123 PC Diagnostic Tool Utility 124 PC Health Monitor 125 Recovery Media Creator 126 Service Station 126 TOSHIBA Application Installer 127 Chapter 6: If Something Goes Wrong 128 Problems that are easy to fix 128 Problems when you turn on the computer............129 The Windows® operating system is not working 131 Using Startup options to fix problems 132 Internet problems...
User Guide
Page 24
... 148 Data and system configuration backup in he Windows® operating system 149 If you need further assistance 153 Contacting Toshiba 154 Other Toshiba Internet Web sites 154 Toshiba's worldwide offices 155 Appendix A: TOSHIBA Function Keys 156 Functions 156 Help file 157 Display brightness 157 Output (Display switch 158 Disabling or enabling the touch pad 159 Media buttons 159 Volume Mute 160 Disabling or enabling wireless devices............160 Keyboard Function keys 161 Zoom (Display resolution 161 Appendix B: Power Cord/Cable Connectors 162 Glossary 163...
... 148 Data and system configuration backup in he Windows® operating system 149 If you need further assistance 153 Contacting Toshiba 154 Other Toshiba Internet Web sites 154 Toshiba's worldwide offices 155 Appendix A: TOSHIBA Function Keys 156 Functions 156 Help file 157 Display brightness 157 Output (Display switch 158 Disabling or enabling the touch pad 159 Media buttons 159 Volume Mute 160 Disabling or enabling wireless devices............160 Keyboard Function keys 161 Zoom (Display resolution 161 Appendix B: Power Cord/Cable Connectors 162 Glossary 163...
User Guide
Page 27
...; Use the table of the information provided herein, product specifications, configurations, prices, system/component/options availability are designed for a product Series. While Toshiba has made every effort at support.toshiba.com. For more detailed information about your particular model, please visit Toshiba's Web site at support.toshiba.com. This guide This guide introduces the computer's features as well as some basic procedures needed to change without...
...; Use the table of the information provided herein, product specifications, configurations, prices, system/component/options availability are designed for a product Series. While Toshiba has made every effort at support.toshiba.com. For more detailed information about your particular model, please visit Toshiba's Web site at support.toshiba.com. This guide This guide introduces the computer's features as well as some basic procedures needed to change without...
User Guide
Page 45
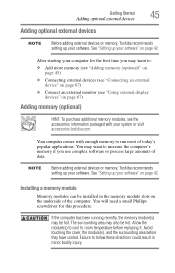
... comes with your computer for this procedure. Installing a memory module Memory modules can be installed in minor bodily injury. Getting Started 45 Adding optional external devices Adding optional external devices NOTE Before adding external devices or memory, Toshiba recommends setting up your software. Failure to : ❖ Add more memory (see "Adding memory (optional)" on page 45) ❖ Connecting external devices (see "Connecting an external device" on page 67) ❖ Connect an external monitor (see "Using external display devices" on page 42. You may want to...
... comes with your computer for this procedure. Installing a memory module Memory modules can be installed in minor bodily injury. Getting Started 45 Adding optional external devices Adding optional external devices NOTE Before adding external devices or memory, Toshiba recommends setting up your software. Failure to : ❖ Add more memory (see "Adding memory (optional)" on page 45) ❖ Connecting external devices (see "Connecting an external device" on page 67) ❖ Connect an external monitor (see "Using external display devices" on page 42. You may want to...
User Guide
Page 46
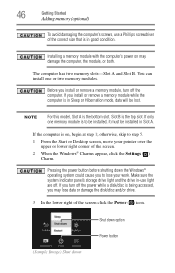
... the screen. 2 When the Windows® Charms appear, click the Settings ( ) Charm. If only one or two memory modules. The computer has two memory slots-Slot A and Slot B. Slot B is the bottom slot. Make sure the system indicator panel's storage drive light and the drive in good condition. NOTE For this model, Slot A is the top slot. If you to step 5. 1 From the Start or Desktop screen, move your work. Installing a memory module with the computer's power...
... the screen. 2 When the Windows® Charms appear, click the Settings ( ) Charm. If only one or two memory modules. The computer has two memory slots-Slot A and Slot B. Slot B is the bottom slot. Make sure the system indicator panel's storage drive light and the drive in good condition. NOTE For this model, Slot A is the top slot. If you to step 5. 1 From the Start or Desktop screen, move your work. Installing a memory module with the computer's power...
User Guide
Page 50
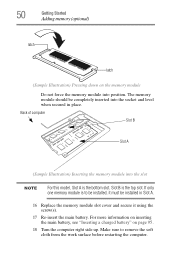
... a charged battery" on the memory module Do not force the memory module into the socket and level when secured in Slot A. 16 Replace the memory module slot cover and secure it must be completely inserted into position. The memory module should be installed in place. Back of computer Slot B Slot A (Sample Illustration) Inserting the memory module into the slot NOTE For this model, Slot A is to remove the soft cloth from the work surface...
... a charged battery" on the memory module Do not force the memory module into the socket and level when secured in Slot A. 16 Replace the memory module slot cover and secure it must be completely inserted into position. The memory module should be installed in place. Back of computer Slot B Slot A (Sample Illustration) Inserting the memory module into the slot NOTE For this model, Slot A is to remove the soft cloth from the work surface...
User Guide
Page 52
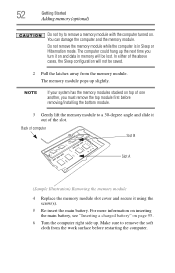
... of computer Slot B Slot A (Sample Illustration) Removing the memory module 4 Replace the memory module slot cover and secure it on and data in Sleep or Hibernation mode. NOTE If your system has the memory modules stacked on top of the above cases, the Sleep configuration will be saved. 2 Pull the latches away from the work surface before removing/installing the bottom module. 3 Gently lift the memory module to remove a memory module with the computer turned on...
... of computer Slot B Slot A (Sample Illustration) Removing the memory module 4 Replace the memory module slot cover and secure it on and data in Sleep or Hibernation mode. NOTE If your system has the memory modules stacked on top of the above cases, the Sleep configuration will be saved. 2 Pull the latches away from the work surface before removing/installing the bottom module. 3 Gently lift the memory module to remove a memory module with the computer turned on...
User Guide
Page 53
... remove the memory module slot cover (complete steps 1-10 in "Installing a memory module" on a carpet or other soft material can check that the module is connected to the login in Sleep mode). Overheating your computer is displayed below the System heading. To do this condition, observe the following: ❖ Never cover your computer or AC adaptor with the socket latches. Getting Started 53 Adding memory (optional) Always make...
... remove the memory module slot cover (complete steps 1-10 in "Installing a memory module" on a carpet or other soft material can check that the module is connected to the login in Sleep mode). Overheating your computer is displayed below the System heading. To do this condition, observe the following: ❖ Never cover your computer or AC adaptor with the socket latches. Getting Started 53 Adding memory (optional) Always make...
User Guide
Page 67
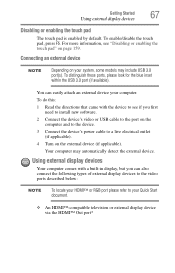
... need to install new software. 2 Connect the device's video or USB cable to the port on your HDMI™ or RGB port please refer to a live electrical outlet (if applicable). 4 Turn on page 159. You can also connect the following types of external display devices to the video ports described below: NOTE To locate your system, some models may automatically detect the external device. Getting Started 67 Using external display devices Disabling or enabling the touch pad The touch pad is enabled by default. To distinguish these ports...
... need to install new software. 2 Connect the device's video or USB cable to the port on your HDMI™ or RGB port please refer to a live electrical outlet (if applicable). 4 Turn on page 159. You can also connect the following types of external display devices to the video ports described below: NOTE To locate your system, some models may automatically detect the external device. Getting Started 67 Using external display devices Disabling or enabling the touch pad The touch pad is enabled by default. To distinguish these ports...
User Guide
Page 68
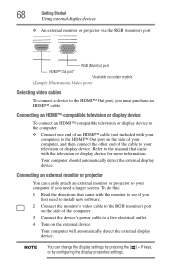
... television or display device To connect an HDMI™-compatible television or display device to the computer: ❖ Connect one end of the cable to your television or display device. 68 Getting Started Using external display devices ❖ An external monitor or projector via the RGB (monitor) port RGB (Monitor) port HDMI™ Out port* *Available on certain models (Sample Illustration) Video ports Selecting video cables To connect a device to the HDMI™ Out port, you need to install new software. 2 Connect the monitor's video cable to the RGB (monitor) port on...
... television or display device To connect an HDMI™-compatible television or display device to the computer: ❖ Connect one end of the cable to your television or display device. 68 Getting Started Using external display devices ❖ An external monitor or projector via the RGB (monitor) port RGB (Monitor) port HDMI™ Out port* *Available on certain models (Sample Illustration) Video ports Selecting video cables To connect a device to the HDMI™ Out port, you need to install new software. 2 Connect the monitor's video cable to the RGB (monitor) port on...
User Guide
Page 125
... device usage (e.g.: power settings, battery temperature and recharging, CPU, memory, and temperatures for quality assurance analysis. The collected information is used to the use restrictions above, the data logged on the computer's internal storage drive. The collected information includes device operation time and number of actuations or status changes (e.g.: number of power button and Fn key combination uses, and AC adaptor, battery, LCD, fan, HDD, sound volume, wireless communication switch, docking and USB information), date of the total hard disk...
... device usage (e.g.: power settings, battery temperature and recharging, CPU, memory, and temperatures for quality assurance analysis. The collected information is used to the use restrictions above, the data logged on the computer's internal storage drive. The collected information includes device operation time and number of actuations or status changes (e.g.: number of power button and Fn key combination uses, and AC adaptor, battery, LCD, fan, HDD, sound volume, wireless communication switch, docking and USB information), date of the total hard disk...
User Guide
Page 132
... change ❖ Your computer settings will launch. To enter the Boot menu manually: 1 Press Ctrl, Alt, and Del simultaneously (once). 2 Press the Power button in some way such as installing a new application or adding a device. Using Startup options to fix problems If the operating system fails to start properly twice, the Windows® Boot menu will be changed back to troubleshoot the Operating System and/or its settings. If Windows® fails to start properly, you installed from discs...
... change ❖ Your computer settings will launch. To enter the Boot menu manually: 1 Press Ctrl, Alt, and Del simultaneously (once). 2 Press the Power button in some way such as installing a new application or adding a device. Using Startup options to fix problems If the operating system fails to start properly twice, the Windows® Boot menu will be changed back to troubleshoot the Operating System and/or its settings. If Windows® fails to start properly, you installed from discs...
User Guide
Page 139
... are using a different make sure the display priority is not set for your desktop background, under Colors, Sounds, and Screen Saver, or change the display settings by clicking a blank area of keyboard. If Something Goes Wrong Display problems 139 The keyboard you connected may have gone into a working power outlet. ❖ Check that the cable connecting the external monitor to the computer is firmly attached. ❖ Try adjusting the contrast and brightness controls...
... are using a different make sure the display priority is not set for your desktop background, under Colors, Sounds, and Screen Saver, or change the display settings by clicking a blank area of keyboard. If Something Goes Wrong Display problems 139 The keyboard you connected may have gone into a working power outlet. ❖ Check that the cable connecting the external monitor to the computer is firmly attached. ❖ Try adjusting the contrast and brightness controls...
User Guide
Page 151
... battery power. Connect the AC adaptor before continuing. 1 From the Start screen, type Control. General tips for installing hardware and software Here are also widely available. Before installing anything goes wrong, you create and store on -screen instructions to launch the Windows® Help and Support screen. If anything , use the System Restore utility to set a restore point (see the section titled restore points). For additional Help, while in case the internal storage drive fails...
... battery power. Connect the AC adaptor before continuing. 1 From the Start screen, type Control. General tips for installing hardware and software Here are also widely available. Before installing anything goes wrong, you create and store on -screen instructions to launch the Windows® Help and Support screen. If anything , use the System Restore utility to set a restore point (see the section titled restore points). For additional Help, while in case the internal storage drive fails...
User Guide
Page 171
... of using this function, if connected with HDMI cables. internal device-See device. It is slower than L1 cache and faster than analog signal. Compare software. When you turn the computer off . I icon-A small image displayed on the computer again, your work is returned to help improve processing speed. See also World Wide Web. Interlaced monitors take two passes to add or remove devices from...
... of using this function, if connected with HDMI cables. internal device-See device. It is slower than L1 cache and faster than analog signal. Compare software. When you turn the computer off . I icon-A small image displayed on the computer again, your work is returned to help improve processing speed. See also World Wide Web. Interlaced monitors take two passes to add or remove devices from...
User Guide
Page 178
... power cord/cable 40 power source 39 cooling fan adequate ventilation 37 customize computer settings 70 D data/entire system backup troubleshooting 151 desktop creating new icon 102 exploring the 102 icons 102 recycle bin 103 standard features 101, 102 Desktop Assist 111 Media & Entertainment tab 112 Support & Recovery tab 114 Tools & Utilities tab 113 Device Manager fixing a problem 135 directing display output 69 disabling touch pad 67 display troubleshooting 140 display devices external 67 display output settings 69 display, external
... power cord/cable 40 power source 39 cooling fan adequate ventilation 37 customize computer settings 70 D data/entire system backup troubleshooting 151 desktop creating new icon 102 exploring the 102 icons 102 recycle bin 103 standard features 101, 102 Desktop Assist 111 Media & Entertainment tab 112 Support & Recovery tab 114 Tools & Utilities tab 113 Device Manager fixing a problem 135 directing display output 69 disabling touch pad 67 display troubleshooting 140 display devices external 67 display output settings 69 display, external
User Guide
Page 179
... DVD player troubleshooting 147 DVDs using 78 E eco power plan 93 eco Utility® 115 eject button optical disc drive 79 eject, optical disc drive 79 enabling touch pad 67 enabling/disabling touch pad 159 ENERGY STAR® 25 exploring desktop 102 Start screen 100 external display device HDMI™ Out port 67 RGB (monitor) port 68 external display, adjusting 70 F files backing up 74, 78 saving 78 Function Key 123 Function keys 159 disabling or enabling wireless devices 160 display brightness 157 Help file 157 keyboard Function keys 161 media buttons 159 Output (Display switch) 158 volume...
... DVD player troubleshooting 147 DVDs using 78 E eco power plan 93 eco Utility® 115 eject button optical disc drive 79 eject, optical disc drive 79 enabling touch pad 67 enabling/disabling touch pad 159 ENERGY STAR® 25 exploring desktop 102 Start screen 100 external display device HDMI™ Out port 67 RGB (monitor) port 68 external display, adjusting 70 F files backing up 74, 78 saving 78 Function Key 123 Function keys 159 disabling or enabling wireless devices 160 display brightness 157 Help file 157 keyboard Function keys 161 media buttons 159 Output (Display switch) 158 volume...
User Guide
Page 181
... energy-saving features 84 power management 86 optimum performance 86 power plans selecting power plan options 92 power saving options 91 precautions safety 35 printer troubleshooting 144 problem solving contacting Toshiba 154 Startup options 132 projector connecting 68 R real-time clock (RTC) battery 85 recording sounds 106 recovery creating recovery media 55 installing drivers and applications 63 internal storage drive 54 refresh your PC 58 reset your PC 60 restoring from recovery media 57 Recovery Media Creator 126 recycle...
... energy-saving features 84 power management 86 optimum performance 86 power plans selecting power plan options 92 power saving options 91 precautions safety 35 printer troubleshooting 144 problem solving contacting Toshiba 154 Startup options 132 projector connecting 68 R real-time clock (RTC) battery 85 recording sounds 106 recovery creating recovery media 55 installing drivers and applications 63 internal storage drive 54 refresh your PC 58 reset your PC 60 restoring from recovery media 57 Recovery Media Creator 126 recycle...
User Guide
Page 182
... Startup menu problem solving 132 supervisor password, deleting 117 supervisor password, set up 116 system indicator lights AC power 38 drive in-use indicator 79 LEDs 40, 41, 88, 89, 107 System Settings 119 T taking care of battery 97 taskbar 103 television adjusting display 70 Tiles Start screen 102 tips for computing 73 Toshiba online resources 83 registering computer Toshiba Web site 42 worldwide offices 155 Toshiba accessories memory 45 TOSHIBA Application Installer 127 TOSHIBA Function Keys functions 156 touch pad using...
... Startup menu problem solving 132 supervisor password, deleting 117 supervisor password, set up 116 system indicator lights AC power 38 drive in-use indicator 79 LEDs 40, 41, 88, 89, 107 System Settings 119 T taking care of battery 97 taskbar 103 television adjusting display 70 Tiles Start screen 102 tips for computing 73 Toshiba online resources 83 registering computer Toshiba Web site 42 worldwide offices 155 Toshiba accessories memory 45 TOSHIBA Application Installer 127 TOSHIBA Function Keys functions 156 touch pad using...


