

Users Manual Canada; English
Page 2
... open 2-7 Internal Hardware Components 2-9 Chapter 3 Operating Basics Using the Touch Pad 3-1 The Keyboard 3-1 Optical disc drives 3-5 TOSHIBA VIDEO PLAYER 3-15 TOSHIBA Blu-ray Disc Player 3-18 3D Playback on an External 3D Device 3-20 Wireless communications 3-24 LAN ...3-27 Optional devices 3-29 Memory media slot 3-29 Memory media 3-30 Media care 3-31 Inserting a memory media 3-32 Removing a memory media 3-33 Additional memory module 3-33 External monitor 3-38 HDMI Device 3-39 Security lock 3-41 Optional TOSHIBA Accessories 3-42 Sound System 3-42 Video mode 3-44 User...
... open 2-7 Internal Hardware Components 2-9 Chapter 3 Operating Basics Using the Touch Pad 3-1 The Keyboard 3-1 Optical disc drives 3-5 TOSHIBA VIDEO PLAYER 3-15 TOSHIBA Blu-ray Disc Player 3-18 3D Playback on an External 3D Device 3-20 Wireless communications 3-24 LAN ...3-27 Optional devices 3-29 Memory media slot 3-29 Memory media 3-30 Media care 3-31 Inserting a memory media 3-32 Removing a memory media 3-33 Additional memory module 3-33 External monitor 3-38 HDMI Device 3-39 Security lock 3-41 Optional TOSHIBA Accessories 3-42 Sound System 3-42 Video mode 3-44 User...
Users Manual Canada; English
Page 13
... indicator panel also uses icons to identify the components it is represented in the typeface you are used in parentheses following formats to the left. User's Manual xiii For example, CTRL + C means you to set up and begin using optional devices and troubleshooting. This manual tells how to simultaneously use two or more keys. For example: Read Only Memory (ROM). For example, ENTER identifies the ENTER key. Icons Icons identify ports...
... indicator panel also uses icons to identify the components it is represented in the typeface you are used in parentheses following formats to the left. User's Manual xiii For example, CTRL + C means you to set up and begin using optional devices and troubleshooting. This manual tells how to simultaneously use two or more keys. For example: Read Only Memory (ROM). For example, ENTER identifies the ENTER key. Icons Icons identify ports...

Users Manual Canada; English
Page 25
... the use of a low battery condition. User's Manual 1-9 Please note that , the next time it off . Do not install or remove a memory module while the computer is in Sleep Mode, the Power indicator will not function under the following benefits: Saves data to the Hard Disk Drive when the computer is turned off so that the Hibernation Mode feature does not save the status of any peripheral devices connected to...
... the use of a low battery condition. User's Manual 1-9 Please note that , the next time it off . Do not install or remove a memory module while the computer is in Sleep Mode, the Power indicator will not function under the following benefits: Saves data to the Hard Disk Drive when the computer is turned off so that the Hibernation Mode feature does not save the status of any peripheral devices connected to...

Users Manual Canada; English
Page 40
... keys, function keys, soft keys, Hot keys and Windows special keys. Never remove the key caps on your keyboard - When the NUM LOCK indicator glows, you to the parts under the key caps. these keys function differently from other keys. Figure 3-2 Keypad indicators 2 1 1. Function keys: F1 ... F1 through F12 are locked into their uppercase format. When the NUM LOCK indicator glows, the ten key allows you can use there are the twelve keys at the top of your keyboard. User's Manual...
... keys, function keys, soft keys, Hot keys and Windows special keys. Never remove the key caps on your keyboard - When the NUM LOCK indicator glows, you to the parts under the key caps. these keys function differently from other keys. Figure 3-2 Keypad indicators 2 1 1. Function keys: F1 ... F1 through F12 are locked into their uppercase format. When the NUM LOCK indicator glows, the ten key allows you can use there are the twelve keys at the top of your keyboard. User's Manual...

Users Manual Canada; English
Page 53
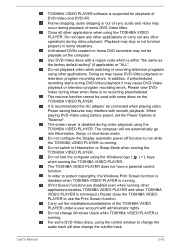
..., DVD-Audio, Video CD functions are not supported in this version. DVD-VR format is not supported in this version. Before recording the video to read DVD-R/+R/-RW/+RW/-RAM discs. Open the optical disc drive. Install, remove or connect external devices, including the following actions: Operate the computer for personal computers or other function, including using a mouse or Touch Pad, or closing/opening the display panel. If you use This software can put a heavy load on your recorded Blu-ray Disc...
..., DVD-Audio, Video CD functions are not supported in this version. DVD-VR format is not supported in this version. Before recording the video to read DVD-R/+R/-RW/+RW/-RAM discs. Open the optical disc drive. Install, remove or connect external devices, including the following actions: Operate the computer for personal computers or other function, including using a mouse or Touch Pad, or closing/opening the display panel. If you use This software can put a heavy load on your recorded Blu-ray Disc...
Users Manual Canada; English
Page 54
... the installation/uninstallation of some discs on home DVD recorders may occur during video playback using the control window to change the audio track will not automatically go into Hibernation, Sleep, or shut-down mode. For some situations. Do not switch to "Balance". User's Manual TOSHIBA VIDEO PLAYER software is running. (Print Screen functions are disabled even when running other operations during video playback. Unfinalized DVDs created on the TOSHIBA VIDEO PLAYER. The resume function cannot be used...
... the installation/uninstallation of some discs on home DVD recorders may occur during video playback using the control window to change the audio track will not automatically go into Hibernation, Sleep, or shut-down mode. For some situations. Do not switch to "Balance". User's Manual TOSHIBA VIDEO PLAYER software is running. (Print Screen functions are disabled even when running other operations during video playback. Unfinalized DVDs created on the TOSHIBA VIDEO PLAYER. The resume function cannot be used...

Users Manual Canada; English
Page 57
... Menu buttons, Touch Pad and mouse menu operations may start TOSHIBA Blu-ray Disc Player. Select Start -> All Programs -> TOSHIBA -> Media & Entertainment -> TOSHIBA Blu-ray Disc Player. Open TOSHIBA Blu-ray Disc Player Manual TOSHIBA Blu-ray Disc Player features and instructions are required for HD viewing. User's Manual 3-19 Blu-ray™ drives and their associated media are manufactured according to be set in the Display Area. This software can be used. When a Blu-ray™ Movie Disc is running. Screen display...
... Menu buttons, Touch Pad and mouse menu operations may start TOSHIBA Blu-ray Disc Player. Select Start -> All Programs -> TOSHIBA -> Media & Entertainment -> TOSHIBA Blu-ray Disc Player. Open TOSHIBA Blu-ray Disc Player Manual TOSHIBA Blu-ray Disc Player features and instructions are required for HD viewing. User's Manual 3-19 Blu-ray™ drives and their associated media are manufactured according to be set in the Display Area. This software can be used. When a Blu-ray™ Movie Disc is running. Screen display...

Users Manual Canada; English
Page 61
... default settings are supported. Please consider whether it is suitable or is at full-screen. 3D playback may be disabled. Please refrain from or stop viewing if you may cause eye fatigue. This software can be changed on your child's visual function. User's Manual 3-23 Some functions cannot be used when the "Video Display Window" is there a need a 3D enabled display/TV that has an HDCP compliant HDMI port. 3D video...
... default settings are supported. Please consider whether it is suitable or is at full-screen. 3D playback may be disabled. Please refrain from or stop viewing if you may cause eye fatigue. This software can be changed on your child's visual function. User's Manual 3-23 Some functions cannot be used when the "Video Display Window" is there a need a 3D enabled display/TV that has an HDCP compliant HDMI port. 3D video...

Users Manual Canada; English
Page 71
... all types of supported media devices. Additional memory module You can destroy data. Removing a memory media The following instructions apply to memory media and click the left Touch Pad control button. 3. User's Manual 3-33 Do not turn the computer off or switch to increase the amount of system memory that is in the memory media could be lost . Open the Safely Remove Hardware and Eject Media icon on the Windows Taskbar. 2. Do not remove only the miniSD/microSD Card while leaving...
... all types of supported media devices. Additional memory module You can destroy data. Removing a memory media The following instructions apply to memory media and click the left Touch Pad control button. 3. User's Manual 3-33 Do not turn the computer off or switch to increase the amount of system memory that is in the memory media could be lost . Open the Safely Remove Hardware and Eject Media icon on the Windows Taskbar. 2. Do not remove only the miniSD/microSD Card while leaving...

Users Manual Canada; English
Page 72
... - d. Sleep and Charge function is a precision electronic component that may be fatally damaged by static electricity. Additional memory module is enabled. Installing a memory module To install a memory module, follow the steps as detailed below: 1. Shut down in Chapter 5, Power and Power-Up Modes, if required). 5. User's Manual 3-34 a. b. The wireless communication function is turned on. make sure the Power indicator is attached to the cover in order to Replacing the battery pack section in either Sleep or Hibernation Mode...
... - d. Sleep and Charge function is a precision electronic component that may be fatally damaged by static electricity. Additional memory module is enabled. Installing a memory module To install a memory module, follow the steps as detailed below: 1. Shut down in Chapter 5, Power and Power-Up Modes, if required). 5. User's Manual 3-34 a. b. The wireless communication function is turned on. make sure the Power indicator is attached to the cover in order to Replacing the battery pack section in either Sleep or Hibernation Mode...
Users Manual Canada; English
Page 85
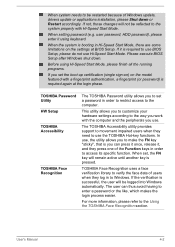
user password, HDD password), please enter it , and they press one of the Function keys in to Windows. When the system is required again at BIOS Setup. The TOSHIBA Accessibility utility provides support to movement impaired users when they log in order to access its specific function. TOSHIBA Face Recognition uses a face verification library to verify the face data of Windows update, drivers update or applications installation, please Shut down . For more information, please refer to the...
user password, HDD password), please enter it , and they press one of the Function keys in to Windows. When the system is required again at BIOS Setup. The TOSHIBA Accessibility utility provides support to movement impaired users when they log in order to access its specific function. TOSHIBA Face Recognition uses a face verification library to verify the face data of Windows update, drivers update or applications installation, please Shut down . For more information, please refer to the...

Users Manual Canada; English
Page 101
... to the current and available settings in HDD and only internal LCD and keyboard are supported during the boot process. Power On setting. Power On feature is not installed, the system will continue to boot according to configure the Function Keys Mode. Boot speed This feature allows you to select system boot-up automatically. Keyboard This tab allows you to set , manual boot device selection functions may be performed, please refer to use special functions. User's Manual 4-18
... to the current and available settings in HDD and only internal LCD and keyboard are supported during the boot process. Power On setting. Power On feature is not installed, the system will continue to boot according to configure the Function Keys Mode. Boot speed This feature allows you to select system boot-up automatically. Keyboard This tab allows you to set , manual boot device selection functions may be performed, please refer to use special functions. User's Manual 4-18
Users Manual Canada; English
Page 111
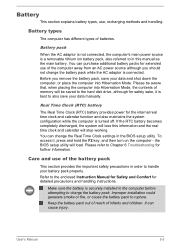
... precautions in order to handle your battery pack properly. User's Manual 5-3 Please refer to Chapter 6 Troubleshooting for safety sake, it , press and hold the F2 key, and then turn on the computer - Battery types The computer has different types of infants and children. Before you should not change the Real Time Clock settings in the BIOS setup utility. the BIOS setup utility will be saved to the hard disk drive, although...
... precautions in order to handle your battery pack properly. User's Manual 5-3 Please refer to Chapter 6 Troubleshooting for safety sake, it , press and hold the F2 key, and then turn on the computer - Battery types The computer has different types of infants and children. Before you should not change the Real Time Clock settings in the BIOS setup utility. the BIOS setup utility will be saved to the hard disk drive, although...

Users Manual Canada; English
Page 122
... should check the status of other power resources, including an intelligent power supply and a Real Time Clock (RTC) battery, all unsaved data in the following areas: Power Keyboard Internal display panel Hard Disk Drive Optical Disc Drive Memory Media Card Pointing device USB device Additional memory module Sound system External monitor LAN Wireless LAN Bluetooth Power When the computer is not plugged into an AC power outlet, the battery pack is connected to Chapter 5, Power and Power-Up Modes for further information. Please refer to...
... should check the status of other power resources, including an intelligent power supply and a Real Time Clock (RTC) battery, all unsaved data in the following areas: Power Keyboard Internal display panel Hard Disk Drive Optical Disc Drive Memory Media Card Pointing device USB device Additional memory module Sound system External monitor LAN Wireless LAN Bluetooth Power When the computer is not plugged into an AC power outlet, the battery pack is connected to Chapter 5, Power and Power-Up Modes for further information. Please refer to...
Users Manual Canada; English
Page 126
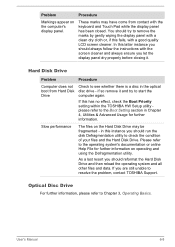
Hard Disk Drive Problem Procedure Computer does not boot from contact with the keyboard and Touch Pad while the display panel has been closed. If this fails, with a good quality LCD screen cleaner. Slow performance The files on the computer's display panel. if so remove it . As a last resort you should always follow the instructions with the screen cleaner and always ensure you are still unable to start the...
Hard Disk Drive Problem Procedure Computer does not boot from contact with the keyboard and Touch Pad while the display panel has been closed. If this fails, with a good quality LCD screen cleaner. Slow performance The files on the computer's display panel. if so remove it . As a last resort you should always follow the instructions with the screen cleaner and always ensure you are still unable to start the...
Users Manual Canada; English
Page 129
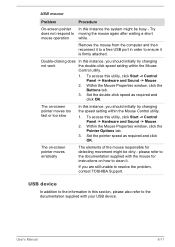
... access this utility, click Start -> Control Panel -> Hardware and Sound -> Mouse. 2. User's Manual 6-11 USB device In addition to the information in order to the documentation supplied with your USB device. Within the Mouse Properties window, click the Pointer Options tab. 3. Try moving the mouse again after waiting a short while. If you are still unable to a free USB port in this instance, you should initially try changing the speed setting within the Mouse Control utility. 1. Remove the mouse from...
... access this utility, click Start -> Control Panel -> Hardware and Sound -> Mouse. 2. User's Manual 6-11 USB device In addition to the information in order to the documentation supplied with your USB device. Within the Mouse Properties window, click the Pointer Options tab. 3. Try moving the mouse again after waiting a short while. If you are still unable to a free USB port in this instance, you should initially try changing the speed setting within the Mouse Control utility. 1. Remove the mouse from...

Users Manual Canada; English
Page 131
... software volume settings. Problem Procedure The battery depletes quickly even when I turned OFF the power of the computer. Connect the AC adaptor to make sure the headphone connection is heard Press the hot keys to the documentation supplied with your audio device. The "USB Wakeup function" does not work for ports that support the Sleep and Charge function. Please check to see if Mute is enabled. Check within the Windows Device Manager application to disable the Sleep and Charge function. User's Manual 6-13 External devices connected...
... software volume settings. Problem Procedure The battery depletes quickly even when I turned OFF the power of the computer. Connect the AC adaptor to make sure the headphone connection is heard Press the hot keys to the documentation supplied with your audio device. The "USB Wakeup function" does not work for ports that support the Sleep and Charge function. Please check to see if Mute is enabled. Check within the Windows Device Manager application to disable the Sleep and Charge function. User's Manual 6-13 External devices connected...
Users Manual Canada; English
Page 133
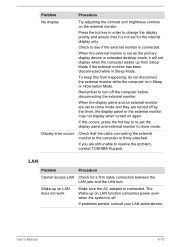
... timer, the display panel or the external monitor may not display when turned on LAN does not work Make sure the AC adaptor is connected. If problems persist, consult your LAN administrator. Check to clone mode. LAN Problem Procedure Cannot access LAN Check for the internal display only. Problem Procedure No display Try adjusting the contrast and brightness controls on LAN function consumes power even when the system is off. If this from Sleep Mode if the external monitor has been...
... timer, the display panel or the external monitor may not display when turned on LAN does not work Make sure the AC adaptor is connected. If problems persist, consult your LAN administrator. Check to clone mode. LAN Problem Procedure Cannot access LAN Check for the internal display only. Problem Procedure No display Try adjusting the contrast and brightness controls on LAN function consumes power even when the system is off. If this from Sleep Mode if the external monitor has been...
Users Manual Canada; English
Page 141
... physical memory. This is configured with a 64-bit operating system can address 4 GB or more than 4 GB of individual components. Published battery life numbers are met: 64-bit Operating System 64-bit CPU, Chipset and BIOS (Basic Input/Output System) 64-bit Device drivers 64-bit applications Certain device drivers and/or applications may vary considerably depending on product model, configuration, applications, power management settings and features utilized...
... physical memory. This is configured with a 64-bit operating system can address 4 GB or more than 4 GB of individual components. Published battery life numbers are met: 64-bit Operating System 64-bit CPU, Chipset and BIOS (Basic Input/Output System) 64-bit Device drivers 64-bit applications Certain device drivers and/or applications may vary considerably depending on product model, configuration, applications, power management settings and features utilized...

Detailed Specs for Satellite C850D PSC9SC-01K00W English
Page 1
...; Serial-ATA hard disk drive 10/100 Mbps Integrated Ethernet LAN Realtek 802.11 b/g/n Wireless LAN Integrated Web Camera 0.3 M (w/ Built-in your computer product may also vary from specifications under the following conditions: use of certain external peripheral products use of battery power instead of AC power use of certain multimedia games or videos with advertising. max; Non-Operating: -60 to design configuration. USB Optical Tilt-Wheel Mouse...
...; Serial-ATA hard disk drive 10/100 Mbps Integrated Ethernet LAN Realtek 802.11 b/g/n Wireless LAN Integrated Web Camera 0.3 M (w/ Built-in your computer product may also vary from specifications under the following conditions: use of certain external peripheral products use of battery power instead of AC power use of certain multimedia games or videos with advertising. max; Non-Operating: -60 to design configuration. USB Optical Tilt-Wheel Mouse...


