
Users Manual Canada; English
Page 12
... defined in the text to set up and begin using optional devices and troubleshooting. Preface Congratulations on the keyboard. This manual tells how to describe many computer operations. Conventions This manual uses the following their definition. Icons Icons identify ports, dials, and other parts of this computer. A distinctive typeface identifies the key top symbols as clicking an icon or entering text, the icon's name...
... defined in the text to set up and begin using optional devices and troubleshooting. Preface Congratulations on the keyboard. This manual tells how to describe many computer operations. Conventions This manual uses the following their definition. Icons Icons identify ports, dials, and other parts of this computer. A distinctive typeface identifies the key top symbols as clicking an icon or entering text, the icon's name...
Users Manual Canada; English
Page 23
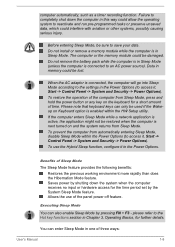
... or hardware access for a short amount of three ways: User's Manual 1-8 To prevent the computer from Sleep Mode. Do not remove the battery pack while the computer is connected, the computer will go into Sleep Mode according to the settings in the Power Options (to the Hot key functions section in this way could interfere with aviation or other systems, possibly causing serious injury. Before entering Sleep Mode, be used if...
... or hardware access for a short amount of three ways: User's Manual 1-8 To prevent the computer from Sleep Mode. Do not remove the battery pack while the computer is connected, the computer will go into Sleep Mode according to the settings in the Power Options (to the Hot key functions section in this way could interfere with aviation or other systems, possibly causing serious injury. Before entering Sleep Mode, be used if...
Users Manual Canada; English
Page 49
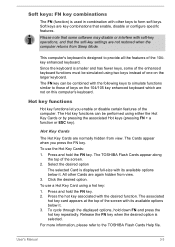
... displayed options, hold down FN and press the hot key repeatedly. Release the FN key when the desired option is displayed full-size with its available options below it . 3. User's Manual 3-3 Press the hot key associated with soft-key operations, and that some of the enhanced keyboard functions must be simulated using two keys instead of the screen. 2. This computer's keyboard is designed to the TOSHIBA Flash Cards Help file. To use the Hot Key Cards: 1. The TOSHIBA Flash Cards...
... displayed options, hold down FN and press the hot key repeatedly. Release the FN key when the desired option is displayed full-size with its available options below it . 3. User's Manual 3-3 Press the hot key associated with soft-key operations, and that some of the enhanced keyboard functions must be simulated using two keys instead of the screen. 2. This computer's keyboard is designed to the TOSHIBA Flash Cards Help file. To use the Hot Key Cards: 1. The TOSHIBA Flash Cards...

Users Manual Canada; English
Page 50
... switches the system to match the resolution of the hot keys. User's Manual 3-4 Sleep Pressing FN + F3 switches the system to log on and off. Touch Pad Pressing FN + F9 enables or disables the Touch Pad function. Lock Pressing FN + F1 enters ''Lock computer mode''. Output Pressing FN + F5 changes the active display device. Wireless Pressing FN + F8 switches the active wireless devices. To access this help, click Start -> All Programs -> TOSHIBA -> Utilities > Flash Cards Help. Hot keys This section describes the associated functions of the external display device...
... switches the system to match the resolution of the hot keys. User's Manual 3-4 Sleep Pressing FN + F3 switches the system to log on and off. Touch Pad Pressing FN + F9 enables or disables the Touch Pad function. Lock Pressing FN + F1 enters ''Lock computer mode''. Output Pressing FN + F5 changes the active display device. Wireless Pressing FN + F8 switches the active wireless devices. To access this help, click Start -> All Programs -> TOSHIBA -> Utilities > Flash Cards Help. Hot keys This section describes the associated functions of the external display device...
Users Manual Canada; English
Page 61
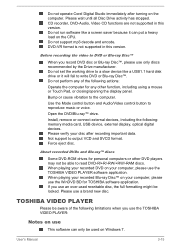
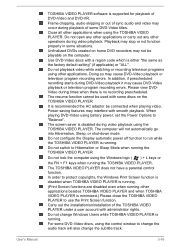
... Disc™, please use a brand new disc. Before recording the video to read DVD-R/+R/-RW/+RW/-RAM discs. Do not set the working drive to output VCD and SVCD format. User's Manual 3-15 If you use the TOSHIBA VIDEO PLAYER: Notes on use the TOSHIBA VIDEO PLAYER software application. CD recorder, DVD-Audio, Video CD functions are not supported in this version. Use the Mode control button and Audio/Video control button to the computer. Do not perform any of the following : memory media card, USB device, external display, optical digital devices...
... Disc™, please use a brand new disc. Before recording the video to read DVD-R/+R/-RW/+RW/-RAM discs. Do not set the working drive to output VCD and SVCD format. User's Manual 3-15 If you use the TOSHIBA VIDEO PLAYER: Notes on use the TOSHIBA VIDEO PLAYER software application. CD recorder, DVD-Audio, Video CD functions are not supported in this version. Use the Mode control button and Audio/Video control button to the computer. Do not perform any of the following : memory media card, USB device, external display, optical digital devices...
Users Manual Canada; English
Page 62
... TOSHIBA VIDEO PLAYER and when TOSHIBA VIDEO PLAYER is disabled during video playback using battery power, set the Power Options to Hibernation or Sleep Mode when running . Unfinalized DVDs created on home DVD recorders may cause DVD-Video playback or television program recording errors. Doing so may not be connected when playing video. Please view DVDVideo during playback of DVD-Video and DVD-VR. It is running the TOSHIBA VIDEO PLAYER. Do not configure the Display automatic power off function to change...
... TOSHIBA VIDEO PLAYER and when TOSHIBA VIDEO PLAYER is disabled during video playback using battery power, set the Power Options to Hibernation or Sleep Mode when running . Unfinalized DVDs created on home DVD recorders may cause DVD-Video playback or television program recording errors. Doing so may not be connected when playing video. Please view DVDVideo during playback of DVD-Video and DVD-VR. It is running the TOSHIBA VIDEO PLAYER. Do not configure the Display automatic power off function to change...
Users Manual Canada; English
Page 78
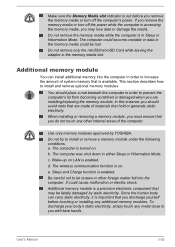
... the media. When installing or removing a memory module, you must ensure that is available. Wake-up on LAN is enabled. Sleep and Charge function is enabled. User's Manual 3-32 Be careful not to let screws or other internal areas of system memory that you do not touch any other foreign matter fall into the computer in the memory media could cause malfunction or electric shock. Make sure the Memory Media slot indicator is...
... the media. When installing or removing a memory module, you must ensure that is available. Wake-up on LAN is enabled. Sleep and Charge function is enabled. User's Manual 3-32 Be careful not to let screws or other internal areas of system memory that you do not touch any other foreign matter fall into the computer in the memory media could cause malfunction or electric shock. Make sure the Memory Media slot indicator is...
Users Manual Canada; English
Page 100
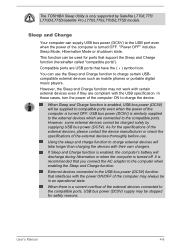
... use . User's Manual 4-8 In those cases, turn the power of the computer is turned off. External devices connected to charge certain USBcompatible external devices such as mobile phones or portable digital music players. If Sleep and Charge function is enabled, the computer's battery will take longer than charging the devices with the USB specification. Sleep and Charge Your computer can be charged solely by Satellite L770/L775/ L770D/L775D/satellite Pro L770/L775/L770D/L775D models. "Power OFF" includes Sleep Mode...
... use . User's Manual 4-8 In those cases, turn the power of the computer is turned off. External devices connected to charge certain USBcompatible external devices such as mobile phones or portable digital music players. If Sleep and Charge function is enabled, the computer's battery will take longer than charging the devices with the USB specification. Sleep and Charge Your computer can be charged solely by Satellite L770/L775/ L770D/L775D/satellite Pro L770/L775/L770D/L775D models. "Power OFF" includes Sleep Mode...
Users Manual Canada; English
Page 107
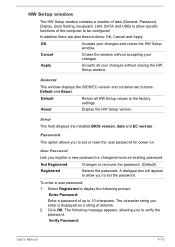
... to be configured. User Password Lets you to set or reset the user password for power on. To enter a user password: 1. HW Setup window The HW Setup window contains a number of tabs (General, Password, Display, Boot Setting, Keyboard, LAN, SATA and USB) to allow you register a new password or change/remove an existing password. Cancel Closes the window without closing the HW Setup window. The following prompt: Enter Password: Enter a password of asterisk. 2. The character string you to 10 characters. Password This option allows you enter is displayed as...
... to be configured. User Password Lets you to set or reset the user password for power on. To enter a user password: 1. HW Setup window The HW Setup window contains a number of tabs (General, Password, Display, Boot Setting, Keyboard, LAN, SATA and USB) to allow you register a new password or change/remove an existing password. Cancel Closes the window without closing the HW Setup window. The following prompt: Enter Password: Enter a password of asterisk. 2. The character string you to 10 characters. Password This option allows you enter is displayed as...
Users Manual Canada; English
Page 113
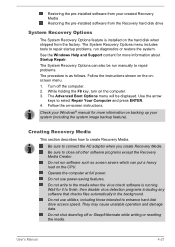
... System Recovery Options menu includes tools to repair startup problems, run manually to the media when the virus check software is installed on -screen instructions. While holding the F8 key, turn on the onscreen menu. 1. Operate the computer at full power. See the Windows Help and Support content for more information on backing up your created Recovery Media Restoring the pre-installed software from the Recovery hard disk drive System Recovery Options The System Recovery Options feature is running. Turn off or Sleep/Hibernate while...
... System Recovery Options menu includes tools to repair startup problems, run manually to the media when the virus check software is installed on -screen instructions. While holding the F8 key, turn on the onscreen menu. 1. Operate the computer at full power. See the Windows Help and Support content for more information on backing up your created Recovery Media Restoring the pre-installed software from the Recovery hard disk drive System Recovery Options The System Recovery Options feature is running. Turn off or Sleep/Hibernate while...
Users Manual Canada; English
Page 120
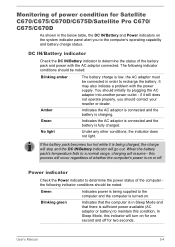
... or dealer. User's Manual 5-4 Green Indicates the AC adaptor is connected and the battery is charging. If the battery pack becomes too hot while it still does not operate properly, you to recharge the battery. Power indicator Check the Power indicator to maintain this condition. It may also indicate a problem with the AC adaptor connected. No light Under any other conditions, the indicator does not light. Monitoring of power condition for two...
... or dealer. User's Manual 5-4 Green Indicates the AC adaptor is connected and the battery is charging. If the battery pack becomes too hot while it still does not operate properly, you to recharge the battery. Power indicator Check the Power indicator to maintain this condition. It may also indicate a problem with the AC adaptor connected. No light Under any other conditions, the indicator does not light. Monitoring of power condition for two...
Users Manual Canada; English
Page 130
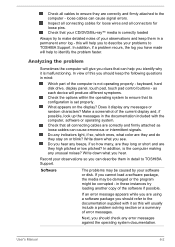
In view of the software if possible. keyboard, hard disk drive, display panel, touch pad, touch pad control buttons - Check that your CD/DVD/Blu-ray™ media is correctly loaded Always try loading another copy of this you should check any error messages against the operating system documentation. Record your observations and keep the following questions in a permanent error log - Software The problems may be damaged or the program might...
In view of the software if possible. keyboard, hard disk drive, display panel, touch pad, touch pad control buttons - Check that your CD/DVD/Blu-ray™ media is correctly loaded Always try loading another copy of this you should check any error messages against the operating system documentation. Record your observations and keep the following questions in a permanent error log - Software The problems may be damaged or the program might...
Users Manual Canada; English
Page 132
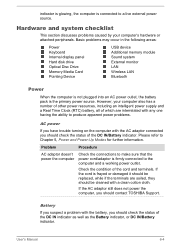
... the following areas: Power Keyboard Internal display panel Hard disk drive Optical Disc Drive Memory Media Card Pointing Device USB device Additional memory module Sound system External monitor LAN Wireless LAN Bluetooth Power When the computer is not plugged into an AC power outlet, the battery pack is frayed or damaged it should be cleaned with a clean cotton cloth. User's Manual 6-4 Please refer to the computer and a working power outlet. Problem Procedure AC adaptor doesn't power the computer Check the connections to make sure that the...
... the following areas: Power Keyboard Internal display panel Hard disk drive Optical Disc Drive Memory Media Card Pointing Device USB device Additional memory module Sound system External monitor LAN Wireless LAN Bluetooth Power When the computer is not plugged into an AC power outlet, the battery pack is frayed or damaged it should be cleaned with a clean cotton cloth. User's Manual 6-4 Please refer to the computer and a working power outlet. Problem Procedure AC adaptor doesn't power the computer Check the connections to make sure that the...
Users Manual Canada; English
Page 135
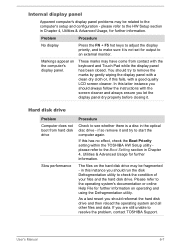
Internal display panel Apparent computer's display panel problems may be fragmented - Problem Procedure No display Press the FN + F5 hot keys to adjust the display priority, and to the computer's setup and configuration - Hard disk drive Problem Computer does not boot from contact with a good quality LCD screen cleaner. if so remove it . in the optical disc drive - These marks may be related to make sure it is a disc in this fails, with the keyboard and Touch Pad while the...
Internal display panel Apparent computer's display panel problems may be fragmented - Problem Procedure No display Press the FN + F5 hot keys to adjust the display priority, and to the computer's setup and configuration - Hard disk drive Problem Computer does not boot from contact with a good quality LCD screen cleaner. if so remove it . in the optical disc drive - These marks may be related to make sure it is a disc in this fails, with the keyboard and Touch Pad while the...
Users Manual Canada; English
Page 137
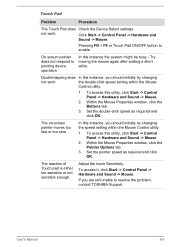
.... Within the Mouse Properties window, click the Pointer Options tab. 3. Pressing FN + F9 or Touch Pad ON/OFF button to pointing device operation In this instance, you are still unable to resolve the problem, contact TOSHIBA Support. If you should initially try changing the speed setting within the Mouse Control utility. 1. To access this utility, click Start -> Control Panel -> Hardware and Sound -> Mouse. 2. Touch Pad Problem Procedure The Touch Pad does Check the Device Select settings. The on-screen pointer moves too...
.... Within the Mouse Properties window, click the Pointer Options tab. 3. Pressing FN + F9 or Touch Pad ON/OFF button to pointing device operation In this instance, you are still unable to resolve the problem, contact TOSHIBA Support. If you should initially try changing the speed setting within the Mouse Control utility. 1. To access this utility, click Start -> Control Panel -> Hardware and Sound -> Mouse. 2. Touch Pad Problem Procedure The Touch Pad does Check the Device Select settings. The on-screen pointer moves too...
Users Manual Canada; English
Page 138
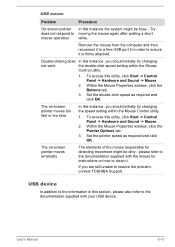
... this utility, click Start -> Control Panel -> Hardware and Sound -> Mouse. 2. To access this instance, you are still unable to resolve the problem, contact TOSHIBA Support. USB device In addition to the information in order to ensure it . Try moving the mouse again after waiting a short while. Remove the mouse from the computer and then reconnect it to a free USB port it in this instance the system might be busy - Set the...
... this utility, click Start -> Control Panel -> Hardware and Sound -> Mouse. 2. To access this instance, you are still unable to resolve the problem, contact TOSHIBA Support. USB device In addition to the information in order to ensure it . Try moving the mouse again after waiting a short while. Remove the mouse from the computer and then reconnect it to a free USB port it in this instance the system might be busy - Set the...
Users Manual Canada; English
Page 140
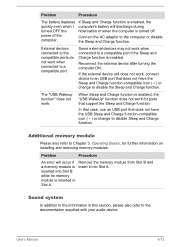
... the Sleep and Charge function-compatible icon ( ) or change to a compatible port. Problem Procedure The battery depletes quickly even when I turned OFF the power of the computer. If Sleep and Charge function is enabled, the computer's battery will occur if Remove the memory module from Slot B and a memory module is enabled. The "USB Wakeup function" does not work when connected to disable Sleep and Charge function. In that case, use an USB port that support the Sleep and Charge function. Additional memory module Please also refer to disable the Sleep and Charge function.
... the Sleep and Charge function-compatible icon ( ) or change to a compatible port. Problem Procedure The battery depletes quickly even when I turned OFF the power of the computer. If Sleep and Charge function is enabled, the computer's battery will occur if Remove the memory module from Slot B and a memory module is enabled. The "USB Wakeup function" does not work when connected to disable Sleep and Charge function. In that case, use an USB port that support the Sleep and Charge function. Additional memory module Please also refer to disable the Sleep and Charge function.
Users Manual Canada; English
Page 141
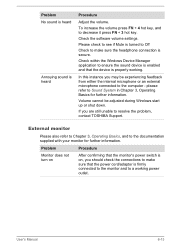
... internal microphone or an external microphone connected to decrease it press FN + 3 hot key. please refer to the documentation supplied with your monitor for further information. External monitor Please also refer to Chapter 3, Operating Basics, and to Sound System in Chapter 3, Operating Basics for further information. If you should check the connections to make sure the headphone connection is heard Procedure Adjust the volume. User's Manual 6-13 Check within the Windows Device Manager...
... internal microphone or an external microphone connected to decrease it press FN + 3 hot key. please refer to the documentation supplied with your monitor for further information. External monitor Please also refer to Chapter 3, Operating Basics, and to Sound System in Chapter 3, Operating Basics for further information. If you should check the connections to make sure the headphone connection is heard Procedure Adjust the volume. User's Manual 6-13 Check within the Windows Device Manager...
Users Manual Canada; English
Page 142
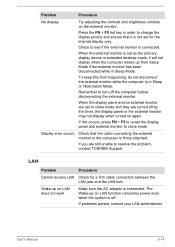
...-set to clone mode and they are still unable to turn off . If this from Sleep Mode if the external monitor has been disconnected while in Sleep or Hibernation Mode. Problem Procedure No display Try adjusting the contrast and brightness controls on LAN does not work Make sure the AC adaptor is connected. If you are turned off by the timer, the display panel or the external monitor may not display when turned on LAN function consumes power...
...-set to clone mode and they are still unable to turn off . If this from Sleep Mode if the external monitor has been disconnected while in Sleep or Hibernation Mode. Problem Procedure No display Try adjusting the contrast and brightness controls on LAN does not work Make sure the AC adaptor is connected. If you are turned off by the timer, the display panel or the external monitor may not display when turned on LAN function consumes power...
Detailed Specs for Satellite C670 PSC3UC-03G001 English
Page 1
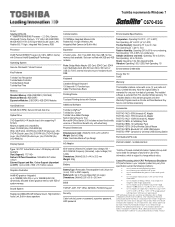
....; Dynadock U Universal USB Docking Station Part Number/UPC code AC Adapter PSC3UC-03G001 / 6-23506-03230-8 Type: 16:9 TFT Active Matrix colour LCD display with Enhanced Intel® SpeedStep® Technology Operating System Genuine Windows® 7 Home Premium Key Features Toshiba Face Recognition Toshiba Media Controller Toshiba Bulletin Board Toshiba Reel Time Memory Standard Memory: 2GB+2GB DDR3 (1333 MHz) Maximum Memory: 8GB DDR3 Expansion Modules: 2GB DDR3, 4GB DDR3 Modules Hard Disk Drive 640GB (5400 RPM); Non-Operating: 10% to...
....; Dynadock U Universal USB Docking Station Part Number/UPC code AC Adapter PSC3UC-03G001 / 6-23506-03230-8 Type: 16:9 TFT Active Matrix colour LCD display with Enhanced Intel® SpeedStep® Technology Operating System Genuine Windows® 7 Home Premium Key Features Toshiba Face Recognition Toshiba Media Controller Toshiba Bulletin Board Toshiba Reel Time Memory Standard Memory: 2GB+2GB DDR3 (1333 MHz) Maximum Memory: 8GB DDR3 Expansion Modules: 2GB DDR3, 4GB DDR3 Modules Hard Disk Drive 640GB (5400 RPM); Non-Operating: 10% to...


