
Users Manual Canada; English
Page 3
... with the display open 2-7 Indicators 2-9 Optical disc drives 2-10 AC adaptor 2-11 Chapter 3 Hardware, Utilities and Options Hardware 3-1 Special features 3-6 Utilities and Applications 3-8 Optional devices 3-11 Optional accessories 3-24 Chapter 4 Operating Basics Using the Touch Pad 4-1 Web Camera 4-2 Using the TOSHIBA Face Recognition 4-3 Using optical disc drives 4-6 Writing CD/DVDs 4-10 TOSHIBA VIDEO PLAYER 4-16 Media care 4-18 Sound System 4-18 Wireless communications 4-20 LAN 4-23 Computer Handling 4-25 Heat dispersal 4-26 Chapter 5 The Keyboard Typewriter keys...
... with the display open 2-7 Indicators 2-9 Optical disc drives 2-10 AC adaptor 2-11 Chapter 3 Hardware, Utilities and Options Hardware 3-1 Special features 3-6 Utilities and Applications 3-8 Optional devices 3-11 Optional accessories 3-24 Chapter 4 Operating Basics Using the Touch Pad 4-1 Web Camera 4-2 Using the TOSHIBA Face Recognition 4-3 Using optical disc drives 4-6 Writing CD/DVDs 4-10 TOSHIBA VIDEO PLAYER 4-16 Media care 4-18 Sound System 4-18 Wireless communications 4-20 LAN 4-23 Computer Handling 4-25 Heat dispersal 4-26 Chapter 5 The Keyboard Typewriter keys...
Users Manual Canada; English
Page 4
... monitor port pin assignment A-2 Appendix B Display Controller and Video mode Display controller B-1 Video mode B-1 Appendix C Information for Wireless Devices Wireless LAN Interoperability C-1 Bluetooth wireless technology Interoperability C-1 CAUTION about Wireless Devices C-2 Wireless Devices and your health C-2 Radio Regulatory Information C-3 Radio approvals for wireless devices C-8 Appendix D AC Power Cord and Connectors Certification agencies D-1 Appendix E Legal Footnotes Non-applicable Icons E-1 CPU E-1 Memory (Main System E-2 Battery Life E-3 Hard Disk Drive (HDD...
... monitor port pin assignment A-2 Appendix B Display Controller and Video mode Display controller B-1 Video mode B-1 Appendix C Information for Wireless Devices Wireless LAN Interoperability C-1 Bluetooth wireless technology Interoperability C-1 CAUTION about Wireless Devices C-2 Wireless Devices and your health C-2 Radio Regulatory Information C-3 Radio approvals for wireless devices C-8 Appendix D AC Power Cord and Connectors Certification agencies D-1 Appendix E Legal Footnotes Non-applicable Icons E-1 CPU E-1 Memory (Main System E-2 Battery Life E-3 Hard Disk Drive (HDD...

Users Manual Canada; English
Page 13
... this manual by -step instructions on setting up and begin using optional devices and troubleshooting. Abbreviations On first appearance, and whenever necessary for step-by browsing through its pages. For example: Read Only Memory (ROM). Be sure to read over the Chapter 1, Getting Started and Chapter 3, Hardware, Utilities and Options chapters to set up your computer. Conventions This manual uses the following their definition. This manual tells...
... this manual by -step instructions on setting up and begin using optional devices and troubleshooting. Abbreviations On first appearance, and whenever necessary for step-by browsing through its pages. For example: Read Only Memory (ROM). Be sure to read over the Chapter 1, Getting Started and Chapter 3, Hardware, Utilities and Options chapters to set up your computer. Conventions This manual uses the following their definition. This manual tells...
Users Manual Canada; English
Page 19
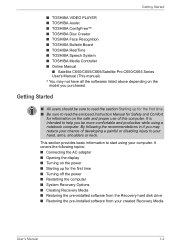
...; Creating Recovery Media ■ Restoring the pre-installed software from the Recovery hard disk drive ■ Restoring the pre-installed software from your created Recovery Media User's Manual 1-2 Getting Started ■ TOSHIBA VIDEO PLAYER ■ TOSHIBA Assist ■ TOSHIBA ConfigFree™ ■ TOSHIBA Disc Creator ■ TOSHIBA Face Recognition ■ TOSHIBA Bulletin Board ■ TOSHIBA ReelTime ■ TOSHIBA Speech System ■ TOSHIBA Media Controller ■ Online Manual ■ Satellite C650/C655/C665/Satellite Pro C650/C665 Series User's Manual (This manual...
...; Creating Recovery Media ■ Restoring the pre-installed software from the Recovery hard disk drive ■ Restoring the pre-installed software from your created Recovery Media User's Manual 1-2 Getting Started ■ TOSHIBA VIDEO PLAYER ■ TOSHIBA Assist ■ TOSHIBA ConfigFree™ ■ TOSHIBA Disc Creator ■ TOSHIBA Face Recognition ■ TOSHIBA Bulletin Board ■ TOSHIBA ReelTime ■ TOSHIBA Speech System ■ TOSHIBA Media Controller ■ Online Manual ■ Satellite C650/C655/C665/Satellite Pro C650/C665 Series User's Manual (This manual...
Users Manual Canada; English
Page 25
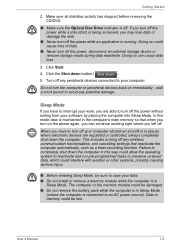
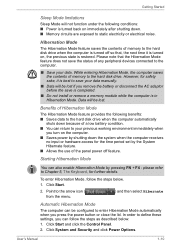
... functionalities, and cancelling settings that when you turn off your computer. wait a short period to save your software by placing the computer into Sleep Mode. Getting Started 2. Failure to completely shut down button ( ). 5. This includes turning off any peripheral devices connected to turn off the power while a disk (disc) is maintained in memory could interfere with aviation or other systems, possibly causing serious injury. ■ Before entering Sleep Mode...
... functionalities, and cancelling settings that when you turn off your computer. wait a short period to save your software by placing the computer into Sleep Mode. Getting Started 2. Failure to completely shut down button ( ). 5. This includes turning off any peripheral devices connected to turn off the power while a disk (disc) is maintained in memory could interfere with aviation or other systems, possibly causing serious injury. ■ Before entering Sleep Mode...
Users Manual Canada; English
Page 27
... : 1. In order to define these settings, you press the power button or close the lid. User's Manual 1-10 Hibernation Mode The Hibernation Mode feature saves the contents of memory to the hard disk drive when the computer is turned off feature. While entering Hibernation Mode, the computer saves the contents of any peripheral devices connected to the computer. ■ Save your data. Click Start and click the Control Panel. 2. Data...
... : 1. In order to define these settings, you press the power button or close the lid. User's Manual 1-10 Hibernation Mode The Hibernation Mode feature saves the contents of memory to the hard disk drive when the computer is turned off feature. While entering Hibernation Mode, the computer saves the contents of any peripheral devices connected to the computer. ■ Save your data. Click Start and click the Control Panel. 2. Data...
Users Manual Canada; English
Page 29
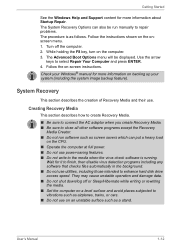
... about Startup Repair. Getting Started See the Windows Help and Support content for more information on backing up your Windows® manual for it to finish, then disable virus detection programs including any software that checks files automatically in the background. ■ Do not use . While holding the F8 key, turn on -screen instructions. User's Manual 1-12 The System Recovery Options can put a heavy load on the CPU. ■ Operate...
... about Startup Repair. Getting Started See the Windows Help and Support content for more information on backing up your Windows® manual for it to finish, then disable virus detection programs including any software that checks files automatically in the background. ■ Do not use . While holding the F8 key, turn on -screen instructions. User's Manual 1-12 The System Recovery Options can put a heavy load on the CPU. ■ Operate...
Users Manual Canada; English
Page 66
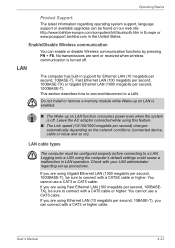
... a CAT5 cable or higher. User's Manual 4-23 If you can enable or disable Wireless communication functions by pressing FN + F8. Enable/Disable Wireless communication You can connect with a CAT5E cable or higher. If you are using Fast Ethernet LAN (100 megabits per second, 10BASE-T), you are using Ethernet LAN (10 megabits per second, 100BASETX), be configured properly before connecting to connect with a CAT3 or higher cable. Do not install or remove a memory module while...
... a CAT5 cable or higher. User's Manual 4-23 If you can enable or disable Wireless communication functions by pressing FN + F8. Enable/Disable Wireless communication You can connect with a CAT5E cable or higher. If you are using Fast Ethernet LAN (100 megabits per second, 10BASE-T), you are using Ethernet LAN (10 megabits per second, 100BASETX), be configured properly before connecting to connect with a CAT3 or higher cable. Do not install or remove a memory module while...
Users Manual Canada; English
Page 71
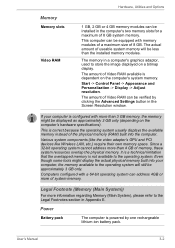
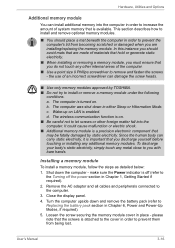
...'s graphics adaptor, used to store the image displayed on the computer's system memory. Hardware, Utilities and Options Memory Memory slots Video RAM 1 GB, 2 GB or 4 GB memory modules can be verified by one rechargeable lithium-ion battery pack. The amount of Video RAM can be installed in the Screen Resolution window. Various system components (like the video adapter's GPU and PCI devices like Wireless LAN, etc.) require their own memory space. The memory in Appendix E. Even...
...'s graphics adaptor, used to store the image displayed on the computer's system memory. Hardware, Utilities and Options Memory Memory slots Video RAM 1 GB, 2 GB or 4 GB memory modules can be verified by one rechargeable lithium-ion battery pack. The amount of Video RAM can be installed in the Screen Resolution window. Various system components (like the video adapter's GPU and PCI devices like Wireless LAN, etc.) require their own memory space. The memory in Appendix E. Even...
Users Manual Canada; English
Page 85
... by TOSHIBA. ■ Do not try to Replacing the battery pack section in Chapter 1, Getting Started if required). 2. b. make sure the Power indicator is on. ■ Be careful not to the Turning off (refer to let screws or other internal areas of an incorrect screwdriver can damage the screw heads. ■ Use only memory modules approved by static electricity. The wireless communication function is...
... by TOSHIBA. ■ Do not try to Replacing the battery pack section in Chapter 1, Getting Started if required). 2. b. make sure the Power indicator is on. ■ Be careful not to the Turning off (refer to let screws or other internal areas of an incorrect screwdriver can damage the screw heads. ■ Use only memory modules approved by static electricity. The wireless communication function is...
Users Manual Canada; English
Page 88
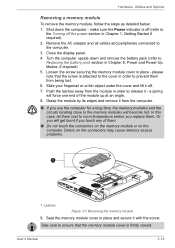
... use the computer for a long time, the memory modules and the circuits locating close to the Turning off . 7. Latches Figure 3-7 Removing the memory module 9. Remove the AC adaptor and all cables and peripherals connected to ensure that the screw is firmly closed. Debris on the computer. User's Manual 3-19 make sure the Power indicator is off (refer to the memory modules will become hot. Close the display panel. 4. Seat the memory module cover in order...
... use the computer for a long time, the memory modules and the circuits locating close to the Turning off . 7. Latches Figure 3-7 Removing the memory module 9. Remove the AC adaptor and all cables and peripherals connected to ensure that the screw is firmly closed. Debris on the computer. User's Manual 3-19 make sure the Power indicator is off (refer to the memory modules will become hot. Close the display panel. 4. Seat the memory module cover in order...
Users Manual Canada; English
Page 95
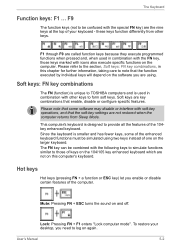
...-key operations, and that enable, disable or configure specific features. To restore your keyboard - User's Manual 5-2 The Keyboard Function keys: F1 ... Since the keyboard is smaller and has fewer keys, some software may disable or interfere with the following keys to simulate functions similar to those keys marked with other keys. Soft keys are key combinations that the soft-key settings are using two keys instead of your desktop, you enable or disable certain features of the 104key enhanced keyboard. Hot keys Hot keys...
...-key operations, and that enable, disable or configure specific features. To restore your keyboard - User's Manual 5-2 The Keyboard Function keys: F1 ... Since the keyboard is smaller and has fewer keys, some software may disable or interfere with the following keys to simulate functions similar to those keys marked with other keys. Soft keys are key combinations that the soft-key settings are using two keys instead of your desktop, you enable or disable certain features of the 104key enhanced keyboard. Hot keys Hot keys...
Users Manual Canada; English
Page 102
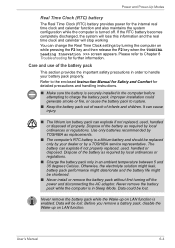
... internal real time clock and calendar function and also maintains the system configuration while the computer is in Sleep Mode. Never remove the battery pack while the computer is turned off the power and disconnecting the AC adaptor. Before you remove a battery pack, disable the Wake-up on while pressing the F2 key and then release the F2 key when the TOSHIBA Leading Innovation >>> screen appears. User's Manual...
... internal real time clock and calendar function and also maintains the system configuration while the computer is in Sleep Mode. Never remove the battery pack while the computer is turned off the power and disconnecting the AC adaptor. Before you remove a battery pack, disable the Wake-up on while pressing the F2 key and then release the F2 key when the TOSHIBA Leading Innovation >>> screen appears. User's Manual...
Users Manual Canada; English
Page 110
... your changes and closes the HW Setup window. User's Manual 7-1 Chapter 7 HW Setup This chapter explains how to use the TOSHIBA HW Setup program to be configured. HW Setup window The HW Setup window contains a number of tabs (General, Password, Display,Boot Setting, Keyboard, LAN, SATA and USB) to allow specific functions of the computer to configure your changes. Accessing HW Setup To run the HW Setup program, click Start -> All Programs -> TOSHIBA -> Utilities -> HWSETUP. In addition there are also three buttons: OK...
... your changes and closes the HW Setup window. User's Manual 7-1 Chapter 7 HW Setup This chapter explains how to use the TOSHIBA HW Setup program to be configured. HW Setup window The HW Setup window contains a number of tabs (General, Password, Display,Boot Setting, Keyboard, LAN, SATA and USB) to allow specific functions of the computer to configure your changes. Accessing HW Setup To run the HW Setup program, click Start -> All Programs -> TOSHIBA -> Utilities -> HWSETUP. In addition there are also three buttons: OK...
Users Manual Canada; English
Page 113
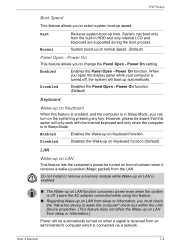
... Normal Reduces system boot-up on LAN function consumes power even when the system is connected via a network. Power On This feature allows you open the display panel while your computer is enabled. ■ The Wake-up time. Do not install or remove a memory module while Wake-up on LAN is turned off . System can turn on the system by pressing any key. Power On function. Disabled Disables the Panel Open - Power On function. (Default) Keyboard Wake-up on...
... Normal Reduces system boot-up on LAN function consumes power even when the system is connected via a network. Power On This feature allows you open the display panel while your computer is enabled. ■ The Wake-up time. Do not install or remove a memory module while Wake-up on LAN is turned off . System can turn on the system by pressing any key. Power On function. Disabled Disables the Panel Open - Power On function. (Default) Keyboard Wake-up on...
Users Manual Canada; English
Page 116
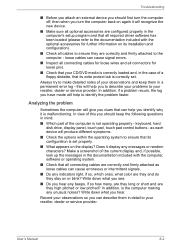
... configuration is set . In addition, if a problem recurs, the log you clues that can cause signal errors. ■ Inspect all connecting cables for loose wires and all connectors for further information on the display? keyboard, hard disk drive, display panel, touch pad, touch pad control buttons - In addition, is the computer making any indicators light, if so, which ones, what color are they and do they stay on or blink? Always try to make...
... configuration is set . In addition, if a problem recurs, the log you clues that can cause signal errors. ■ Inspect all connecting cables for loose wires and all connectors for further information on the display? keyboard, hard disk drive, display panel, touch pad, touch pad control buttons - In addition, is the computer making any indicators light, if so, which ones, what color are they and do they stay on or blink? Always try to make...
Users Manual Canada; English
Page 129
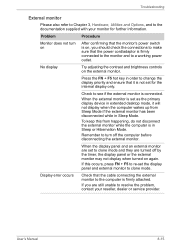
... an external monitor are turned off the computer before disconnecting the external monitor. Troubleshooting External monitor Please also refer to Chapter 3, Hardware, Utilities and Options, and to a working power outlet. Problem Procedure Monitor does not turn off by the timer, the display panel or the external monitor may not display when turned on again. Press the FN + F5 hot key in order to change the display priority and ensure that the monitor's power switch is not set as the primary display device in Sleep Mode.
... an external monitor are turned off the computer before disconnecting the external monitor. Troubleshooting External monitor Please also refer to Chapter 3, Hardware, Utilities and Options, and to a working power outlet. Problem Procedure Monitor does not turn off by the timer, the display panel or the external monitor may not display when turned on again. Press the FN + F5 hot key in order to change the display priority and ensure that the monitor's power switch is not set as the primary display device in Sleep Mode.
Users Manual Canada; English
Page 151
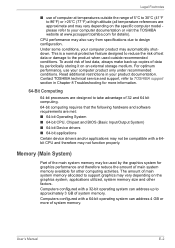
... an external storage medium. Under some conditions, your product documentation. The amount of lost data or damage to support graphics may automatically shutdown. User's Manual E-2 To avoid risk of main system memory allocated to the product when used by periodically storing it on the graphics system, applications utilized, system memory size and other computing activities. CPU performance may not function properly...
... an external storage medium. Under some conditions, your product documentation. The amount of lost data or damage to support graphics may automatically shutdown. User's Manual E-2 To avoid risk of main system memory allocated to the product when used by periodically storing it on the graphics system, applications utilized, system memory size and other computing activities. CPU performance may not function properly...
Users Manual Canada; English
Page 157
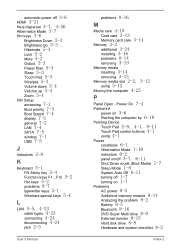
... Power Plan 5-3 Sleep 5-3 Touch Pad 5-3 Wireless 5-3 Volume down 5-4 Volume up 5-4 Zoom 5-4 HW Setup accessing 7-1 Boot priority 7-3 Boot Speed 7-4 display 7-3 general 7-2 LAN 7-4 SATA 7-5 window 7-1 USB 7-5 J Indicators 2-9 K Keyboard 5-1 FN Sticky key 5-4 Function keys F1...F12 5-2 Hot keys 5-2 problems 8-7 typewriter keys 5-1 Windows special keys 5-4 L LAN 3-5, 4-23 cable types 4-23 connecting 4-24 disconnecting 4-24 jack 2-3 User's Manual problems 8-16 M Media care 4-18 Card care 3-13 Memory card care 3-14 Memory 3-2 additional 3-24 installing 3-16 problems 8-14 removing 3-19 Memory media...
... Power Plan 5-3 Sleep 5-3 Touch Pad 5-3 Wireless 5-3 Volume down 5-4 Volume up 5-4 Zoom 5-4 HW Setup accessing 7-1 Boot priority 7-3 Boot Speed 7-4 display 7-3 general 7-2 LAN 7-4 SATA 7-5 window 7-1 USB 7-5 J Indicators 2-9 K Keyboard 5-1 FN Sticky key 5-4 Function keys F1...F12 5-2 Hot keys 5-2 problems 8-7 typewriter keys 5-1 Windows special keys 5-4 L LAN 3-5, 4-23 cable types 4-23 connecting 4-24 disconnecting 4-24 jack 2-3 User's Manual problems 8-16 M Media care 4-18 Card care 3-13 Memory card care 3-14 Memory 3-2 additional 3-24 installing 3-16 problems 8-14 removing 3-19 Memory media...
Detailed Specs for Satellite C650 PSC2EC-01D001 English
Page 1
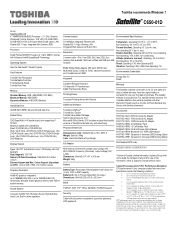
... make backup copies of Word® and Excel® only, with Enhanced Intel® SpeedStep® Technology Operating System Genuine Windows® 7 Home Premium Key Features Toshiba Face Recognition Toshiba Media Controller Toshiba Bulletin Board Toshiba Reel Time Memory Standard Memory: 2GB +2GB DDR3 (1333 MHz) Maximum Memory: 8GB DDR3 Expansion Modules: 4GB DDR3 Modules Hard Disk Drive 320GB (5400 RPM); Dynadock U Universal USB Docking Station AC Adapter Part Number/UPC code 65W external Universal AC adapter...
... make backup copies of Word® and Excel® only, with Enhanced Intel® SpeedStep® Technology Operating System Genuine Windows® 7 Home Premium Key Features Toshiba Face Recognition Toshiba Media Controller Toshiba Bulletin Board Toshiba Reel Time Memory Standard Memory: 2GB +2GB DDR3 (1333 MHz) Maximum Memory: 8GB DDR3 Expansion Modules: 4GB DDR3 Modules Hard Disk Drive 320GB (5400 RPM); Dynadock U Universal USB Docking Station AC Adapter Part Number/UPC code 65W external Universal AC adapter...

