User Manual
Page 20
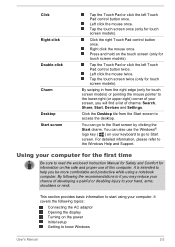
...: Connecting the AC adaptor Opening the display Turning on the power Initial setup Getting to start using a notebook computer. Press and hold on your chance of charms: Search, Share, Start, Devices and Settings. Left click the mouse twice. It covers the following the recommendations in from the Start screen to the Windows Help and Support. Click Right-click Double-click Charm Desktop Start screen Tap the Touch Pad or click the left Touch Pad control button...
...: Connecting the AC adaptor Opening the display Turning on the power Initial setup Getting to start using a notebook computer. Press and hold on your chance of charms: Search, Share, Start, Devices and Settings. Left click the mouse twice. It covers the following the recommendations in from the Start screen to the Windows Help and Support. Click Right-click Double-click Charm Desktop Start screen Tap the Touch Pad or click the left Touch Pad control button...
User Manual
Page 27
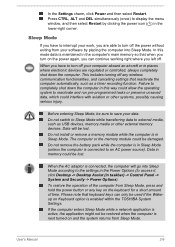
Sleep Mode If you have to external media, such as a timer recording function. Do not switch to Sleep Mode while transferring data to turn off . Do not remove the battery pack while the computer is in taskbar) -> Control Panel -> System and Security -> Power Options). If the computer enters Sleep Mode while a network application is enabled within the TOSHIBA System Settings. Data will go into Sleep Mode. User's Manual 2-9 Please note that keyboard keys can continue working right where you turn on...
Sleep Mode If you have to external media, such as a timer recording function. Do not switch to Sleep Mode while transferring data to turn off . Do not remove the battery pack while the computer is in taskbar) -> Control Panel -> System and Security -> Power Options). If the computer enters Sleep Mode while a network application is enabled within the TOSHIBA System Settings. Data will go into Sleep Mode. User's Manual 2-9 Please note that keyboard keys can continue working right where you turn on...
User Manual
Page 29
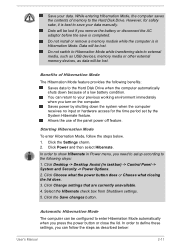
... (in Power menu, you need to setup according to enter Hibernation Mode automatically when you press the power button or close the lid. Benefits of a low battery condition. Click the Settings charm. 2. Click Change settings that are currently unavailable. 4. In order to the Hard Disk Drive. Click Choose what the power button does or Choose what closing the lid does. 3. Click the Save changes button. Do not install or remove a memory module while the...
... (in Power menu, you need to setup according to enter Hibernation Mode automatically when you press the power button or close the lid. Benefits of a low battery condition. Click the Settings charm. 2. Click Change settings that are currently unavailable. 4. In order to the Hard Disk Drive. Click Choose what the power button does or Choose what closing the lid does. 3. Click the Save changes button. Do not install or remove a memory module while the...
User Manual
Page 48
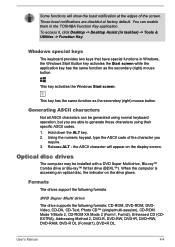
... function as the secondary (right) mouse button. Using the numeric keypad, type the ASCII code of the screen. User's Manual 4-4 This key activates the Windows Start screen. Generating ASCII characters Not all ASCII characters can enable them in the TOSHIBA Function Key application. When the computer is accessing an optical disc, the indicator on the display screen. Some functions will appear on the drive glows. Windows special keys The keyboard provides two keys that have special functions in taskbar) -> Tools & Utilities -> Function Key...
... function as the secondary (right) mouse button. Using the numeric keypad, type the ASCII code of the screen. User's Manual 4-4 This key activates the Windows Start screen. Generating ASCII characters Not all ASCII characters can enable them in the TOSHIBA Function Key application. When the computer is accessing an optical disc, the indicator on the display screen. Some functions will appear on the drive glows. Windows special keys The keyboard provides two keys that have special functions in taskbar) -> Tools & Utilities -> Function Key...
User Manual
Page 59
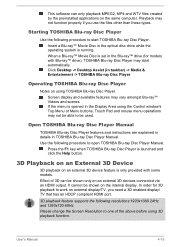
... optical disc drive while the operating system is set in the Blu-ray™ drive (for 3D playback to work on the internal display. User's Manual 4-15 If the menu is only provided with Blu-ray™ drive), TOSHIBA Blu-ray Disc Player may start TOSHIBA Blu-ray Disc Player. This software can be shown only on an external 3D device feature is opened in the Display Area using the Control window's Top Menu or Menu buttons, Touch Pad and mouse menu operations...
... optical disc drive while the operating system is set in the Blu-ray™ drive (for 3D playback to work on the internal display. User's Manual 4-15 If the menu is only provided with Blu-ray™ drive), TOSHIBA Blu-ray Disc Player may start TOSHIBA Blu-ray Disc Player. This software can be shown only on an external 3D device feature is opened in the Display Area using the Control window's Top Menu or Menu buttons, Touch Pad and mouse menu operations...
User Manual
Page 63
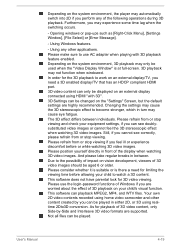
... "Video Display Window" is there a need a 3D enabled display/TV that has an HDCP compliant HDMI port. 3D video content can only be displayed on an external display connected using HDMI "with 3D playback feature enabled. Please refrain from or stop viewing and check your child's visual function. Due to become stronger, which in turn may cause eye fatigue. Please use AC adapter when playing with 3D". 3D Settings can be changed...
... "Video Display Window" is there a need a 3D enabled display/TV that has an HDCP compliant HDMI port. 3D video content can only be displayed on an external display connected using HDMI "with 3D playback feature enabled. Please refrain from or stop viewing and check your child's visual function. Due to become stronger, which in turn may cause eye fatigue. Please use AC adapter when playing with 3D". 3D Settings can be changed...
User Manual
Page 64
.... Make sure the battery is connected. Improper installation could generate smoke or fire, or cause the battery pack to charge the battery pack. Before you should not change the Real Time Clock settings in the computer before attempting to rupture. You can cause injury. User's Manual 4-20 Battery This section explains battery types, use of the computer away from an AC power source although you remove the battery...
.... Make sure the battery is connected. Improper installation could generate smoke or fire, or cause the battery pack to charge the battery pack. Before you should not change the Real Time Clock settings in the computer before attempting to rupture. You can cause injury. User's Manual 4-20 Battery This section explains battery types, use of the computer away from an AC power source although you remove the battery...

User Manual
Page 71
... the computer in order to increase the amount of materials that you disconnect the AC Adaptor while the computer is available. This section describes how to the computer. 2. Do not connect any power supplying device to the LAN jack. Turn off the power to all external devices connected to install and remove optional memory modules. User's Manual 4-27 Do not connect any other end of the cable into a LAN hub connector...
... the computer in order to increase the amount of materials that you disconnect the AC Adaptor while the computer is available. This section describes how to the computer. 2. Do not connect any power supplying device to the LAN jack. Turn off the power to all external devices connected to install and remove optional memory modules. User's Manual 4-27 Do not connect any other end of the cable into a LAN hub connector...

User Manual
Page 72
...: 1. a. Be careful not to the computer. 3. User's Manual 4-28 Click Power in either Sleep or Hibernation Mode. Close the display panel. 4. The computer was shut down in the Settings charm, and then click Shut down while holding down and remove the battery pack (refer to you discharge yourself before touching or installing any metal close to Replacing the battery pack section, if required). 5. d. It...
...: 1. a. Be careful not to the computer. 3. User's Manual 4-28 Click Power in either Sleep or Hibernation Mode. Close the display panel. 4. The computer was shut down in the Settings charm, and then click Shut down while holding down and remove the battery pack (refer to you discharge yourself before touching or installing any metal close to Replacing the battery pack section, if required). 5. d. It...

User Manual
Page 75
... all cables and peripherals connected to Replacing the battery pack section, if required. 10. Slide your computer over. 11. Take care to ensure that the screw is firmly closed. Install the battery pack - Removing a memory module To remove the memory module, follow the steps as detailed below: 1. Seat the memory module cover in place - Turn the computer on the model you purchased. 9. ensure that the Power indicator is recognized - Turn...
... all cables and peripherals connected to Replacing the battery pack section, if required. 10. Slide your computer over. 11. Take care to ensure that the screw is firmly closed. Install the battery pack - Removing a memory module To remove the memory module, follow the steps as detailed below: 1. Seat the memory module cover in place - Turn the computer on the model you purchased. 9. ensure that the Power indicator is recognized - Turn...
User Manual
Page 82
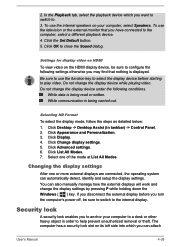
... and setup the display settings. Be sure to use the internal speakers on the HDMI display device, be sure to switch to play video. Click the Set Default button. 5. While data is displayed. You can attach User's Manual 4-38 If you turn the computer's power off, be sure to help prevent unauthorized removal or theft. Do not change the display settings by pressing P while holding down the Windows ( ) key. To use the function key to select the display device...
... and setup the display settings. Be sure to use the internal speakers on the HDMI display device, be sure to switch to play video. Click the Set Default button. 5. While data is displayed. You can attach User's Manual 4-38 If you turn the computer's power off, be sure to help prevent unauthorized removal or theft. Do not change the display settings by pressing P while holding down the Windows ( ) key. To use the function key to select the display device...
User Manual
Page 94
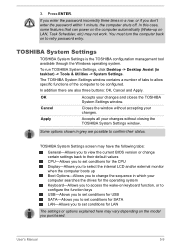
... retry password entry. Some options shown in which your changes. TOSHIBA System Settings screen may vary depending on the model you to select the internal LCD and/or external monitor when the computer boots up on keyboard function, or to configure the function keys USB-Allows you to set conditions for USB SATA-Allows you to set conditions for SATA LAN-Allows you don't enter the password within 1 minute, the computer shuts off. User's Manual 5-9 OK...
... retry password entry. Some options shown in which your changes. TOSHIBA System Settings screen may vary depending on the model you to select the internal LCD and/or external monitor when the computer boots up on keyboard function, or to configure the function keys USB-Allows you to set conditions for USB SATA-Allows you to set conditions for SATA LAN-Allows you don't enter the password within 1 minute, the computer shuts off. User's Manual 5-9 OK...
User Manual
Page 103
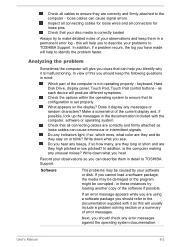
... configuration is the computer making any error messages against the operating system documentation. Write down what you clues that your observations so you should refer to ensure that all connectors for loose pins. in the documentation included with it as each device will give you hear. Next, you can cause signal errors. keyboard, Hard Disk Drive, display panel, Touch Pad, Touch Pad control buttons - Record your disc media is not operating...
... configuration is the computer making any error messages against the operating system documentation. Write down what you clues that your observations so you should refer to ensure that all connectors for loose pins. in the documentation included with it as each device will give you hear. Next, you can cause signal errors. keyboard, Hard Disk Drive, display panel, Touch Pad, Touch Pad control buttons - Record your disc media is not operating...
User Manual
Page 105
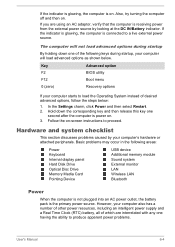
... advanced options during startup By holding down the corresponding key and then release this key one of the following areas: Power Keyboard Internal display panel Hard Disk Drive Optical Disc Drive Memory Media Card Pointing Device USB device Additional memory module Sound system External monitor LAN Wireless LAN Bluetooth Power When the computer is not plugged into an AC power outlet, the battery pack is connected to proceed. If the indicator is glowing, the computer is the primary power source. Key Advanced option F2 BIOS utility F12 Boot menu 0 (zero) Recovery options If...
... advanced options during startup By holding down the corresponding key and then release this key one of the following areas: Power Keyboard Internal display panel Hard Disk Drive Optical Disc Drive Memory Media Card Pointing Device USB device Additional memory module Sound system External monitor LAN Wireless LAN Bluetooth Power When the computer is not plugged into an AC power outlet, the battery pack is connected to proceed. If the indicator is glowing, the computer is the primary power source. Key Advanced option F2 BIOS utility F12 Boot menu 0 (zero) Recovery options If...
User Manual
Page 109
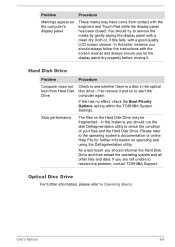
... utility. if so remove it . As a last resort you should reformat the Hard Disk Drive and then reload the operating system and all other files and data. in the optical disc drive - Slow performance The files on the computer's display panel. You should always follow the instructions with a good quality LCD screen cleaner. Problem Markings appear on the Hard Disk Drive may have come from Hard Disk Drive Check to start...
... utility. if so remove it . As a last resort you should reformat the Hard Disk Drive and then reload the operating system and all other files and data. in the optical disc drive - Slow performance The files on the computer's display panel. You should always follow the instructions with a good quality LCD screen cleaner. Problem Markings appear on the Hard Disk Drive may have come from Hard Disk Drive Check to start...

User Manual
Page 110
... your memory media card for further information. User's Manual 6-9 Check whether the disc is securely closed. Problem Procedure Memory media card error occurs Remove the memory media card from reading the disc. You cannot write to a memory media card Remove the memory media card from the computer and check to both the USB mouse section and the documentation supplied with your mouse. Touch Pad Problem Procedure The Touch Pad does Check the Device Select settings. Disc™ in the drive Open the disc tray and make sure the disc...
... your memory media card for further information. User's Manual 6-9 Check whether the disc is securely closed. Problem Procedure Memory media card error occurs Remove the memory media card from reading the disc. You cannot write to a memory media card Remove the memory media card from the computer and check to both the USB mouse section and the documentation supplied with your mouse. Touch Pad Problem Procedure The Touch Pad does Check the Device Select settings. Disc™ in the drive Open the disc tray and make sure the disc...
User Manual
Page 111
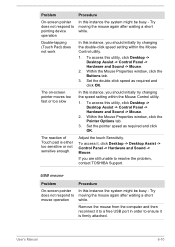
... waiting a short while. Remove the mouse from the computer and then reconnect it to a free USB port in order to pointing device operation In this instance, you should initially try changing the double-click speed setting within the Mouse Control utility. 1. Double-tapping (Touch Pad) does not work In this instance the system might be busy - To access this utility, click Desktop -> Desktop Assist -> Control Panel -> Hardware and Sound -> Mouse. 2. Set the pointer speed...
... waiting a short while. Remove the mouse from the computer and then reconnect it to a free USB port in order to pointing device operation In this instance, you should initially try changing the double-click speed setting within the Mouse Control utility. 1. Double-tapping (Touch Pad) does not work In this instance the system might be busy - To access this utility, click Desktop -> Desktop Assist -> Control Panel -> Hardware and Sound -> Mouse. 2. Set the pointer speed...
User Manual
Page 112
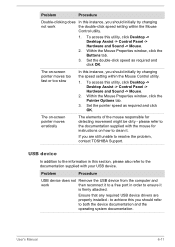
... this instance, you should refer to achieve this utility, click Desktop -> Desktop Assist -> Control Panel -> Hardware and Sound -> Mouse. 2. to both the device documentation and the operating system documentation. To access this you are properly installed - If you should initially try changing the speed setting within the Mouse Control utility. 1. Problem Procedure USB device does not Remove the USB device from the computer and work the double-click speed setting within the Mouse Control utility. 1. User's Manual 6-11
... this instance, you should refer to achieve this utility, click Desktop -> Desktop Assist -> Control Panel -> Hardware and Sound -> Mouse. 2. to both the device documentation and the operating system documentation. To access this you are properly installed - If you should initially try changing the speed setting within the Mouse Control utility. 1. Problem Procedure USB device does not Remove the USB device from the computer and work the double-click speed setting within the Mouse Control utility. 1. User's Manual 6-11
User Manual
Page 113
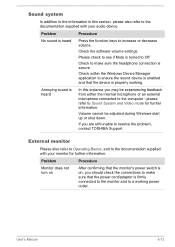
... connections to make sure the headphone connection is properly working power outlet. Sound system In addition to the information in this instance you may be adjusted during Windows start up or shut down. External monitor Please also refer to Operating Basics, and to the computer - Check within the Windows Device Manager application to resolve the problem, contact TOSHIBA Support. Volume cannot be experiencing feedback from either the internal microphone or an external microphone connected...
... connections to make sure the headphone connection is properly working power outlet. Sound system In addition to the information in this instance you may be adjusted during Windows start up or shut down. External monitor Please also refer to Operating Basics, and to the computer - Check within the Windows Device Manager application to resolve the problem, contact TOSHIBA Support. Volume cannot be experiencing feedback from either the internal microphone or an external microphone connected...
User Manual
Page 114
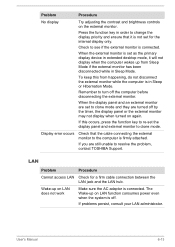
... in Sleep Mode. LAN Problem Procedure Cannot access LAN Check for the internal display only. User's Manual 6-13 Problem Procedure No display Try adjusting the contrast and brightness controls on again. If you are set the display panel and external monitor to clone mode and they are turned off the computer before disconnecting the external monitor. The Wake-up from happening, do not disconnect the external monitor while the computer is in order to resolve the problem, contact TOSHIBA Support...
... in Sleep Mode. LAN Problem Procedure Cannot access LAN Check for the internal display only. User's Manual 6-13 Problem Procedure No display Try adjusting the contrast and brightness controls on again. If you are set the display panel and external monitor to clone mode and they are turned off the computer before disconnecting the external monitor. The Wake-up from happening, do not disconnect the external monitor while the computer is in order to resolve the problem, contact TOSHIBA Support...


