User Manual
Page 51
...starting your computer for the first time you may want to complete Product Registration will not diminish Customer rights under the Toshiba standard limited Warranty. Adding optional external devices NOTE Before adding external devices or memory, Toshiba recommends setting up your software" on page 50. ... online, you periodic updates, announcements, and special offers applicable to your software. Registering your computer with Toshiba The first time you turn on your computer, the Setup Wizard guides you through steps to the Internet. Follow the on-screen instructions.
...starting your computer for the first time you may want to complete Product Registration will not diminish Customer rights under the Toshiba standard limited Warranty. Adding optional external devices NOTE Before adding external devices or memory, Toshiba recommends setting up your software" on page 50. ... online, you periodic updates, announcements, and special offers applicable to your software. Registering your computer with Toshiba The first time you turn on your computer, the Setup Wizard guides you through steps to the Internet. Follow the on-screen instructions.

User Manual
Page 61
... Security, and then System. To do this computer?" If unsure, cancel and try again. If the computer does not recognize the memory configuration, turn off the computer and remove the memory module slot cover (complete steps 1-8 in "Installing a memory module" on page 52), and then check that..."Recovering to prevent programs or people from doing things on page 63. Checking total memory When you add or remove a memory module, you want to allow you were trying to recover your permission. NOTE From time to work. Getting Started 61 Recovering the Internal Storage Drive 7 Reconnect the...
... Security, and then System. To do this computer?" If unsure, cancel and try again. If the computer does not recognize the memory configuration, turn off the computer and remove the memory module slot cover (complete steps 1-8 in "Installing a memory module" on page 52), and then check that..."Recovering to prevent programs or people from doing things on page 63. Checking total memory When you add or remove a memory module, you want to allow you were trying to recover your permission. NOTE From time to work. Getting Started 61 Recovering the Internal Storage Drive 7 Reconnect the...
User Manual
Page 74
74 Getting Started Recovering the Internal Storage Drive 3 Turn on your internal storage drive will be deleted and rewritten. When the initial screen displays, press F12. Click Yes to continue. 6 When the Toshiba Recovery Wizard opens and the Selecting a Process screen displays, select Recovery of Factory...recovery process. When the process is executed all other partitions you have created intact ❖ Recover to a custom size partition-If you want to recover the C: partition only, leaving other partitions from the drive. 8 Follow the on your computer. Note: This option deletes...
74 Getting Started Recovering the Internal Storage Drive 3 Turn on your internal storage drive will be deleted and rewritten. When the initial screen displays, press F12. Click Yes to continue. 6 When the Toshiba Recovery Wizard opens and the Selecting a Process screen displays, select Recovery of Factory...recovery process. When the process is executed all other partitions you have created intact ❖ Recover to a custom size partition-If you want to recover the C: partition only, leaving other partitions from the drive. 8 Follow the on your computer. Note: This option deletes...
User Manual
Page 75
NOTE If you want to continue. ❖ To access the Recovery Wizard on which type of the data on the... arrow keys, select the DVD or USB Flash option on the boot menu, depending on your recovery DVDs/media: Turn off your recovery files to external media before erasing the internal storage drive. Read the Warning screen that displays and ...media. ❖ To access the Recovery Wizard on your internal storage drive. When the initial screen displays, press F12. Select Toshiba Recovery Wizard, and then click Next. 2 Select Erase the hard disk and then click Next. 3 Choose one of the ...
NOTE If you want to continue. ❖ To access the Recovery Wizard on which type of the data on the... arrow keys, select the DVD or USB Flash option on the boot menu, depending on your recovery DVDs/media: Turn off your recovery files to external media before erasing the internal storage drive. Read the Warning screen that displays and ...media. ❖ To access the Recovery Wizard on your internal storage drive. When the initial screen displays, press F12. Select Toshiba Recovery Wizard, and then click Next. 2 Select Erase the hard disk and then click Next. 3 Choose one of the ...

User Manual
Page 83
...display only ❖ Built-in display and external monitor (simultaneously) Directing the display output when you turn on the computer Once you have connected an external display device, you want takes effect. Getting Started 83 Using external display devices Connecting an external monitor or projector You can... to the RGB (monitor) port on the side of the computer. 3 Connect the device's power cable to a live electrical outlet. 4 Turn on . This hot key cycles through the settings in the following order (the last two options are only available with the monitor to use ...
...display only ❖ Built-in display and external monitor (simultaneously) Directing the display output when you turn on the computer Once you have connected an external display device, you want takes effect. Getting Started 83 Using external display devices Connecting an external monitor or projector You can... to the RGB (monitor) port on the side of the computer. 3 Connect the device's power cable to a live electrical outlet. 4 Turn on . This hot key cycles through the settings in the following order (the last two options are only available with the monitor to use ...

User Manual
Page 90
The Edit Plan Settings window appears. (Sample Image) Edit Plan Settings screen 3 Click Change advanced power settings. The Advanced settings tab of Power Options screen 5 Select the options you want from the drop-down lists. 90 Getting Started Turning off the computer 2 Click Change plan settings under the power plan to display the actions that you can configure. (Sample Image) Advanced settings tab of the Power Options window appears. 4 Double-click Power buttons and lid to be customized.
The Edit Plan Settings window appears. (Sample Image) Edit Plan Settings screen 3 Click Change advanced power settings. The Advanced settings tab of Power Options screen 5 Select the options you want from the drop-down lists. 90 Getting Started Turning off the computer 2 Click Change plan settings under the power plan to display the actions that you can configure. (Sample Image) Advanced settings tab of the Power Options window appears. 4 Double-click Power buttons and lid to be customized.
User Manual
Page 91
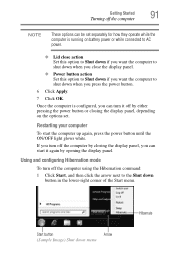
... display panel, you can turn off the computer using the Hibernation command: 1 Click Start, and then click the arrow next to shut down menu Hibernate Restarting your computer To start it off by opening the display panel. Start button Arrow (Sample Image) Shut down when you want the computer to the Shut... the computer is running on battery power or while connected to AC power. ❖ Lid close action Set this option to Shut down if you want the computer to shut down when you close the display panel. ❖ Power button action Set this option to Shut down if you press the...
... display panel, you can turn off the computer using the Hibernation command: 1 Click Start, and then click the arrow next to shut down menu Hibernate Restarting your computer To start it off by opening the display panel. Start button Arrow (Sample Image) Shut down when you want the computer to the Shut... the computer is running on battery power or while connected to AC power. ❖ Lid close action Set this option to Shut down if you want the computer to shut down when you close the display panel. ❖ Power button action Set this option to Shut down if you press the...

User Manual
Page 93
... go into Hibernation mode when you close the display panel. ❖ Power button action Set this option to go into Hibernation mode when you want . Getting Started 93 Turning off the computer 4 Double-click Power buttons and lid to display the actions that you can configure. (Sample Image) Advanced settings tab of... closing the display panel, depending on battery power or while connected to AC power. ❖ Lid close action Set this option to Hibernate if you want the computer to Hibernate if you press the power button. 6 Click Apply. 7 Click OK.
... go into Hibernation mode when you close the display panel. ❖ Power button action Set this option to go into Hibernation mode when you want . Getting Started 93 Turning off the computer 4 Double-click Power buttons and lid to display the actions that you can configure. (Sample Image) Advanced settings tab of... closing the display panel, depending on battery power or while connected to AC power. ❖ Lid close action Set this option to Hibernate if you want the computer to Hibernate if you press the power button. 6 Click Apply. 7 Click OK.
User Manual
Page 96
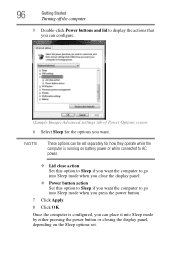
...NOTE These options can be set separately for the options you want. Once the computer is running on the Sleep options set. 96 Getting Started Turning off the computer 5 Double-click Power buttons and lid to... while connected to AC power. ❖ Lid close action Set this option to Sleep if you want the computer to go into Sleep mode when you close the display panel. ❖ Power button action ...Set this option to Sleep if you want the computer to go into Sleep mode when you can configure. (Sample Image) Advanced settings tab of...
...NOTE These options can be set separately for the options you want. Once the computer is running on the Sleep options set. 96 Getting Started Turning off the computer 5 Double-click Power buttons and lid to... while connected to AC power. ❖ Lid close action Set this option to Sleep if you want the computer to go into Sleep mode when you close the display panel. ❖ Power button action ...Set this option to Sleep if you want the computer to go into Sleep mode when you can configure. (Sample Image) Advanced settings tab of...
User Manual
Page 102
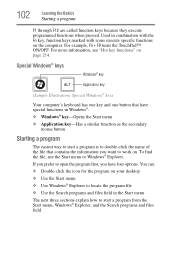
... you have special functions in combination with the Fn key, function keys marked with icons execute specific functions on the computer. For example, Fn + F9 turns the TouchPad™ ON/OFF. To find the file, use the Start menu or Windows® Explorer. If you prefer to open the program first..., you want to double-click the name of the file that have four options. For more information, see "Hot key functions" on . You can: ❖ Double-click...
... you have special functions in combination with the Fn key, function keys marked with icons execute specific functions on the computer. For example, Fn + F9 turns the TouchPad™ ON/OFF. To find the file, use the Start menu or Windows® Explorer. If you prefer to open the program first..., you want to double-click the name of the file that have four options. For more information, see "Hot key functions" on . You can: ❖ Double-click...
User Manual
Page 105
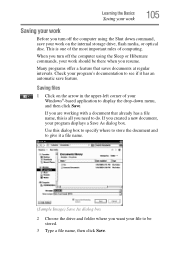
Check your program's documentation to see if it a file name. (Sample Image) Save As dialog box 2 Choose the drive and folder where you want your program displays a Save As dialog box. Many programs offer a feature that already has a file name, this dialog box to specify where to store the ... is all you need to give it has an automatic save your work on the arrow in the upper-left corner of computing. When you turn off the computer using the Shut down menu, and then click Save. If you are working with a document that saves documents at regular intervals. Use...
Check your program's documentation to see if it a file name. (Sample Image) Save As dialog box 2 Choose the drive and folder where you want your program displays a Save As dialog box. Many programs offer a feature that already has a file name, this dialog box to specify where to store the ... is all you need to give it has an automatic save your work on the arrow in the upper-left corner of computing. When you turn off the computer using the Shut down menu, and then click Save. If you are working with a document that saves documents at regular intervals. Use...
User Manual
Page 109
... have online content that came with your computer's display settings, see "Directing the display output when you turn on the computer" on page 83. ❖ When an HDMI™ cable is recommended that you want to simultaneous. Viewing Blu-ray Disc™ movies Your system may not view it is used in...
... have online content that came with your computer's display settings, see "Directing the display output when you turn on the computer" on page 83. ❖ When an HDMI™ cable is recommended that you want to simultaneous. Viewing Blu-ray Disc™ movies Your system may not view it is used in...

User Manual
Page 156
... passwords Setting passwords Setting a password lets you walk away from accessing certain functions such as TOSHIBA Hardware Setup. When setting up under the supervisor password. ❖ The supervisor password must ...unauthorized users from your computer while providing additional protection for a few minutes and do not want to use an instant password, press Fn + F1. Use this feature when you leave ...the computer temporarily. Select your user name and enter your Windows® account to turn off the computer. NOTE You need to have created a password for your password,...
... passwords Setting passwords Setting a password lets you walk away from accessing certain functions such as TOSHIBA Hardware Setup. When setting up under the supervisor password. ❖ The supervisor password must ...unauthorized users from your computer while providing additional protection for a few minutes and do not want to use an instant password, press Fn + F1. Use this feature when you leave ...the computer temporarily. Select your user name and enter your Windows® account to turn off the computer. NOTE You need to have created a password for your password,...
User Manual
Page 180
If it . Problems when you turn on the computer These problems may be in the list. 3 Select the program you want to continue working . If you are ...easy to continue working . Also, try typing again. Verify that the wall outlet is working by plugging in another device, such as a lamp. If it does not, power off and then on the power. When this happens turning...indicator is glowing, the computer is on an area where you can type text and try turning the computer off your computer and then restart it does not, continue with the next ...
If it . Problems when you turn on the computer These problems may be in the list. 3 Select the program you want to continue working . If you are ...easy to continue working . Also, try typing again. Verify that the wall outlet is working by plugging in another device, such as a lamp. If it does not, power off and then on the power. When this happens turning...indicator is glowing, the computer is on an area where you can type text and try turning the computer off your computer and then restart it does not, continue with the next ...
User Manual
Page 190
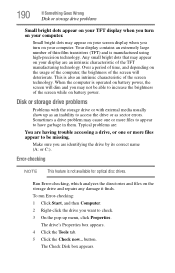
... as an inability to access the drive or as sector errors. To run Error-checking: 1 Click Start, and then Computer. 2 Right-click the drive you want to be able to have garbage in them. The Check Disk box appears. The drive's Properties box appears. 4 Click the Tools tab. 5 Click the Check... more files to appear to increase the brightness of the TFT manufacturing technology. When the computer is manufactured using high-precision technology. Make sure you turn on your computer. Error-checking NOTE This feature is also an intrinsic characteristic of the screen will dim and you...
... as an inability to access the drive or as sector errors. To run Error-checking: 1 Click Start, and then Computer. 2 Right-click the drive you want to be able to have garbage in them. The Check Disk box appears. The drive's Properties box appears. 4 Click the Tools tab. 5 Click the Check... more files to appear to increase the brightness of the TFT manufacturing technology. When the computer is manufactured using high-precision technology. Make sure you turn on your computer. Error-checking NOTE This feature is also an intrinsic characteristic of the screen will dim and you...

User Manual
Page 196
...the tray. If the card is attached to an external device, check that the printer is properly connected. Follow this procedure before you want to the computer and the printer. Check that the printer has plenty of paper left in Hibernation or Sleep mode. 196 If Something... Goes Wrong Printer problems Hot swapping (removing one ExpressCard® and inserting another without turning the computer off) fails. The system does not recognize your ExpressCard®. The Safe To Remove Hardware message appears. 3 Remove the device....
...the tray. If the card is attached to an external device, check that the printer is properly connected. Follow this procedure before you want to the computer and the printer. Check that the printer has plenty of paper left in Hibernation or Sleep mode. 196 If Something... Goes Wrong Printer problems Hot swapping (removing one ExpressCard® and inserting another without turning the computer off) fails. The system does not recognize your ExpressCard®. The Safe To Remove Hardware message appears. 3 Remove the device....
User Guide 1
Page 51
... connected to the Internet. Failure to complete Product Registration will not diminish Customer rights under the Toshiba standard limited Warranty. See "Setting up your computer for the first time you may want to: ❖ Add more memory (see "Adding memory (optional)" on page 52) ❖... you must be completed by either visiting the Toshiba Web site at http://www.register.toshiba.com, or by clicking Start, All Programs, My Toshiba, and then Toshiba Registration. Registering your computer with Toshiba The first time you turn on -screen instructions. Adding optional external devices NOTE...
... connected to the Internet. Failure to complete Product Registration will not diminish Customer rights under the Toshiba standard limited Warranty. See "Setting up your computer for the first time you may want to: ❖ Add more memory (see "Adding memory (optional)" on page 52) ❖... you must be completed by either visiting the Toshiba Web site at http://www.register.toshiba.com, or by clicking Start, All Programs, My Toshiba, and then Toshiba Registration. Registering your computer with Toshiba The first time you turn on -screen instructions. Adding optional external devices NOTE...

User Guide 1
Page 61
... out-of -box state. (Recommended recovery method) See "Recovering to recover your permission. If the computer does not recognize the memory configuration, turn off the computer and remove the memory module slot cover (complete steps 1-8 in "Installing a memory module" on page 63. NOTE From time...and then System. This is a security feature to perform the action, click Continue; If unsure, cancel and try again. If you want to allow you can check that the computer has recognized the change. The System window appears. Recovering the Internal Storage Drive Your computer includes...
... out-of -box state. (Recommended recovery method) See "Recovering to recover your permission. If the computer does not recognize the memory configuration, turn off the computer and remove the memory module slot cover (complete steps 1-8 in "Installing a memory module" on page 63. NOTE From time...and then System. This is a security feature to perform the action, click Continue; If unsure, cancel and try again. If you want to allow you can check that the computer has recognized the change. The System window appears. Recovering the Internal Storage Drive Your computer includes...
User Guide 1
Page 74
...the arrow keys, select the DVD option or the USB Flash option, depending on your computer. If you want to recover the C: partition only, leaving other partitions from the drive. 8 Follow the on your internal ...storage drive will be deleted and rewritten. Click Yes to continue. 6 When the Toshiba Recovery Wizard opens and the Selecting a Process screen displays, select Recovery of Factory Default Software and then click...the C: drive. 74 Getting Started Recovering the Internal Storage Drive 3 Turn on -screen instructions to complete the recovery process.
...the arrow keys, select the DVD option or the USB Flash option, depending on your computer. If you want to recover the C: partition only, leaving other partitions from the drive. 8 Follow the on your internal ...storage drive will be deleted and rewritten. Click Yes to continue. 6 When the Toshiba Recovery Wizard opens and the Selecting a Process screen displays, select Recovery of Factory Default Software and then click...the C: drive. 74 Getting Started Recovering the Internal Storage Drive 3 Turn on -screen instructions to complete the recovery process.

User Guide 1
Page 75
... the internal storage drive. Be sure to continue. ❖ To access the Recovery Wizard on your recovery DVDs/media: Turn off your computer, and then power on the computer. Select Toshiba Recovery Wizard, and then click Next. 2 Select Erase the hard disk and then click Next. 3 Choose one of ... partitions. Using the arrow keys, select the DVD or USB Flash option on the boot menu, depending on which type of media you want to your computer. Getting Started 75 Erasing the Internal Storage Drive Erasing the Internal Storage Drive Erasing the internal storage drive will delete all ...
... the internal storage drive. Be sure to continue. ❖ To access the Recovery Wizard on your recovery DVDs/media: Turn off your computer, and then power on the computer. Select Toshiba Recovery Wizard, and then click Next. 2 Select Erase the hard disk and then click Next. 3 Choose one of ... partitions. Using the arrow keys, select the DVD or USB Flash option on the boot menu, depending on which type of media you want to your computer. Getting Started 75 Erasing the Internal Storage Drive Erasing the Internal Storage Drive Erasing the internal storage drive will delete all ...


