User Guide
Page 5
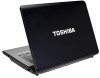
... the fax software instructions installed on the first page of the transmission, the date and time it may be necessary for which charges exceed local or long-distance transmission charges.) In order to program this computer. Contact the state public utility commission, public service commission or corporation commission for repair or limited warranty information, please contact Toshiba Corporation, Toshiba America Information...
... the fax software instructions installed on the first page of the transmission, the date and time it may be necessary for which charges exceed local or long-distance transmission charges.) In order to program this computer. Contact the state public utility commission, public service commission or corporation commission for repair or limited warranty information, please contact Toshiba Corporation, Toshiba America Information...
User Guide
Page 28
...Opening the display panel 47 Your computer's features and specifications ....48 Turning on the power 48 Adding memory (optional 49 Installing a memory module 49 Removing a memory module 55 Checking total memory 56 Hard Drive Recovery Utilities 57 Creating Recovery CDs/DVDs 58 Hard Disk Drive Recovery options 59 Hard Disk Drive Recovery using the Recovery media 64 Installing drivers and applications 65 Using the TouchPad 65 Scrolling with the TouchPad 66 Control buttons 66 Disabling or enabling the TouchPad 66 Using the Dual Mode Pad 67 Using Dual Mode 67 Using external display...
...Opening the display panel 47 Your computer's features and specifications ....48 Turning on the power 48 Adding memory (optional 49 Installing a memory module 49 Removing a memory module 55 Checking total memory 56 Hard Drive Recovery Utilities 57 Creating Recovery CDs/DVDs 58 Hard Disk Drive Recovery options 59 Hard Disk Drive Recovery using the Recovery media 64 Installing drivers and applications 65 Using the TouchPad 65 Scrolling with the TouchPad 66 Control buttons 66 Disabling or enabling the TouchPad 66 Using the Dual Mode Pad 67 Using Dual Mode 67 Using external display...
User Guide
Page 56
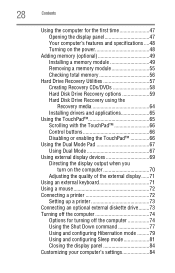
... the memory configuration, turn off the computer and remove the memory module slot cover (complete steps 1-8 in "Installing a memory module" on page 117. 6 Turn the computer right side up squarely with the socket latches. For more information on inserting the main battery, see "Inserting a charged battery" on page 49), and then check that the computer has recognized the change. 56 Getting Started Adding memory (optional) 3 Gently lift the memory module to work...
... the memory configuration, turn off the computer and remove the memory module slot cover (complete steps 1-8 in "Installing a memory module" on page 117. 6 Turn the computer right side up squarely with the socket latches. For more information on inserting the main battery, see "Inserting a charged battery" on page 49), and then check that the computer has recognized the change. 56 Getting Started Adding memory (optional) 3 Gently lift the memory module to work...
User Guide
Page 60
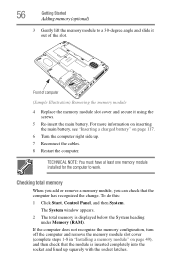
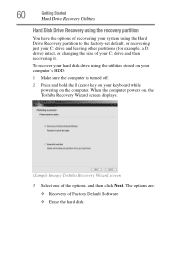
... Started Hard Drive Recovery Utilities Hard Disk Drive Recovery using the recovery partition You have the options of recovering your system using the utilities stored on your computer's HDD: 1 Make sure the computer is turned off. 2 Press and hold the 0 (zero) key on your keyboard while powering on , the Toshiba Recovery Wizard screen displays. (Sample Image) Toshiba Recovery Wizard screen 3 Select one of the options, and then click Next. When the computer powers on the computer. To recover your hard disk drive using the Hard Drive Recovery partition to the factory-set default...
... Started Hard Drive Recovery Utilities Hard Disk Drive Recovery using the recovery partition You have the options of recovering your system using the utilities stored on your computer's HDD: 1 Make sure the computer is turned off. 2 Press and hold the 0 (zero) key on your keyboard while powering on , the Toshiba Recovery Wizard screen displays. (Sample Image) Toshiba Recovery Wizard screen 3 Select one of the options, and then click Next. When the computer powers on the computer. To recover your hard disk drive using the Hard Drive Recovery partition to the factory-set default...

User Guide
Page 69
... the computer. 2 Connect the device's power cable to use one of the Dual Mode Pad (buttons 4, 5, and 6 in the Properties for Synaptics LuxPad window) are unassigned by default. In order to a live electrical outlet. To do this : 1 Connect the monitor's video cable to close the Mouse Properties window. To configure a virtual button: 1 Perform steps 1-5 in display, but you can also connect an external display device to an available video port, as follows: ❖ An external monitor or projector...
... the computer. 2 Connect the device's power cable to use one of the Dual Mode Pad (buttons 4, 5, and 6 in the Properties for Synaptics LuxPad window) are unassigned by default. In order to a live electrical outlet. To do this : 1 Connect the monitor's video cable to close the Mouse Properties window. To configure a virtual button: 1 Perform steps 1-5 in display, but you can also connect an external display device to an available video port, as follows: ❖ An external monitor or projector...

User Guide
Page 70
... change the display output settings is to your television. Your computer will automatically detect the external display device and activate a screen with display options. Connecting an HDMI-compatible television or VCR/DVD player (Available on the side of your computer) to the HDMI Out port on certain models) To connect an HDMI-compatible television or VCR/DVD player to the computer: 1 Connect one end of the cable to use the internal display only, the external device...
... change the display output settings is to your television. Your computer will automatically detect the external display device and activate a screen with display options. Connecting an HDMI-compatible television or VCR/DVD player (Available on the side of your computer) to the HDMI Out port on certain models) To connect an HDMI-compatible television or VCR/DVD player to the computer: 1 Connect one end of the cable to use the internal display only, the external device...
User Guide
Page 177
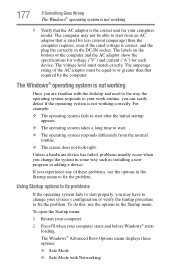
... adaptor show the specifications for voltage ("V") and current ("A") for each device. To open the Startup menu: 1 Restart your computer. 2 Press F8 when your computer model. The Windows® Advanced Boot Options menu displays these problems, use the options in the Startup menu to change the system in the DC-IN socket. The computer may have to fix the problem. 177 If Something Goes Wrong The Windows® operating system is not...
... adaptor show the specifications for voltage ("V") and current ("A") for each device. To open the Startup menu: 1 Restart your computer. 2 Press F8 when your computer model. The Windows® Advanced Boot Options menu displays these problems, use the options in the Startup menu to change the system in the DC-IN socket. The computer may have to fix the problem. 177 If Something Goes Wrong The Windows® operating system is not...
User Guide
Page 181
... drive, optional external diskette drive, and other power-using functions. If removing the memory module eliminates the error, the memory module may cause errors that appear in case the new version is seated properly. 5 Check for the error again. 6 If the error recurs, remove the memory module entirely and check for the computer to the Lock button in "Installing a memory module" on page 55. 4 Reinstall the memory module, following the instructions in the lower-right part of the Start menu. Memory problems Incorrectly connected...
... drive, optional external diskette drive, and other power-using functions. If removing the memory module eliminates the error, the memory module may cause errors that appear in case the new version is seated properly. 5 Check for the error again. 6 If the error recurs, remove the memory module entirely and check for the computer to the Lock button in "Installing a memory module" on page 55. 4 Reinstall the memory module, following the instructions in the lower-right part of the Start menu. Memory problems Incorrectly connected...
User Guide
Page 183
... have connected an external keyboard and the operating system displays one or more keyboard error messages. You have plugged the external keyboard in the lower-right part of time, the battery will restart and recognize the device. Try using is on . You may be on , press Fn + F10 to turn off the cursor control mode light, or Fn + F11 to turn off , make sure the software you press the keys on...
... have connected an external keyboard and the operating system displays one or more keyboard error messages. You have plugged the external keyboard in the lower-right part of time, the battery will restart and recognize the device. Try using is on . You may be on , press Fn + F10 to turn off the cursor control mode light, or Fn + F11 to turn off , make sure the software you press the keys on...
User Guide
Page 184
... continue working power outlet. ❖ Check that the cable connecting the external monitor to the computer is firmly attached. ❖ Try adjusting the contrast and brightness controls on . ❖ Check that the monitor is not set for the built-in screen, make sure the display priority is turned on the external monitor. ❖ Press Fn and F5 simultaneously to activate the screen. If you through the display options. Press any key, type the password...
... continue working power outlet. ❖ Check that the cable connecting the external monitor to the computer is firmly attached. ❖ Try adjusting the contrast and brightness controls on . ❖ Check that the monitor is not set for the built-in screen, make sure the display priority is turned on the external monitor. ❖ Press Fn and F5 simultaneously to activate the screen. If you through the display options. Press any key, type the password...
User Guide
Page 189
... Card status: 1 Click Start, Control Panel, System and Maintenance, and then Device Manager. 2 Double-click the PCMCIA adapter. PC Card problems (Available on page 179. Most PC Card problems occur during installation and setup of these devices to work no longer work under the operating system. If the card malfunctions again, it may apply. If your system does not have built-in drivers for information about using PC Cards. Adjust the volume control. Resolving PC Card problems...
... Card status: 1 Click Start, Control Panel, System and Maintenance, and then Device Manager. 2 Double-click the PCMCIA adapter. PC Card problems (Available on page 179. Most PC Card problems occur during installation and setup of these devices to work no longer work under the operating system. If the card malfunctions again, it may apply. If your system does not have built-in drivers for information about using PC Cards. Adjust the volume control. Resolving PC Card problems...
User Guide
Page 191
...: The slot appears to work no longer work. Resolving ExpressCard™ problems Here are securely connected. ❖ Occasionally a defective ExpressCard™ slips through quality control. If you are having trouble getting one or more of devices, such as a removable hard disk, additional memory, or a pager. Contact the manufacturer of new cards. If the card malfunctions again, it may apply. If another computer with an operating system driver...
...: The slot appears to work no longer work. Resolving ExpressCard™ problems Here are securely connected. ❖ Occasionally a defective ExpressCard™ slips through quality control. If you are having trouble getting one or more of devices, such as a removable hard disk, additional memory, or a pager. Contact the manufacturer of new cards. If the card malfunctions again, it may apply. If another computer with an operating system driver...
User Guide
Page 193
... a working power outlet, turned on and ready (on . Try printing another file. If a Notepad file prints correctly, the problem may have connected the printer while the computer is connected to print a short test file using Notepad. Some printers will not receive or transmit properly. You may be in the instructions that the printer is on line). Make sure the cable...
... a working power outlet, turned on and ready (on . Try printing another file. If a Notepad file prints correctly, the problem may have connected the printer while the computer is connected to print a short test file using Notepad. Some printers will not receive or transmit properly. You may be in the instructions that the printer is on line). Make sure the cable...
User Guide
Page 232
... the operating system automatically recognize the change. A small image displayed on the motherboard to interact with the Fn key can set system options or control system parameters, such as the battery save mode. (2) A key or combination of keys that uses a liquid substance between two transparent electrode panels. A method of refreshing a computer screen, in which certain keys in combination with any device to help improve processing speed. Interlaced monitors...
... the operating system automatically recognize the change. A small image displayed on the motherboard to interact with the Fn key can set system options or control system parameters, such as the battery save mode. (2) A key or combination of keys that uses a liquid substance between two transparent electrode panels. A method of refreshing a computer screen, in which certain keys in combination with any device to help improve processing speed. Interlaced monitors...
User Guide
Page 238
... battery changing 115 charge indicator light 46, 108 charge not lasting 182 charging 44, 46 conserving power 112 disposal 120 low charge 110 monitoring power 46, 108 not charging 182 notification 111 power plan 214 power plan hot key 114 real-time clock (RTC) 105 removing 115 BIOS Setup see Toshiba Hardware Setup Bridge Media Adapter inserting memory media 138 removing memory media 138 button power 48, 58 start 124 C CD creating 102 playing an audio 100 CD, using 97 character keys 88 charging the battery 46 checking device...
... battery changing 115 charge indicator light 46, 108 charge not lasting 182 charging 44, 46 conserving power 112 disposal 120 low charge 110 monitoring power 46, 108 not charging 182 notification 111 power plan 214 power plan hot key 114 real-time clock (RTC) 105 removing 115 BIOS Setup see Toshiba Hardware Setup Bridge Media Adapter inserting memory media 138 removing memory media 138 button power 48, 58 start 124 C CD creating 102 playing an audio 100 CD, using 97 character keys 88 charging the battery 46 checking device...
User Guide
Page 239
... files/trouble accessing a disk 186 running slow 186 diskette drive cannot insert a diskette 187 cannot read a diskette 187 connecting 73 external, connecting 73 display does not look normal/flickers 184 external monitor not working 185 screen is blank 184 display device external 69 display output settings 70 display, external adjusting 71 disposal information 26 disposing of used batteries 120 double-click 66 DVD creating 102 DVD player general problems 197 DVD, using 97 E environment computer-friendly 39 error messages device driver...
... files/trouble accessing a disk 186 running slow 186 diskette drive cannot insert a diskette 187 cannot read a diskette 187 connecting 73 external, connecting 73 display does not look normal/flickers 184 external monitor not working 185 screen is blank 184 display device external 69 display output settings 70 display, external adjusting 71 disposal information 26 disposing of used batteries 120 double-click 66 DVD creating 102 DVD player general problems 197 DVD, using 97 E environment computer-friendly 39 error messages device driver...
User Guide
Page 240
... and Support Windows® operating system 179 Hibernation mode 75 configuring 79 starting again from 81 hot key display brightness 218 display modes 217 Hibernation mode 216 keyboard overlays 222 password security 213 power plan 214 Sleep mode 215 volume mute 212 zooming 222 Hot Key Cards 207 hot key power plan 114 http 130 I i.LINK port 139 icon 123 desktop 123 Internet Explorer® 123 moving to desktop 123 recycle bin 123 safety 37 installation memory module 49 installing memory modules 49 mouse...
... and Support Windows® operating system 179 Hibernation mode 75 configuring 79 starting again from 81 hot key display brightness 218 display modes 217 Hibernation mode 216 keyboard overlays 222 password security 213 power plan 214 Sleep mode 215 volume mute 212 zooming 222 Hot Key Cards 207 hot key power plan 114 http 130 I i.LINK port 139 icon 123 desktop 123 Internet Explorer® 123 moving to desktop 123 recycle bin 123 safety 37 installation memory module 49 installing memory modules 49 mouse...

User Guide
Page 241
... 88 L lock computer, using 85 M main battery removing 115 memory adding 49 problem solving 181 removing expansion slot cover 51 memory module inserting 52 installation 49 removing 56 microphone 132 modem connecting to telephone line 126 determining COM port 125 problem solving 193, 194 resetting port to default settings 125 upgrading 125 monitor 69 connecting 69 not working 184 mouse installing 72 serial 72 N network accessing 127 Dial-Up Networking Wizard 127 networking wireless 129 Notification Area 124 O opening the display panel 47 optical drive problems 187 troubleshooting 187...
... 88 L lock computer, using 85 M main battery removing 115 memory adding 49 problem solving 181 removing expansion slot cover 51 memory module inserting 52 installation 49 removing 56 microphone 132 modem connecting to telephone line 126 determining COM port 125 problem solving 193, 194 resetting port to default settings 125 upgrading 125 monitor 69 connecting 69 not working 184 mouse installing 72 serial 72 N network accessing 127 Dial-Up Networking Wizard 127 networking wireless 129 Notification Area 124 O opening the display panel 47 optical drive problems 187 troubleshooting 187...
User Guide
Page 242
... 48 power button 48, 58 power plan hot key 114 power plans 112 power source 44 connecting 45 powering down using Hibernation 79 using Shut Down 77 using Sleep 81 precautions 40 primary button 66 printer connecting 72 problem solving 193 printing a file 95 problem solving AC power 182 accessing disk drives 175 battery charge does not last 182 battery not charging 182 cannot insert diskette in drive 187 cannot read a diskette 187 changing display properties 185 checking device...
... 48 power button 48, 58 power plan hot key 114 power plans 112 power source 44 connecting 45 powering down using Hibernation 79 using Shut Down 77 using Sleep 81 precautions 40 primary button 66 printer connecting 72 problem solving 193 printing a file 95 problem solving AC power 182 accessing disk drives 175 battery charge does not last 182 battery not charging 182 cannot insert diskette in drive 187 cannot read a diskette 187 changing display properties 185 checking device...
User Guide
Page 243
... password, set up 148 T Taskbar 124 telephone line connecting to modem 126 television adjusting display 71 Toshiba registering computer 43 worldwide offices 205 TOSHIBA Assist 141 Toshiba Hardware Setup 153 Toshiba online resources 103 Toshiba utilities 140 traveling tips 121 troubleshooting DVD player general problems 197 external keyboard 183 keyboard 183 keypad overlay 183 optical drive 187 turning on the computer 48 turning on the power 48 U user password, disabling 150 user password, setting 149 using a file extension 95 V video projector adjusting display...
... password, set up 148 T Taskbar 124 telephone line connecting to modem 126 television adjusting display 71 Toshiba registering computer 43 worldwide offices 205 TOSHIBA Assist 141 Toshiba Hardware Setup 153 Toshiba online resources 103 Toshiba utilities 140 traveling tips 121 troubleshooting DVD player general problems 197 external keyboard 183 keyboard 183 keypad overlay 183 optical drive 187 turning on the computer 48 turning on the power 48 U user password, disabling 150 user password, setting 149 using a file extension 95 V video projector adjusting display...


